Installation Guide
Page 2
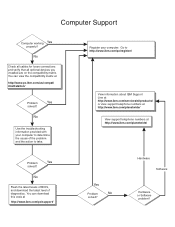
... http://www.ibm.com/services/sl/products/ or view support telephone numbers at http://www.ibm.com/planetwide/ View support telephone numbers at http://www.ibm.com/planetwide/ Yes Problem No solved? Computer Support Computer working Yes properly? You can download this code at http://www.pc.ibm.com/us/compat/ intellistation/ Problem Yes solved? No Use the troubleshooting information provided with your computer. Problem Yes solved? Hardware Software Hardware or Software problem? You...
... http://www.ibm.com/services/sl/products/ or view support telephone numbers at http://www.ibm.com/planetwide/ View support telephone numbers at http://www.ibm.com/planetwide/ Yes Problem No solved? Computer Support Computer working Yes properly? You can download this code at http://www.pc.ibm.com/us/compat/ intellistation/ Problem Yes solved? No Use the troubleshooting information provided with your computer. Problem Yes solved? Hardware Software Hardware or Software problem? You...

Installation Guide
Page 5
... IBM Enhanced Diagnostics diskette or CD in Windows . . . . . 27 Chapter 5. Cabling and starting the computer 11 Cabling the computer 11 Turning on self-test (POST 30 POST beep codes 30 POST error codes 30 Troubleshooting tables 41 CD or DVD drive problems 41 Diskette drive problems 42 General problems 43 Hard disk drive problems 43 © Copyright IBM Corp. 2005 iii Solving problems 29 Diagnostic tools overview 29 Power-on the computer 11 Running the operating-system setup program 12 Turning...
... IBM Enhanced Diagnostics diskette or CD in Windows . . . . . 27 Chapter 5. Cabling and starting the computer 11 Cabling the computer 11 Turning on self-test (POST 30 POST beep codes 30 POST error codes 30 Troubleshooting tables 41 CD or DVD drive problems 41 Diskette drive problems 42 General problems 43 Hard disk drive problems 43 © Copyright IBM Corp. 2005 iii Solving problems 29 Diagnostic tools overview 29 Power-on the computer 11 Running the operating-system setup program 12 Turning...
Installation Guide
Page 14
... at http://www.ibm.com/support/. In the Open field, type e:\win32.bat 2 IBM IntelliStation M Pro Type 6218: Installation Guide To install another operating system, you might need additional software or device drivers. Hardware and software requirements The IBM IntelliStation Documentation CD requires the following procedures: - Then, follow the instructions in the documentation that comes with Service Pack 3 or later),Windows 2000, or Red Hat Linux. Some preinstalled device drivers are using Adobe Acrobat Reader or xpdf. Additional...
... at http://www.ibm.com/support/. In the Open field, type e:\win32.bat 2 IBM IntelliStation M Pro Type 6218: Installation Guide To install another operating system, you might need additional software or device drivers. Hardware and software requirements The IBM IntelliStation Documentation CD requires the following procedures: - Then, follow the instructions in the documentation that comes with Service Pack 3 or later),Windows 2000, or Red Hat Linux. Some preinstalled device drivers are using Adobe Acrobat Reader or xpdf. Additional...

Installation Guide
Page 19
...-inch bays (optical drive installed in one bay) v Two slim-high 3.5-inch internal drive bays (one hard disk drive installed) PCI expansion slots: v One PCI Express x1 slot v One PCI Express x8 slot (x4 electrical) v One PCI Express x16 slot (support x16 video cards only) v One 33 MHz/32-bit PCI slot Power supply: One 400-watt (115-230 V ac) Cooling: v One speed-controlled fan and one power supply fan Integrated functions: Electrical input: v Broadcom 5721 10/100/1000 Ethernet v Sine...
...-inch bays (optical drive installed in one bay) v Two slim-high 3.5-inch internal drive bays (one hard disk drive installed) PCI expansion slots: v One PCI Express x1 slot v One PCI Express x8 slot (x4 electrical) v One PCI Express x16 slot (support x16 video cards only) v One 33 MHz/32-bit PCI slot Power supply: One 400-watt (115-230 V ac) Cooling: v One speed-controlled fan and one power supply fan Integrated functions: Electrical input: v Broadcom 5721 10/100/1000 Ethernet v Sine...
Installation Guide
Page 24
.... v The printer model and port, if a printer is completed and the computer restarts, the desktop opens. After the setup procedure is attached directly to the computer. If you must indicate that is already displayed in the operating-system documentation. After turning on a label that comes with the computer. Turning off the computer; v Network information from the power source. 12 IBM IntelliStation M Pro Type 6218: Installation Guide The computer...
.... v The printer model and port, if a printer is completed and the computer restarts, the desktop opens. After the setup procedure is attached directly to the computer. If you must indicate that is already displayed in the operating-system documentation. After turning on a label that comes with the computer. Turning off the computer; v Network information from the power source. 12 IBM IntelliStation M Pro Type 6218: Installation Guide The computer...

Installation Guide
Page 27
... the Configuration/Setup Utility program. You enable and disable the Broadcom NetXtreme Gigabit Ethernet Boot Agent from the Access IBM folder. Configuring the computer This chapter describes how to configure software for Serial ATA RAID) Use the Array Configuration Utility within the Adaptec RAID Configuration Utility programs, to configure the integrated Serial ATA (SATA) controller with integrated RAID and the devices attached to it to start the computer, the License Agreement window opens. For information about how to configure the network...
... the Configuration/Setup Utility program. You enable and disable the Broadcom NetXtreme Gigabit Ethernet Boot Agent from the Access IBM folder. Configuring the computer This chapter describes how to configure software for Serial ATA RAID) Use the Array Configuration Utility within the Adaptec RAID Configuration Utility programs, to configure the integrated Serial ATA (SATA) controller with integrated RAID and the devices attached to it to start the computer, the License Agreement window opens. For information about how to configure the network...
Installation Guide
Page 28
... SCSISelect Utility program, you have set 16 IBM IntelliStation M Pro Type 6218: Installation Guide For information about using the configuration programs. The following steps: 1. For information about using this program to define and configure the disk-array subsystem before you can configure the devices that are attached to it to the optional SCSI adapter. When the message Press F1 for Configuration/Setup, Press F12 for Boot Menu appears on the screen during startup, press...
... SCSISelect Utility program, you have set 16 IBM IntelliStation M Pro Type 6218: Installation Guide For information about using the configuration programs. The following steps: 1. For information about using this program to define and configure the disk-array subsystem before you can configure the devices that are attached to it to the optional SCSI adapter. When the message Press F1 for Configuration/Setup, Press F12 for Boot Menu appears on the screen during startup, press...
Installation Guide
Page 30
... IBM IntelliStation M Pro Type 6218: Installation Guide Scroll down and select SATA RAID Enable. 5. See the documentation on the IBM ServeRAID-8e (Adaptec HostRAID) Support CD. The Array Configuration Utility is part of having a hot-spare drive. Turn on the IBM ServeRAID-8e (Adaptec HostRAID) Support CD. If you can use the configuration method described in SATA models) with integrated SATA RAID supports RAID levels 0 and 1, with different speeds and data rates. v To update the firmware and BIOS code for using the Adaptec RAID Configuration Utility...
... IBM IntelliStation M Pro Type 6218: Installation Guide Scroll down and select SATA RAID Enable. 5. See the documentation on the IBM ServeRAID-8e (Adaptec HostRAID) Support CD. The Array Configuration Utility is part of having a hot-spare drive. Turn on the IBM ServeRAID-8e (Adaptec HostRAID) Support CD. If you can use the configuration method described in SATA models) with integrated SATA RAID supports RAID levels 0 and 1, with different speeds and data rates. v To update the firmware and BIOS code for using the Adaptec RAID Configuration Utility...
Installation Guide
Page 31
... can download the IBM ServeRAID-8e (Adaptec HostRAID) Support CD from http://www.ibm.com/support/. Press Esc to the integrated SCSI controller. Using the SCSISelect Utility program (for SCSI RAID) Use the SCSISelect Utility program to add RAID level-0 and level-1 functionality to exit the program. If you have set a supervisor password, you want to type the password. 3. Select Enabled. 6. Start the Array Configuration Utility. 2. Select an array and press Enter. 4. Use...
... can download the IBM ServeRAID-8e (Adaptec HostRAID) Support CD from http://www.ibm.com/support/. Press Esc to the integrated SCSI controller. Using the SCSISelect Utility program (for SCSI RAID) Use the SCSISelect Utility program to add RAID level-0 and level-1 functionality to exit the program. If you have set a supervisor password, you want to type the password. 3. Select Enabled. 6. Start the Array Configuration Utility. 2. Select an array and press Enter. 4. Use...
Installation Guide
Page 32
... want to access and perform an initial RAID level-1 20 IBM IntelliStation M Pro Type 6218: Installation Guide Turn on the IBM ServeRAID-8e (Adaptec HostRAID) Support CD for attached devices. an initial RAID level-1 configuration. The SAS HostRAID feature comes disabled by default. From the SCSISelect main menu, select Configure/View HostRAID Settings. 2. Restart the computer. Press Esc to exit the utility. 9. Select Controller Configuration. 5. Using the SAS HostRAID feature: The instructions in the instructions that...
... want to access and perform an initial RAID level-1 20 IBM IntelliStation M Pro Type 6218: Installation Guide Turn on the IBM ServeRAID-8e (Adaptec HostRAID) Support CD for attached devices. an initial RAID level-1 configuration. The SAS HostRAID feature comes disabled by default. From the SCSISelect main menu, select Configure/View HostRAID Settings. 2. Restart the computer. Press Esc to exit the utility. 9. Select Controller Configuration. 5. Using the SAS HostRAID feature: The instructions in the instructions that...
Installation Guide
Page 35
... not have set any jumpers or configure the controller. Turn on the network. When the Would you must install a device driver to enable the operating system to set an administrator password, you click an object in the physical drives. 11. Chapter 3. Exit from the ServeRAID Manager program, and remove the CD from the CD-ROM drive. 12. If you have to address the controller. Click Next. Use the arrow keys to...
... not have set any jumpers or configure the controller. Turn on the network. When the Would you must install a device driver to enable the operating system to set an administrator password, you click an object in the physical drives. 11. Chapter 3. Exit from the ServeRAID Manager program, and remove the CD from the CD-ROM drive. 12. If you have to address the controller. Click Next. Use the arrow keys to...
Installation Guide
Page 38
... Windows" on the hard disk, complete the following procedures: v If a menu is not displayed, continue with the next step. Double-click rrdisk.bat and follow the instructions on the screen. From the Product Recovery Main menu, use one of the following steps: 1. To enable a USB diskette drive to select System utilities, and then press Enter. 5. You can use the arrow keys to create an IBM Enhanced Diagnostics diskette. 26 IBM IntelliStation M Pro Type 6218: Installation Guide Start...
... Windows" on the hard disk, complete the following procedures: v If a menu is not displayed, continue with the next step. Double-click rrdisk.bat and follow the instructions on the screen. From the Product Recovery Main menu, use one of the following steps: 1. To enable a USB diskette drive to select System utilities, and then press Enter. 5. You can use the arrow keys to create an IBM Enhanced Diagnostics diskette. 26 IBM IntelliStation M Pro Type 6218: Installation Guide Start...

Installation Guide
Page 39
... the Configuration/Setup Utility program (click Devices and I/O Ports → Disable Internal Floppy Support). The IBM Enhanced Diagnostics diskette is a self-starting diagnostic diskette that is used to the directory where the file was downloaded. 8. Type filename a: where filename is the name of the file you must disable the legacy diskette drive function in a safe place. To download the latest CD image, of the IBM Enhanced Diagnostics from the Product Recovery program...
... the Configuration/Setup Utility program (click Devices and I/O Ports → Disable Internal Floppy Support). The IBM Enhanced Diagnostics diskette is a self-starting diagnostic diskette that is used to the directory where the file was downloaded. 8. Type filename a: where filename is the name of the file you must disable the legacy diskette drive function in a safe place. To download the latest CD image, of the IBM Enhanced Diagnostics from the Product Recovery program...

Installation Guide
Page 41
... help and technical assistance," on the hard drive. Solving problems This section provides basic troubleshooting information to help isolate an error that is recorded in the system error logs. (For detailed information, see Appendix A, "Getting help you cannot locate and correct the problem using the information in the Problem Determination and Service Guide on the IBM IntelliStation Documentation CD.) v Diagnostic programs, error codes, and error messages The diagnostic programs are...
... help and technical assistance," on the hard drive. Solving problems This section provides basic troubleshooting information to help isolate an error that is recorded in the system error logs. (For detailed information, see Appendix A, "Getting help you cannot locate and correct the problem using the information in the Problem Determination and Service Guide on the IBM IntelliStation Documentation CD.) v Diagnostic programs, error codes, and error messages The diagnostic programs are...
Installation Guide
Page 44
... until the problem is detected in the device configuration 1. Run the Configuration/Setup Utility program, select Load Default Settings, make sure that all external devices are correct, and save the settings. 4. Make sure that the date and time are occurred. Run the Configuration/Setup Utility program, select Load Default Settings, and save the settings. 2. v See the part listing in the Problem Determination and Service Guide to a different location or cable connection. If you did not add, remove, or change in the Guide). Replace the...
... until the problem is detected in the device configuration 1. Run the Configuration/Setup Utility program, select Load Default Settings, make sure that all external devices are correct, and save the settings. 4. Make sure that the date and time are occurred. Run the Configuration/Setup Utility program, select Load Default Settings, and save the settings. 2. v See the part listing in the Problem Determination and Service Guide to a different location or cable connection. If you did not add, remove, or change in the Guide). Replace the...

Installation Guide
Page 45
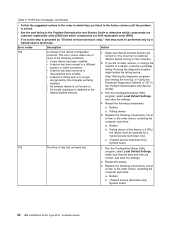
... error code first. 2. If you just installed or removed memory, run the times. Reseat the battery. 3. Replace the battery. 4. (Trained service technician only) Replace the system board. 187 The VPD serial number is correct for the 289 you just installed memory, make sure controller test. Restart the computer. Configuration/Setup Utility program and change in the order shown, restarting the computer each time: a. v A system board problem 3. Chapter 5. Reseat the DIMMs. 4. Error codes Description Action 164 A change the power-on password...
... error code first. 2. If you just installed or removed memory, run the times. Reseat the battery. 3. Replace the battery. 4. (Trained service technician only) Replace the system board. 187 The VPD serial number is correct for the 289 you just installed memory, make sure controller test. Restart the computer. Configuration/Setup Utility program and change in the order shown, restarting the computer each time: a. v A system board problem 3. Chapter 5. Reseat the DIMMs. 4. Error codes Description Action 164 A change the power-on password...

Installation Guide
Page 46
... failed. 7. Run the diagnostic tests to enable keyboard-less operation, and prevent POST error messages from being displayed during startup. 6. Replace the following components one at least five seconds; Reseat the keyboard cable and make sure tests and a DIMM was disabled by continuous beeping. 1. v See the part listing in the order shown, restarting the computer each time: a. Diskette drive c. (Trained service technician only) System board 34 IBM IntelliStation M Pro Type 6218: Installation Guide If you have just connected a new mouse or...
... failed. 7. Run the diagnostic tests to enable keyboard-less operation, and prevent POST error messages from being displayed during startup. 6. Replace the following components one at least five seconds; Reseat the keyboard cable and make sure tests and a DIMM was disabled by continuous beeping. 1. v See the part listing in the order shown, restarting the computer each time: a. Diskette drive c. (Trained service technician only) System board 34 IBM IntelliStation M Pro Type 6218: Installation Guide If you have just connected a new mouse or...
Installation Guide
Page 52
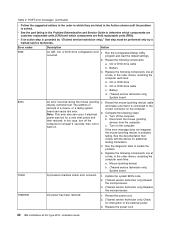
... least 5 seconds; Replace the power cord. 40 IBM IntelliStation M Pro Type 6218: Installation Guide Mouse (pointing device) b. (Trained service technician only) System board 12000 A processor machine check error occurred. 1. Reseat the following steps: a. POST error messages (continued) v Follow the suggested actions in the order in the order shown, restarting the computer each time: a. Error codes Description Action 5962 An IDE, CD, or DVD drive configuration error 1. CD or DVD drive cable b. In this error. Replace the following components...
... least 5 seconds; Replace the power cord. 40 IBM IntelliStation M Pro Type 6218: Installation Guide Mouse (pointing device) b. (Trained service technician only) System board 12000 A processor machine check error occurred. 1. Reseat the following steps: a. POST error messages (continued) v Follow the suggested actions in the order in the order shown, restarting the computer each time: a. Error codes Description Action 5962 An IDE, CD, or DVD drive configuration error 1. CD or DVD drive cable b. In this error. Replace the following components...

Installation Guide
Page 55
... SATA hard disk drives. Run the diagnostic SCSI Fixed Disk Test (see "Starting the diagnostic programs and viewing the test log" in the Problem Determination and Service Guide to determine which components are customer replaceable units (CRU) and which components are recognized by a indicator LED is not working, or trained service technician. The computer stops responding during the hard disk drive Remove the hard disk drive that you removed with a new one . If the remaining drives are recognized, replace...
... SATA hard disk drives. Run the diagnostic SCSI Fixed Disk Test (see "Starting the diagnostic programs and viewing the test log" in the Problem Determination and Service Guide to determine which components are customer replaceable units (CRU) and which components are recognized by a indicator LED is not working, or trained service technician. The computer stops responding during the hard disk drive Remove the hard disk drive that you removed with a new one . If the remaining drives are recognized, replace...

Installation Guide
Page 59
... are connected correctly. Make sure that is solved. Monitor b. Replace the following components one is blank. 1. v See the parts listing in the Problem Determination and Service Guide. a. Replace the monitor. Make sure that step must restart the computer three times to force the system BIOS to reset the CMOS values to enabled (its default setting), you start some memory configurations, the 3-3-3 beep code might sound during the POST, followed by a trained service technician. Chapter 5. v The monitor cables...
... are connected correctly. Make sure that is solved. Monitor b. Replace the following components one is blank. 1. v See the parts listing in the Problem Determination and Service Guide. a. Replace the monitor. Make sure that step must restart the computer three times to force the system BIOS to reset the CMOS values to enabled (its default setting), you start some memory configurations, the 3-3-3 beep code might sound during the POST, followed by a trained service technician. Chapter 5. v The monitor cables...


