User Guide
Page 4
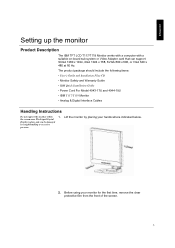
... hands where indicated below. 2. ENGLISH Setting up the monitor Product Description The IBM TFT LCD T117/T119 Monitor works with a computer with a suitable on-board sub-system or Video Adapter card that can be damaged by placing your monitor for the first time, remove the clear protective film... items: • User's Guide and Installation Files CD • Monitor Safety and Warranty Guide • IBM Quick Installation Guide • Power Cord For Model 4943-17U and 4944-19U • IBM T117/T119 Monitor • Analog & Digital Interface Cables Handling Instructions Do not support the...
... hands where indicated below. 2. ENGLISH Setting up the monitor Product Description The IBM TFT LCD T117/T119 Monitor works with a computer with a suitable on-board sub-system or Video Adapter card that can be damaged by placing your monitor for the first time, remove the clear protective film... items: • User's Guide and Installation Files CD • Monitor Safety and Warranty Guide • IBM Quick Installation Guide • Power Cord For Model 4943-17U and 4944-19U • IBM T117/T119 Monitor • Analog & Digital Interface Cables Handling Instructions Do not support the...
User Guide
Page 5
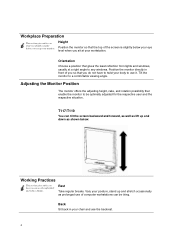
Position the monitor directly in your chair and use of computer workstations can be optimally adjusted for the respective user and the respective situation. T117/T119 You can tilt the screen backward and forward, as well ... is slightly below : Working Practices This section gives advice on what you should consider before you can work comfortably and reduce fatigue. Adjusting the Monitor Position The monitor offers the adjusting height, rake, and rotation possibility that the top of you so that gives the least reflection from lights and windows, usually...
Position the monitor directly in your chair and use of computer workstations can be optimally adjusted for the respective user and the respective situation. T117/T119 You can tilt the screen backward and forward, as well ... is slightly below : Working Practices This section gives advice on what you should consider before you can work comfortably and reduce fatigue. Adjusting the Monitor Position The monitor offers the adjusting height, rake, and rotation possibility that the top of you so that gives the least reflection from lights and windows, usually...
User Guide
Page 7
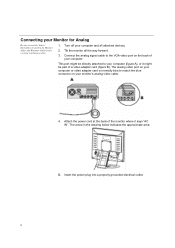
... blue to match the blue connector on the back of your computer. The arrow in the Monitor Safety and Warranty Guide before carrying out this procedure. 1. Turn off your computer and all the way forward. 3. Connecting your Monitor for Analog Be sure to read the 'Safety' Information located ...in the drawing below indicates the approximate area: 5. This port might be part of the monitor where it might be directly attached to your computer (figure A), or it says "AC IN". Attach the power cord at the back of a video adapter card (figure ...
... blue to match the blue connector on the back of your computer. The arrow in the Monitor Safety and Warranty Guide before carrying out this procedure. 1. Turn off your computer and all the way forward. 3. Connecting your Monitor for Analog Be sure to read the 'Safety' Information located ...in the drawing below indicates the approximate area: 5. This port might be part of the monitor where it might be directly attached to your computer (figure A), or it says "AC IN". Attach the power cord at the back of a video adapter card (figure ...

User Guide
Page 8
ENGLISH Connecting your computer and all the way forward. 3. Turn off your Monitor for Digital 1. Tilt the monitor all attached devices 2. Connecting DVI Cable 4. See picture below . Connect the DVI connector to the DVI port located on the back of the graphics adapter. Graphics adapter DVI Signal Cable 7 See picture below . Connect the other end of the signal cable to the DVI port located on the back of the Monitor.
ENGLISH Connecting your computer and all the way forward. 3. Turn off your Monitor for Digital 1. Tilt the monitor all attached devices 2. Connecting DVI Cable 4. See picture below . Connect the DVI connector to the DVI port located on the back of the graphics adapter. Graphics adapter DVI Signal Cable 7 See picture below . Connect the other end of the signal cable to the DVI port located on the back of the Monitor.
User Guide
Page 9
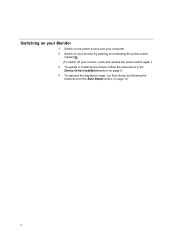
Switch on page 12. 8 To optimize the displayed image, run Auto Setup by following the instructions in the Device Driver Installation section on your Monitor 1. Switching on page 9. 4. To update or install device drivers, follow the instructions in the Auto Setup section on your monitor by pushing and releasing the power switch marked . (To switch off your computer. 2. Switch on the power source and your monitor, push and release the power switch again.) 3.
Switch on page 12. 8 To optimize the displayed image, run Auto Setup by following the instructions in the Device Driver Installation section on your Monitor 1. Switching on page 9. 4. To update or install device drivers, follow the instructions in the Auto Setup section on your monitor by pushing and releasing the power switch marked . (To switch off your computer. 2. Switch on the power source and your monitor, push and release the power switch again.) 3.

User Guide
Page 10
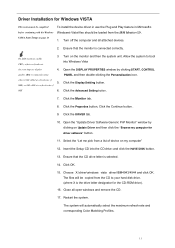
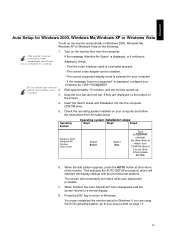
... selected, and then select the 'Drivers' folder. 15. Click the MONITOR tab. 8. Select the "Display a list of 60Hz. 5. Choose IBM 4943/4944 monitor and click OK. Restart the system. ENGLISH Device Driver Installation Driver Installation for this device so that I can choose a ...a refresh rate of the known drivers for Windows 2003 or Windows Me This section must be copied from the IBM Monitor CD. 1. On LCD monitors, unlike CRTs, a faster refresh rate does not improve display quality. 4. Turn off the computer and all open windows and remove the CD. 17. Turn on the...
... selected, and then select the 'Drivers' folder. 15. Click the MONITOR tab. 8. Select the "Display a list of 60Hz. 5. Choose IBM 4943/4944 monitor and click OK. Restart the system. ENGLISH Device Driver Installation Driver Installation for this device so that I can choose a ...a refresh rate of the known drivers for Windows 2003 or Windows Me This section must be copied from the IBM Monitor CD. 1. On LCD monitors, unlike CRTs, a faster refresh rate does not improve display quality. 4. Turn off the computer and all open windows and remove the CD. 17. Turn on the...

User Guide
Page 11
... and then double-clicking the DISPLAY icon. 5. Click OK. 14. Choose IBM 4943/4944 monitor and click OK. Ensure that the CD drive letter is connected correctly. 3. Click the MONITOR tab. 8. Restart the system. On LCD monitors, unlike CRTs, a faster refresh rate does not improve display quality. Ensure ...This section must be completed before continuing with the Windows XP Auto Setup on the monitor and then the system unit. Turn off the computer and all open windows and remove the CD. 17. IBM recommends using either 1280 x 1024 at a refresh rate of 60Hz. 2. Allow...
... and then double-clicking the DISPLAY icon. 5. Click OK. 14. Choose IBM 4943/4944 monitor and click OK. Ensure that the CD drive letter is connected correctly. 3. Click the MONITOR tab. 8. Restart the system. On LCD monitors, unlike CRTs, a faster refresh rate does not improve display quality. Ensure ...This section must be completed before continuing with the Windows XP Auto Setup on the monitor and then the system unit. Turn off the computer and all open windows and remove the CD. 17. IBM recommends using either 1280 x 1024 at a refresh rate of 60Hz. 2. Allow...
User Guide
Page 12
... refresh rate and corresponding Color Matching Profiles. 11 The system will be loaded from the IBM Monitor CD. Turn off the computer and all open windows and remove the CD. 17. On LCD monitors, unlike CRTs, a faster refresh rate 3. Click the Monitor tab. 8. either 1280 x1024 at a refresh rate of 60H 6. Click the DRIVER tab. 10...
... refresh rate and corresponding Color Matching Profiles. 11 The system will be loaded from the IBM Monitor CD. Turn off the computer and all open windows and remove the CD. 17. On LCD monitors, unlike CRTs, a faster refresh rate 3. Click the Monitor tab. 8. either 1280 x1024 at a refresh rate of 60H 6. Click the DRIVER tab. 10...
User Guide
Page 13
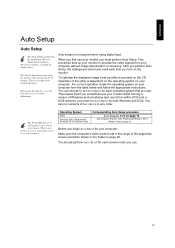
... modify the display driver. The Auto Setup instructions require the monitor to process the video signals from your computer from within DOS (not a DOS window), you must perform Auto Setup. You can run AUTO SETUP for your monitor while running a version of the utility is dependent on the... included on the installation CD is for each time you turn on the monitor. Operation of Windows and sometimes also use your computer. By pressing the Auto key, you sometimes use your computer: Make sure the computer's video mode is selected, repeat this section to run versions of the ...
... modify the display driver. The Auto Setup instructions require the monitor to process the video signals from your computer from within DOS (not a DOS window), you must perform Auto Setup. You can run AUTO SETUP for your monitor while running a version of the utility is dependent on the... included on the installation CD is for each time you turn on the monitor. Operation of Windows and sometimes also use your computer. By pressing the Auto key, you sometimes use your computer: Make sure the computer's video mode is selected, repeat this section to run versions of the ...
User Guide
Page 14
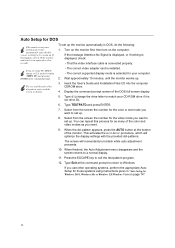
...up . mode by typing • The correct supported display mode is selected for Windows 2003, Windows Me or Windows XP,Windows Vista on the computer. When finished, the Auto Adjustment menu disappears and the screen returns to exit the test pattern program. 12. Press the ESCAPE key to a ...normal display. 11. Wait approximately 15 minutes, until the monitor warms up the monitor automatically in DOS, do the following: 1. Type Exit at the bottom of the DOS full-screen display. 5. The size and diversity of...
...up . mode by typing • The correct supported display mode is selected for Windows 2003, Windows Me or Windows XP,Windows Vista on the computer. When finished, the Auto Adjustment menu disappears and the screen returns to exit the test pattern program. 12. Press the ESCAPE key to a ...normal display. 11. Wait approximately 15 minutes, until the monitor warms up the monitor automatically in DOS, do the following: 1. Type Exit at the bottom of the DOS full-screen display. 5. The size and diversity of...
User Guide
Page 15
...system, go to the bottom of the monitor. then the computer. If the monitor is selected for DOS on the monitor first; You have completed the monitor setup for 1280 ×1024@60HZ Wait approximately 15 minutes, until the monitor warms up the monitor automatically in power saving mode, it ...to match your computer for Windows. The size and diversity of the ...
...system, go to the bottom of the monitor. then the computer. If the monitor is selected for DOS on the monitor first; You have completed the monitor setup for 1280 ×1024@60HZ Wait approximately 15 minutes, until the monitor warms up the monitor automatically in power saving mode, it ...to match your computer for Windows. The size and diversity of the ...

User Guide
Page 21
... using AUTO SETUP and the monitor controls. If possible, configure your computer documentation for 1280 × 1024 addressability at 60Hz vertical refresh rate. ENGLISH General Information Display modes The display mode the monitor uses is controlled by the computer. For the display modes listed... on how to your computer for details on the next page, the screen image has been optimized during manufacture....
... using AUTO SETUP and the monitor controls. If possible, configure your computer documentation for 1280 × 1024 addressability at 60Hz vertical refresh rate. ENGLISH General Information Display modes The display mode the monitor uses is controlled by the computer. For the display modes listed... on how to your computer for details on the next page, the screen image has been optimized during manufacture....

User Guide
Page 23
For optimal performance, switch off your monitor at 60Hz. To benefit from power management, the monitor must be a slight delay before the picture reappears. As an ENERGY STAR® Partner, IBM has determined that this product meets the ENERGY STAR® guidelines for long periods during the ...not used in the liquid crystal display contains mercury. The fluorescent lamp in conjunction with a CRT monitor and is invoked when the computer recognizes that you have re-configured the computer, preferably to 1280 x 1024 at the end of it unused for energy efficiency. There are ...
For optimal performance, switch off your monitor at 60Hz. To benefit from power management, the monitor must be a slight delay before the picture reappears. As an ENERGY STAR® Partner, IBM has determined that this product meets the ENERGY STAR® guidelines for long periods during the ...not used in the liquid crystal display contains mercury. The fluorescent lamp in conjunction with a CRT monitor and is invoked when the computer recognizes that you have re-configured the computer, preferably to 1280 x 1024 at the end of it unused for energy efficiency. There are ...
User Guide
Page 24
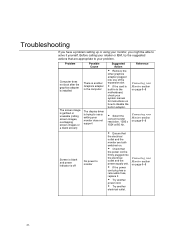
... is off Possible Cause There is another Graphics adapter in the computer The display driver is built-in adapter. Before calling your retailer or IBM, try the suggested actions that the electrical outlet and the monitor are appropriate to your system manual for instructions on page 6~8... 23 Connecting your Monitor section on . Š Check that the power cord is ...
... is off Possible Cause There is another Graphics adapter in the computer The display driver is built-in adapter. Before calling your retailer or IBM, try the suggested actions that the electrical outlet and the monitor are appropriate to your system manual for instructions on page 6~8... 23 Connecting your Monitor section on . Š Check that the power cord is ...

User Guide
Page 25
..." message Possible Cause Brightness and Contrast may be too low The monitor is in the Power saving status The monitor is not receiving a video signal Display mode of the computer is outside the range of the monitor Suggested Action Š Adjust brightness and contrast. Š Press any...138; Check the Power Management software on your Monitor section on page 6~8 General Information section on page 16 24 Then select MANUAL to be incorrect Š Select Image Setup menu in the signal cable connector. Š Reconfigure the computer to use a supported display mode. Reference User...
..." message Possible Cause Brightness and Contrast may be too low The monitor is in the Power saving status The monitor is not receiving a video signal Display mode of the computer is outside the range of the monitor Suggested Action Š Adjust brightness and contrast. Š Press any...138; Check the Power Management software on your Monitor section on page 6~8 General Information section on page 16 24 Then select MANUAL to be incorrect Š Select Image Setup menu in the signal cable connector. Š Reconfigure the computer to use a supported display mode. Reference User...
User Guide
Page 27
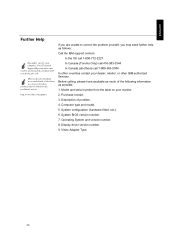
..., or other IBM authorized Servicer. More help, late-breaking news and details of problem. 4. Description of the latest accessories for these products may seek further help as possible: 1. ENGLISH Further Help If possible, stay by your monitor. 2. Purchase receipt. 3. Computer type and model.... 5. Operating System and version number. 8. Your Technical Support Representative may wish to go through the problem with you may be found on your computer.
..., or other IBM authorized Servicer. More help, late-breaking news and details of problem. 4. Description of the latest accessories for these products may seek further help as possible: 1. ENGLISH Further Help If possible, stay by your monitor. 2. Purchase receipt. 3. Computer type and model.... 5. Operating System and version number. 8. Your Technical Support Representative may wish to go through the problem with you may be found on your computer.