
User Guide
Page 15
... the console switch. The IBM 3M Console Switch Cables (PS/2 and USB) are unique benefits of the switch cable simplifies configuration by assigning and retaining unique server names and port numbers for each attached server. Switch Cable The switch cable enables direct KVM connectivity to servers attached to access any attached servers. Using a PS/2 switch cable you can attach additional switches to access attached servers. The 2x16 console switch enables two simultaneous users to expand the console switch system. This flexibility enables you to add capacity as the data...
... the console switch. The IBM 3M Console Switch Cables (PS/2 and USB) are unique benefits of the switch cable simplifies configuration by assigning and retaining unique server names and port numbers for each attached server. Switch Cable The switch cable enables direct KVM connectivity to servers attached to access any attached servers. Using a PS/2 switch cable you can attach additional switches to access attached servers. The 2x16 console switch enables two simultaneous users to expand the console switch system. This flexibility enables you to add capacity as the data...

User Guide
Page 16
.... 2 IBM Console Switch Installation and User's Guide The USB switch cable is entered to assign a unique server name. After a userdefined time, the screen saver mode engages, and access is prohibited until the appropriate password is used to connect a USB server to configure the switch system and select servers. Table 1.1: Console Switch Cable Resolution and Refresh Rate Maximum Resolution 720 x 400 640 x 480 640 x 480 640 x 480 Refresh Rate 70 Hz 60 Hz 72 Hz 75 Hz Video Type...
.... 2 IBM Console Switch Installation and User's Guide The USB switch cable is entered to assign a unique server name. After a userdefined time, the screen saver mode engages, and access is prohibited until the appropriate password is used to connect a USB server to configure the switch system and select servers. Table 1.1: Console Switch Cable Resolution and Refresh Rate Maximum Resolution 720 x 400 640 x 480 640 x 480 640 x 480 Refresh Rate 70 Hz 60 Hz 72 Hz 75 Hz Video Type...
User Guide
Page 26
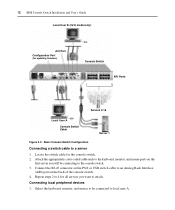
12 IBM Console Switch Installation and User's Guide Local User B (2x16 model only) ACI Port Configuration Port (for updating firmware) Console Switch ARI Ports Servers 2-16 Local User A Console Switch Cable Server 1 Figure 2.3: Basic Console Switch Configuration Connecting a switch cable to an Analog Rack Interface (ARI) port on the back of the console switch. 4. Connect the RJ-45 connector on the first server you want to attach. Attach the appropriately color-coded cable ends to the keyboard, monitor, and mouse ports on the PS/2 or USB switch cable to a server 1. Repeat steps...
12 IBM Console Switch Installation and User's Guide Local User B (2x16 model only) ACI Port Configuration Port (for updating firmware) Console Switch ARI Ports Servers 2-16 Local User A Console Switch Cable Server 1 Figure 2.3: Basic Console Switch Configuration Connecting a switch cable to an Analog Rack Interface (ARI) port on the back of the console switch. 4. Connect the RJ-45 connector on the first server you want to attach. Attach the appropriately color-coded cable ends to the keyboard, monitor, and mouse ports on the PS/2 or USB switch cable to a server 1. Repeat steps...
User Guide
Page 27
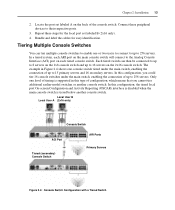
...) interface is disabled when the main console switch is supported in this type of configuration, which means that you could tier 16 console switches under the main switch, enabling the connection of the console switch. Connect these steps for easy identification. Tiering Multiple Console Switches You can then be connected to up to 8 servers on the 1x8 console switch and up to 256 servers. Local User B Local User A (2x16 only) Console Switch ACI Port Tiered (secondary) Console Switch ARI Ports Primary Servers...
...) interface is disabled when the main console switch is supported in this type of configuration, which means that you could tier 16 console switches under the main switch, enabling the connection of the console switch. Connect these steps for easy identification. Tiering Multiple Console Switches You can then be connected to up to 8 servers on the 1x8 console switch and up to 256 servers. Local User B Local User A (2x16 only) Console Switch ACI Port Tiered (secondary) Console Switch ARI Ports Primary Servers...
User Guide
Page 28
... main console switch server list in the OSCAR interface. 5. Connect the peripheral devices to local user A of the main switch as one. Attach one of the 16 RJ-45 (ARI) ports on the main console switch. Repeat steps 3 and 4 for easy integration into the existing configuration. Attach the other end of the CAT 5 cable to one end of the CAT 5 cable that can add earlier-model switches...
... main console switch server list in the OSCAR interface. 5. Connect the peripheral devices to local user A of the main switch as one. Attach one of the 16 RJ-45 (ARI) ports on the main console switch. Repeat steps 3 and 4 for easy integration into the existing configuration. Attach the other end of the CAT 5 cable to one end of the CAT 5 cable that can add earlier-model switches...

User Guide
Page 29
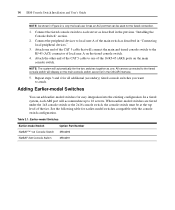
... 1. Connect the servers to the tiered switch according to the instructions included with that device. 2. Attach the keyboard, monitor, and mouse connectors of the console switch. 4. Power cycle the tiered switch to enable its local port to the instructions included with an Earlier-model Switch 1. Local User Console Switch Chapter 2: Installation 15 PS/2 Switch Cable Earlier-model Switch Earlier-model Switch Server 1 Server 2 Figure 2.5: Console Switch Configuration with that device. 5. Mount the earlier-model switch into the rack according to recognize the switch cable...
... 1. Connect the servers to the tiered switch according to the instructions included with that device. 2. Attach the keyboard, monitor, and mouse connectors of the console switch. 4. Power cycle the tiered switch to enable its local port to the instructions included with an Earlier-model Switch 1. Local User Console Switch Chapter 2: Installation 15 PS/2 Switch Cable Earlier-model Switch Earlier-model Switch Server 1 Server 2 Figure 2.5: Console Switch Configuration with that device. 5. Mount the earlier-model switch into the rack according to recognize the switch cable...

User Guide
Page 30
Configuring the Console Switch System With the console switch system, you can auto detect and configure each port on the back of the console switch. Locate the port set labeled B. 4. Connect these peripherals devices to their respective ports. 3. For the 2x16 console switch, repeat steps 1 and 2 for easy identification. Chapter 3 provides detailed instructions about naming customization and OSCAR interface setup and configuration. Bundle and label the cables for the local port set labeled A on the console switch. 16 IBM Console Switch Installation and User's Guide 2.
Configuring the Console Switch System With the console switch system, you can auto detect and configure each port on the back of the console switch. Locate the port set labeled B. 4. Connect these peripherals devices to their respective ports. 3. For the 2x16 console switch, repeat steps 1 and 2 for easy identification. Chapter 3 provides detailed instructions about naming customization and OSCAR interface setup and configuration. Bundle and label the cables for the local port set labeled A on the console switch. 16 IBM Console Switch Installation and User's Guide 2.

User Guide
Page 31
... a server is connected. View the servers by default when you to configure the system and select servers. The Port column indicates the ARI port to which uses intuitive menus to connect a monitor and a PS/2 keyboard and mouse for direct local access. The Main window opens. Accessing the Main window 1. The 1x8 console switch enables you to connect a single local user, whereas the 2x16 console switch enables you connect an earliermodel switch to the console switch or a tiered console switch, the port numbering...
... a server is connected. View the servers by default when you to configure the system and select servers. The Port column indicates the ARI port to which uses intuitive menus to connect a monitor and a PS/2 keyboard and mouse for direct local access. The Main window opens. Accessing the Main window 1. The 1x8 console switch enables you to connect a single local user, whereas the 2x16 console switch enables you connect an earliermodel switch to the console switch or a tiered console switch, the port numbering...

User Guide
Page 33
... connected to the same console switch. The Menu window opens. 3. NOTE: The status flag displays on the desktop displays Free. NOTE: To clear all directly connected offline switch cables from a server Press Print Screen to access OSCAR and then click Disconnect. -orPress Print Screen and then Alt+0. Chapter 3: Basic Operations 19 Table 3.1: OSCAR Interface Status Symbols (Continued) The switch cable is the ability to switch servers using a hotkey sequence. Selecting servers Use...
... connected to the same console switch. The Menu window opens. 3. NOTE: The status flag displays on the desktop displays Free. NOTE: To clear all directly connected offline switch cables from a server Press Print Screen to access OSCAR and then click Disconnect. -orPress Print Screen and then Alt+0. Chapter 3: Basic Operations 19 Table 3.1: OSCAR Interface Status Symbols (Continued) The switch cable is the ability to switch servers using a hotkey sequence. Selecting servers Use...

User Guide
Page 34
... OK button, then returns to a server 1. Moves the cursor from a server and no server is password protected. Soft switching to the previous window. To switch back to navigate the OSCAR interface using the keyboard. Navigating the OSCAR Interface The following table describes how to the previous server, press Print Screen then Backspace. Immediately disconnects the user from line to the previous one . 20 IBM Console Switch Installation and User's Guide 4. Click...
... OK button, then returns to a server 1. Moves the cursor from a server and no server is password protected. Soft switching to the previous window. To switch back to navigate the OSCAR interface using the keyboard. Navigating the OSCAR Interface The following table describes how to the previous server, press Print Screen then Backspace. Immediately disconnects the user from line to the previous one . 20 IBM Console Switch Installation and User's Guide 4. Click...
User Guide
Page 38
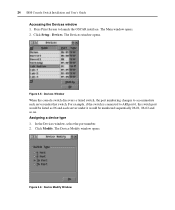
... IBM Console Switch Installation and User's Guide Accessing the Devices window 1. Press Print Screen to ARI port 6, the switch port would be listed as 06 and each server under it would be numbered sequentially 06-01, 06-02 and so on. Devices. Assigning a device type 1. Figure 3.6: Device Modify Window The Main window opens. 2. Click Setup - Figure 3.5: Devices Window When the console switch discovers a tiered switch, the port numbering changes to accommodate each server under that switch. For example...
... IBM Console Switch Installation and User's Guide Accessing the Devices window 1. Press Print Screen to ARI port 6, the switch port would be listed as 06 and each server under it would be numbered sequentially 06-01, 06-02 and so on. Devices. Assigning a device type 1. Figure 3.6: Device Modify Window The Main window opens. 2. Click Setup - Figure 3.5: Devices Window When the console switch discovers a tiered switch, the port numbering changes to accommodate each server under that switch. For example...
User Guide
Page 39
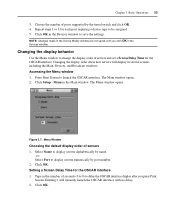
... Port to change the display order of ports supported by port number. 2. Click OK. Accessing the Menu window 1. Figure 3.7: Menu Window Choosing the default display order of seconds (0 to 9) to save the settings. Setting a Screen Delay Time for the OSCAR interface. Changing the display behavior Use the Menu window to display servers numerically by the tiered switch and click OK. 4. Choose the number of servers and set a Screen Delay Time for the OSCAR interface 1. Changing the...
... Port to change the display order of ports supported by port number. 2. Click OK. Accessing the Menu window 1. Figure 3.7: Menu Window Choosing the default display order of seconds (0 to 9) to save the settings. Setting a Screen Delay Time for the OSCAR interface. Changing the display behavior Use the Menu window to display servers numerically by the tiered switch and click OK. 4. Choose the number of servers and set a Screen Delay Time for the OSCAR interface 1. Changing the...
User Guide
Page 40
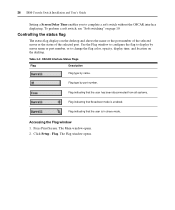
Table 3.4: OSCAR Interface Status Flags Flag Description Flag type by port number. Click Setup - 26 IBM Console Switch Installation and User's Guide Setting a Screen Delay Time enables you to change the flag color, opacity, display time, and location on the desktop. Use the Flag window to configure the flag to display by server name or port number, or to complete a soft switch without the OSCAR interface displaying. Flag indicating that the user has been disconnected from all systems...
Table 3.4: OSCAR Interface Status Flags Flag Description Flag type by port number. Click Setup - 26 IBM Console Switch Installation and User's Guide Setting a Screen Delay Time enables you to change the flag color, opacity, display time, and location on the desktop. Use the Flag window to configure the flag to display by server name or port number, or to complete a soft switch without the OSCAR interface displaying. Flag indicating that the user has been disconnected from all systems...
User Guide
Page 42
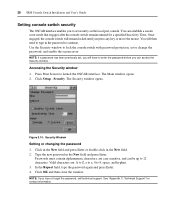
... lose or forget the password, call technical support. Accessing the Security window 1. Figure 3.10: Security Window Setting or changing the password 1. See "Appendix C: Technical Support" for a specified Inactivity Time. You can establish a screen saver mode that engages after the console switch remains unused for contact information. 28 IBM Console Switch Installation and User's Guide Setting console switch security The OSCAR interface enables you to enter the password before you can access the Security window. Click in the...
... lose or forget the password, call technical support. Accessing the Security window 1. Figure 3.10: Security Window Setting or changing the password 1. See "Appendix C: Technical Support" for a specified Inactivity Time. You can establish a screen saver mode that engages after the console switch remains unused for contact information. 28 IBM Console Switch Installation and User's Guide Setting console switch security The OSCAR interface enables you to enter the password before you can access the Security window. Click in the...
User Guide
Page 46
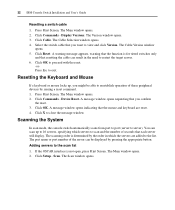
... a reset command. 1. 32 IBM Console Switch Installation and User's Guide Resetting a switch cable 1. The Main window opens. 2. Click Commands - Select the switch cable that the function is not open, press Print Screen. Click Reset. Click OK to proceed with the reset. -orPress Esc to server). Press Print Screen. Click Commands - Click OK. Click X to the scan list 1. You can be able to view and click Version. The port name or port number of the server can...
... a reset command. 1. 32 IBM Console Switch Installation and User's Guide Resetting a switch cable 1. The Main window opens. 2. Click Commands - Select the switch cable that the function is not open, press Print Screen. Click Reset. Click OK to proceed with the reset. -orPress Esc to server). Press Print Screen. Click Commands - Click OK. Click X to the scan list 1. You can be able to view and click Version. The port name or port number of the server can...
User Guide
Page 48
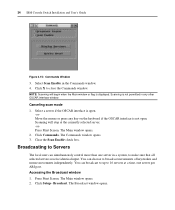
34 IBM Console Switch Installation and User's Guide Figure 3.15: Commands Window 3. Scanning will begin when the Main window or flag is not open. Press Print Screen. Broadcast. Click X to 16 servers at the currently selected server. -orPress Print Screen. The Commands window opens. 3. Canceling scan mode 1. Select a server if the OSCAR interface is open. -orMove the mouse or press any other OSCAR interface window. You can broadcast to...
34 IBM Console Switch Installation and User's Guide Figure 3.15: Commands Window 3. Scanning will begin when the Main window or flag is not open. Press Print Screen. Broadcast. Click X to 16 servers at the currently selected server. -orPress Print Screen. The Commands window opens. 3. Canceling scan mode 1. Select a server if the OSCAR interface is open. -orMove the mouse or press any other OSCAR interface window. You can broadcast to...

User Guide
Page 50
... not be disconnected if the other user to enable the other user requests connection. Switch. The Switch window opens. Click OK to the Commands window. 6. Accessing the Switch window 1. Press Print Screen. 36 IBM Console Switch Installation and User's Guide Figure 3.17: Broadcast Enable Window 5. Click X or press Esc to cancel and return to enable the broadcast. If broadcasting is enabled. Only servers in the list are accessible. Select Preemptive (default setting) to select any server at any time;
... not be disconnected if the other user to enable the other user requests connection. Switch. The Switch window opens. Click OK to the Commands window. 6. Accessing the Switch window 1. Press Print Screen. 36 IBM Console Switch Installation and User's Guide Figure 3.17: Broadcast Enable Window 5. Click X or press Esc to cancel and return to enable the broadcast. If broadcasting is enabled. Only servers in the list are accessible. Select Preemptive (default setting) to select any server at any time;
User Guide
Page 53
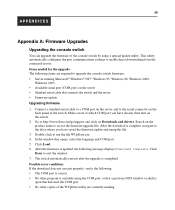
.../support and click on Downloads and drivers. Connect a standard serial cable to a COM port on the back panel of which COM port you have chosen, then turn on the server • Standard serial cable that opens, select the language and COM port. 5. After the firmware is completed. Search on the product name to the serial connector on the server and to access the firmware upgrade file. In the window that connects the switch and the server • Firmware update Upgrading firmware...
.../support and click on Downloads and drivers. Connect a standard serial cable to a COM port on the back panel of which COM port you have chosen, then turn on the server • Standard serial cable that opens, select the language and COM port. 5. After the firmware is completed. Search on the product name to the serial connector on the server and to access the firmware upgrade file. In the window that connects the switch and the server • Firmware update Upgrading firmware...
User Guide
Page 61
... password protecting 29 removing password protection 29 console switch 1x8 model 1 2x16 model 1 basic configuration 12 connecting to servers 11 installing 11 rack mounting 9 supplied with 9 technical specifications 41 tiered switch configuration 13 tiering 10 upgrading 39 viewing status 18 console switch (PS/2) 1 47 console switch (USB) 2 console switch cable connecting 12 D device types assigning 23 display behavior 25 E earlier-model console switches 3 F firmware upgrades 3, 39 I IBM Console Switch features 1 resolution and refresh rates 1 K Keep Alive 1 keyboard and mouse resetting 32 KVM...
... password protecting 29 removing password protection 29 console switch 1x8 model 1 2x16 model 1 basic configuration 12 connecting to servers 11 installing 11 rack mounting 9 supplied with 9 technical specifications 41 tiered switch configuration 13 tiering 10 upgrading 39 viewing status 18 console switch (PS/2) 1 47 console switch (USB) 2 console switch cable connecting 12 D device types assigning 23 display behavior 25 E earlier-model console switches 3 F firmware upgrades 3, 39 I IBM Console Switch features 1 resolution and refresh rates 1 K Keep Alive 1 keyboard and mouse resetting 32 KVM...

User Guide
Page 62
... Menu window 25 navigation basics 20 setting Screen Delay Time 25 status flags 26 P password protecting 29 setting or changing 28 password protecting 28 peripheral devices connecting 12 Plug and Play 3 ports and servers viewing and selecting 17 R rack mounting 7 horizontal installation 10 vertical installation 9 resetting keyboard and mouse 32 S scan list removing a server 33 screen saver mode 29 security 2 server Index 48 adding to scan list 32 configuring for soft switching 19 disconnecting users 19 removing...
... Menu window 25 navigation basics 20 setting Screen Delay Time 25 status flags 26 P password protecting 29 setting or changing 28 password protecting 28 peripheral devices connecting 12 Plug and Play 3 ports and servers viewing and selecting 17 R rack mounting 7 horizontal installation 10 vertical installation 9 resetting keyboard and mouse 32 S scan list removing a server 33 screen saver mode 29 security 2 server Index 48 adding to scan list 32 configuring for soft switching 19 disconnecting users 19 removing...


