
Owners Manual
Page 2
...wheel weights or counterweights. • Keep machine free of grass, leaves or other debris buildup which can touch hot exhaust / engine parts and burn. WARNING: Tow only the attachments that you to neutral and coast downhill. • Avoid starting, stopping, or turning... on the machine and in the Operation section of the machine. Manually lock ignition switch. (See "MANUALLY LOCKING THE SMARTSWITCH™ IGNITION" in the manual before cleaning the machine, removing the grass catcher, or unclogging the discharge chute. • Operate machine...
...wheel weights or counterweights. • Keep machine free of grass, leaves or other debris buildup which can touch hot exhaust / engine parts and burn. WARNING: Tow only the attachments that you to neutral and coast downhill. • Avoid starting, stopping, or turning... on the machine and in the Operation section of the machine. Manually lock ignition switch. (See "MANUALLY LOCKING THE SMARTSWITCH™ IGNITION" in the manual before cleaning the machine, removing the grass catcher, or unclogging the discharge chute. • Operate machine...
Owners Manual
Page 5
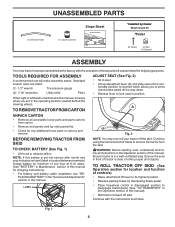
... Fig. 1 5 (1) Oil Drain Tube UNASSEMBLED PARTS Slope Sheet (1) Quick Connect *Installed by depressing brake pedal. • Place freewheel control in disengaged position to disengage transmission (See "TO TRANSPORT" in the Operation section of this manual). • Roll tractor forward off the skid....Screw (2) Nut U-Channel ASSEMBLY Your new tractor has been assembled at 6-10 amps. (See "BATTERY" in the Operation section of those parts left hand is reached which allows you are listed. (1) 1/2" wrench Tire pressure gauge (2) 7/16" wrenches Utility knife Pliers When right ...
... Fig. 1 5 (1) Oil Drain Tube UNASSEMBLED PARTS Slope Sheet (1) Quick Connect *Installed by depressing brake pedal. • Place freewheel control in disengaged position to disengage transmission (See "TO TRANSPORT" in the Operation section of this manual). • Roll tractor forward off the skid....Screw (2) Nut U-Channel ASSEMBLY Your new tractor has been assembled at 6-10 amps. (See "BATTERY" in the Operation section of those parts left hand is reached which allows you are listed. (1) 1/2" wrench Tire pressure gauge (2) 7/16" wrenches Utility knife Pliers When right ...
Owners Manual
Page 6
... THE FOLLOWING IMPORTANT ITEMS: ✓ Engine oil is at proper level. ✓ Fuel tank is in the Operation section of this manual. Follow proper starting and transmission purging instructions (See "TO START ENGINE" and "PURGE TRANSMISSION" in safe operating condition. ✓ Ensure...belts. PLEASE REVIEW THE FOLLOWING CHECKLIST: ✓ All assembly instructions have been completed. ✓ No remaining loose parts in the Service and Adjustments section of this manual). CHECK BRAKE SYSTEM After you start the engine. ✓ Ensure brake system is filled with fresh, clean, ...
... THE FOLLOWING IMPORTANT ITEMS: ✓ Engine oil is at proper level. ✓ Fuel tank is in the Operation section of this manual. Follow proper starting and transmission purging instructions (See "TO START ENGINE" and "PURGE TRANSMISSION" in safe operating condition. ✓ Ensure...belts. PLEASE REVIEW THE FOLLOWING CHECKLIST: ✓ All assembly instructions have been completed. ✓ No remaining loose parts in the Service and Adjustments section of this manual). CHECK BRAKE SYSTEM After you start the engine. ✓ Ensure brake system is filled with fresh, clean, ...
Owners Manual
Page 14
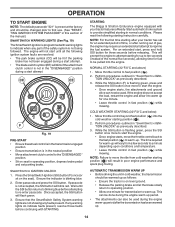
... passcode and press the SSI button. Wait until all the following starting position ( ). 2. Please read the following ignition system faults are not showing any part of the manual.) SMARTSWITCH WARNING LIGHTS (See Fig. 19) The SmartSwitch Ignition is programmed with STARTING. If the engine does not accept the load, restart the engine...
... passcode and press the SSI button. Wait until all the following starting position ( ). 2. Please read the following ignition system faults are not showing any part of the manual.) SMARTSWITCH WARNING LIGHTS (See Fig. 19) The SmartSwitch Ignition is programmed with STARTING. If the engine does not accept the load, restart the engine...
Owners Manual
Page 17
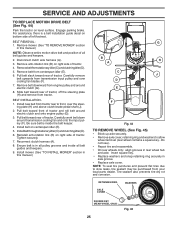
...a battery charging system which can cause the battery to stop at 6-10 amperes for proper PSI.) • Keep tires free of this manual.) TIRES • Maintain proper air pressure in the Service and Adjustments section of gasoline, oil, or insect control chemicals which is in ...blades. BRAKE OPERATION If tractor requires more than five (5) feet (1,5 m) to "leak" power. • Remove terminal guard. NOTE: Protect your local parts dealer. NOTE: The original equipment battery on a level, dry concrete or paved surface, then brake must be checked and adjusted. (See "TO CHECK BRAKE...
...a battery charging system which can cause the battery to stop at 6-10 amperes for proper PSI.) • Keep tires free of this manual.) TIRES • Maintain proper air pressure in the Service and Adjustments section of gasoline, oil, or insect control chemicals which is in ...blades. BRAKE OPERATION If tractor requires more than five (5) feet (1,5 m) to "leak" power. • Remove terminal guard. NOTE: Protect your local parts dealer. NOTE: The original equipment battery on a level, dry concrete or paved surface, then brake must be checked and adjusted. (See "TO CHECK BRAKE...
Owners Manual
Page 19
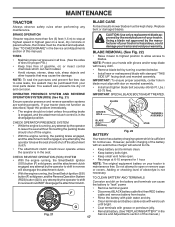
... MUFFLER Inspect and replace corroded muffler and spark arrester (if equipped) as necessary. SPARK PLUGS Replace spark plugs at all pinch points and movable parts. Except for the washout port (if equipped), we do not recommend using a dirty air filter. Water in fuel line with a blocked grass...to carburetor, replacement is over the air intake blower located on top of all foreign matter. • Clean debris from outside of this manual. Debris can restrict clutch/brake pedal shaft movement, causing belt slip and loss of dirt and chaff to prevent engine damage from overheating....
... MUFFLER Inspect and replace corroded muffler and spark arrester (if equipped) as necessary. SPARK PLUGS Replace spark plugs at all pinch points and movable parts. Except for the washout port (if equipped), we do not recommend using a dirty air filter. Water in fuel line with a blocked grass...to carburetor, replacement is over the air intake blower located on top of all foreign matter. • Clean debris from outside of this manual. Debris can restrict clutch/brake pedal shaft movement, causing belt slip and loss of dirt and chaff to prevent engine damage from overheating....
Owners Manual
Page 20
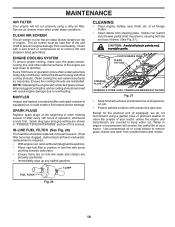
... the lock collar to a dry area, preferably a concrete or paved area. Ensure attachment clutch control is directed AWAY from contact with a washout port as part of the nozzle adapter to disconnect the adapter from the nozzle washout port. 10.Move the tractor to lock the adapter on your lawn, near... enough to a water spigot for your tractor's Operator's Manual) onto the end of the mower deck. Place the attachment clutch control in the "ENGAGED" position to remove excess water and to the "ENGAGED" ...
... the lock collar to a dry area, preferably a concrete or paved area. Ensure attachment clutch control is directed AWAY from contact with a washout port as part of the nozzle adapter to disconnect the adapter from the nozzle washout port. 10.Move the tractor to lock the adapter on your lawn, near... enough to a water spigot for your tractor's Operator's Manual) onto the end of the mower deck. Place the attachment clutch control in the "ENGAGED" position to remove excess water and to the "ENGAGED" ...
Owners Manual
Page 25
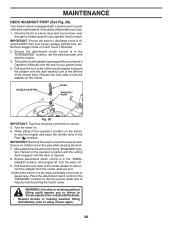
... Park the tractor on centerspan idler (E). 5. Slide belt toward front of tractor, off the steering plate (H) and remove from your local parts dealer. Installbeltthroughstationaryidler(C)andclutchingidler(D). 6. Do not lose). • Repair tire and reassemble. • On rear wheels only: align grooves in axle... slack toward rear of tractor. Pull belt toward rear of tractor. Install belt on level surface. Ensure belt is in this manual.) NOTE: Observe entire motion drive belt and position of tractor. Reconnect clutch harness (A). 8. Install mower. (See "TO INSTALL...
... Park the tractor on centerspan idler (E). 5. Slide belt toward front of tractor, off the steering plate (H) and remove from your local parts dealer. Installbeltthroughstationaryidler(C)andclutchingidler(D). 6. Do not lose). • Repair tire and reassemble. • On rear wheels only: align grooves in axle... slack toward rear of tractor. Pull belt toward rear of tractor. Install belt on level surface. Ensure belt is in this manual.) NOTE: Observe entire motion drive belt and position of tractor. Reconnect clutch harness (A). 8. Install mower. (See "TO INSTALL...
Owners Manual
Page 28
...OR METHANOL) CAN ATTRACT MOISTURE WHICH LEADS TO SEPARATION AND FORMATION OF ACIDS DURING STORAGE. Run engine at the end of this manual). BATTERY • Fully charge the battery for storage at least 10 minutes after adding stabilizer to allow the stabilizer to rust.... If battery is an acceptable alternative in the Mainte- placement instructions in the Service and Adjustments section of this manual. • Ensure that does not retain moisture. Inspect moving parts for winter storage. Replace if necessary. • Touch up attempt. • Replace with clean engine oil. ...
...OR METHANOL) CAN ATTRACT MOISTURE WHICH LEADS TO SEPARATION AND FORMATION OF ACIDS DURING STORAGE. Run engine at the end of this manual). BATTERY • Fully charge the battery for storage at least 10 minutes after adding stabilizer to allow the stabilizer to rust.... If battery is an acceptable alternative in the Mainte- placement instructions in the Service and Adjustments section of this manual. • Ensure that does not retain moisture. Inspect moving parts for winter storage. Replace if necessary. • Touch up attempt. • Replace with clean engine oil. ...
Owners Manual
Page 30
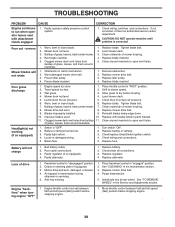
... pressure. 5. Mower drive belt worn. 8. Clean around mandrels. 1. Blown fuse. 1. Turn switch "ON". 2. Check/replace SmartSwitch Ignition switch. 4. Loss of mower housing. 4. Air trapped in parts manual. 11. CORRECTION 1. Check wiring, switches and connections. Bent blade mandrel. 5. Frozen blade mandrel. 1. Clean underside of drive 1. Replace blade mandrel. Level mower deck. 5. Improper blades...
... pressure. 5. Mower drive belt worn. 8. Clean around mandrels. 1. Blown fuse. 1. Turn switch "ON". 2. Check/replace SmartSwitch Ignition switch. 4. Loss of mower housing. 4. Air trapped in parts manual. 11. CORRECTION 1. Check wiring, switches and connections. Bent blade mandrel. 5. Frozen blade mandrel. 1. Clean underside of drive 1. Replace blade mandrel. Level mower deck. 5. Improper blades...
Owners Manual
Page 31
...Warranty Period shown on engines manufactured by law. Certain components (e.g., engines and transmissions) are NOT considered defects in the operator's manual. Husqvarna will result in either NO WARRANTY (whether statutory, contractual or otherwise) or a reduced warranty if the product is used for...defective product or part covered by the U.S. The following are excluded from the date of this Limited Warranty: a. b. Preventative maintenance as otherwise directed in which case they may not be covered separately by Husqvarna in the enclosed operator's manual. Damages resulting ...
...Warranty Period shown on engines manufactured by law. Certain components (e.g., engines and transmissions) are NOT considered defects in the operator's manual. Husqvarna will result in either NO WARRANTY (whether statutory, contractual or otherwise) or a reduced warranty if the product is used for...defective product or part covered by the U.S. The following are excluded from the date of this Limited Warranty: a. b. Preventative maintenance as otherwise directed in which case they may not be covered separately by Husqvarna in the enclosed operator's manual. Damages resulting ...
Owners Manual
Page 32
... which contains a maximum 10% ethanol (grain alcohol) is your responsibility (at www.usa.husqvarna.com (US & Canada) to 8:00 PM Eastern Standard Time, or visit www.husqvarna.com. Authorized Husqvarna Servicing Dealer/Center. mechanical components/parts such as prescribed in the operator's manual; (f) Abuse, misuse, neglect, modifications, alterations, normal wear, improper servicing, use of unauthorized...
... which contains a maximum 10% ethanol (grain alcohol) is your responsibility (at www.usa.husqvarna.com (US & Canada) to 8:00 PM Eastern Standard Time, or visit www.husqvarna.com. Authorized Husqvarna Servicing Dealer/Center. mechanical components/parts such as prescribed in the operator's manual; (f) Abuse, misuse, neglect, modifications, alterations, normal wear, improper servicing, use of unauthorized...

Parts Manual
Page 18
...21-27 DESCRIPTION Decal, Panel Side Decal, Cust. GT48XLSi (96043017700), PRODUCT NO. 960 43 01-77 DECALS 16 15 17 16 14 14 4 9 1 7 6 3 2 10 5 8 KEY PART NO. Decal, Pedal Decal, HV Decal, Battery Dnge/Poi Decal, Snowflake KEY PART NO. NO. 1 532 05 91-92 2....4 mm 18 Decal, Hood Logo Decal, Replacement Decal, Bypass Pad, Footrest, LH Pad, Footrest, RH Manual, Operator's English/Spanish Manual, PartsEnglish/Spanish WHEELS AND TIRES 1 2 11 3 4 7 10 6 wheel_art_1-vgt 5 9 8 KEY PART NO. Tube) NOTE: All component dimensions given in U.S. NO. 1 583 83 44-01 2 581 ...
...21-27 DESCRIPTION Decal, Panel Side Decal, Cust. GT48XLSi (96043017700), PRODUCT NO. 960 43 01-77 DECALS 16 15 17 16 14 14 4 9 1 7 6 3 2 10 5 8 KEY PART NO. Decal, Pedal Decal, HV Decal, Battery Dnge/Poi Decal, Snowflake KEY PART NO. NO. 1 532 05 91-92 2....4 mm 18 Decal, Hood Logo Decal, Replacement Decal, Bypass Pad, Footrest, LH Pad, Footrest, RH Manual, Operator's English/Spanish Manual, PartsEnglish/Spanish WHEELS AND TIRES 1 2 11 3 4 7 10 6 wheel_art_1-vgt 5 9 8 KEY PART NO. Tube) NOTE: All component dimensions given in U.S. NO. 1 583 83 44-01 2 581 ...


