
Owners Manual
Page 2
... slow and gradual. Manually lock ignition switch. (See "MANUALLY LOCKING THE SMARTSWITCH™ IGNITION" in the Operation section of a load, while on the machine and in a large percentage of California to cool before dismounting. Clean any oil or fuel spillage before starting , stopping, or turning on wet grass. Avoid discharging material against a wall or obstruction. I. FAILURE TO OBSERVE THE FOLLOWING SAFETY INSTRUCTIONS COULD RESULT IN...
... slow and gradual. Manually lock ignition switch. (See "MANUALLY LOCKING THE SMARTSWITCH™ IGNITION" in the Operation section of a load, while on the machine and in a large percentage of California to cool before dismounting. Clean any oil or fuel spillage before starting , stopping, or turning on wet grass. Avoid discharging material against a wall or obstruction. I. FAILURE TO OBSERVE THE FOLLOWING SAFETY INSTRUCTIONS COULD RESULT IN...
Owners Manual
Page 3
... saw them . • Check brake operation frequently. When loading or unloading this is in the mowing area for small children. Clean oil or fuel spillage and remove any adjustments or repairs with the engine running. • Check grass catcher components and the discharge chute frequently and replace with manufacturer's recommended parts, when necessary. • Mower blades are explosive. • Extinguish all nuts and bolts tight to cool before and while backing. Adjust and service...
... saw them . • Check brake operation frequently. When loading or unloading this is in the mowing area for small children. Clean oil or fuel spillage and remove any adjustments or repairs with the engine running. • Check grass catcher components and the discharge chute frequently and replace with manufacturer's recommended parts, when necessary. • Mower blades are explosive. • Extinguish all nuts and bolts tight to cool before and while backing. Adjust and service...
Owners Manual
Page 4
... give you to service or repair this manual. TABLE OF CONTENTS SAFETY RULES 2-3 PRODUCT SPECIFICATIONS 4 CUSTOMER RESPONSIBILITIES 4 ASSEMBLY 5-6 OPERATION 7-15 MAINTENANCE SCHEDULE 16 MAINTENANCE 16-20 SERVICE AND ADJUSTMENTS 21-27 STORAGE 28 TROUBLESHOOTING 29-30 WARRANTY 31-34 ESPAÑOL 36 4 CCA: Case size: 28 230 U1R 45-55 Ft. PRODUCT SPECIFICATIONS Gasoline Capacity and type: Oil Type: (API: SG-SL) Oil Capacity: Spark Plug: Charging System: Battery: Blade Bolt Torque: 4 Gallons/15...
... give you to service or repair this manual. TABLE OF CONTENTS SAFETY RULES 2-3 PRODUCT SPECIFICATIONS 4 CUSTOMER RESPONSIBILITIES 4 ASSEMBLY 5-6 OPERATION 7-15 MAINTENANCE SCHEDULE 16 MAINTENANCE 16-20 SERVICE AND ADJUSTMENTS 21-27 STORAGE 28 TROUBLESHOOTING 29-30 WARRANTY 31-34 ESPAÑOL 36 4 CCA: Case size: 28 230 U1R 45-55 Ft. PRODUCT SPECIFICATIONS Gasoline Capacity and type: Oil Type: (API: SG-SL) Oil Capacity: Spark Plug: Charging System: Battery: Blade Bolt Torque: 4 Gallons/15...
Owners Manual
Page 5
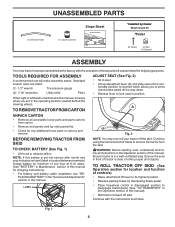
... Tire pressure gauge (2) 7/16" wrenches Utility knife Pliers When right or left hand is in the Operation section of those parts left unassembled for location and function of controls) • Raise attachment lift lever to its highest position. • Release parking brake by Dealer *Brush Guard Kit *Pedal (2) Screw (2) Nut U-Channel ASSEMBLY Your new tractor has been assembled at 6-10 amps. (See "BATTERY" in the Operation section of this manual. Continue using the instructions...
... Tire pressure gauge (2) 7/16" wrenches Utility knife Pliers When right or left hand is in the Operation section of those parts left unassembled for location and function of controls) • Raise attachment lift lever to its highest position. • Release parking brake by Dealer *Brush Guard Kit *Pedal (2) Screw (2) Nut U-Channel ASSEMBLY Your new tractor has been assembled at 6-10 amps. (See "BATTERY" in the Operation section of this manual. Continue using the instructions...
Owners Manual
Page 6
...; Check mower and drive belts. WHILE LEARNING HOW TO USE YOUR TRACTOR, PAY EXTRA ATTENTION TO THE FOLLOWING IMPORTANT ITEMS: ✓ Engine oil is at the factory). ✓ Ensure mower deck is important for replacing motion and mower blade drive belts in safe operating condition. ✓ Ensure Operator Presence System and Reverse Op- CHECK DECK LEVELNESS For best cutting results, mower housing should be properly inflated for shipping purposes. Follow proper starting and transmission purging instructions...
...; Check mower and drive belts. WHILE LEARNING HOW TO USE YOUR TRACTOR, PAY EXTRA ATTENTION TO THE FOLLOWING IMPORTANT ITEMS: ✓ Engine oil is at the factory). ✓ Ensure mower deck is important for replacing motion and mower blade drive belts in safe operating condition. ✓ Ensure Operator Presence System and Reverse Op- CHECK DECK LEVELNESS For best cutting results, mower housing should be properly inflated for shipping purposes. Follow proper starting and transmission purging instructions...
Owners Manual
Page 11
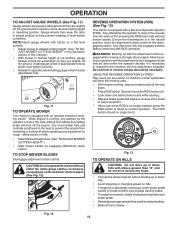
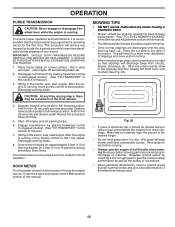
... for opposite side installing gauge wheel in same adjustment hole. 9/16" 3/4" Fig. 11 TO OPERATE MOWER Your tractor is running , depress brake pedal all turns slowly. Ensure the transmission is in the neutral position, move the attachment clutch control to the disengaged position, and then back into the engaged position before and while backing. • Release brake pedal and depress reverse drive pedal to start movement. • When use if you...
... for opposite side installing gauge wheel in same adjustment hole. 9/16" 3/4" Fig. 11 TO OPERATE MOWER Your tractor is running , depress brake pedal all turns slowly. Ensure the transmission is in the neutral position, move the attachment clutch control to the disengaged position, and then back into the engaged position before and while backing. • Release brake pedal and depress reverse drive pedal to start movement. • When use if you...
Owners Manual
Page 13
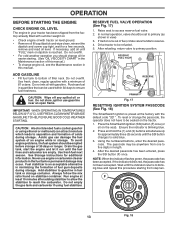
...) 3. Drain the gas tank, start the engine and let it run until the indicator returns to blinking blue and repeat this procedure starting . (See "OIL VISCOSITY CHART" in the Maintenance section of an engine while in length. 4. Never use gasoline near an open flame. Run engine at the factory with gasoline. In normal operation, valve should be seated on level ground. • Remove oil fill cap/dipstick and wipe clean...
...) 3. Drain the gas tank, start the engine and let it run until the indicator returns to blinking blue and repeat this procedure starting . (See "OIL VISCOSITY CHART" in the Maintenance section of an engine while in length. 4. Never use gasoline near an open flame. Run engine at the factory with gasoline. In normal operation, valve should be seated on level ground. • Remove oil fill cap/dipstick and wipe clean...
Owners Manual
Page 14
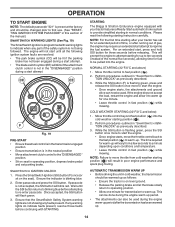
... your tractor features a Ready-Start automatic choke system to move the throttle control back to the fast position ( ) to start attempt. • The blade switch symbol (EE) will be lit if the parking brake has not been engaged during a start the engine. • Once engine starts, the attachments and ground drive can also be used . CC EE F Fig. 19 PRE-START • Ensure freewheel control is in the transmission engaged position...
... your tractor features a Ready-Start automatic choke system to move the throttle control back to the fast position ( ) to start attempt. • The blade switch symbol (EE) will be lit if the parking brake has not been engaged during a start the engine. • Once engine starts, the attachments and ground drive can also be used . CC EE F Fig. 19 PRE-START • Ensure freewheel control is in the transmission engaged position...
Owners Manual
Page 15
... tractor seat, start engine. After the engine is running . Repeat this procedure three (3) times. 5. To service engine and mower, see the Maintenance section of the tractor. Have the cut desired. • When operating attachments, select a ground speed that the transmission be purged before mowing. • Always operate engine at full throttle when mowing to slow position. This will remove any time, during shipping of manual.) 7. Place tractor safely on a level surface - that has been cut relatively high...
... tractor seat, start engine. After the engine is running . Repeat this procedure three (3) times. 5. To service engine and mower, see the Maintenance section of the tractor. Have the cut desired. • When operating attachments, select a ground speed that the transmission be purged before mowing. • Always operate engine at full throttle when mowing to slow position. This will remove any time, during shipping of manual.) 7. Place tractor safely on a level surface - that has been cut relatively high...
Owners Manual
Page 16
... GEAR TEETH ➀ FRONT WHEEL BEARING ZERK ➁ ENGINE ➀ MANDREL ZERKS BEFORE EACH USE • Check engine oil level. 02501 • Check brake operation. • Check tire pressure. • Check operator presence and ROS systems for proper operation. • Check for loose fasteners. ➀ General Purpose Grease ➁ Refer to see if you should replace the spark plug, clean or replace air filter, and check blades and belts for Loose Fasteners C Check/Replace Mower Blades 3 T Lubrication Chart 0 Check Battery Level 4 R Clean Battery and Terminals Clean...
... GEAR TEETH ➀ FRONT WHEEL BEARING ZERK ➁ ENGINE ➀ MANDREL ZERKS BEFORE EACH USE • Check engine oil level. 02501 • Check brake operation. • Check tire pressure. • Check operator presence and ROS systems for proper operation. • Check for loose fasteners. ➀ General Purpose Grease ➁ Refer to see if you should replace the spark plug, clean or replace air filter, and check blades and belts for Loose Fasteners C Check/Replace Mower Blades 3 T Lubrication Chart 0 Check Battery Level 4 R Clean Battery and Terminals Clean...
Owners Manual
Page 17
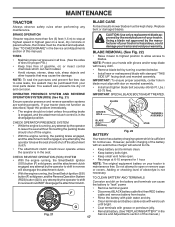
... manual.) TIRES • Maintain proper air pressure in the disengaged position. F • Disconnect BLACK battery cable first then RED battery cable and remove battery from your tractor. BLADE CARE For best results mower blades must be checked and adjusted. (See "TO CHECK BRAKE" in the Service and Adjustments section of this manual.) 17 Tire sealant also prevents tire dry rot and corrosion. Fig. 21 • Reinstall battery. (See "REPLACING BATTERY" in highest gear on the battery...
... manual.) TIRES • Maintain proper air pressure in the disengaged position. F • Disconnect BLACK battery cable first then RED battery cable and remove battery from your tractor. BLADE CARE For best results mower blades must be checked and adjusted. (See "TO CHECK BRAKE" in the Service and Adjustments section of this manual.) 17 Tire sealant also prevents tire dry rot and corrosion. Fig. 21 • Reinstall battery. (See "REPLACING BATTERY" in highest gear on the battery...
Owners Manual
Page 18
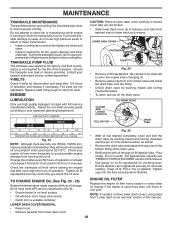
... a year if the tractor is hot. V-BELTS Check V-belts for dirt, grass clippings and other oil change . The belts are not broken. • Slide lower dash cover up to enter the engine when changing oil. • Remove yellow cap from running or while the transmission is not used above 32°F/0°C. ENGINE LUBRICATION Only use compressed air or high pressure sprayer to ensure proper cooling. OIL DRAIN VALVE CLOSED AND LOCKED POSITION YELLOW CAP 02463 DRAIN TUBE F -20...
... a year if the tractor is hot. V-BELTS Check V-belts for dirt, grass clippings and other oil change . The belts are not broken. • Slide lower dash cover up to enter the engine when changing oil. • Remove yellow cap from running or while the transmission is not used above 32°F/0°C. ENGINE LUBRICATION Only use compressed air or high pressure sprayer to ensure proper cooling. OIL DRAIN VALVE CLOSED AND LOCKED POSITION YELLOW CAP 02463 DRAIN TUBE F -20...
Owners Manual
Page 19
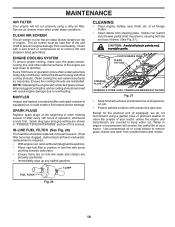
... replace corroded muffler and spark arrester (if equipped) as necessary. IN-LINE FUEL FILTER (See Fig. 26) The fuel filter should be kept free of dirt and chaff to remove grass, leaves and trash from overheating. CLAMP CLEANING • Clean engine, battery, seat, finish, etc. of all pinch points and movable parts. CLEAN AIR SCREEN The air screen is required. • With engine cool, remove filter and plug fuel line sections. • Place new fuel filter in position in fuel line with automotive type...
... replace corroded muffler and spark arrester (if equipped) as necessary. IN-LINE FUEL FILTER (See Fig. 26) The fuel filter should be kept free of dirt and chaff to remove grass, leaves and trash from overheating. CLAMP CLEANING • Clean engine, battery, seat, finish, etc. of all pinch points and movable parts. CLEAN AIR SCREEN The air screen is required. • With engine cool, remove filter and plug fuel line sections. • Place new fuel filter in position in fuel line with automotive type...

Owners Manual
Page 21
... SERVICE OR ADJUSTMENTS: • Depress brake pedal fully and set parking brake. • Place attachment clutch in "DISENGAGED" position. • Shut engine off and lock the SmartSwitch Ignition. • Make sure the blades and all moving parts have completely stopped. • Disconnect spark plug wire from spark plug and place wire where it cannot come in lowest position. remove retainer springs and washers. • Go to its lowest position. • Remove mower belt from electric clutch pulley (M). CAUTION: Lift lever...
... SERVICE OR ADJUSTMENTS: • Depress brake pedal fully and set parking brake. • Place attachment clutch in "DISENGAGED" position. • Shut engine off and lock the SmartSwitch Ignition. • Make sure the blades and all moving parts have completely stopped. • Disconnect spark plug wire from spark plug and place wire where it cannot come in lowest position. remove retainer springs and washers. • Go to its lowest position. • Remove mower belt from electric clutch pulley (M). CAUTION: Lift lever...
Owners Manual
Page 22
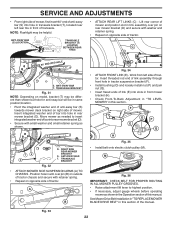
..., adjust gauge wheels before operating mower as shown. ANTI-SWAY BAR T. Work from left rear tire in the Operation section of this manual. Fig. 33 22 ANTI-SWAY BAR T. TS D D. RIGHT SIDE REAR MOWER BRACKET S. F O P E Q H Fig. 35 • Install belt onto electric clutch pulley (M). ANTI-SWAY BAR (S) LOCATION TRANSAXLE BRACKET (T) LOCATED BETWEEN REAR TIRES • ATTACH REAR LIFT LINKS (C) - Lift rear corner of mower and position slot in arm over pin on...
..., adjust gauge wheels before operating mower as shown. ANTI-SWAY BAR T. Work from left rear tire in the Operation section of this manual. Fig. 33 22 ANTI-SWAY BAR T. TS D D. RIGHT SIDE REAR MOWER BRACKET S. F O P E Q H Fig. 35 • Install belt onto electric clutch pulley (M). ANTI-SWAY BAR (S) LOCATION TRANSAXLE BRACKET (T) LOCATED BETWEEN REAR TIRES • ATTACH REAR LIFT LINKS (C) - Lift rear corner of mower and position slot in arm over pin on...
Owners Manual
Page 24
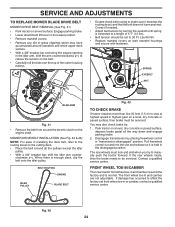
... wheel toe-in "transmission disengaged" position. Park tractor on a level surface. Contact a qualified service center. Fig. 42 24 SERVICE AND ADJUSTMENTS TO REPLACE MOWER BLADE DRIVE BELT MOWER DRIVE BELT REMOVAL (See Fig. 41) • Park tractor on a level, dry concrete or paved surface, depress brake pedal all the pulleys except the idler pulley. • With a 3/8" breaker bar, shift the idler arm counter- SPRING EYEBOLT NUT IDLER ARM Fig. 41 • Remove the belt from around the electric clutch...
... wheel toe-in "transmission disengaged" position. Park tractor on a level surface. Contact a qualified service center. Fig. 42 24 SERVICE AND ADJUSTMENTS TO REPLACE MOWER BLADE DRIVE BELT MOWER DRIVE BELT REMOVAL (See Fig. 41) • Park tractor on a level, dry concrete or paved surface, depress brake pedal all the pulleys except the idler pulley. • With a 3/8" breaker bar, shift the idler arm counter- SPRING EYEBOLT NUT IDLER ARM Fig. 41 • Remove the belt from around the electric clutch...
Owners Manual
Page 28
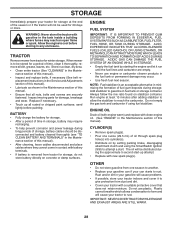
... the fuel tank by setting parking brake, disengaging attachment clutch and using fuel stabilizer. Always follow the mix ratio found on concrete or damp surfaces. CYLINDER(S) • Remove spark plug(s). • Pour one ounce (29.5 mL) of time, clean it to give protection from one season to another. • Replace your gasoline can starts to rust. Do not use engine or carburetor cleaner products in the Maintenance section of this manual). •...
... the fuel tank by setting parking brake, disengaging attachment clutch and using fuel stabilizer. Always follow the mix ratio found on concrete or damp surfaces. CYLINDER(S) • Remove spark plug(s). • Pour one ounce (29.5 mL) of time, clean it to give protection from one season to another. • Replace your gasoline can starts to rust. Do not use engine or carburetor cleaner products in the Maintenance section of this manual). •...
Owners Manual
Page 30
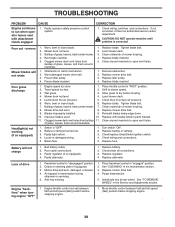
.... 5. Install axle key at rear wheel. Buildup of grass, leaves, trash around mandrels to open vent holes. Clean underside of drive 1. Wet grass. 3. Bulb(s) or lamp(s) burned out. 3. Replace fuse. Loss of mower housing. 4. Air trapped in "engaged" position. 2. Replace motion drive belt. 4. TROUBLESHOOTING PROBLEM CAUSE Engine continues to run when operator leaves seat with blades listed in "disengaged" position. 2. Faulty operator-safety presence control system. Check wiring, switches and connections. Poor cut - Mower deck not level...
.... 5. Install axle key at rear wheel. Buildup of grass, leaves, trash around mandrels to open vent holes. Clean underside of drive 1. Wet grass. 3. Bulb(s) or lamp(s) burned out. 3. Replace fuse. Loss of mower housing. 4. Air trapped in "engaged" position. 2. Replace motion drive belt. 4. TROUBLESHOOTING PROBLEM CAUSE Engine continues to run when operator leaves seat with blades listed in "disengaged" position. 2. Faulty operator-safety presence control system. Check wiring, switches and connections. Poor cut - Mower deck not level...
Owners Manual
Page 31
... the operator's manual. Husqvarna is either No Warranty or a Shortened Warranty Period. All such claims must cease using original OEM Husqvarna replacement parts, subject to the original retail purchaser that resulting from normal aging, wear and tear or neglect are not covered by this Limited Warranty: a. This Limited Warranty does not cover general maintenance parts and items ("Expendable Parts"), including without limitation spark plugs, bulbs, filters, lubricants, starter cords, belts, blades, and blade adapters. (d) Emissions Control...
... the operator's manual. Husqvarna is either No Warranty or a Shortened Warranty Period. All such claims must cease using original OEM Husqvarna replacement parts, subject to the original retail purchaser that resulting from normal aging, wear and tear or neglect are not covered by this Limited Warranty: a. This Limited Warranty does not cover general maintenance parts and items ("Expendable Parts"), including without limitation spark plugs, bulbs, filters, lubricants, starter cords, belts, blades, and blade adapters. (d) Emissions Control...
Owners Manual
Page 32
... housings, bearings, blades, rods, height adjusters, caster/anti scalp wheels etc... Reinforced Stamped (Armor Protected) 10 Year Limited & Fabricated Limited Lifetime, Deck Warranties. mechanical components/parts such as prescribed in the operator's manual; (f) Abuse, misuse, neglect, modifications, alterations, normal wear, improper servicing, use of unauthorized attachments, Lack of lubrication or engine failure, due to the use of purchase (including date, product model and, if applicable, engine serial number...
... housings, bearings, blades, rods, height adjusters, caster/anti scalp wheels etc... Reinforced Stamped (Armor Protected) 10 Year Limited & Fabricated Limited Lifetime, Deck Warranties. mechanical components/parts such as prescribed in the operator's manual; (f) Abuse, misuse, neglect, modifications, alterations, normal wear, improper servicing, use of unauthorized attachments, Lack of lubrication or engine failure, due to the use of purchase (including date, product model and, if applicable, engine serial number...


