
Installation Guide
Page 1
... meets all national and local standards and ANSI/ NFPA 70. Fan Support System o Fan attaches directly to your ceiling fan site. Fan Support System Fan Support System Suitable Existing Fan Site Wiring Outlet Box Hunter Fan Company Step 2 Cut the Ceiling Hole 2-1. o Fan support system will hold full weight of the fan. You have no larger than the minor diameter of the...
... meets all national and local standards and ANSI/ NFPA 70. Fan Support System o Fan attaches directly to your ceiling fan site. Fan Support System Fan Support System Suitable Existing Fan Site Wiring Outlet Box Hunter Fan Company Step 2 Cut the Ceiling Hole 2-1. o Fan support system will hold full weight of the fan. You have no larger than the minor diameter of the...
Owner's Manual
Page 2
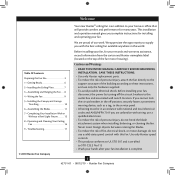
... wall switch location. We appreciate the opportunity to supply you complete instructions for your fan installation is complete. © 2010 Hunter Fan Company 2 42751-01 • 08/12/10 • Hunter Fan Company Welcome Your new Hunter® ceiling fan is an addition to your fan, disconnect the power by turning off position, securely fasten a prominent warning device, such...
... wall switch location. We appreciate the opportunity to supply you complete instructions for your fan installation is complete. © 2010 Hunter Fan Company 2 42751-01 • 08/12/10 • Hunter Fan Company Welcome Your new Hunter® ceiling fan is an addition to your fan, disconnect the power by turning off position, securely fasten a prominent warning device, such...
Owner's Manual
Page 3
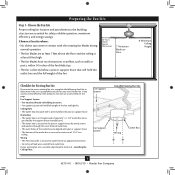
...the joist or support brace. Choose the Fan Site Proper ceiling fan location and attachment to the building structure are essential for Existing Fan Site If you cannot check off every item, prepare a new fan site as specified by the support brace ...Ceiling Hole • e outlet box clearance hole is suitable, skip ahead to outlet box by an approved connector. • Six inches of the fan and light kit. Preparing the Fan Site Step 1 - Fan Support System Fan Support System Suitable Existing Fan Site Wiring Outlet Box 3 42751-01 • 08/12/10 • Hunter Fan...
...the joist or support brace. Choose the Fan Site Proper ceiling fan location and attachment to the building structure are essential for Existing Fan Site If you cannot check off every item, prepare a new fan site as specified by the support brace ...Ceiling Hole • e outlet box clearance hole is suitable, skip ahead to outlet box by an approved connector. • Six inches of the fan and light kit. Preparing the Fan Site Step 1 - Fan Support System Fan Support System Suitable Existing Fan Site Wiring Outlet Box 3 42751-01 • 08/12/10 • Hunter Fan...
Owner's Manual
Page 4
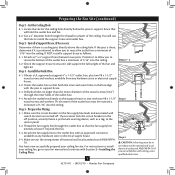
... • 08/12/10 • Hunter Fan Company Attach a 2" x 4" support brace between two joists. Step 5 CAUTION: All wiring must be in the box align with national and local electrical codes and ANSI/NFPA 70. You will hold the outlet box and fan. 2-2. Locate the site for the ceiling hole directly below the joist or...
... • 08/12/10 • Hunter Fan Company Attach a 2" x 4" support brace between two joists. Step 5 CAUTION: All wiring must be in the box align with national and local electrical codes and ANSI/NFPA 70. You will hold the outlet box and fan. 2-2. Locate the site for the ceiling hole directly below the joist or...
Owner's Manual
Page 5
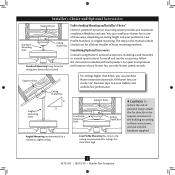
... to the support structure of three ways, depending on ceiling height and your Hunter fan, use only Hunter speed controls. Installer's Choice and Optional Accessories Support Brace Standard Mounting Style Ceiling Outlet Box Standard Mounting hangs from the ceiling by a downrod (included). All Hunter fans use sturdy 3/4" diameter pipe to these instructions, and use the accessories, follow the...
... to the support structure of three ways, depending on ceiling height and your Hunter fan, use only Hunter speed controls. Installer's Choice and Optional Accessories Support Brace Standard Mounting Style Ceiling Outlet Box Standard Mounting hangs from the ceiling by a downrod (included). All Hunter fans use sturdy 3/4" diameter pipe to these instructions, and use the accessories, follow the...
Owner's Manual
Page 6
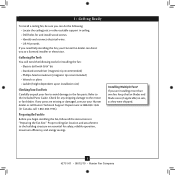
... • Hunter Fan Company If you need the following : • Locate the ceiling joist or other suitable support in "Preparing the Fan Site." Installing Multiple Fans? If you begin installing the fan, follow all the instructions in ceiling. • Drill holes for safety, reliable operation, maximum efficiency, and energy savings. 1 • Getting Ready To install a ceiling fan, be sure...
... • Hunter Fan Company If you need the following : • Locate the ceiling joist or other suitable support in "Preparing the Fan Site." Installing Multiple Fans? If you begin installing the fan, follow all the instructions in ceiling. • Drill holes for safety, reliable operation, maximum efficiency, and energy savings. 1 • Getting Ready To install a ceiling fan, be sure...
Owner's Manual
Page 7
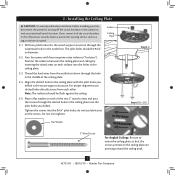
... you drilled in the off the circuit breakers to orient the ceiling plate so that the arrows printed on the ceiling plate are pointing toward the ceiling peak. 7 42751-01 • 08/12/10 • Hunter Fan Company Position the isolators between the ceiling plate and ceiling by turning off position, securely fasten a prominent warning device, such...
... you drilled in the off the circuit breakers to orient the ceiling plate so that the arrows printed on the ceiling plate are pointing toward the ceiling peak. 7 42751-01 • 08/12/10 • Hunter Fan Company Position the isolators between the ceiling plate and ceiling by turning off position, securely fasten a prominent warning device, such...
Owner's Manual
Page 8
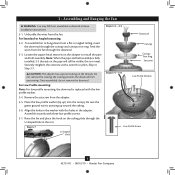
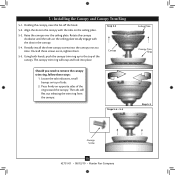
.... 3-1. Unbundle the wires from the adapter. 3-5. For Standard or Angled mounting: 3-2. Place the low profile washer (lip up toward the ceiling. 3-6. Raise the fan and place the hook on the pipe will still be visible; Step 3-7 U-shaped Hole Steps 3-2 - 3-3 Downrod Canopy Canopy Trim Ring ...Setscrew Steps 3-5 - 3-6 Low Profile Washer Low Profile Screw 8 42751-01 • 08/12/10 • Hunter Fan Company Assemble securely with a wrench or pliers. To assemble fan to Step 3-7. Note: When the pipe and ball assembly is pointing up ) into the canopy. Remove the setscrew ...
.... 3-1. Unbundle the wires from the adapter. 3-5. For Standard or Angled mounting: 3-2. Place the low profile washer (lip up toward the ceiling. 3-6. Raise the fan and place the hook on the pipe will still be visible; Step 3-7 U-shaped Hole Steps 3-2 - 3-3 Downrod Canopy Canopy Trim Ring ...Setscrew Steps 3-5 - 3-6 Low Profile Washer Low Profile Screw 8 42751-01 • 08/12/10 • Hunter Fan Company Assemble securely with a wrench or pliers. To assemble fan to Step 3-7. Note: When the pipe and ball assembly is pointing up ) into the canopy. Remove the setscrew ...
Owner's Manual
Page 9
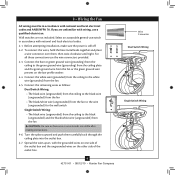
... the green ground wire (grounding) from the ceiling plate and the green ground wire from the fan or the green ground wire present on the other side of the outlet box. 9 42751-01 • 08/12/10 • Hunter Fan Company Wire Connector Dual Switch Wiring Single Switch ...Wiring Wall switches are visible after making connections. 4-6. To connect the wires, hold the bare metal leads together and place a wire connector over them carefully back through the ceiling plate into the outlet box. 4-7....
... the green ground wire (grounding) from the ceiling plate and the green ground wire from the fan or the green ground wire present on the other side of the outlet box. 9 42751-01 • 08/12/10 • Hunter Fan Company Wire Connector Dual Switch Wiring Single Switch ...Wiring Wall switches are visible after making connections. 4-6. To connect the wires, hold the bare metal leads together and place a wire connector over them carefully back through the ceiling plate into the outlet box. 4-7....
Owner's Manual
Page 10
... Align the slots in the canopy with the slots in , tighten them. 5-5. Steps 5-4 - 5-5 Ceiling Plate Canopy Trim Ring Step 5-3 Canopy Screw 10 42751-01 • 08/12/10 • Hunter Fan Company Rotate the canopy clockwise until the tabs on top of the ring toward the canopy. Partially install...the three canopy screws into place. Holding the canopy, raise the fan off the hook. 5-2. The canopy trim ring will flex out releasing the trim ring from the canopy. Locate the tab indicators, small bumps on the ceiling plate totally engage with the tabs on opposite sides of tabs....
... Align the slots in the canopy with the slots in , tighten them. 5-5. Steps 5-4 - 5-5 Ceiling Plate Canopy Trim Ring Step 5-3 Canopy Screw 10 42751-01 • 08/12/10 • Hunter Fan Company Rotate the canopy clockwise until the tabs on top of the ring toward the canopy. Partially install...the three canopy screws into place. Holding the canopy, raise the fan off the hook. 5-2. The canopy trim ring will flex out releasing the trim ring from the canopy. Locate the tab indicators, small bumps on the ceiling plate totally engage with the tabs on opposite sides of tabs....
Owner's Manual
Page 13
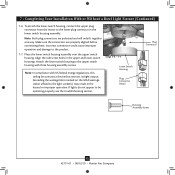
...wattage sticker affixed to the product. 7-7. Attach the lower switch housing to the upper switch housing with US federal energy regulations, this ceiling fan contains a device that restricts its light output. Note: In compliance with three housing assembly screws. Steps 7-6 - 7-7 Lower Switch ...Housing Plug Connector Detail Plug Connector Housing Assembly Screw 13 42751-01 • 08/12/10 • Hunter Fan Company Incorrect connection could cause improper operation and damage to the light socket(s) may result in fire hazard or improper operation. 7 •...
...wattage sticker affixed to the product. 7-7. Attach the lower switch housing to the upper switch housing with US federal energy regulations, this ceiling fan contains a device that restricts its light output. Note: In compliance with three housing assembly screws. Steps 7-6 - 7-7 Lower Switch ...Housing Plug Connector Detail Plug Connector Housing Assembly Screw 13 42751-01 • 08/12/10 • Hunter Fan Company Incorrect connection could cause improper operation and damage to the light socket(s) may result in fire hazard or improper operation. 7 •...
Owner's Manual
Page 16
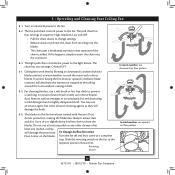
... cleaning finishes, use upward air flow pattern 16 42751-01 • 08/12/10 • Hunter Fan Company Restart fan. The light pull chain controls the power to the opposite position. Ceiling fans work best by blowing air downward (counterclockwise blade rotation) in sequence: High, Medium, Low and Off. • Pull the chain slowly to...
... cleaning finishes, use upward air flow pattern 16 42751-01 • 08/12/10 • Hunter Fan Company Restart fan. The light pull chain controls the power to the opposite position. Ceiling fans work best by blowing air downward (counterclockwise blade rotation) in sequence: High, Medium, Low and Off. • Pull the chain slowly to...
Parts Guide
Page 1
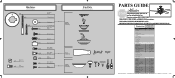
...parts are included in the box. Parts List Item Name Hanging System Kit Ceiling Plate Canopy Canopy Trim Ring Hanger Ball / Downrod Assembly Setscrew Low Profile ... / Bulb Model # Asm. REFER TO THE INSTALLATION MANUAL FOR FULL ASSEMBLY INSTRUCTIONS. Dwg. # Finish Qnty 1 20552 97531-01 Cocoa Part # 94945-67 1 G0474-05 1 76201-05 1 G0761-32 1 G0656-67 1 97231...85188-01 1 66075-01 1 65798-01 1 08200-01 1 08198-01 1 73853-01 1 73854-01 2 77646-04 Hunter Fan Company • 7130 Goodlett Farms Pkwy. #400 • Memphis, TN 38016 • www.hunterfan.com • 98000...
...parts are included in the box. Parts List Item Name Hanging System Kit Ceiling Plate Canopy Canopy Trim Ring Hanger Ball / Downrod Assembly Setscrew Low Profile ... / Bulb Model # Asm. REFER TO THE INSTALLATION MANUAL FOR FULL ASSEMBLY INSTRUCTIONS. Dwg. # Finish Qnty 1 20552 97531-01 Cocoa Part # 94945-67 1 G0474-05 1 76201-05 1 G0761-32 1 G0656-67 1 97231...85188-01 1 66075-01 1 65798-01 1 08200-01 1 08198-01 1 73853-01 1 73854-01 2 77646-04 Hunter Fan Company • 7130 Goodlett Farms Pkwy. #400 • Memphis, TN 38016 • www.hunterfan.com • 98000...


