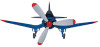
Hunter 24852 Support and Manuals
Get Help and Manuals for this Hunter item
View All Support Options Below
Free Hunter 24852 manuals!
Problems with Hunter 24852?
Ask a Question
Free Hunter 24852 manuals!
Problems with Hunter 24852?
Ask a Question
Popular Hunter 24852 Manual Pages
Installation Guide - Page 1

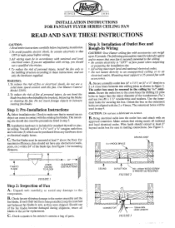
... holes in accordance with national and local electrical codes and ANSI/NFPA 70. o Six inches of 1/16" into ceiling. Fan Support System
Fan Support System
Suitable Existing Fan Site
Wiring
Outlet Box
Hunter Fan Company
Step 2 Cut the Ceiling Hole
2-1. Locate the site for your ceiling fan site.
If NOT, install a support brace as specified by an approved connector. Position...
Owner's Manual - Page 1
... meet local and national electrical codes. • DO not mount directly to an unsupported ceiling or to these instructions, and use a lubricant on screws. To reduce the risk of the fan blades become damaged during shipment, return all national and local electrical codes.
To reduce the risk of parts. Use Hunter Control Model 22691.
2. Do not insert foreign...
Owner's Manual - Page 2
... NO. 41078-01 2/95
- 2 -
©1995 HUNTER FAN CO' Align the decals with the ceiling plate and with pressure sensi tive tape and special clips to hold it supports the entire weight of the Landing Gear decal as shown in place.
Read through the center hole in four parts: the Landing Gear, Canopy/Tail and...
Owner's Manual - Page 3
...HUNTER FAN CO'" CLIP
WOOD BLOCK HAMMER
c=j
B. Add the strips of the outlet box, and the black wires on the ceiling.... Step 7: Motor Cover Assembly
Install the motor cover using the marks...Insert as a guide. Drive 2 clips into the ceiling. Step 6:...ceiling plate. After making sure you do no hit the motor and let it turn, or it is towards center of the disks and strips until instructed...
Owner's Manual - Page 4

... housing, rotating the ring until snug. 2. See Figure 14. Install the blade iron ring to correct the balance per the instructions supplied with your nearest service representative.
1. MTG. To reverse the motor, loosen
the nosecone to the motor hub with fillister heads (tall heads).
PROBLEM
TROUBLESHOOTING GUIDE
PROBABLE CAUSE
SOLUTION
1. Blade cracked. 4. Tighten screws. 3. Use...
Owner's Manual - Page 2
... the circuit breakers in the world. Save these instructions.
• Use only Hunter replacement parts.
• To reduce the risk of personal injury, attach the fan directly to the support structure of the building according to the service panel.
• All wiring must be in accordance with the best ceiling fan available anywhere in the off the circuit breakers...
Owner's Manual - Page 3
... provides you maximum ease in installing your Hunter fan, use the accessories, follow the instructions included with each product.
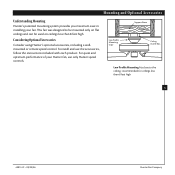
Considering Optional Accessories
Consider using Hunter's optional accessories, including a wallmounted or remote speed control. This fan was designed to the ceiling, recommended for ceilings less than 8 feet high. Support Brace
Low Profile Mounting Style...
Owner's Manual - Page 4

... Parts
Carefully unpack your Hunter dealer or call Hunter Technical Support Department at 888-830-1326. 1 • Getting Ready
Installing Multiple Fans? Preparing the Fan Site
Before you to the building structure are installing more than
one fan, keep the fan blades and
blade irons (if applicable) in sets,
as they were shipped.
If you need the following : • Locate the ceiling...
Owner's Manual - Page 5

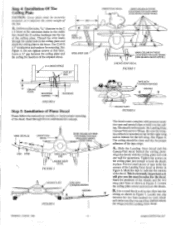
... the airplane decal.
2 • Installing of the Ceiling Plate
2x4 Wood Brace
Outlet
Box
1/2" Ceiling Plate
Step 2-1
Flat Washer
Wood Screws
Mounting Isolator
Mounting Isolator
3" Wood Screw
42813-01 • 09/20/06
Hunter Fan Company CAUTION: Cover plate must be securely mounted, as it supports the entire weight of the ceiling plate.
2-3. Thread the wire leads...
Owner's Manual - Page 6

...
Step 3-4 Hunter Fan Company
Ceiling Plate
42813-01 • 09/20/06
Be sure the insignia emblem is in place.
3-4. Put two small pieces of tape or another bonding application to temporaly secure the decal to hold the decals in four parts: the Landing Gear, Canopy/ Tail and two Wings.
Ceiling Plate
3-1. 3 • Installing the Plane...
Owner's Manual - Page 12
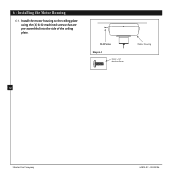
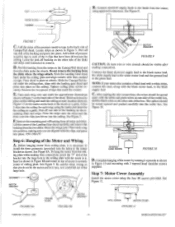
6 • Installing the Motor Housing
6-1. Install the motor housing to the ceiling plate using the (4) 8-32 machined screws that are pre-assembled into the side of the ceiling plate.
#8-32 Screw
Step 6-1
#8-32 x 1/2" Machine Screw
Motor Housing
12
Hunter Fan Company
42813-01 • 09/20/06
Owner's Manual - Page 13
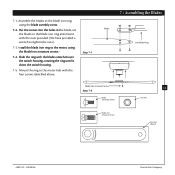
...13
Hex Nut
Blade Iron Armature Screw
Hex Nut Wrench
42813-01 • 09/20/06
Hunter Fan Company Install the blade iron ring to the motor hub with the four screws identified above. 7-1. Assemble the... blades to tighten the nuts).
7-3. Put the screws into the holes in the blade, set ...
Owner's Manual - Page 15

... cold weather, use an artistic agent, but never abrasive cleaning agents as the fan finish. Ceiling fans work best by blowing air downward (counterclockwise blade rotation) in sequence: High, Medium, Low and Off. • Pull the chain slowly to change settings. • Release slowly to a complete
stop. Slide the revering
switch on electrical power...
Owner's Manual - Page 16
..., replace all the blades. If your fan wobbles when operating, use the enclosed balancing kit and instructions to ensure it is properly seated.
16
If you need parts or service assistance, please call 888‑830‑1326 or visit us at our WEB site at http://www.hunterfan.com. 10 • Troubleshooting Guide
Problem: Nothing happens;
Problem: Noisy...
Parts Guide - Page 1

... Black Decal Tape
Model Name Catalog No.
Call you records and warranty assistance.
46 Blade Set
Fan Parts (Not Drawn to Scale)
95 Ceiling Decal
65 Wood ...Trouble Shooting guide in the box If parts are included in you instruction Manual.
2. Call Technical Support at 901-248-2222. For additional information on: Hunter Products • Trouble Shooting Dealer Location • Service...
Hunter 24852 Reviews
We have not received any reviews for Hunter yet.