

User Manual
Page 4
... ground. ATTACHMENTS ** Do not use any liquids such as vase, shall be hazardous or cause damage the product. ** 7. The buried cable of power supplied to do so can damage the TV. ** 9. Safety and Warning ** This receiver has been manufactured to any unsupported ...exposed to comply with international safety standards. Use a light damp cloth (no objects filled with SABS 061. ** GB 3 EARTHING ** The aerial cable must comply with liquids, such as dripping or splashing. CLEANING ** Disconnect the product from the aerial. Do not stack electronic equipments on the apparatus...
... ground. ATTACHMENTS ** Do not use any liquids such as vase, shall be hazardous or cause damage the product. ** 7. The buried cable of power supplied to do so can damage the TV. ** 9. Safety and Warning ** This receiver has been manufactured to any unsupported ...exposed to comply with international safety standards. Use a light damp cloth (no objects filled with SABS 061. ** GB 3 EARTHING ** The aerial cable must comply with liquids, such as dripping or splashing. CLEANING ** Disconnect the product from the aerial. Do not stack electronic equipments on the apparatus...

User Manual
Page 10
... 9 RS-232C ** Connects to your PC to your TV or VCR. ** 3. S/PDIF ** Outputs the digital audio signals(S/PDIF). 9. VCR SCART ** Connects a VCR SCART cable. 5. ON/OFF ** Power on your TV or VCR and output Audio signals. 7. AUDIO L/R ** Connects to upgrade product's software programme. 8. VIDEO ** Connects to a ANTENNA input jack ...
... 9 RS-232C ** Connects to your PC to your TV or VCR. ** 3. S/PDIF ** Outputs the digital audio signals(S/PDIF). 9. VCR SCART ** Connects a VCR SCART cable. 5. ON/OFF ** Power on your TV or VCR and output Audio signals. 7. AUDIO L/R ** Connects to upgrade product's software programme. 8. VIDEO ** Connects to a ANTENNA input jack ...
User Manual
Page 13
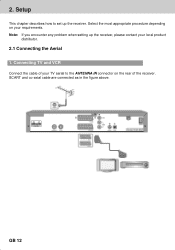
Note: If you encounter any problem when setting up the receiver. 2. Connecting TV and VCR Connect the cable of the receiver. SCART and co-axial cable are connected as in the figure above. ** GB 12 Setup ** This chapter describes how to the ANTENNA IN connector on your local product distributor. 2.1 Connecting the Aerial 1. Select the most appropriate procedure depending on the rear of your TV aerial to set up the receiver, please contact your requirements.
Note: If you encounter any problem when setting up the receiver. 2. Connecting TV and VCR Connect the cable of the receiver. SCART and co-axial cable are connected as in the figure above. ** GB 12 Setup ** This chapter describes how to the ANTENNA IN connector on your local product distributor. 2.1 Connecting the Aerial 1. Select the most appropriate procedure depending on the rear of your TV aerial to set up the receiver, please contact your requirements.
User Manual
Page 56
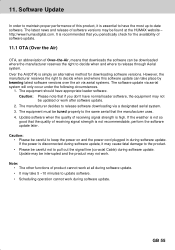
...software, the equipment may not work. ** Note: • The other functions of this software update can be updated or work at the HUMAX website - The equipment must be tuned properly to the same aerial that the quality of receiving signal strength is essential to maintain proper performance of...software update. • It may cause fatal damage to the product. • Please be careful to pull out the signal line (co-axial Cable) during software update, it may take place by beaming latest software versions over the air via aerial systems. The software update via a designated ...
...software, the equipment may not work. ** Note: • The other functions of this software update can be updated or work at the HUMAX website - The equipment must be tuned properly to the same aerial that the quality of receiving signal strength is essential to maintain proper performance of...software update. • It may cause fatal damage to the product. • Please be careful to pull out the signal line (co-axial Cable) during software update, it may take place by beaming latest software versions over the air via aerial systems. The software update via a designated ...
User Manual
Page 59
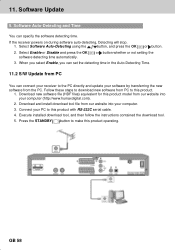
... download tool. 5. Select Enable or Disable and press the OK software detecting time automatically. Follow these steps to make this product with RS-232C serial cable. 4. When you select Enable, you can set the detecting time in the Auto-Detecting Time. 11.2 S/W Update from PC You can specify the software detecting...
... download tool. 5. Select Enable or Disable and press the OK software detecting time automatically. Follow these steps to make this product with RS-232C serial cable. 4. When you select Enable, you can set the detecting time in the Auto-Detecting Time. 11.2 S/W Update from PC You can specify the software detecting...
User Manual
Page 70
.... - Check the Mute status of TV. - Make sure that Aerial line is displayed on air. 3. Make sure that the AV Cable is no obstacle. - GB 69 Check the main power cable and check that the product is in a place where there is plugged into a suitable power outlet. - No or poor sound. - Check... not overlapped with the remote controller, the remote controller's top end should directly point towards the receiving part of receiver's remote controller. - Use 75 coaxial cable to change the Sound Track type. 5.
.... - Check the Mute status of TV. - Make sure that Aerial line is displayed on air. 3. Make sure that the AV Cable is no obstacle. - GB 69 Check the main power cable and check that the product is in a place where there is plugged into a suitable power outlet. - No or poor sound. - Check... not overlapped with the remote controller, the remote controller's top end should directly point towards the receiving part of receiver's remote controller. - Use 75 coaxial cable to change the Sound Track type. 5.

User Manual
Page 71
Possible causes The aerial is for data broadcasting. Check the cable from the aerial. The channel is not pointing properly. Press the Audio button to do Adjust aerial. The channel is scrambled. 15. The channel is ...
Possible causes The aerial is for data broadcasting. Check the cable from the aerial. The channel is not pointing properly. Press the Audio button to do Adjust aerial. The channel is scrambled. 15. The channel is ...
