
User Manual
Page 2
Please read this user's manual carefully to be copied, used or translated in part or whole without HUMAX's prior consent in writing except approval of ownership of copyright and copyright law. ** Warranty This warranty does not cover parts which ...of Irdeto Access B.V. Keep this manual. ** Trademarks Irdeto is subject to change without notice. ** Copyright (Copyright © 2009 HUMAX Corporation) Not to be able to your product for purchasing a HUMAX product. The information in this user's manual next to safely install, use and maintain the product at maximum performance. ** Thank...
Please read this user's manual carefully to be copied, used or translated in part or whole without HUMAX's prior consent in writing except approval of ownership of copyright and copyright law. ** Warranty This warranty does not cover parts which ...of Irdeto Access B.V. Keep this manual. ** Trademarks Irdeto is subject to change without notice. ** Copyright (Copyright © 2009 HUMAX Corporation) Not to be able to your product for purchasing a HUMAX product. The information in this user's manual next to safely install, use and maintain the product at maximum performance. ** Thank...
User Manual
Page 3
This will prevent possible harm to the environment or human health from uncontrolled waste disposal. ** Domestic users: Please contact either the retailer where you purchased this product or their local government office for details of where and how they can take this from other household wastes at the end of its working life. This product should not be mixed with other types of wastes and recycle it responsibly to promote the sustainable reuse of material resources. This symbol indicates important instructions accompanying the product. ** Instruction about the 'WEEE' Symbol ...
This will prevent possible harm to the environment or human health from uncontrolled waste disposal. ** Domestic users: Please contact either the retailer where you purchased this product or their local government office for details of where and how they can take this from other household wastes at the end of its working life. This product should not be mixed with other types of wastes and recycle it responsibly to promote the sustainable reuse of material resources. This symbol indicates important instructions accompanying the product. ** Instruction about the 'WEEE' Symbol ...
User Manual
Page 4
MAINS SUPPLY 90-250V AC 50/60Hz • Operate this may be hazardous or cause damage to the product. 7. OVERLOADING • Do not overload a wall outlet, extension cord or adapter as these may result in electric fire or shock. 3. CLEANING • Disconnect the product from the TV. CONNECTION TO THE TV • Disconnect the product from the mains before connecting or disconnecting the cable from the wall outlet before you start any unsupported attachments as this product only from the type of power supply indicated on the apparatus. 4. ** This product has been manufactured ...
MAINS SUPPLY 90-250V AC 50/60Hz • Operate this may be hazardous or cause damage to the product. 7. OVERLOADING • Do not overload a wall outlet, extension cord or adapter as these may result in electric fire or shock. 3. CLEANING • Disconnect the product from the TV. CONNECTION TO THE TV • Disconnect the product from the mains before connecting or disconnecting the cable from the wall outlet before you start any unsupported attachments as this product only from the type of power supply indicated on the apparatus. 4. ** This product has been manufactured ...

User Manual
Page 5
10.LOCATION • Place the product indoors to avoid exposing it to lightning, rain or sun. • Do not place it near a radiator or heat register. • Make sure it has more than 10 cm clearance from the wall outlet and disconnect the antenna during a thunderstorm or when left unattended and unused for mounting. • Do not place the product on a rack or a bookcase, ensure that there is adequate ventilation and that you have followed the manufacturer's instructions for long periods of parts is required, be sure the service technician uses replacement parts specified by the ...
10.LOCATION • Place the product indoors to avoid exposing it to lightning, rain or sun. • Do not place it near a radiator or heat register. • Make sure it has more than 10 cm clearance from the wall outlet and disconnect the antenna during a thunderstorm or when left unattended and unused for mounting. • Do not place the product on a rack or a bookcase, ensure that there is adequate ventilation and that you have followed the manufacturer's instructions for long periods of parts is required, be sure the service technician uses replacement parts specified by the ...
User Manual
Page 6
To avoid damage of order. • Do not insert metal or alien substance into the slots for the modules or Smartcards. To avoid damage of product; • Do not use the product when defective, serious damage can be caused to it is out of the power cord or plug; • Do not modify or process the power cord or plug arbitrarily. • Do not bend or twist the power cord. • Make sure to disconnect the power cord holding the plug. • Keep heating appliances as far as a disconnection device, shall remain readily accessible by the user. ** 1. ** Warning ** The mains plug, as...
To avoid damage of order. • Do not insert metal or alien substance into the slots for the modules or Smartcards. To avoid damage of product; • Do not use the product when defective, serious damage can be caused to it is out of the power cord or plug; • Do not modify or process the power cord or plug arbitrarily. • Do not bend or twist the power cord. • Make sure to disconnect the power cord holding the plug. • Keep heating appliances as far as a disconnection device, shall remain readily accessible by the user. ** 1. ** Warning ** The mains plug, as...
User Manual
Page 7
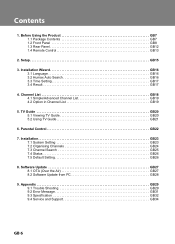
... Search GB25 7.4 Status GB26 7.5 Default Setting GB26 8. Software Update GB27 8.1 OTA (Over the Air GB27 8.2 Software Update from PC GB28 9. Installation Wizard GB16 3.1 Language GB16 3.2 Humax Auto Search GB16 3.3 Time Setting GB17 3.4 Result GB17 4. Channel List GB18 4.1 Simple/Advanced Channel List GB19 4.2 Option in Channel List GB19 5. Appendix GB29 9.1 Trouble Shooting...
... Search GB25 7.4 Status GB26 7.5 Default Setting GB26 8. Software Update GB27 8.1 OTA (Over the Air GB27 8.2 Software Update from PC GB28 9. Installation Wizard GB16 3.1 Language GB16 3.2 Humax Auto Search GB16 3.3 Time Setting GB17 3.4 Result GB17 4. Channel List GB18 4.1 Simple/Advanced Channel List GB19 4.2 Option in Channel List GB19 5. Appendix GB29 9.1 Trouble Shooting...
User Manual
Page 8
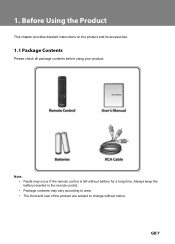
Always keep the battery inserted in the remote control. • Package contents may occur if the remote control is left without notice. Please check all package contents before using your product. ** ** Note: • Faults may vary according to area. • The front and rear of the product are subject to change without battery for a long time. This chapter provides detailed instructions on the product and its accessories.
Always keep the battery inserted in the remote control. • Package contents may occur if the remote control is left without notice. Please check all package contents before using your product. ** ** Note: • Faults may vary according to area. • The front and rear of the product are subject to change without battery for a long time. This chapter provides detailed instructions on the product and its accessories.
User Manual
Page 9
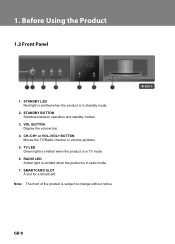
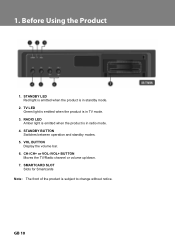
STANDBY BUTTON Switches between operation and standby modes. ** 3. RADIO LED Amber light is emitted when the product is subject to change without notice. SMARTCARD SLOT A slot for a Smartcard ** Note: The front of the product is in radio mode. ** 7. VOL BUTTON Display the volume bar. ** 4. ** ** 1. STANDBY LED Red light is emitted when the product is in standby mode. ** 2. TV LED Green light is emitted when the product is in TV mode. ** 6. CH-/CH+ or VOL-/VOL+ BUTTON Moves the TV/Radio channel or volume up/down. ** 5.
STANDBY BUTTON Switches between operation and standby modes. ** 3. RADIO LED Amber light is emitted when the product is subject to change without notice. SMARTCARD SLOT A slot for a Smartcard ** Note: The front of the product is in radio mode. ** 7. VOL BUTTON Display the volume bar. ** 4. ** ** 1. STANDBY LED Red light is emitted when the product is in standby mode. ** 2. TV LED Green light is emitted when the product is in TV mode. ** 6. CH-/CH+ or VOL-/VOL+ BUTTON Moves the TV/Radio channel or volume up/down. ** 5.
User Manual
Page 10
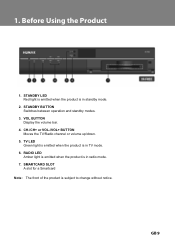
** ** 1. RADIO LED Amber light is emitted when the product is subject to change without notice. SMARTCARD SLOT A slot for a Smartcard ** Note: The front of the product is in radio mode. ** 7. CH-/CH+ or VOL-/VOL+ BUTTON Moves the TV/Radio channel or volume up/down. ** 5. VOL BUTTON Display the volume bar. ** 4. TV LED Green light is emitted when the product is in TV mode. ** 6. STANDBY LED Red light is emitted when the product is in standby mode. ** 2. STANDBY BUTTON Switches between operation and standby modes. ** 3.
** ** 1. RADIO LED Amber light is emitted when the product is subject to change without notice. SMARTCARD SLOT A slot for a Smartcard ** Note: The front of the product is in radio mode. ** 7. CH-/CH+ or VOL-/VOL+ BUTTON Moves the TV/Radio channel or volume up/down. ** 5. VOL BUTTON Display the volume bar. ** 4. TV LED Green light is emitted when the product is in TV mode. ** 6. STANDBY LED Red light is emitted when the product is in standby mode. ** 2. STANDBY BUTTON Switches between operation and standby modes. ** 3.
User Manual
Page 11
RADIO LED Amber light is emitted when the product is in TV mode. ** 3. STANDBY BUTTON Switches between operation and standby modes. ** 5. CH-/CH+ or VOL-/VOL+ BUTTON Moves the TV/Radio channel or volume up/down. ** 7. TV LED Green light is emitted when the product is in standby mode. ** 2. VOL BUTTON Display the volume bar. ** 6. SMARTCARD SLOT Slots for Smartcards ** Note: The front of the product is in radio mode. ** 4. ** ** 1. STANDBY LED Red light is emitted when the product is subject to change without notice.
RADIO LED Amber light is emitted when the product is in TV mode. ** 3. STANDBY BUTTON Switches between operation and standby modes. ** 5. CH-/CH+ or VOL-/VOL+ BUTTON Moves the TV/Radio channel or volume up/down. ** 7. TV LED Green light is emitted when the product is in standby mode. ** 2. VOL BUTTON Display the volume bar. ** 6. SMARTCARD SLOT Slots for Smartcards ** Note: The front of the product is in radio mode. ** 4. ** ** 1. STANDBY LED Red light is emitted when the product is subject to change without notice.

User Manual
Page 12
CH-/CH+ or VOL-/VOL+ BUTTON Moves the TV/Radio channel or volume up/down. ** 5. TV LED Green light is emitted when the product is in TV mode. ** 6. RADIO LED Amber light is emitted when the product is in radio mode. ** 7. STANDBY LED Red light is emitted when the product is subject to change without notice. STANDBY BUTTON Switches between operation and standby modes. ** 3. VOL BUTTON Display the volume bar. ** 4. SMARTCARD SLOT A slot for a Smartcard ** Note: The front of the product is in standby mode. ** 2. ** ** 1.
CH-/CH+ or VOL-/VOL+ BUTTON Moves the TV/Radio channel or volume up/down. ** 5. TV LED Green light is emitted when the product is in TV mode. ** 6. RADIO LED Amber light is emitted when the product is in radio mode. ** 7. STANDBY LED Red light is emitted when the product is subject to change without notice. STANDBY BUTTON Switches between operation and standby modes. ** 3. VOL BUTTON Display the volume bar. ** 4. SMARTCARD SLOT A slot for a Smartcard ** Note: The front of the product is in standby mode. ** 2. ** ** 1.
User Manual
Page 13
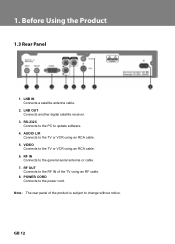
** 1. RS-232C Connects to the PC to the general aerial antenna or cable. ** 7. RF IN Connects to update software. ** 4. RF OUT Connects to the RF IN of the product is subject to the power cord. ** Note: The rear panel of the TV using an RF cable. 8. LNB OUT Connects another digital satellite receiver. ** 3. POWER CORD Connects to change without notice. AUDIO L/R Connects to the TV or VCR using an RCA cable. ** 5. VIDEO Connects to the TV or VCR using an RCA cable. ** 6. LNB IN Connects a satellite antenna cable. ** 2.
** 1. RS-232C Connects to the PC to the general aerial antenna or cable. ** 7. RF IN Connects to update software. ** 4. RF OUT Connects to the RF IN of the product is subject to the power cord. ** Note: The rear panel of the TV using an RF cable. 8. LNB OUT Connects another digital satellite receiver. ** 3. POWER CORD Connects to change without notice. AUDIO L/R Connects to the TV or VCR using an RCA cable. ** 5. VIDEO Connects to the TV or VCR using an RCA cable. ** 6. LNB IN Connects a satellite antenna cable. ** 2.
User Manual
Page 14
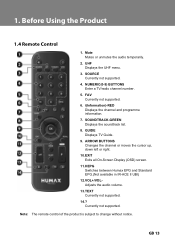
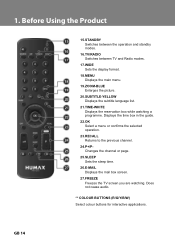
... or moves the cursor up, down left or right. ** 10.EXIT ** Exits all On-Screen Display (OSD) screen. ** 11.HEPG ** Switches between Humax EPG and Standard EPG.(Not available in IR-ACE II UBI) ** 12.VOL+/VOL- ** Adjusts the audio volume. ** 13.TEXT ** Currently not supported. ** 14.? ** Currently not supported. ** Note: The...
... or moves the cursor up, down left or right. ** 10.EXIT ** Exits all On-Screen Display (OSD) screen. ** 11.HEPG ** Switches between Humax EPG and Standard EPG.(Not available in IR-ACE II UBI) ** 12.VOL+/VOL- ** Adjusts the audio volume. ** 13.TEXT ** Currently not supported. ** 14.? ** Currently not supported. ** Note: The...
User Manual
Page 15
Displays the time box in the guide. ** 22.OK ** Select a menu or confirms the selected operation. ** 23.RECALL ** Returns to the previous channel. ** 24.P+/P- ** Changes the channel or page. ** 25.SLEEP ** Sets the sleep time. ** 26.E-MAIL ** Displays the mail box screen. ** 27.FREEZE ** Freezes the TV screen you are watching. Does not cease audio. ** ** COLOUR BUTTONS (R/G/Y/B/W) ** Select colour buttons for interactive applications. ** 15.STANDBY ** Switches between the operation and standby modes. ** 16.TV/RADIO ** Switches between TV and Radio modes. ** 17.WIDE ** Sets the display format...
Displays the time box in the guide. ** 22.OK ** Select a menu or confirms the selected operation. ** 23.RECALL ** Returns to the previous channel. ** 24.P+/P- ** Changes the channel or page. ** 25.SLEEP ** Sets the sleep time. ** 26.E-MAIL ** Displays the mail box screen. ** 27.FREEZE ** Freezes the TV screen you are watching. Does not cease audio. ** ** COLOUR BUTTONS (R/G/Y/B/W) ** Select colour buttons for interactive applications. ** 15.STANDBY ** Switches between the operation and standby modes. ** 16.TV/RADIO ** Switches between TV and Radio modes. ** 17.WIDE ** Sets the display format...
User Manual
Page 16
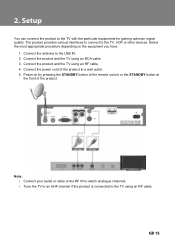
Connect the power cord of the product. ** ** Note: • Connect your aerial or cable to the RF IN to watch analogue channels. • Tune the TV to an UHF channel if the product is connected to the TV using an RCA cable. 3. The product provides various interfaces to connect to a wall outlet. 5. Connect the product and the TV using an RF cable. Power on the equipment you have. ** 1. ** You can connect the product to the LNB IN. 2. Select the most appropriate procedure depending on by pressing the STANDBY button of the remote control or the STANDBY button at the front of ...
Connect the power cord of the product. ** ** Note: • Connect your aerial or cable to the RF IN to watch analogue channels. • Tune the TV to an UHF channel if the product is connected to the TV using an RCA cable. 3. The product provides various interfaces to connect to a wall outlet. 5. Connect the product and the TV using an RF cable. Power on the equipment you have. ** 1. ** You can connect the product to the LNB IN. 2. Select the most appropriate procedure depending on by pressing the STANDBY button of the remote control or the STANDBY button at the front of ...
User Manual
Page 17
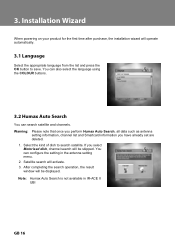
.... If you have already set are deleted. 1. You can also select the language using the COLOUR buttons. You can configure the setting in IR-ACE II UBI After completing the search operation, the result window will be displayed. ** When powering on your product for the first time after... purchase, the installation wizard will activate. 3. Note: Humax Auto Search is not available in the antenna setting menu. 2. Select the kind of dish to save. Satellite search will operate automatically.
.... If you have already set are deleted. 1. You can also select the language using the COLOUR buttons. You can configure the setting in IR-ACE II UBI After completing the search operation, the result window will be displayed. ** When powering on your product for the first time after... purchase, the installation wizard will activate. 3. Note: Humax Auto Search is not available in the antenna setting menu. 2. Select the kind of dish to save. Satellite search will operate automatically.
User Manual
Page 18
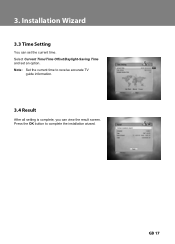
You can view the result screen. Note: Set the current time to complete the installation wizard. Select Current Time/Time Offset/Daylight-Saving Time and set the current time. Press the OK button to receive accurate TV guide information. After all setting is complete, you can set an option.
You can view the result screen. Note: Set the current time to complete the installation wizard. Select Current Time/Time Offset/Daylight-Saving Time and set the current time. Press the OK button to receive accurate TV guide information. After all setting is complete, you can set an option.
User Manual
Page 19
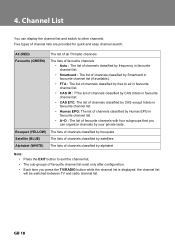
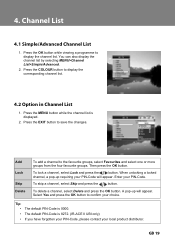
...in favourite channel list (if available). • FTA : The list of channels classified by free to air in favourite channel list. • CAS IR : TThe list of channels classified by CAS Irdeto in favourite channel list. • CAS ETC: The list of channels classified by CAS except Irdeto... in favourite channel list. • Humax EPG: The list of channels classified by Humax EPG in favourite channel list. • A~D : The list of favourite channels with four subgroups that you can display the channel...
...in favourite channel list (if available). • FTA : The list of channels classified by free to air in favourite channel list. • CAS IR : TThe list of channels classified by CAS Irdeto in favourite channel list. • CAS ETC: The list of channels classified by CAS except Irdeto... in favourite channel list. • Humax EPG: The list of channels classified by Humax EPG in favourite channel list. • A~D : The list of favourite channels with four subgroups that you can display the channel...
User Manual
Page 20
... and press the button. Delete ** To delete a channel, select Delete and press the OK button. Press the MENU button while the channel list is 8272. (IR-ACE II UBI only) • If you have forgotten your PIN-Code, please contact your PIN-Code. Press the EXIT button to save the changes...
... and press the button. Delete ** To delete a channel, select Delete and press the OK button. Press the MENU button while the channel list is 8272. (IR-ACE II UBI only) • If you have forgotten your PIN-Code, please contact your PIN-Code. Press the EXIT button to save the changes...
User Manual
Page 21
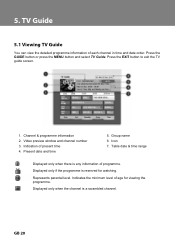
Video preview window and channel number 3. Icon 7. Indication of age for watching. Indicates the minimum level of present time 4. Present date and time ** 5. Represents parental level. Displayed only when the channel is any information of each channel in time and date order. You can view the detailed programme information of programme. Press the EXIT button to exit the TV guide screen. ** ** 1. Group name 6. Table date & time range Displayed only when there is a scrambled channel. Channel & programme information 2. Displayed only if the programme is ...
Video preview window and channel number 3. Icon 7. Indication of age for watching. Indicates the minimum level of present time 4. Present date and time ** 5. Represents parental level. Displayed only when the channel is any information of each channel in time and date order. You can view the detailed programme information of programme. Press the EXIT button to exit the TV guide screen. ** ** 1. Group name 6. Table date & time range Displayed only when there is a scrambled channel. Channel & programme information 2. Displayed only if the programme is ...