
User Manual
Page 3
... Throughout the whole manual, pay special attention to qualified service personnel. This symbol indicates important instructions accompanying the product. Notice Read this manual carefully and make the user aware of possible problems and information of any importance to help understand, use and maintain the installation. ** To reduce the risk of electric shock or personal injury. No user serviceable parts inside the...
... Throughout the whole manual, pay special attention to qualified service personnel. This symbol indicates important instructions accompanying the product. Notice Read this manual carefully and make the user aware of possible problems and information of any importance to help understand, use and maintain the installation. ** To reduce the risk of electric shock or personal injury. No user serviceable parts inside the...
User Manual
Page 4
... you start any power cords into the unit. LOCATION ** Place the product indoors to lightening, rain or sun. OVERLOADING ** Do not overload a wall outlet, extension cord or adapter as this product only from the mains before you have followed the manufacturer's instructions for mounting. Use a light damp cloth (no objects filled with international safety standards. CONNECTION TO THE CABLE TV SIGNAL ** Connect all...
... you start any power cords into the unit. LOCATION ** Place the product indoors to lightening, rain or sun. OVERLOADING ** Do not overload a wall outlet, extension cord or adapter as this product only from the mains before you have followed the manufacturer's instructions for mounting. Use a light damp cloth (no objects filled with international safety standards. CONNECTION TO THE CABLE TV SIGNAL ** Connect all...
User Manual
Page 6
... 37 7.2 Language Setting 39 7.3 Time Setting 40 7.4 A/V Control 42 7.5 Other Settings 44 8. Contents 1. Setup 13 2.1 Using HDMI Cable 13 2.2 Using DVI Converter 14 2.3 Using Component Cable 16 2.4 Using SCART Cable 17 2.5 Powering On 18 3. EPG 31 6.1 EPG Main 31 6.2 EPG Table 33 6.3 Schedule List 33 6.4 Find Programme 34 7. Channel List 27 5.1 All Channels List 27 5.2 Favourite Channel List 29 5.3 HD Channel List 30 5.4 Recent Channel List 30 6. Installation 50 9.1 Channel Search 50 9.2 Default Setting 52 GB 5 Edit Channels 45 8.1 Edit Channel Lists 45...
... 37 7.2 Language Setting 39 7.3 Time Setting 40 7.4 A/V Control 42 7.5 Other Settings 44 8. Contents 1. Setup 13 2.1 Using HDMI Cable 13 2.2 Using DVI Converter 14 2.3 Using Component Cable 16 2.4 Using SCART Cable 17 2.5 Powering On 18 3. EPG 31 6.1 EPG Main 31 6.2 EPG Table 33 6.3 Schedule List 33 6.4 Find Programme 34 7. Channel List 27 5.1 All Channels List 27 5.2 Favourite Channel List 29 5.3 HD Channel List 30 5.4 Recent Channel List 30 6. Installation 50 9.1 Channel Search 50 9.2 Default Setting 52 GB 5 Edit Channels 45 8.1 Edit Channel Lists 45...
User Manual
Page 8
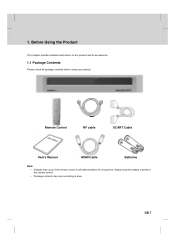
GB 7 Before Using the Product This chapter provides detailed instructions on the product and its accessories. 1.1 Package Contents Please check all package contents before using your product. ** ** Remote Control ** RF cable SCART Cable User's Manual ** HDMI Cable Batteries Note: • Defaults may vary according to area. Always keep the battery inserted in the remote control. • Package contents may occur if the remote control is left without battery for a long time. Before Using the Product 1. 1.
GB 7 Before Using the Product This chapter provides detailed instructions on the product and its accessories. 1.1 Package Contents Please check all package contents before using your product. ** ** Remote Control ** RF cable SCART Cable User's Manual ** HDMI Cable Batteries Note: • Defaults may vary according to area. Always keep the battery inserted in the remote control. • Package contents may occur if the remote control is left without battery for a long time. Before Using the Product 1. 1.
User Manual
Page 11
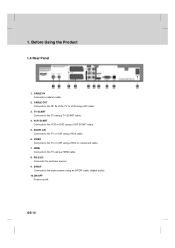
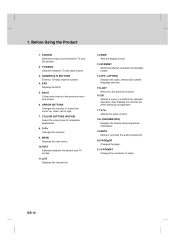
... TV or VCR using a HDMI cable. ** 8. RS-232C ** Connector for customer service. ** 9. VIDEO ** Connects to the TV using a RF cable. ** 3. HDMI ** Connects to the TV or VCR using a TV SCART cable. ** 4. S/PDIF ** Connects to the TV using a RCA or component cable. ** 7. TV SCART ** Connects to the audio system using a RCA cable. ** 6. AUDIO L/R ** Connects to the TV or VCR using an S/PDIF cable. (digital audio) ** 10.ON/OFF ** Powers on/off. ** GB 10 CABLE IN ** Connects a network cable. ** 2. 1. Before Using the Product 1.4 Rear...
... TV or VCR using a HDMI cable. ** 8. RS-232C ** Connector for customer service. ** 9. VIDEO ** Connects to the TV using a RF cable. ** 3. HDMI ** Connects to the TV or VCR using a TV SCART cable. ** 4. S/PDIF ** Connects to the TV using a RCA or component cable. ** 7. TV SCART ** Connects to the audio system using a RCA cable. ** 6. AUDIO L/R ** Connects to the TV or VCR using an S/PDIF cable. (digital audio) ** 10.ON/OFF ** Powers on/off. ** GB 10 CABLE IN ** Connects a network cable. ** 2. 1. Before Using the Product 1.4 Rear...
User Manual
Page 13
...a menu or confirms the selected operation. P-/P+ ** Changes the channel. ** 9. NUMERIC(0-9) BUTTONS ** Enters a TV/radio channel number. 4. Also displays the channel list while watching a programme. ** 17.V-/V+ ** Adjusts the audio volume. ** 18.i (INFORMATION) ** Displays the channel and programme information. ** 19.MUTE ** Mutes or unmutes the audio temporarily. ** 20.PAGE ** Changes the page. ** 21.V-FORMAT ** Changes the resolution of video. ** GB 12 1. COLOUR BUTTONS (R/G/Y/B) ** Select the colour keys for interactive applications. ** 8. ARROW BUTTONS ** Changes the channel...
...a menu or confirms the selected operation. P-/P+ ** Changes the channel. ** 9. NUMERIC(0-9) BUTTONS ** Enters a TV/radio channel number. 4. Also displays the channel list while watching a programme. ** 17.V-/V+ ** Adjusts the audio volume. ** 18.i (INFORMATION) ** Displays the channel and programme information. ** 19.MUTE ** Mutes or unmutes the audio temporarily. ** 20.PAGE ** Changes the page. ** 21.V-FORMAT ** Changes the resolution of video. ** GB 12 1. COLOUR BUTTONS (R/G/Y/B) ** Select the colour keys for interactive applications. ** 8. ARROW BUTTONS ** Changes the channel...
User Manual
Page 14
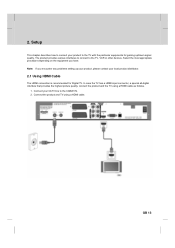
... the particular equipments for Digital TV. Connect your local product distributor. 2.1 Using HDMI Cable The HDMI connection is recommended for gaining optimum signal quality. The product provides various interfaces to connect to the CABLE IN. 2. Connect the product and TV using a HDMI cable as follows. ** 1. Select the most appropriate procedure depending on the equipment you have. ** Note: If you encounter any problems setting up your product...
... the particular equipments for Digital TV. Connect your local product distributor. 2.1 Using HDMI Cable The HDMI connection is recommended for gaining optimum signal quality. The product provides various interfaces to connect to the CABLE IN. 2. Connect the product and TV using a HDMI cable as follows. ** 1. Select the most appropriate procedure depending on the equipment you have. ** Note: If you encounter any problems setting up your product...
User Manual
Page 18
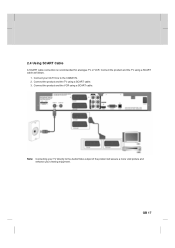
Connect the product and the TV using a SCART cable as follows. ** 1. ** 2.4 Using SCART Cable A SCART cable connection is recommended for analogue TV or VCR. Connect the product and the TV using a SCART cable. 3. Connect your viewing enjoyment. GB 17 Connect the product and the VCR using a SCART cable. ** ** Note: Connecting your TV directly to the Audio/Video output of the product will assure a more vivid picture and enhance your CATV line to the CABLE IN. 2.
Connect the product and the TV using a SCART cable as follows. ** 1. ** 2.4 Using SCART Cable A SCART cable connection is recommended for analogue TV or VCR. Connect the product and the TV using a SCART cable. 3. Connect your viewing enjoyment. GB 17 Connect the product and the VCR using a SCART cable. ** ** Note: Connecting your TV directly to the Audio/Video output of the product will assure a more vivid picture and enhance your CATV line to the CABLE IN. 2.

User Manual
Page 20
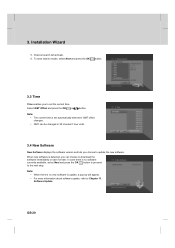
... button. Select Frequency using the NUMERIC(0-9) buttons. ** 2. Select User Define to activate channel search. 1. 3. Enter the frequency using the button. Select the symbol rate using the button. Select Network ID using the OK or button. This chapter includes the first time setup of the language, channel search, time setting and software update which will operate automatically. Select Next and press the OK button to select the main language. GB 19 Installation Wizard When powering...
... button. Select Frequency using the NUMERIC(0-9) buttons. ** 2. Select User Define to activate channel search. 1. 3. Enter the frequency using the button. Select the symbol rate using the button. Select Network ID using the OK or button. This chapter includes the first time setup of the language, channel search, time setting and software update which will operate automatically. Select Next and press the OK button to select the main language. GB 19 Installation Wizard When powering...
User Manual
Page 21
... will activate. 6. GB 20 Channel search will appear. • For more information about software update, refer to download the software immediately or save search results, select Next and press the OK button. 3.3 Time Time enables you to set automatically whenever GMT offset changes. • GMT can be changed in 30 minutes/1 hour units. 3.4 New Software New Software displays the software version and lets you...
... will activate. 6. GB 20 Channel search will appear. • For more information about software update, refer to download the software immediately or save search results, select Next and press the OK button. 3.3 Time Time enables you to set automatically whenever GMT offset changes. • GMT can be changed in 30 minutes/1 hour units. 3.4 New Software New Software displays the software version and lets you...
User Manual
Page 23
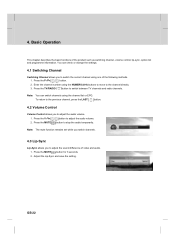
... 4. You can switch channels using the channel list or EPG. Enter the channel number using one of the following methods. 1. Press the MUTE button to stop the audio temporarily. ** Note: The mute function remains set while you switch channels. 4.3 Lip-Sync Lip-Sync allows you to adjust the sound difference of the product such as switching channel, volume control, lip-sync, option list and programme information...
... 4. You can switch channels using the channel list or EPG. Enter the channel number using one of the following methods. 1. Press the MUTE button to stop the audio temporarily. ** Note: The mute function remains set while you switch channels. 4.3 Lip-Sync Lip-Sync allows you to adjust the sound difference of the product such as switching channel, volume control, lip-sync, option list and programme information...

User Manual
Page 25
...+ button. 2. button and 5. To view the sub-page, use the button. Subtitle You can also use the TEXT button on the i-plate. ** 1. The subtitle will be displayed in teletext 4. To display teletext menu, press the MENU mode. button in the selected language at the bottom of teletext screen. Mix Adjusts transparency of the screen. 4. Select the teletext function you want using the sub-code written by users. button and...
...+ button. 2. button and 5. To view the sub-page, use the button. Subtitle You can also use the TEXT button on the i-plate. ** 1. The subtitle will be displayed in teletext 4. To display teletext menu, press the MENU mode. button in the selected language at the bottom of teletext screen. Mix Adjusts transparency of the screen. 4. Select the teletext function you want using the sub-code written by users. button and...
User Manual
Page 33
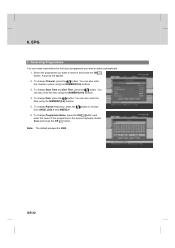
... also enter the time using the NUMERIC(0-9) buttons. ** 5. To change Channel, press the button. You can make reservations for the future programmes you want to choose from ONCE, DAILY and WEEKLY. ** ** 6. To change Start Time and End Time, press the button. Select Save and press the OK button. ** Note: The default password is 0000. 6. To change Date, press the button. EPG ** 2. Reserving Programmes...
... also enter the time using the NUMERIC(0-9) buttons. ** 5. To change Channel, press the button. You can make reservations for the future programmes you want to choose from ONCE, DAILY and WEEKLY. ** ** 6. To change Start Time and End Time, press the button. Select Save and press the OK button. ** Note: The default password is 0000. 6. To change Date, press the button. EPG ** 2. Reserving Programmes...
User Manual
Page 38
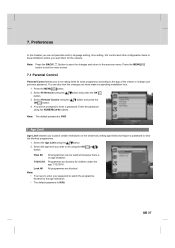
... lock the changes you wish to set parental control, language setting, time setting, A/V control and other configuration items to place certain restrictions on the viewers by the age restriction. • The default password is no age limitation. 7/12/15/18 Programmes are blocked. Enter the password using the OK button. Press the MENU button to exit the menu screen. 7.1 Parental Control Parental Control allows you to keep limitations where...
... lock the changes you wish to set parental control, language setting, time setting, A/V control and other configuration items to place certain restrictions on the viewers by the age restriction. • The default password is no age limitation. 7/12/15/18 Programmes are blocked. Enter the password using the OK button. Press the MENU button to exit the menu screen. 7.1 Parental Control Parental Control allows you to keep limitations where...
User Manual
Page 40
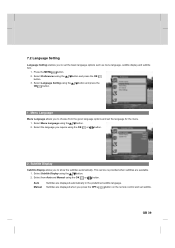
... subtitles automatically. Select from the given language options and set the language for the menu. 1. Menu Language Menu Language allows you to choose from Auto and Manual using the button. 2. Subtitles are displayed when you press the OPT+ button on the remote control and set the basic language options such as menu language, subtitle display and subtitle font. 1. Select Subtitle Display using the OK or button. Auto Manual Subtitles are available. 1. GB 39 7.2 Language Setting Language Setting enables you to...
... subtitles automatically. Select from the given language options and set the language for the menu. 1. Menu Language Menu Language allows you to choose from Auto and Manual using the button. 2. Subtitles are displayed when you press the OPT+ button on the remote control and set the basic language options such as menu language, subtitle display and subtitle font. 1. Select Subtitle Display using the OK or button. Auto Manual Subtitles are available. 1. GB 39 7.2 Language Setting Language Setting enables you to...
User Manual
Page 48
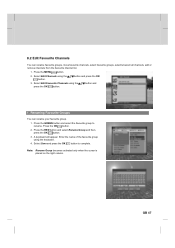
... Edit Favourite Channels using the button. A keyboard will appear. Press the RED button and select Rename Group and then, press the OK button. 3. Select Edit Channels using the press the OK button. Renaming Favourite Groups You can rename favourite groups, move favourite channels, select favourite groups, select/unselect all channels, add or remove channels from the favourite channel list. 1. Press the MENU button. 2. Press the OK button. 2. Enter...
... Edit Favourite Channels using the button. A keyboard will appear. Press the RED button and select Rename Group and then, press the OK button. 3. Select Edit Channels using the press the OK button. Renaming Favourite Groups You can rename favourite groups, move favourite channels, select favourite groups, select/unselect all channels, add or remove channels from the favourite channel list. 1. Press the MENU button. 2. Press the OK button. 2. Enter...
User Manual
Page 51
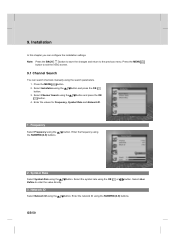
... MENU button. 2. Select Channel Search using ** 2. button. Network ID button. Enter the frequency using the button. Select Installation using the button. Enter the values for Frequency, Symbol Rate and Network ID. 1. Select User Select Network ID using the button. Press the MENU button to the previous menu. GB 50 9. Installation In this chapter you can configure the installation settings. ** Note: Press the BACK button to save the changes and return to exit the menu screen. ** 9.1 Channel Search You can search channels manually using...
... MENU button. 2. Select Channel Search using ** 2. button. Network ID button. Enter the frequency using the button. Select Installation using the button. Enter the values for Frequency, Symbol Rate and Network ID. 1. Select User Select Network ID using the button. Press the MENU button to the previous menu. GB 50 9. Installation In this chapter you can configure the installation settings. ** Note: Press the BACK button to save the changes and return to exit the menu screen. ** 9.1 Channel Search You can search channels manually using...
User Manual
Page 59
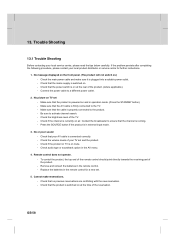
... the AV menu. ** 4. Check if the channel is currently on at the time of your AV cable is switched on . - No or poor sound - Check that the product is connected correctly. - Check the volume levels of the reservation. Check audio type or soundtrack option in external input mode. ** 3. Replace the batteries in the remote control for further instructions. ** 1. Check that your TV set and...
... the AV menu. ** 4. Check if the channel is currently on at the time of your AV cable is switched on . - No or poor sound - Check that the product is connected correctly. - Check the volume levels of the reservation. Check audio type or soundtrack option in external input mode. ** 3. Replace the batteries in the remote control for further instructions. ** 1. Check that your TV set and...
User Manual
Page 61
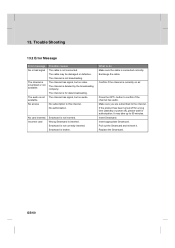
... the channel has audio. The channel is connected correctly. The channel has signal, but no audio. What to this channel. Insert Smartcard. GB 60 The channel has signal, but no video. No subscription to do Make sure the cable is deleted by the broadcasting company. No card inserted. Trouble Shooting 13.2 Error Message Error message No or bad signal The channel is broken. Smartcard is scrambled or not available. Replace the Smartcard. Pull...
... the channel has audio. The channel is connected correctly. The channel has signal, but no audio. What to this channel. Insert Smartcard. GB 60 The channel has signal, but no video. No subscription to do Make sure the cable is deleted by the broadcasting company. No card inserted. Trouble Shooting 13.2 Error Message Error message No or bad signal The channel is broken. Smartcard is scrambled or not available. Replace the Smartcard. Pull...
User Manual
Page 63
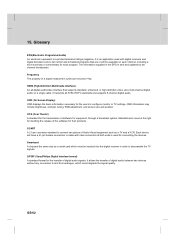
... without any conversion to a printed television listings magazine; it is an application used for connecting the devices. ** Smartcard A chipcard the same size as a TV and a VCR. 15. a cable with digital receivers and digital television sets to list current and scheduled programs that supports standard, enhanced, or high-definition video, plus multi-channel digital audio on each program. Glossary EPG(Electronic Programme Guide) An electronic equivalent to and from...
... without any conversion to a printed television listings magazine; it is an application used for connecting the devices. ** Smartcard A chipcard the same size as a TV and a VCR. 15. a cable with digital receivers and digital television sets to list current and scheduled programs that supports standard, enhanced, or high-definition video, plus multi-channel digital audio on each program. Glossary EPG(Electronic Programme Guide) An electronic equivalent to and from...


