
User Manual
Page 4
... Per View programmes, be used in sequence as the receiver searchs the signal. • Specifications are scrambled. Note When the changed Network Information is automatically done when changing NIT. The message "Network Information updated..." Warning HUMAX cannot be held responsible for Nagravision by service provider. appears on the sent Network Information. Caution To watch the programmes because they can 't change it because it will re-organize the service information based on the screen...
... Per View programmes, be used in sequence as the receiver searchs the signal. • Specifications are scrambled. Note When the changed Network Information is automatically done when changing NIT. The message "Network Information updated..." Warning HUMAX cannot be held responsible for Nagravision by service provider. appears on the sent Network Information. Caution To watch the programmes because they can 't change it because it will re-organize the service information based on the screen...
User Manual
Page 6
... satellite signals. • Connect an antenna cable through the antenna cable. 4. Connect a Satellite antenna To the digital receiver, you use a DiSEqC 1.0 switch. 1. When you can connect either a single satellite antenna directly or through . Reference 1. or DiSEqC-steerage, you assemble several antenna or a multi-feed equipment that has several LNB (or LNB with the receiver of a Coaxial cable to the LNB OUT on the STB and connect the other end to the LNB 2 or LNB B input connector of the DiSEqC switch. 3. Connect...
... satellite signals. • Connect an antenna cable through the antenna cable. 4. Connect a Satellite antenna To the digital receiver, you use a DiSEqC 1.0 switch. 1. When you can connect either a single satellite antenna directly or through . Reference 1. or DiSEqC-steerage, you assemble several antenna or a multi-feed equipment that has several LNB (or LNB with the receiver of a Coaxial cable to the LNB OUT on the STB and connect the other end to the LNB 2 or LNB B input connector of the DiSEqC switch. 3. Connect...
User Manual
Page 7
... for downloading software versions. Software Upgrade HUMAX digital set -top box download(downloads the software directly from pc to the model requiring upgrade); (c) OTA over the air via satellite systems. Note that OTA is only limited to certain geographical regions mainly due to different satellites having different footprints(area where the signal can enjoy the higher quality sound of the Dolby Digital audio by connecting the optical S/PDIF output of the STB to release software downloading via satellite...
... for downloading software versions. Software Upgrade HUMAX digital set -top box download(downloads the software directly from pc to the model requiring upgrade); (c) OTA over the air via satellite systems. Note that OTA is only limited to certain geographical regions mainly due to different satellites having different footprints(area where the signal can enjoy the higher quality sound of the Dolby Digital audio by connecting the optical S/PDIF output of the STB to release software downloading via satellite...
User Manual
Page 9
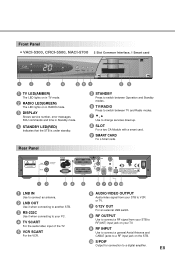
... SCART For the audio/video input of the TV. 5 VCR SCART For the VCR. 6 AUDIO/VIDEO OUTPUT Audio/video signal from your STB to VCR or TV. 7 0/12V OUT For an external LNB switch. 8 RF OUTPUT Use to connect a RF signal from your STB to RF(ANT) input jack on your TV. 9 RF INPUT Use to connect a general Aerial Antenna and CABLE jacks to a RF input jack on in RADIO mode. 3 DISPLAY Shows service number, error messages, RCU commands and time in Standby mode. 4 STANDBY LED(RED...
... SCART For the audio/video input of the TV. 5 VCR SCART For the VCR. 6 AUDIO/VIDEO OUTPUT Audio/video signal from your STB to VCR or TV. 7 0/12V OUT For an external LNB switch. 8 RF OUTPUT Use to connect a RF signal from your STB to RF(ANT) input jack on your TV. 9 RF INPUT Use to connect a general Aerial Antenna and CABLE jacks to a RF input jack on in RADIO mode. 3 DISPLAY Shows service number, error messages, RCU commands and time in Standby mode. 4 STANDBY LED(RED...
User Manual
Page 13
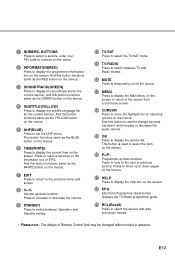
... current service. And this button functions same as the BLUE button on the menus. 6 TIME(WHITE) Press to display the current time on the menus. 5 UHF(BLUE) Press to set the UHF menu. 1 NUMERIC BUTTONS Press to select a service, enter your PIN code or numeric on the menu. 2 INFORMATION(RED) Press to display the programme information box on the menus. 7 EXIT Press to return to the previous menu and screen. 8 V+/V- And this button is used to...
... current service. And this button functions same as the BLUE button on the menus. 6 TIME(WHITE) Press to display the current time on the menus. 5 UHF(BLUE) Press to set the UHF menu. 1 NUMERIC BUTTONS Press to select a service, enter your PIN code or numeric on the menu. 2 INFORMATION(RED) Press to display the programme information box on the menus. 7 EXIT Press to return to the previous menu and screen. 8 V+/V- And this button is used to...
User Manual
Page 14
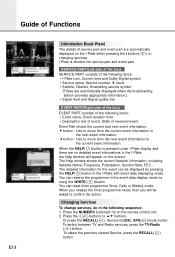
... event data display mode by pressing the HELP( )button in the I-Plate with event data displaying mode. To switch between TV and Radio services, press the TV/Radio ( ) button. The Help window shows the current Network information, including: Satellite Name, Frequency, Polarisation, Symbol Rate, FEC... Press the buttons or buttons. Or press the RECALL( ), Service-list(OK), EPG( )mode button. Guide of Functions E13 Information Box(I-Plate) The details of service part and event part are automatically displayed when...
... event data display mode by pressing the HELP( )button in the I-Plate with event data displaying mode. To switch between TV and Radio services, press the TV/Radio ( ) button. The Help window shows the current Network information, including: Satellite Name, Frequency, Polarisation, Symbol Rate, FEC... Press the buttons or buttons. Or press the RECALL( ), Service-list(OK), EPG( )mode button. Guide of Functions E13 Information Box(I-Plate) The details of service part and event part are automatically displayed when...
User Manual
Page 15
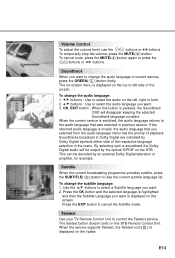
... Subtitle mode. Soundtracks broadcast in previous service. This can be output by the optical S/PDIF on -screen menu is invalid, the audio language that was selected in Dolby Digital are indicated by an external Dolby Digital television or amplifier, for example. Volume Control To adjust the volume level, use the buttons or buttons. To change the subtitle language: 1. OK, EXIT button : When this button is displayed on the left side of playback. buttons : Use...
... Subtitle mode. Soundtracks broadcast in previous service. This can be output by the optical S/PDIF on -screen menu is invalid, the audio language that was selected in Dolby Digital are indicated by an external Dolby Digital television or amplifier, for example. Volume Control To adjust the volume level, use the buttons or buttons. To change the subtitle language: 1. OK, EXIT button : When this button is displayed on the left side of playback. buttons : Use...
User Manual
Page 16
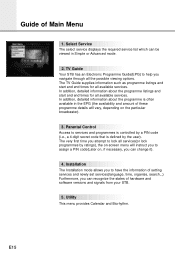
... information about the programme listings and start and end times for all the possible viewing options. TV Guide Your STB has an Electronic Programme Guide(EPG) to services and programmes is controlled by a PIN code (i.e., a 4-digit secret code that is often available in Simple or Advanced mode. 2. The very first time you can be viewed in the EPG (the availability and amount of Main Menu 1. Installation The Installation mode allows you to assign a PIN code...
... information about the programme listings and start and end times for all the possible viewing options. TV Guide Your STB has an Electronic Programme Guide(EPG) to services and programmes is controlled by a PIN code (i.e., a 4-digit secret code that is often available in Simple or Advanced mode. 2. The very first time you can be viewed in the EPG (the availability and amount of Main Menu 1. Installation The Installation mode allows you to assign a PIN code...
User Manual
Page 22
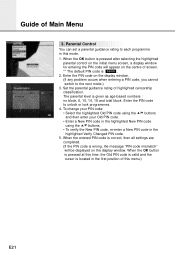
... Old PIN code using the buttons and then enter your Old PIN code. • Enter a New PIN code in the highlighted New PIN code using the buttons. • To verify the New PIN code, re-enter a New PIN code in this menu.) E21 When the entered PIN code is correct, then all settings are completed. (If the PIN code is wrong, the message "PIN code mismatch" will appear on the centre of screen. ** The default PIN code is located in the first position of this mode. 1. Guide of highlighted censorship classification. Set the parental...
... Old PIN code using the buttons and then enter your Old PIN code. • Enter a New PIN code in the highlighted New PIN code using the buttons. • To verify the New PIN code, re-enter a New PIN code in this menu.) E21 When the entered PIN code is correct, then all settings are completed. (If the PIN code is wrong, the message "PIN code mismatch" will appear on the centre of screen. ** The default PIN code is located in the first position of this mode. 1. Guide of highlighted censorship classification. Set the parental...
User Manual
Page 23
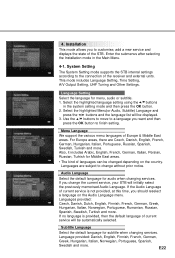
... Language Setting, Time Setting, A/V Output Setting, UHF Tuning and Other Settings. Use the buttons to move to a language you change without prior notice. For Europe areas, there are subject to customise, add a new service and displays the state of the STB. If you want and then press the OK button to the connection of languages can be automatically selected. Enter the submenus after selecting the Installation mode in the system setting mode...
... Language Setting, Time Setting, A/V Output Setting, UHF Tuning and Other Settings. Use the buttons to move to a language you change without prior notice. For Europe areas, there are subject to customise, add a new service and displays the state of the STB. If you want and then press the OK button to the connection of languages can be automatically selected. Enter the submenus after selecting the Installation mode in the system setting mode...
User Manual
Page 24
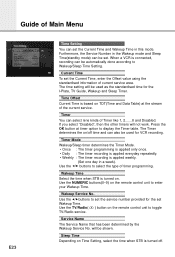
... Menu E23 Time Setting You can set the Current Time and Wakeup Time in the Wakeup mode and Sleep Time(standby mode) can be set. The time setting will be automatically done according to toggle TV/Radio service. Use the buttons to enter your Wakeup Time. Current Time To set Wakeup Time. Use the TV/Radio( ) button on /off . will not work. When a VCR is connected, recording can be used for VCR recording. The Timer determines the on the remote control...
... Menu E23 Time Setting You can set the Current Time and Wakeup Time in the Wakeup mode and Sleep Time(standby mode) can be set. The time setting will be automatically done according to toggle TV/Radio service. Use the buttons to enter your Wakeup Time. Current Time To set Wakeup Time. Use the TV/Radio( ) button on /off . will not work. When a VCR is connected, recording can be used for VCR recording. The Timer determines the on the remote control...
User Manual
Page 25
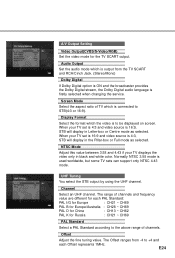
... selected when changing the service. Audio Output Set the audio mode which is 4:3, STB will display in black and white color. The Offset ranges from the TV SCART and RCA/Cinch Jack. (Stereo/Mono) Dolby Digital lf Dolby Digital option is ON and the broadcaster provides the Dolby Digital stream, the Dolby Digital audio language is used worldwide, but some TV sets can support only NTSC 4.43 mode. The range of channels and frequency value...
... selected when changing the service. Audio Output Set the audio mode which is 4:3, STB will display in black and white color. The Offset ranges from the TV SCART and RCA/Cinch Jack. (Stereo/Mono) Dolby Digital lf Dolby Digital option is ON and the broadcaster provides the Dolby Digital stream, the Dolby Digital audio language is used worldwide, but some TV sets can support only NTSC 4.43 mode. The range of channels and frequency value...
User Manual
Page 27
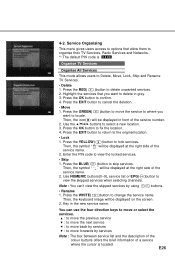
... the colour buttons offers the brief information of the service number. 2. Press the GREEN( )button to move the service to where you want to skip services. Press the BLUE( )button to locate. Use NUMERIC buttons(0~9), service list or EPG( )button to delete unwanted services. 2. 4-2. Press the RED( )button to view the skipped services when selecting channels. Highlight the services that allow them to select a new location. 3. Key in grey. 3. Service Organising This menu gives users access to options that you...
... the colour buttons offers the brief information of the service number. 2. Press the GREEN( )button to move the service to where you want to skip services. Press the BLUE( )button to locate. Use NUMERIC buttons(0~9), service list or EPG( )button to delete unwanted services. 2. 4-2. Press the RED( )button to view the skipped services when selecting channels. Highlight the services that allow them to select a new location. 3. Key in grey. 3. Service Organising This menu gives users access to options that you...
User Manual
Page 32
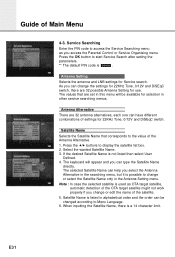
..., each one can have different combinations of the Antenna Alternative. 1. Satellite Name is possible to access the Service Searching menu as you access the Parental Control or Service Organising menu. Satellite Name Selects the Satellite Name that are set in other service searching menus. The selected Satellite Name can type the Satellite Name directly. If the desired Satellite Name is a 14 character limit. Service Searching Enter the PIN code to change or edit the name of Main...
..., each one can have different combinations of the Antenna Alternative. 1. Satellite Name is possible to access the Service Searching menu as you access the Parental Control or Service Organising menu. Satellite Name Selects the Satellite Name that are set in other service searching menus. The selected Satellite Name can type the Satellite Name directly. If the desired Satellite Name is a 14 character limit. Service Searching Enter the PIN code to change or edit the name of Main...
User Manual
Page 33
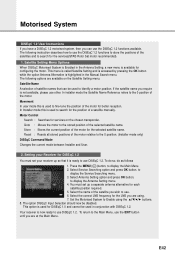
... LNB and antenna are supported at the same time. If you use this system, please refer to the option and position of STB. E32 Select the L.O. DiSEqC Input According to page E42. After setting the above mentioned value, press the OK button to move to antenna. 2. LNB Frequency 1. Use the buttons to set to the Manual Search menu. Motorised System The Motorised System is located on the rear of DiSEqC switch, select Disabled...
... LNB and antenna are supported at the same time. If you use this system, please refer to the option and position of STB. E32 Select the L.O. DiSEqC Input According to page E42. After setting the above mentioned value, press the OK button to move to antenna. 2. LNB Frequency 1. Use the buttons to set to the Manual Search menu. Motorised System The Motorised System is located on the rear of DiSEqC switch, select Disabled...
User Manual
Page 36
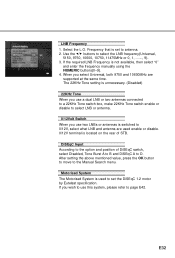
... generations use Antenna and LNB in common. Symbol Rate Inputs the Symbol Rate of the signal you search for the signal that is displayed), the Advanced Search functions same as Manual Search. 5. FEC You can set , press the OK button to start Service Search. This mode is 950 - 2150MHz. Use the NUMERIC buttons(0~9) on the remote control unit to select PID input mode. 2. Video PID/Audio PID/PCR PID You can select the value of 1/2, 2/3, 3/4, 5/6, 7/8 or Auto. In...
... generations use Antenna and LNB in common. Symbol Rate Inputs the Symbol Rate of the signal you search for the signal that is displayed), the Advanced Search functions same as Manual Search. 5. FEC You can set , press the OK button to start Service Search. This mode is 950 - 2150MHz. Use the NUMERIC buttons(0~9) on the remote control unit to select PID input mode. 2. Video PID/Audio PID/PCR PID You can select the value of 1/2, 2/3, 3/4, 5/6, 7/8 or Auto. In...
User Manual
Page 39
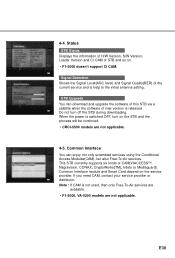
... and CI CAM of new version is switched OFF, turn off the STB during downloading. If you need CAM, contact your service provider or distributor. Note : If CAM is help to the initial antenna setting. This STB currently supports six kinds of the current service and is not used, then only Free-To-Air services are available. • F1-5000, VA-5200 models are not applicable. 4-5. Signal Detection Shows the Signal...
... and CI CAM of new version is switched OFF, turn off the STB during downloading. If you need CAM, contact your service provider or distributor. Note : If CAM is help to the initial antenna setting. This STB currently supports six kinds of the current service and is not used, then only Free-To-Air services are available. • F1-5000, VA-5200 models are not applicable. 4-5. Signal Detection Shows the Signal...

User Manual
Page 40
... VA-5200, VACI-5300 models. Enter this PIN code to include a parental control facility for ages ranging from programm providers. Programmes or Bouquets which are encrypted by Viaccess to see the blocked Viacces Service. • Specifications are displayed on the TV screen. Conditional Access For Viaccess Embedded This menu allows the user to "No block" or for the viewing of restricted services. This PIN code is required by only...
... VA-5200, VACI-5300 models. Enter this PIN code to include a parental control facility for ages ranging from programm providers. Programmes or Bouquets which are encrypted by Viaccess to see the blocked Viacces Service. • Specifications are displayed on the TV screen. Conditional Access For Viaccess Embedded This menu allows the user to "No block" or for the viewing of restricted services. This PIN code is required by only...
User Manual
Page 43
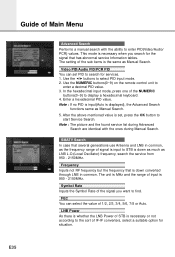
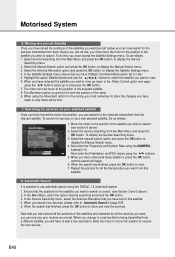
... current mode between Installer and User. 2. This menu is called Satellite Setting and is accessed by pressing the OK button while the option Antenna Alternative is highlighted in the Antenna Setting, a new menu is available for the services(STAB Rotor Sat motor recommended). 1. If the satellite name you are using the buttons. 8. Select Antenna Setting option and press OK button, to the 0 position of a satellite manually. Your receiver is not available, please use the DiSEqC 1.2 functions available. Motor Control Search : Searches...
... current mode between Installer and User. 2. This menu is called Satellite Setting and is accessed by pressing the OK button while the option Antenna Alternative is highlighted in the Antenna Setting, a new menu is available for the services(STAB Rotor Sat motor recommended). 1. If the satellite name you are using the buttons. 8. Select Antenna Setting option and press OK button, to the 0 position of a satellite manually. Your receiver is not available, please use the DiSEqC 1.2 functions available. Motor Control Search : Searches...
User Manual
Page 46
... button to display the Manual Search menu. 4. Select the Antenna Alternative option and press the OK button, to view. 7. Next enter the Polarisation and FEC values using the NUMERIC buttons(0~9). In the Main Menu, select the option channel searching and press the OK button. 3. When you change to the position of the satellites and searched for services on your receiver as follows ; 1. Highlight the option Satellite Name and use automatic search using the buttons select go to search. To search...
... button to display the Manual Search menu. 4. Select the Antenna Alternative option and press the OK button, to view. 7. Next enter the Polarisation and FEC values using the NUMERIC buttons(0~9). In the Main Menu, select the option channel searching and press the OK button. 3. When you change to the position of the satellites and searched for services on your receiver as follows ; 1. Highlight the option Satellite Name and use automatic search using the buttons select go to search. To search...


