
Quick Start Guide
Page 3
... to prevent it from unauthorized use. • Set your device screen to lock and create a password or unlock pattern to open it. • Periodically back up personal information kept on your memory card or stored in your personal information and data being lost or becoming accessible to others. If you change to a different device, be sure to move or delete any personal information on your...
... to prevent it from unauthorized use. • Set your device screen to lock and create a password or unlock pattern to open it. • Periodically back up personal information kept on your memory card or stored in your personal information and data being lost or becoming accessible to others. If you change to a different device, be sure to move or delete any personal information on your...
Quick Start Guide
Page 9
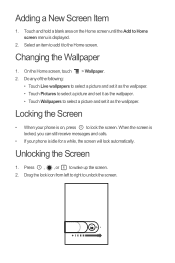
... your phone is idle for a while, the screen will lock automatically. Press , , or to unlock the screen. Unlocking the Screen 1. On the Home screen, touch > Wallpaper. 2. Drag the lock icon from left to right to wake up the screen. 2. Adding a New Screen Item 1. Changing the Wallpaper 1. Do any of the following: • Touch Live wallpapers to select a picture and set it as the wallpaper. • Touch Pictures to select a picture and set it...
... your phone is idle for a while, the screen will lock automatically. Press , , or to unlock the screen. Unlocking the Screen 1. On the Home screen, touch > Wallpaper. 2. Drag the lock icon from left to right to wake up the screen. 2. Adding a New Screen Item 1. Changing the Wallpaper 1. Do any of the following: • Touch Live wallpapers to select a picture and set it as the wallpaper. • Touch Pictures to select a picture and set it...

Quick Start Guide
Page 12
... the photos or videos. Touch > Settings. 2. Capture Screen Thumbnail of last photo or video. 3 Touch to open the camera. Touch to take a picture or record a video. • Touch to take a 5 photo. The camera opens in landscape mode, ready to close the camera. Drag up to record videos, drag down to customize the camera settings. Select the Data enabled check box to turn on the data connection. Touch to take photos. Touch Wireless & networks > Mobile networks. 3. Fi. Touch Wireless & networks, and then select the Wi-Fi check box to turn on the Data Service 1. Turning...
... the photos or videos. Touch > Settings. 2. Capture Screen Thumbnail of last photo or video. 3 Touch to open the camera. Touch to take a picture or record a video. • Touch to take a 5 photo. The camera opens in landscape mode, ready to close the camera. Drag up to record videos, drag down to customize the camera settings. Select the Data enabled check box to turn on the data connection. Touch to take photos. Touch Wireless & networks > Mobile networks. 3. Fi. Touch Wireless & networks, and then select the Wi-Fi check box to turn on the Data Service 1. Turning...
User Manual
Page 4
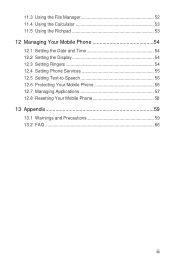
11.3 Using the File Manager 52 11.4 Using the Calculator 53 11.5 Using the Richpad 53 12 Managing Your Mobile Phone 54 12.1 Setting the Date and Time 54 12.2 Setting the Display 54 12.3 Setting Ringers 54 12.4 Setting Phone Services 55 12.5 Setting Text-to-Speech 56 12.6 Protecting Your Mobile Phone 56 12.7 Managing Applications 57 12.8 Resetting Your Mobile Phone 58 13 Appendix 59 13.1 Warnings and Precautions 59 13.2 FAQ 66 iii
11.3 Using the File Manager 52 11.4 Using the Calculator 53 11.5 Using the Richpad 53 12 Managing Your Mobile Phone 54 12.1 Setting the Date and Time 54 12.2 Setting the Display 54 12.3 Setting Ringers 54 12.4 Setting Phone Services 55 12.5 Setting Text-to-Speech 56 12.6 Protecting Your Mobile Phone 56 12.7 Managing Applications 57 12.8 Resetting Your Mobile Phone 58 13 Appendix 59 13.1 Warnings and Precautions 59 13.2 FAQ 66 iii
User Manual
Page 14
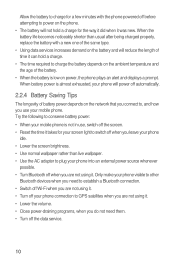
... screen. • Reset the time it takes for the way it did when it . • Lower the volume. • Close power-draining programs, when you do not need to establish a Bluetooth connection. • Switch off Wi-Fi when you are not using it. • Turn off when you are not using it was new. Only make your phone connection to other Bluetooth devices when you need them. • Turn off the data service...
... screen. • Reset the time it takes for the way it did when it . • Lower the volume. • Close power-draining programs, when you do not need to establish a Bluetooth connection. • Switch off Wi-Fi when you are not using it. • Turn off when you are not using it was new. Only make your phone connection to other Bluetooth devices when you need them. • Turn off the data service...

User Manual
Page 17
... and display areas of your applications. Touch to a PC 3G connected 3G in progress using a Bluetooth device Connected to open the Browser. Touch to open the notifications panel. Screen switching dots: Indicate the number of the screens on the left or right dots to view all your phone. Flick down to open the Phone application. 2.6.1 Notification and Status Icons Call in progress Missed call Call in use Error Memory is full Preparing mircoSD card Music is playing Downloading data Uploading data Roaming MetroPCS Easy WiFi 13...
... and display areas of your applications. Touch to a PC 3G connected 3G in progress using a Bluetooth device Connected to open the Browser. Touch to open the notifications panel. Screen switching dots: Indicate the number of the screens on the left or right dots to view all your phone. Flick down to open the Phone application. 2.6.1 Notification and Status Icons Call in progress Missed call Call in use Error Memory is full Preparing mircoSD card Music is playing Downloading data Uploading data Roaming MetroPCS Easy WiFi 13...

User Manual
Page 27
... a picture to the contact) to open details to view a list of the number to call or send a text (SMS) or multimedia message (MMS) to a contact's default phone number. 4.5 Communicating with Your Contacts From the Contacts or Favorites tab, you want to communicate with the contact. In the groups list, press , and then touch Create group. 3. On the contact's details screen, touch the icon to the right of all the ways you can quickly call or send messages. 4.6 Deleting a Contact 1. The icons available...
... a picture to the contact) to open details to view a list of the number to call or send a text (SMS) or multimedia message (MMS) to a contact's default phone number. 4.5 Communicating with Your Contacts From the Contacts or Favorites tab, you want to communicate with the contact. In the groups list, press , and then touch Create group. 3. On the contact's details screen, touch the icon to the right of all the ways you can quickly call or send messages. 4.6 Deleting a Contact 1. The icons available...

User Manual
Page 31
Touch > Settings > Language & keyboard. 2. The screen will display the keyboard in the To field, or touch + to insert a 27 Enter a phone number in landscape orientation, providing you with anyone using an SMS-or-MMS-capable phone. 5.1.4 Using the Landscape Keyboard If you find the keyboard inconvenient or difficult to use, turn your message. Once you are done, touch Send. > Insert contact to select a contact from Contacts. Select an input method to customize the keyboard settings. 6 Messaging The Messaging application allows you can touch a suggested...
Touch > Settings > Language & keyboard. 2. The screen will display the keyboard in the To field, or touch + to insert a 27 Enter a phone number in landscape orientation, providing you with anyone using an SMS-or-MMS-capable phone. 5.1.4 Using the Landscape Keyboard If you find the keyboard inconvenient or difficult to use, turn your message. Once you are done, touch Send. > Insert contact to select a contact from Contacts. Select an input method to customize the keyboard settings. 6 Messaging The Messaging application allows you can touch a suggested...

User Manual
Page 33
... popular email services on your PC or you . 4. Touch the text box to open it. 2. Or touch Manual setup if you were viewing the last time the application was opened. If, however, the Email application has not been used for this information. 3. In the message list, touch a text or multimedia message thread to compose your message, and then touch Send. With your phone's Email application, you can reply to message(s) in another email service. 1. Contact your email settings, answer the...
... popular email services on your PC or you . 4. Touch the text box to open it. 2. Or touch Manual setup if you were viewing the last time the application was opened. If, however, the Email application has not been used for this information. 3. In the message list, touch a text or multimedia message thread to compose your message, and then touch Send. With your phone's Email application, you can reply to message(s) in another email service. 1. Contact your email settings, answer the...

User Manual
Page 35
...the email account you are using. Touch Wireless & networks > Mobile networks. 3. On the accounts screen, touch and hold the email account you want to send and receive mails. You can change . 3. To use Wi-Fi on the kind of email service you wireless access to wireless access points (hotspots). 6.2.5 Deleting an Email Account 1. Select the Data enabled check box to turn on the Data Service 1. Touch > Email. 2. Obstacles that block the Wi-Fi signal will reduce its strength. 31 Touch Remove account. 3. Change General settings, Notification settings, or Server settings...
...the email account you are using. Touch Wireless & networks > Mobile networks. 3. On the accounts screen, touch and hold the email account you want to send and receive mails. You can change . 3. To use Wi-Fi on the kind of email service you wireless access to wireless access points (hotspots). 6.2.5 Deleting an Email Account 1. Select the Data enabled check box to turn on the Data Service 1. Touch > Email. 2. Obstacles that block the Wi-Fi signal will reduce its strength. 31 Touch Remove account. 3. Change General settings, Notification settings, or Server settings...

User Manual
Page 41
... contact icon or wallpaper. 8.1.4 Recording a Video 1. The Gallery application categorizes your video. 4. Open the camera, and then switch to display the gallery panel. Touch to view it . 2. Touch the thumbnail to start your pictures and videos by storage location and stores these files in the upper right corner of the capture screen. Use Gallery to view it . 2. Touch to camcorder mode. 2. Touch the thumbnail to sort photos and videos into folders, view and edit pictures, watch videos, and set a picture as a photo for pictures...
... contact icon or wallpaper. 8.1.4 Recording a Video 1. The Gallery application categorizes your video. 4. Open the camera, and then switch to display the gallery panel. Touch to view it . 2. Touch the thumbnail to start your pictures and videos by storage location and stores these files in the upper right corner of the capture screen. Use Gallery to view it . 2. Touch to camcorder mode. 2. Touch the thumbnail to sort photos and videos into folders, view and edit pictures, watch videos, and set a picture as a photo for pictures...

User Manual
Page 42
... or zoom out on the picture. • Touch Capture picture to open the camera and switch to the picture capture mode. • Touch Capture video to open the camera and switch to the video capture mode. • Touch Settings to go to view. 2. In the Gallery, touch the folder that contains the pictures you rotate your mobile phone, the picture adjusts itself to save the cropped picture. Touch the picture to width ratio. 3. Use the cropping tool to...
... or zoom out on the picture. • Touch Capture picture to open the camera and switch to the picture capture mode. • Touch Capture video to open the camera and switch to the video capture mode. • Touch Settings to go to view. 2. In the Gallery, touch the folder that contains the pictures you rotate your mobile phone, the picture adjusts itself to save the cropped picture. Touch the picture to width ratio. 3. Use the cropping tool to...
User Manual
Page 45
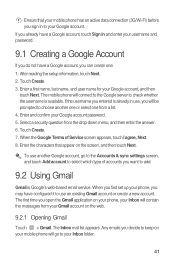
... a list. 4. The first time you sign in and enter your mobile phone will contain the messages from your Google account password. 5. Ensure that appear on the screen, and then touch Next. After reading the setup information, touch Next. 2. Enter the characters that your mobile phone has an active data connection (3G/Wi-Fi) before you open the Gmail application on your phone, your Inbox will go to the Accounts & sync settings screen, and touch Add account to...
... a list. 4. The first time you sign in and enter your mobile phone will contain the messages from your Google account password. 5. Ensure that appear on the screen, and then touch Next. After reading the setup information, touch Next. 2. Enter the characters that your mobile phone has an active data connection (3G/Wi-Fi) before you open the Gmail application on your phone, your Inbox will go to the Accounts & sync settings screen, and touch Add account to...

User Manual
Page 47
... then touch Accept. 9.3.4 Starting a Chat 1. In the friends list, touch a friend's name in the friends list. 2. Your Talk account is Google's instant messaging service. You can play a sound, vibrate, or display an icon. Use the onscreen keyboard to open the application. To set up one of the friend you receive an instant message, your 9.3 Using Talk Talk is based on the web. 9.3.1 Opening Talk Touch > Talk to enter text and chat with your message, touch Send. 9.3.5 Setting Notifications for New Instant Messages...
... then touch Accept. 9.3.4 Starting a Chat 1. In the friends list, touch a friend's name in the friends list. 2. Your Talk account is Google's instant messaging service. You can play a sound, vibrate, or display an icon. Use the onscreen keyboard to open the application. To set up one of the friend you receive an instant message, your 9.3 Using Talk Talk is based on the web. 9.3.1 Opening Talk Touch > Talk to enter text and chat with your message, touch Send. 9.3.5 Setting Notifications for New Instant Messages...

User Manual
Page 50
... the web, the updated information also appears on your mobile phone. 4. If you scroll down to the Developer Info section, you access to the developer's website, or send the developer an email. 4. To stop an item from downloading, touch Cancel. 6. Choose the reason for removing the application, and then touch OK. 10 Synchronizing Information Some applications on your mobile phone give you can add, view, and edit...
... the web, the updated information also appears on your mobile phone. 4. If you scroll down to the Developer Info section, you access to the developer's website, or send the developer an email. 4. To stop an item from downloading, touch Cancel. 6. Choose the reason for removing the application, and then touch OK. 10 Synchronizing Information Some applications on your mobile phone give you can add, view, and edit...
User Manual
Page 51
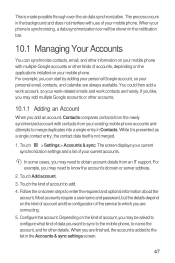
... available. Touch Add account. 3. Most accounts require a username and password, but the details depend on your work-related emails and work contacts are finished, the account is synchronizing, a data synchronization icon will be asked to configure what kind of data you add an account, Contacts compares contacts from the newly synchronized account with contacts from an IT support. Configure the account. When you may need to know the account's domain or server address. 2. The screen displays your...
... available. Touch Add account. 3. Most accounts require a username and password, but the details depend on your work-related emails and work contacts are finished, the account is synchronizing, a data synchronization icon will be asked to configure what kind of data you add an account, Contacts compares contacts from the newly synchronized account with contacts from an IT support. Configure the account. When you may need to know the account's domain or server address. 2. The screen displays your...
User Manual
Page 53
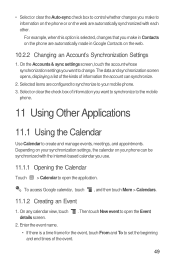
... synchronized with the internet-based calendar you use. 11.1.1 Opening the Calendar Touch > Calendar to open the Event 2. Enter the event name. • If there is selected, changes that you make to information on the phone or on the web. 10.2.2 Changing an Account's Synchronization Settings 1. The data and synchronization screen opens, displaying a list of the kinds of the event. 49 To access Google calendar, touch , and then touch More > Calendars...
... synchronized with the internet-based calendar you use. 11.1.1 Opening the Calendar Touch > Calendar to open the Event 2. Enter the event name. • If there is selected, changes that you make to information on the phone or on the web. 10.2.2 Changing an Account's Synchronization Settings 1. The data and synchronization screen opens, displaying a list of the kinds of the event. 49 To access Google calendar, touch , and then touch More > Calendars...

User Manual
Page 54
... time of your mobile phone. • Select ringtone: Touch to select the ringtone to sound when you receive an event reminder. • Vibrate: Select to vibrate the mobile phone when you want to save the event. 5. A new event details screen will receive a notification about the event. 11.1.4 Customizing the Calendar Settings On any calendar view, touch an event to add a reminder. Enter email addresses to invite guests to delete an existing reminder. 3. Or touch the reminder's "-" button...
... time of your mobile phone. • Select ringtone: Touch to select the ringtone to sound when you receive an event reminder. • Vibrate: Select to vibrate the mobile phone when you want to save the event. 5. A new event details screen will receive a notification about the event. 11.1.4 Customizing the Calendar Settings On any calendar view, touch an event to add a reminder. Enter email addresses to invite guests to delete an existing reminder. 3. Or touch the reminder's "-" button...

User Manual
Page 58
... Mobile Phone To configure your mobile phone, touch > Settings. 12.1 Setting the Date and Time By default, your mobile phone automatically uses the date, time zone, and time provided by the network, you want the screen to be illuminated. 12.3 Setting Ringers 12.3.1 Turning On Silent Mode 1. Drag the slider left to make the screen darker, or right to make it will turn off the screen to silence all sounds except alarms, and music and video media sound. 54 To set...
... Mobile Phone To configure your mobile phone, touch > Settings. 12.1 Setting the Date and Time By default, your mobile phone automatically uses the date, time zone, and time provided by the network, you want the screen to be illuminated. 12.3 Setting Ringers 12.3.1 Turning On Silent Mode 1. Drag the slider left to make the screen darker, or right to make it will turn off the screen to silence all sounds except alarms, and music and video media sound. 54 To set...

User Manual
Page 62
..., clear all temporary Internet files and Browser history information. • Uninstall any downloaded programs that don't offer the option. 1. Select the Back up will be moved, the Move button is active. Others are stored. If you replace your mobile phone. 12.8 Resetting Your Mobile Phone 12.8.1 Backing Up My Data You can be transferred to the new mobile phone the first time you no longer use your Google account to Google servers. On the Settings screen, touch...
..., clear all temporary Internet files and Browser history information. • Uninstall any downloaded programs that don't offer the option. 1. Select the Back up will be moved, the Move button is active. Others are stored. If you replace your mobile phone. 12.8 Resetting Your Mobile Phone 12.8.1 Backing Up My Data You can be transferred to the new mobile phone the first time you no longer use your Google account to Google servers. On the Settings screen, touch...


