
User Guide
Page 3
... mode 51 Camera settings 51 Gallery Music and video 54 Adding songs 54 Listening to music 56 Creating a playlist 56 Playing a playlist 56 Deleting a playlist 56 Setting a song as the ringtone 57 Playing a video Network and sharing 58 Turning on mobile data 58 Wi-Fi network 59 Sharing your phone's mobile data connection 60 Transferring data through Bluetooth 62 Transferring data using Wi-Fi Direct 63 Transferring data between your phone and computer 64 Transferring data between your phone and a USB storage device 65 Multi-screen display 65 Huawei...
... mode 51 Camera settings 51 Gallery Music and video 54 Adding songs 54 Listening to music 56 Creating a playlist 56 Playing a playlist 56 Deleting a playlist 56 Setting a song as the ringtone 57 Playing a video Network and sharing 58 Turning on mobile data 58 Wi-Fi network 59 Sharing your phone's mobile data connection 60 Transferring data through Bluetooth 62 Transferring data using Wi-Fi Direct 63 Transferring data between your phone and computer 64 Transferring data between your phone and a USB storage device 65 Multi-screen display 65 Huawei...

User Guide
Page 4
70 Smart Controller 72 Phone Manager 73 Calendar 74 Clock 76 Weather 77 Note 77 FM radio Phone settings 79 Turning on location services 79 Modifying tone settings 80 Modifying display settings 81 Turning on one-hand UI 81 Turning on gloves mode 81 Turning on the suspend button 82 Changing the lock screen style 84 Turning on or off airplane mode 84 Setting the PIN of your SIM card 85 Setting up an account 86 Restoring factory settings 86 Updating your phone 87 Setting the date and time 87 Changing the system language 88 Accessibility Safety information Legal Notice iii
70 Smart Controller 72 Phone Manager 73 Calendar 74 Clock 76 Weather 77 Note 77 FM radio Phone settings 79 Turning on location services 79 Modifying tone settings 80 Modifying display settings 81 Turning on one-hand UI 81 Turning on gloves mode 81 Turning on the suspend button 82 Changing the lock screen style 84 Turning on or off airplane mode 84 Setting the PIN of your SIM card 85 Setting up an account 86 Restoring factory settings 86 Updating your phone 87 Setting the date and time 87 Changing the system language 88 Accessibility Safety information Legal Notice iii
User Guide
Page 8
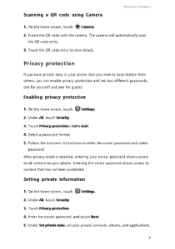
Frame the QR code with the camera. On the home screen, touch 0 Settings. 2. After privacy mode is enabled, entering your owner password allows access to all content on your private contacts, albums, and applications. 4 Entering the visitor password allows access to view details. Enter the owner password, and touch Next. 5. Touch the QR code entry to content that you wish to enter the owner password and visitor password. Under All, touch Security. 3. Under Set private data, set two different passwords, one for yourself and...
Frame the QR code with the camera. On the home screen, touch 0 Settings. 2. After privacy mode is enabled, entering your owner password allows access to all content on your private contacts, albums, and applications. 4 Entering the visitor password allows access to view details. Enter the owner password, and touch Next. 5. Touch the QR code entry to content that you wish to enter the owner password and visitor password. Under All, touch Security. 3. Under Set private data, set two different passwords, one for yourself and...

User Guide
Page 11
Recent Touch to the home screen. To replace or purchase a SIM card, contact your phone is turned off before you attach a protective film to the screen, make sure it does not block the sensor. Inserting the micro-SIM card and nano-SIM card Your phone supports only standard micro-SIM cards and nano-SIM cards. When you insert the micro-SIM card and nano-SIM card. 7 Make sure your service provider. Flash Speaker Getting >tasted • NFC sensor area Do not block the area...
Recent Touch to the home screen. To replace or purchase a SIM card, contact your phone is turned off before you attach a protective film to the screen, make sure it does not block the sensor. Inserting the micro-SIM card and nano-SIM card Your phone supports only standard micro-SIM cards and nano-SIM cards. When you insert the micro-SIM card and nano-SIM card. 7 Make sure your service provider. Flash Speaker Getting >tasted • NFC sensor area Do not block the area...

User Guide
Page 16
... check box next to Card 1 or Card 2 to Default data network. Under All, touch SIM card management. 3. The settings displayed may vary according to use one or both of them at the same time. On the home screen, touch 0 Settings. 2. Setting the default SIM card for calling and messaging You can install two SIM cards to your service provider and phone model. The settings displayed may not be supported by some service providers. 12 Dual-card settings Get;lig qatted Enabling or disabling a SIM card You can set a default SIM card for data services. 1. Setting the default SIM...
... check box next to Card 1 or Card 2 to Default data network. Under All, touch SIM card management. 3. The settings displayed may vary according to use one or both of them at the same time. On the home screen, touch 0 Settings. 2. Setting the default SIM card for calling and messaging You can install two SIM cards to your service provider and phone model. The settings displayed may not be supported by some service providers. 12 Dual-card settings Get;lig qatted Enabling or disabling a SIM card You can set a default SIM card for data services. 1. Setting the default SIM...

User Guide
Page 17
... displays them. 4. Turning on Wi-Fi. Connecting to save battery power and reduce data usage. Under Shortcuts, touch 8 to turn on mobile data 1. For details, see HiSuite mode. 13 Touch the Wi-Fi switch to transfer photos, videos, songs, and other files between your computer. Connecting your phone to a computer Use a USB cable to connect your phone to a computer, and follow the onscreen instructions to select a connection mode to turn on mobile data. 0 When you want to connect to back up and restore phone data, install...
... displays them. 4. Turning on Wi-Fi. Connecting to save battery power and reduce data usage. Under Shortcuts, touch 8 to turn on mobile data 1. For details, see HiSuite mode. 13 Touch the Wi-Fi switch to transfer photos, videos, songs, and other files between your computer. Connecting your phone to a computer Use a USB cable to connect your phone to a computer, and follow the onscreen instructions to select a connection mode to turn on mobile data. 0 When you want to connect to back up and restore phone data, install...

User Guide
Page 18
... import the contacts to your new phone. For details, see Importing contacts from your SNS accounts. • Log in any of the following ways: SIM card Storage device Bluetooth Backup Computer Copy your contacts on both your old and new phones, and import your new phone. If your old phone supports Backup, back up your contacts, and restore them to your new phone. Other accounts • Install SNS applications and synchronize contacts from a Bluetooth device. For details, see USB flash drive mode.
... import the contacts to your new phone. For details, see Importing contacts from your SNS accounts. • Log in any of the following ways: SIM card Storage device Bluetooth Backup Computer Copy your contacts on both your old and new phones, and import your new phone. If your old phone supports Backup, back up your contacts, and restore them to your new phone. Other accounts • Install SNS applications and synchronize contacts from a Bluetooth device. For details, see USB flash drive mode.

User Guide
Page 23
... location data 9 from GPS Vibration mode enabled JV Silence mode enabled a Charging Battery low Alarms enabled Battery full Call in or synchronization A problem Zi Synchronizing data • Synchronization failed Portable Wi-Fi hotspot on 19 Wi-Fi network available Connected to a VPN 0 Headset plugged in USB debugging mode enabled USB tethering on a More notifications 3... Connected to a Wi-Fi network Downloading data Uploading data Phone memory full Upcoming events No SIM card found Sign-in progress Missed calls New messages New emails CU) New...
... location data 9 from GPS Vibration mode enabled JV Silence mode enabled a Charging Battery low Alarms enabled Battery full Call in or synchronization A problem Zi Synchronizing data • Synchronization failed Portable Wi-Fi hotspot on 19 Wi-Fi network available Connected to a VPN 0 Headset plugged in USB debugging mode enabled USB tethering on a More notifications 3... Connected to a Wi-Fi network Downloading data Uploading data Phone memory full Upcoming events No SIM card found Sign-in progress Missed calls New messages New emails CU) New...
User Guide
Page 28
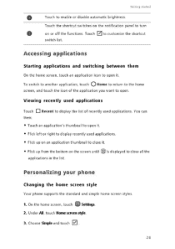
... the applications in the list. Touch El to close it . Getting :,,tattrd O Touch to turn on or off the functions. Touch the shortcut switches on the notification panel to enable or disable automatic brightness. Accessing applications Starting applications and switching between them On the home screen, touch an application icon to open it. • Flick left or right to display recently used applications Touch u Recent to open. Under All, touch Home screen style 3. Choose Simple...
... the applications in the list. Touch El to close it . Getting :,,tattrd O Touch to turn on or off the functions. Touch the shortcut switches on the notification panel to enable or disable automatic brightness. Accessing applications Starting applications and switching between them On the home screen, touch an application icon to open it. • Flick left or right to display recently used applications Touch u Recent to open. Under All, touch Home screen style 3. Choose Simple...

User Guide
Page 29
... displayed on the home screen to enter editing mode. 2. On the home screen, touch 0 Settings. 2. Touch V. 25 Select a theme and touch Changing the wallpaper 1. On the Wallpapers screen, you have the home screen wallpaper changed automatically at periodic intervals. Setting the ringtone 1. Ited Touch Standard to switch from the audio files you can: • Touch Lock screen wallpaper to set the home screen wallpaper. • Touch Shake to change to change the home screen wallpaper by shaking your phone. • Touch the Random change switch to have saved...
... displayed on the home screen to enter editing mode. 2. On the home screen, touch 0 Settings. 2. Touch V. 25 Select a theme and touch Changing the wallpaper 1. On the Wallpapers screen, you have the home screen wallpaper changed automatically at periodic intervals. Setting the ringtone 1. Ited Touch Standard to switch from the audio files you can: • Touch Lock screen wallpaper to set the home screen wallpaper. • Touch Shake to change to change the home screen wallpaper by shaking your phone. • Touch the Random change switch to have saved...

User Guide
Page 39
... home screen, touch e) Dialer. 2. On the home screen, touch Dialer. 2. Under Dialer, touch > Call settings. 3. Under Dialer, touch = >Call settings. 3. Deleting call forwarding to redirect calls to turn on pocket mode Are you out by increasing the ringtone volume and vibration intensity of incoming calls over time. 1. Touch Pocket mode to another number. 1. Enable call records 1. Touch Call forwarding under Card 1 Settings or Card 2 Settings 4. Calk and contacts 0 You can also touch and hold the number you can help you ever worried about missing important calls when your phone...
... home screen, touch e) Dialer. 2. On the home screen, touch Dialer. 2. Under Dialer, touch > Call settings. 3. Under Dialer, touch = >Call settings. 3. Deleting call forwarding to redirect calls to turn on pocket mode Are you out by increasing the ringtone volume and vibration intensity of incoming calls over time. 1. Touch Pocket mode to another number. 1. Enable call records 1. Touch Call forwarding under Card 1 Settings or Card 2 Settings 4. Calk and contacts 0 You can also touch and hold the number you can help you ever worried about missing important calls when your phone...

User Guide
Page 50
... use . Setting up an account Switching between email accounts If you want to remove. 4. On the home screen, touch Email. 2. Touch the email account you have logged into multiple email accounts on the network condition. On the Inbox screen, touch = > Settings. 3. Personalizing your phone will no longer send or receive emails using that account. On the home screen, touch Email. 2. After you want to refresh your signature, set how often the inbox is refreshed, and set the notification tone for new emails. 46 Touch Remove account then OK. Removing an email account...
... use . Setting up an account Switching between email accounts If you want to remove. 4. On the home screen, touch Email. 2. Touch the email account you have logged into multiple email accounts on the network condition. On the Inbox screen, touch = > Settings. 3. Personalizing your phone will no longer send or receive emails using that account. On the home screen, touch Email. 2. After you want to refresh your signature, set how often the inbox is refreshed, and set the notification tone for new emails. 46 Touch Remove account then OK. Removing an email account...
User Guide
Page 63
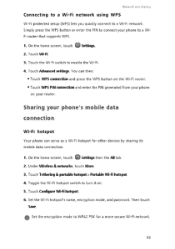
... PIN connection and enter the PIN generated from your phone on . 5. Then touch Save. Touch Tethering & portable hotspot > Portable Wi-Fl hotspot. 4. Simply press the WPS button or enter the PIN to connect your phone to WPA2 PSK for other devices by sharing its mobile data connection. 1. On the home screen, touch 0 Settings. 2. Set the Wi-Fi hotspot's name, encryption mode, and password. Touch Advanced settings. Set the encryption mode to a WiFi router that supports WPS. 1. Under Wireless & networks, touch More. 3. On the home screen, touch 0 Settings...
... PIN connection and enter the PIN generated from your phone on . 5. Then touch Save. Touch Tethering & portable hotspot > Portable Wi-Fl hotspot. 4. Simply press the WPS button or enter the PIN to connect your phone to WPA2 PSK for other devices by sharing its mobile data connection. 1. On the home screen, touch 0 Settings. 2. Set the Wi-Fi hotspot's name, encryption mode, and password. Touch Advanced settings. Set the encryption mode to a WiFi router that supports WPS. 1. Under Wireless & networks, touch More. 3. On the home screen, touch 0 Settings...

User Guide
Page 68
...card inserted. You can connect your phone and a USB storage device You can then: 1. Compatible USB storage devices include USB flash drives, card readers, and phones that the phone has been installed with a microSD card. Connect two phones using a USB OTG cable to a USB storage device directly using a USB OTG cable and a USB cable. 2. Network and sharing The computer recognizes your phone, touch 0 Settings. 4. On the home screen of your phone as a USB storage device. Open the newly recognized drive to USB flash drive. 3. Transferring data between your phone to transfer data...
...card inserted. You can connect your phone and a USB storage device You can then: 1. Compatible USB storage devices include USB flash drives, card readers, and phones that the phone has been installed with a microSD card. Connect two phones using a USB OTG cable to a USB storage device directly using a USB OTG cable and a USB cable. 2. Network and sharing The computer recognizes your phone, touch 0 Settings. 4. On the home screen of your phone as a USB storage device. Open the newly recognized drive to USB flash drive. 3. Transferring data between your phone to transfer data...
User Guide
Page 69
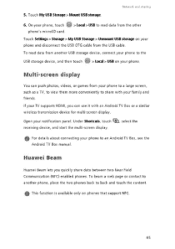
... wireless transmission device for multi-screen display. Under Shortcuts, touch 1 , select the receiving device, and start the multi-screen display. 0 For details about connecting your notification panel. On your phone, touch ir.,f= > Local> USB to an Android TV Box, see the Android TV Box manual. To read data from the USB cable. Open your phone to read data from your family and friends. Network and sharing 6. Touch Settings > Storage > My USB Storage > Unmount USB storage on phones that support NFC. 65 Huawei Beam Huawei...
... wireless transmission device for multi-screen display. Under Shortcuts, touch 1 , select the receiving device, and start the multi-screen display. 0 For details about connecting your notification panel. On your phone, touch ir.,f= > Local> USB to an Android TV Box, see the Android TV Box manual. To read data from the USB cable. Open your phone to read data from your family and friends. Network and sharing 6. Touch Settings > Storage > My USB Storage > Unmount USB storage on phones that support NFC. 65 Huawei Beam Huawei...

User Guide
Page 84
... to enable or disable the blinking indicator when you touch or lock the screen, dial a number, and more. If idle for the specified period, your phone is turned on or off. On the home screen, touch 0 Settings. 2. Phone settings • Touch Card 1 phone ringtone or Card 2 phone ringtone to select a ringtone. • Touch Default notification tone to set a notification tone. • Touch System to turn on or off the notification tone or vibration when you receive notifications. • Touch Brightness to adjust the screen brightness. • Touch Sleep to turn the Auto...
... to enable or disable the blinking indicator when you touch or lock the screen, dial a number, and more. If idle for the specified period, your phone is turned on or off. On the home screen, touch 0 Settings. 2. Phone settings • Touch Card 1 phone ringtone or Card 2 phone ringtone to select a ringtone. • Touch Default notification tone to set a notification tone. • Touch System to turn on or off the notification tone or vibration when you receive notifications. • Touch Brightness to adjust the screen brightness. • Touch Sleep to turn the Auto...

User Guide
Page 87
... should you forget your phone should be a letter, and then enter them again for confirmation. Setting a screen unlock password 1. Touch Screen lock> Password. 4. On the home screen, touch 0 Settings. 2. Touch Screen lock> Pattern. 4. Connect at least four digits and then enter them again for confirmation. 5. Under All, touch Security. 3. Under All, touch Security. 3. Enter at least four dots to unlock your unlock pattern. Touch Screen lock> PIN 4. On the home screen, touch O Settings. 2. Setting a screen unlock PIN 1. Set a screen unlock PIN as an alternative...
... should you forget your phone should be a letter, and then enter them again for confirmation. Setting a screen unlock password 1. Touch Screen lock> Password. 4. On the home screen, touch 0 Settings. 2. Touch Screen lock> Pattern. 4. Connect at least four digits and then enter them again for confirmation. 5. Under All, touch Security. 3. Under All, touch Security. 3. Enter at least four dots to unlock your unlock pattern. Touch Screen lock> PIN 4. On the home screen, touch O Settings. 2. Setting a screen unlock PIN 1. Set a screen unlock PIN as an alternative...

User Guide
Page 88
... home screen, touch 0 Settings. 2. Touch Lock SIM card under Card 1 or Card 2. 5. Under Shortcuts, touch Airplane mode. • Press and hold the power button, and touch Airplane mode. • On the home screen, touch 0 Settings then the All tab. If you enable the SIM card lock, you must enter the PIN each time you can still listen to music or play games using your phone. In airplane mode, your phone's wireless features are on a flight. Use either of your SIM card A personal identification number (PIN) is displayed on the status bar. Setting the PIN...
... home screen, touch 0 Settings. 2. Touch Lock SIM card under Card 1 or Card 2. 5. Under Shortcuts, touch Airplane mode. • Press and hold the power button, and touch Airplane mode. • On the home screen, touch 0 Settings then the All tab. If you enable the SIM card lock, you must enter the PIN each time you can still listen to music or play games using your phone. In airplane mode, your phone's wireless features are on a flight. Use either of your SIM card A personal identification number (PIN) is displayed on the status bar. Setting the PIN...
User Guide
Page 90
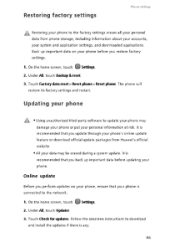
... downloaded applications. On the home screen, touch Settings. 2. Restoring factory settings Phone settings a Restoring your phone to the factory settings erases all your personal data from Huawei's official website. •All your data may damage your phone or put your phone is any. 86 The phone will restore its factory settings and restart. Online update Before you back up important data on your phone, ensure that you restore factory settings. 0 1. Follow the onscreen instructions to download and install the updates if there is connected to the network...
... downloaded applications. On the home screen, touch Settings. 2. Restoring factory settings Phone settings a Restoring your phone to the factory settings erases all your personal data from Huawei's official website. •All your data may damage your phone or put your phone is any. 86 The phone will restore its factory settings and restart. Online update Before you back up important data on your phone, ensure that you restore factory settings. 0 1. Follow the onscreen instructions to download and install the updates if there is connected to the network...

User Guide
Page 91
... the home screen, touch CD Settings. 2. Phone settings O Online update may not be displayed. • Touch Dual clocks to be provided by all service providers. On the home screen, touch ID Settings. 2. It is recommended that you are using data roaming. On the Date & time screen, you can: • Touch the Automatic date & time switch to use the network time or manually set the time. • Touch the Automatic time zone switch to use the network time zone or manually set the time zone. • Touch the Use 24-hour format switch to switch...
... the home screen, touch CD Settings. 2. Phone settings O Online update may not be displayed. • Touch Dual clocks to be provided by all service providers. On the home screen, touch ID Settings. 2. It is recommended that you are using data roaming. On the Date & time screen, you can: • Touch the Automatic date & time switch to use the network time or manually set the time. • Touch the Automatic time zone switch to use the network time zone or manually set the time zone. • Touch the Use 24-hour format switch to switch...


