Quick Start Guide
Page 1
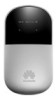
... Wireless Modem (hereinafter referred to as the E5). The supported functions and actual appearance are provided for illustration only. For details about your product selection, consult your product purchased. When the E5 gets heated to a certain extent, it will switch off or disconnect from the network automatically to set the management parameters, see the Help on the web management...
... Wireless Modem (hereinafter referred to as the E5). The supported functions and actual appearance are provided for illustration only. For details about your product selection, consult your product purchased. When the E5 gets heated to a certain extent, it will switch off or disconnect from the network automatically to set the management parameters, see the Help on the web management...
Quick Start Guide
Page 3
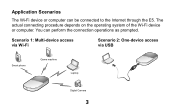
You can be connected to the Internet through the E5. Scenario 1: Multi-device access via Wi-Fi Scenario 2: One-device access via USB Smart phone Game machine Laptop Digital Camera 3 Application Scenarios The Wi-Fi device or computer can perform the connection operations as prompted. The actual connecting procedure depends on the operating system of the Wi-Fi device or computer.
You can be connected to the Internet through the E5. Scenario 1: Multi-device access via Wi-Fi Scenario 2: One-device access via USB Smart phone Game machine Laptop Digital Camera 3 Application Scenarios The Wi-Fi device or computer can perform the connection operations as prompted. The actual connecting procedure depends on the operating system of the Wi-Fi device or computer.
Quick Start Guide
Page 5
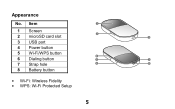
Item 1 1 Screen 2 microSD card slot 2 3 3 USB port 4 Power button 5 Wi-Fi/WPS button 6 Dialing button 4 5 7 7 Strap hole 6 8 8 Battery button Wi-Fi: Wireless Fidelity WPS: Wi-Fi Protected Setup 5 Appearance No.
Item 1 1 Screen 2 microSD card slot 2 3 3 USB port 4 Power button 5 Wi-Fi/WPS button 6 Dialing button 4 5 7 7 Strap hole 6 8 8 Battery button Wi-Fi: Wireless Fidelity WPS: Wi-Fi Protected Setup 5 Appearance No.
Quick Start Guide
Page 6
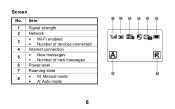
Screen No. Item 1 Signal strength 2 Network 3 Wi-Fi enabled Number of devices connected 4 Internet connection 5 New messages Number of new messages 6 Power level 7 Roaming state 8 M: Manual mode A: Auto mode 6 12 3 4 5 6 8 7
Screen No. Item 1 Signal strength 2 Network 3 Wi-Fi enabled Number of devices connected 4 Internet connection 5 New messages Number of new messages 6 Power level 7 Roaming state 8 M: Manual mode A: Auto mode 6 12 3 4 5 6 8 7

Quick Start Guide
Page 8
Note: The microSD card is being used the battery for a long time, please charge it first. Method 1: Charging by Using the Charger Caution: Use the charger compatible the E5 model and provided by the designated manufacturers only. Otherwise, the card and the E5 may be damaged, and the data stored on the card may be corrupted. If...
Note: The microSD card is being used the battery for a long time, please charge it first. Method 1: Charging by Using the Charger Caution: Use the charger compatible the E5 model and provided by the designated manufacturers only. Otherwise, the card and the E5 may be damaged, and the data stored on the card may be corrupted. If...

Quick Start Guide
Page 9
Power off the E5. 2. Connect the E5 and PC with a compatible data cable. 9 Method 2: Charging by other manufacturers or vendors is used, the E5 may fail to work and dangers may fail to work. The charger is not provided in the package, you can contact your local dealer to buy one yourself. provided by Connecting to a PC 1. At the same time, any national regulations on terminal products or warranty applicable to the E5 may be caused. If the charger is an optional accessory.
Power off the E5. 2. Connect the E5 and PC with a compatible data cable. 9 Method 2: Charging by other manufacturers or vendors is used, the E5 may fail to work and dangers may fail to work. The charger is not provided in the package, you can contact your local dealer to buy one yourself. provided by Connecting to a PC 1. At the same time, any national regulations on terminal products or warranty applicable to the E5 may be caused. If the charger is an optional accessory.
Quick Start Guide
Page 10
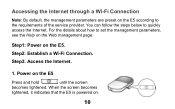
For the details about how to set the management parameters, see the Help on . 10 When the screen becomes lightened, it indicates that the E5 is powered on the Web management page. Step2: Establish a Wi-Fi Connection. Step3: Access the Internet. 1. Step1: Power on the E5 Press and hold until the screen becomes lightened. Power on the E5. You can follow the steps below to the requirements of the service provider. Accessing the Internet through a Wi-Fi Connection Note: By default, the management parameters are preset on the E5 according to quickly access the Internet.
For the details about how to set the management parameters, see the Help on . 10 When the screen becomes lightened, it indicates that the E5 is powered on the Web management page. Step2: Establish a Wi-Fi Connection. Step3: Access the Internet. 1. Step1: Power on the E5 Press and hold until the screen becomes lightened. Power on the E5. You can follow the steps below to the requirements of the service provider. Accessing the Internet through a Wi-Fi Connection Note: By default, the management parameters are preset on the E5 according to quickly access the Internet.
Quick Start Guide
Page 11
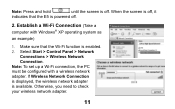
... enabled. 2. If Wireless Network Connection is displayed, the wireless network adapter is off . 2. Note: Press and hold until the screen is available. When the screen is off, it indicates that the Wi-Fi function is powered off . Note: To set up a Wi-Fi connection, the PC must be configured with Windows® XP operating system as an example) 1. Select Start > Control Panel > Network Connections > Wireless Network Connection. Otherwise, you need...
... enabled. 2. If Wireless Network Connection is displayed, the wireless network adapter is off . 2. Note: Press and hold until the screen is available. When the screen is off, it indicates that the Wi-Fi function is powered off . Note: To set up a Wi-Fi connection, the PC must be configured with Windows® XP operating system as an example) 1. Select Start > Control Panel > Network Connections > Wireless Network Connection. Otherwise, you need...

Quick Start Guide
Page 12
Select the network whose SSID is attached on the E5. Note: If the encryption parameter is already set for the E5, the Wireless Network Connection dialog box is displayed and requires the network key and confirmation. The SSID and key label is the same as that of the screen. Then, you can connect your PC to display the wireless network list. 4. 3. Wait until the wireless connection icon is displayed in the status area in the lower right corner of the E5, and then click . Click View available Wireless Networks to the E5. 12
Select the network whose SSID is attached on the E5. Note: If the encryption parameter is already set for the E5, the Wireless Network Connection dialog box is displayed and requires the network key and confirmation. The SSID and key label is the same as that of the screen. Then, you can connect your PC to display the wireless network list. 4. 3. Wait until the wireless connection icon is displayed in the status area in the lower right corner of the E5, and then click . Click View available Wireless Networks to the E5. 12
Quick Start Guide
Page 13
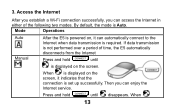
Mode Operations Auto Manual After the E5 is powered on, it indicates that the connection is set up successfully. When is not performed over a period of the following two modes. Access the Internet After you establish a Wi-Fi connection successfully, you can access the Internet in either of time, the E5 automatically disconnects from the Internet Press and hold CONNECT until is displayed on the screen...
Mode Operations Auto Manual After the E5 is powered on, it indicates that the connection is set up successfully. When is not performed over a period of the following two modes. Access the Internet After you establish a Wi-Fi connection successfully, you can access the Internet in either of time, the E5 automatically disconnects from the Internet Press and hold CONNECT until is displayed on the screen...

Quick Start Guide
Page 14
... launch web management page to connect to select the mode of accessing the Internet. If the E5 accesses the roaming network, the E5 automatically disconnects from the network as prompted. Note: You can only press and hold CONNECT to the Internet is disconnected. Mode Operations disappears, it indicates that the connection to establish or disconnect a network connection. The dialing button does not work in...
... launch web management page to connect to select the mode of accessing the Internet. If the E5 accesses the roaming network, the E5 automatically disconnects from the network as prompted. Note: You can only press and hold CONNECT to the Internet is disconnected. Mode Operations disappears, it indicates that the connection to establish or disconnect a network connection. The dialing button does not work in...

Quick Start Guide
Page 15
Accessing the Web Management Page 1. Start the Internet browser and enter http://192.168.1.1 in the address bar. 3. Insert the microSD card. 15 Make sure that the connection between the E5 and the Client is enabled, you can store data on the card or share the data stored on the card on the web management page. 1. Verifying the PIN Code When the PIN code protection is proper. 2. Enter the password, and then click...
Accessing the Web Management Page 1. Start the Internet browser and enter http://192.168.1.1 in the address bar. 3. Insert the microSD card. 15 Make sure that the connection between the E5 and the Client is enabled, you can store data on the card or share the data stored on the card on the web management page. 1. Verifying the PIN Code When the PIN code protection is proper. 2. Enter the password, and then click...
Quick Start Guide
Page 17
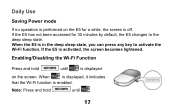
If the E5 is enabled. When is displayed, it indicates that the Wi-Fi function is activated, the screen becomes lightened. Daily Use Saving Power mode If no operation is performed on the screen. When the E5 is in the deep sleep state, you can press any key to the deep sleep state. Enabling/Disabling the Wi-Fi Function Press and hold until is off. Note: Press and hold until 17 If the E5 has not been accessed for a while, the screen is displayed on the E5 for 30 minutes by default, the E5 changes to activate the Wi-Fi function.
If the E5 is enabled. When is displayed, it indicates that the Wi-Fi function is activated, the screen becomes lightened. Daily Use Saving Power mode If no operation is performed on the screen. When the E5 is in the deep sleep state, you can press any key to the deep sleep state. Enabling/Disabling the Wi-Fi Function Press and hold until is off. Note: Press and hold until 17 If the E5 has not been accessed for a while, the screen is displayed on the E5 for 30 minutes by default, the E5 changes to activate the Wi-Fi function.
Quick Start Guide
Page 18
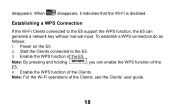
... pressing and holding , you can generate a network key without manual input. To establish a WPS connection,do as follows: 1. When disappears, it indicates that the Wi-Fi is disabled. Start the Clients connected to the E5 support the WPS function, the E5 can enable the WPS function of the Clients, see the Clients' user guide. 18 disappears. Establishing a WPS Connection If the Wi-Fi Clients connected to the E5. 3. Note: For the...
... pressing and holding , you can generate a network key without manual input. To establish a WPS connection,do as follows: 1. When disappears, it indicates that the Wi-Fi is disabled. Start the Clients connected to the E5 support the WPS function, the E5 can enable the WPS function of the Clients, see the Clients' user guide. 18 disappears. Establishing a WPS Connection If the Wi-Fi Clients connected to the E5. 3. Note: For the...
Quick Start Guide
Page 19
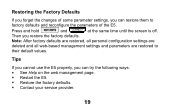
Press and hold and CONNECT at the same time until the screen is off. Tips If you cannot use the E5 properly, you can restore them to their default values. Restoring the Factory Defaults If you forget the changes of the E5. Note: After factory defaults are restored, all personal configuration settings are deleted and all web-based management settings and parameters are restored to factory defaults and reconfigure the parameters...
Press and hold and CONNECT at the same time until the screen is off. Tips If you cannot use the E5 properly, you can restore them to their default values. Restoring the Factory Defaults If you forget the changes of the E5. Note: After factory defaults are restored, all personal configuration settings are deleted and all web-based management settings and parameters are restored to factory defaults and reconfigure the parameters...
Quick Start Guide
Page 20
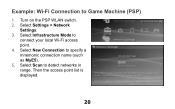
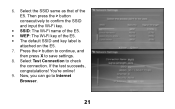
Example: Wi-Fi Connection to detect networks in range. Then the access point list is displayed. 20 Select Scan to Game Machine (PSP) 1. Select Infrastructure Mode to specify a mnemonic connection name (such as MyE5). 5. Select New Connection to connect your local Wi-Fi access point. 4. Turn on the PSP WLAN switch. 2. Select Settings > Network Settings. 3.
Example: Wi-Fi Connection to detect networks in range. Then the access point list is displayed. 20 Select Scan to Game Machine (PSP) 1. Select Infrastructure Mode to specify a mnemonic connection name (such as MyE5). 5. Select New Connection to connect your local Wi-Fi access point. 4. Turn on the PSP WLAN switch. 2. Select Settings > Network Settings. 3.
Quick Start Guide
Page 21
Press the > button to continue, and then press X to Internet Browser. 21 If the test succeeds, congratulations! You're online! 9. Select the SSID same as that of the E5. The default SSID and key label is attached on the E5. 7. Now, you can go to save settings. 8. Then press the > button consecutively to check the connection. Select Test Connection to confirm the SSID and input the Wi-Fi key. SSID: The Wi-Fi name of the E5. WEP: The Wi-Fi key of the E5. 6.
Press the > button to continue, and then press X to Internet Browser. 21 If the test succeeds, congratulations! You're online! 9. Select the SSID same as that of the E5. The default SSID and key label is attached on the E5. 7. Now, you can go to save settings. 8. Then press the > button consecutively to check the connection. Select Test Connection to confirm the SSID and input the Wi-Fi key. SSID: The Wi-Fi name of the E5. WEP: The Wi-Fi key of the E5. 6.
Quick Start Guide
Page 22
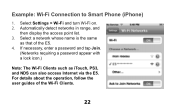
Example: Wi-Fi Connection to Smart Phone (iPhone) 1. For details about the operation, follow the user guides of the E5. 4. Automatically detect networks in range, and then display the access point list. 3. If necessary, enter a password and tap Join. (Networks requiring a password appear with a lock icon.) Note: The Wi-Fi Clients such as that of the Wi-Fi Clients. 22 Select a network whose name is the same as iTouch, PS3, and NDS can also access Internet via the E5. Select Settings > Wi-Fi and turn Wi-Fi on. 2.
Example: Wi-Fi Connection to Smart Phone (iPhone) 1. For details about the operation, follow the user guides of the E5. 4. Automatically detect networks in range, and then display the access point list. 3. If necessary, enter a password and tap Join. (Networks requiring a password appear with a lock icon.) Note: The Wi-Fi Clients such as that of the Wi-Fi Clients. 22 Select a network whose name is the same as iTouch, PS3, and NDS can also access Internet via the E5. Select Settings > Wi-Fi and turn Wi-Fi on. 2.
Quick Start Guide
Page 23
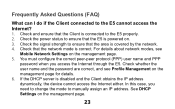
... access the Internet through the E5. See DHCP Settings on the management page. 5. You must configure the correct peer-peer protocol (PPP) user name and PPP password when you need to change the mode to ensure that the E5 is powered on the management page for details. 6. Check that the network mode is disabled and the Client obtains the IP address dynamically, the device cannot access the Internet either. Check the power status to manually assign...
... access the Internet through the E5. See DHCP Settings on the management page. 5. You must configure the correct peer-peer protocol (PPP) user name and PPP password when you need to change the mode to ensure that the E5 is powered on the management page for details. 6. Check that the network mode is disabled and the Client obtains the IP address dynamically, the device cannot access the Internet either. Check the power status to manually assign...
Quick Start Guide
Page 24
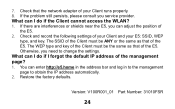
Restore the factory defaults. Version: V100R001_01 Part Number: 31010FSR 24 If the problem still persists, please consult you need to obtain the IP address automatically. 2. Check and record the following settings of your E5: SSID, WEP type, and key. You can I do if I do if the Client cannot access the WLAN? 1. The SSID of the Client must be ANY or the same as that the network adapter of your Client and your Client runs...
Restore the factory defaults. Version: V100R001_01 Part Number: 31010FSR 24 If the problem still persists, please consult you need to obtain the IP address automatically. 2. Check and record the following settings of your E5: SSID, WEP type, and key. You can I do if I do if the Client cannot access the WLAN? 1. The SSID of the Client must be ANY or the same as that the network adapter of your Client and your Client runs...


