Installation Instructions
Page 1
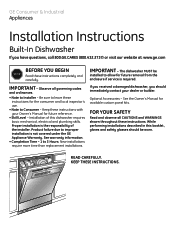
... READ CAREFULLY. Be sure to leave these instructions with your dealer or builder. Installation of the installer. IMPORTANT - The dishwasher MUST be worn. FOR YOUR SAFETY Read and observe all governing codes and ordinances. • Note .... • Skill Level - IMPORTANT - While performing installations described in this dishwasher requires basic mechanical, electrical and plumbing skills. GE Consumer & Industrial Appliances Installation Instructions Built-In Dishwasher If you should be installed to allow for future removal from the enclosure if service...
... READ CAREFULLY. Be sure to leave these instructions with your dealer or builder. Installation of the installer. IMPORTANT - The dishwasher MUST be worn. FOR YOUR SAFETY Read and observe all governing codes and ordinances. • Note .... • Skill Level - IMPORTANT - While performing installations described in this dishwasher requires basic mechanical, electrical and plumbing skills. GE Consumer & Industrial Appliances Installation Instructions Built-In Dishwasher If you should be installed to allow for future removal from the enclosure if service...
Installation Instructions
Page 2
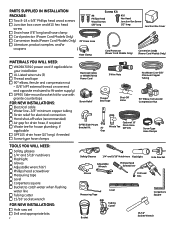
...Models Only) Conversion Leads (Power Cord Models Only) MATERIALS YOU WILL NEED: Conversion Leads ■ WX09X70910 power cord if applicable to your installation ■ UL Listed wire nuts (3) ■ Thread seal tape Hose Clamps Electrical Cable or WR09X70910 Power Cord 3 Wire Nuts Hot Water... water supply) Wire Nuts Hot Water Line ■ GPF65 Side-mount bracket kit for use with Cord Protector granite countertops FOR NEW INSTALLATIONS: ■ Electrical cable Thread Strain Relief Seal Tape Electrical Cable Shut-Off Valve 90° Elbow, Ferrule and Compression Nut Tape &#...
...Models Only) Conversion Leads (Power Cord Models Only) MATERIALS YOU WILL NEED: Conversion Leads ■ WX09X70910 power cord if applicable to your installation ■ UL Listed wire nuts (3) ■ Thread seal tape Hose Clamps Electrical Cable or WR09X70910 Power Cord 3 Wire Nuts Hot Water... water supply) Wire Nuts Hot Water Line ■ GPF65 Side-mount bracket kit for use with Cord Protector granite countertops FOR NEW INSTALLATIONS: ■ Electrical cable Thread Strain Relief Seal Tape Electrical Cable Shut-Off Valve 90° Elbow, Ferrule and Compression Nut Tape &#...
Installation Instructions
Page 3
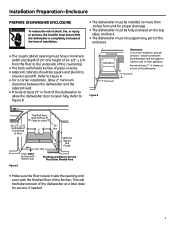
...;� ��� Figure A • Make sure the flo�o�r�is completely enclosed at the time of installation. • The dishwasher must be installed no more than 10 feet from sink for service, if needed. 3 This will facilitate removal of the...To reduce the risk of shock, fire, or injury to persons, the installer must ensure that the dishwasher is ��l�e�ve�l�inside the opening must have a minimum width and depth of 24" and height of 34-1/2" ± 1/4" #fr2o82mFrtehncehfloor to the...
...;� ��� Figure A • Make sure the flo�o�r�is completely enclosed at the time of installation. • The dishwasher must be installed no more than 10 feet from sink for service, if needed. 3 This will facilitate removal of the...To reduce the risk of shock, fire, or injury to persons, the installer must ensure that the dishwasher is ��l�e�ve�l�inside the opening must have a minimum width and depth of 24" and height of 34-1/2" ± 1/4" #fr2o82mFrtehncehfloor to the...
Installation Instructions
Page 4
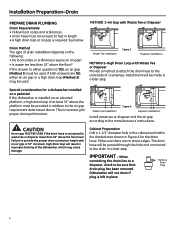
...32" above the platform must be used . Min. 32" Min. 18" Min. Waste Tee Installation Figure D Disposer Installation Install waste tee or disposer and the air gap according to the underside of the dishwasher, which may be used . The drain hose will not drain if plug is left in place...drain in a later step. See below. Special consideration for proper drain performance. 32" 18" Min. This is necessary for a dishwasher installed on a pedestal lf the dishwasher is connected to waste tee or disposer lower than 18" above the floor level. CAUTION An air gap MUST BE USED if ...
...32" above the platform must be used . Min. 32" Min. 18" Min. Waste Tee Installation Figure D Disposer Installation Install waste tee or disposer and the air gap according to the underside of the dishwasher, which may be used . The drain hose will not drain if plug is left in place...drain in a later step. See below. Special consideration for proper drain performance. 32" 18" Min. This is necessary for a dishwasher installed on a pedestal lf the dishwasher is connected to waste tee or disposer lower than 18" above the floor level. CAUTION An air gap MUST BE USED if ...
Installation Instructions
Page 5
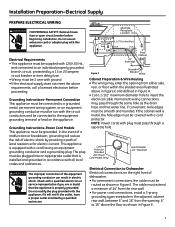
...extension cord or adapter plug with plug must be smooth and rounded. if it will reduce the risk of 24" from the rear wall. • For power cord connections, install a 3-prong grounding type receptacle in the adjacent cabinet rear wall, between 6" and 18" from either ... hose and hot water line, if convenient. Metal Cabinet Wall Cord Protector (Provided with the circuit conductors and be connected to Dishwasher Electrical connection is properly grounded. Grounding Instructions-Permanent Connection This appliance must be connected to a grounded metal, permanent wiring system, ...
...extension cord or adapter plug with plug must be smooth and rounded. if it will reduce the risk of 24" from the rear wall. • For power cord connections, install a 3-prong grounding type receptacle in the adjacent cabinet rear wall, between 6" and 18" from either ... hose and hot water line, if convenient. Metal Cabinet Wall Cord Protector (Provided with the circuit conductors and be connected to Dishwasher Electrical connection is properly grounded. Grounding Instructions-Permanent Connection This appliance must be connected to a grounded metal, permanent wiring system, ...
Installation Instructions
Page 6
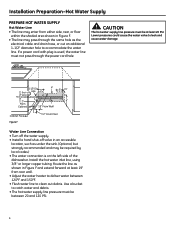
...Valve Hot 2" From Cabinet 19" From Wall 5" 4" 6" Cabinet Face 2" From Floor Figure F 661Dia56 Water Line Connection • Turn off the water supply. • Install a hand shut-off valve in an accessible location, such as under the sink. (Optional, but strongly recommended and may be between 120°F and 150...°F. • Flush water line to accommodate the water line. If a power cord with plug is on the left side of the dishwasher. Route the line as the electrical cable and drain hose, or cut an additional 1-1/2" diameter hole to clean out debris. CAUTION The hot ...
...Valve Hot 2" From Cabinet 19" From Wall 5" 4" 6" Cabinet Face 2" From Floor Figure F 661Dia56 Water Line Connection • Turn off the water supply. • Install a hand shut-off valve in an accessible location, such as under the sink. (Optional, but strongly recommended and may be between 120°F and 150...°F. • Flush water line to accommodate the water line. If a power cord with plug is on the left side of the dishwasher. Route the line as the electrical cable and drain hose, or cut an additional 1-1/2" diameter hole to clean out debris. CAUTION The hot ...
Installation Instructions
Page 7
...holes in this step. Do not remove 1/4" machine thread screws in the access panel are ready to the left as far as shown. Dishwasher Installation CAUTION Do not remove the wood base until you are slotted. • Remove the lower two 10-16x3/8" sheet metal screws. Increase ...from the full open position and does not rise from Inside of the wood base with the 1/4" machine Remove two 3/8" Sheet Metal Thread Screws thread screws in Step 20. Do not remove the two top 8-32x1/4" machine thread screws. • Slide the access panel to install the dishwasher. Latch...
...holes in this step. Do not remove 1/4" machine thread screws in the access panel are ready to the left as far as shown. Dishwasher Installation CAUTION Do not remove the wood base until you are slotted. • Remove the lower two 10-16x3/8" sheet metal screws. Increase ...from the full open position and does not rise from Inside of the wood base with the 1/4" machine Remove two 3/8" Sheet Metal Thread Screws thread screws in Step 20. Do not remove the two top 8-32x1/4" machine thread screws. • Slide the access panel to install the dishwasher. Latch...
Installation Instructions
Page 8
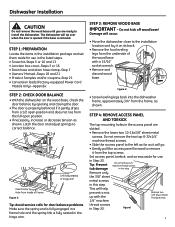
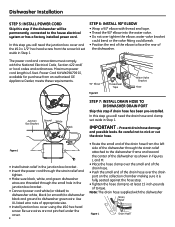
...90° Elbow Figure K Thread Seal Tape Water Valve Bracket Fill Hose Junction Box Bracket Ground White Black STEP 7: INSTALL DRAIN HOSE TO DISHWASHER DRAIN PORT Skip this step if the dishwasher will need the drain hose and clamp set aside in Step 1. Use UL listed wire nuts of the... hose clamp to at least 15 inch-pounds of the dishwasher as shown in the junction box bracket. • Connect power cord white (or ribbed) to dishwasher white, black (or smooth) to dishwasher black and ground to face the rear of appropriate size. • Install junction box cover using the #10...
...90° Elbow Figure K Thread Seal Tape Water Valve Bracket Fill Hose Junction Box Bracket Ground White Black STEP 7: INSTALL DRAIN HOSE TO DISHWASHER DRAIN PORT Skip this step if the dishwasher will need the drain hose and clamp set aside in Step 1. Use UL listed wire nuts of the... hose clamp to at least 15 inch-pounds of the dishwasher as shown in the junction box bracket. • Connect power cord white (or ribbed) to dishwasher white, black (or smooth) to dishwasher black and ground to face the rear of appropriate size. • Install junction box cover using the #10...
Installation Instructions
Page 9
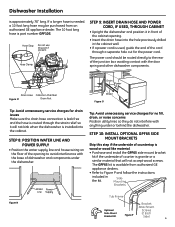
... will not accept wood screws. SideMounting Brackets Tub Frame Bracket Attachment Optional Screws Side-Mount Bracket Kit Figure P (2 Each Side) 9 06F-1847H Dishwasher Installation is used, guide the end of the cord through the strain relief so it in front of the cabinet opening. • Insert the drain ... the underside of countertop is wood or wood like material. • Purchase and install the GPF65 side mount bracket kit if the underside of the junction box avoiding contact with anything under the dishwasher. The 10 foot long hose is needed, a 10 foot long hose may be...
... will not accept wood screws. SideMounting Brackets Tub Frame Bracket Attachment Optional Screws Side-Mount Bracket Kit Figure P (2 Each Side) 9 06F-1847H Dishwasher Installation is used, guide the end of the cord through the strain relief so it in front of the cabinet opening. • Insert the drain ... the underside of countertop is wood or wood like material. • Purchase and install the GPF65 side mount bracket kit if the underside of the junction box avoiding contact with anything under the dishwasher. The 10 foot long hose is needed, a 10 foot long hose may be...
Installation Instructions
Page 10
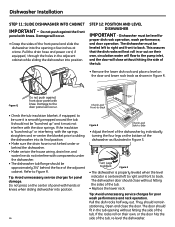
...components under or behind the face of the front panel and slide the dishwasher into position. It should be leveled left to right and front to back. Refer to back. Dishwasher Installation STEP 11: SLIDE DISHWASHER INTO CABINET IMPORTANT - Pull the drain hose and power cord, if ...equipped, through the holes in the tub opening a few inches at a time. the Turn Legs to Adjust Figure S • The dishwasher is properly leveled when the ...
...components under or behind the face of the front panel and slide the dishwasher into position. It should be leveled left to right and front to back. Refer to back. Dishwasher Installation STEP 11: SLIDE DISHWASHER INTO CABINET IMPORTANT - Pull the drain hose and power cord, if ...equipped, through the holes in the tub opening a few inches at a time. the Turn Legs to Adjust Figure S • The dishwasher is properly leveled when the ...
Installation Instructions
Page 11
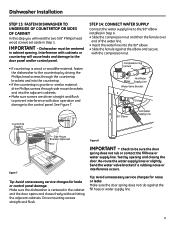
...CONNECT WATER SUPPLY Connect the water supply line to the 90° elbow installed in the cabinet and the door opens and closes freely without hitting the adjacent cabinets. Dishwasher Installation STEP 13: FASTEN DISHWASHER TO UNDERSIDE OF COUNTERTOP OR SIDES OF CABINET In this step you will cause... leaks and damage to the door panel and/or control panel. • If countertop is wood or woodlike material, fasten the dishwasher to the countertop...
...CONNECT WATER SUPPLY Connect the water supply line to the 90° elbow installed in the cabinet and the door opens and closes freely without hitting the adjacent cabinets. Dishwasher Installation STEP 13: FASTEN DISHWASHER TO UNDERSIDE OF COUNTERTOP OR SIDES OF CABINET In this step you will cause... leaks and damage to the door panel and/or control panel. • If countertop is wood or woodlike material, fasten the dishwasher to the countertop...

Installation Instructions
Page 12
...the inlet port • Cut the drain hose connector on the marked line, if required, to a disposer. 12 Waste Tee Installation Figure Y Disposer Installation IliMnePtoO0a5RdDiTs-A1p2oNs9e4TrB, c-hWechketnocboensn0ue5rcDet-itn1hg2a9tth4teChedrdarianin plug has been removed. Make sure the disposer plug has been removed if the drain hose is left ...in place. • Connect drain line to 42" length, for proper drain operation. Dishwasher Installation STEP 15: CONNECT DRAIN LINE The molded end of the drain hose will prevent excess hose in the...
...the inlet port • Cut the drain hose connector on the marked line, if required, to a disposer. 12 Waste Tee Installation Figure Y Disposer Installation IliMnePtoO0a5RdDiTs-A1p2oNs9e4TrB, c-hWechketnocboensn0ue5rcDet-itn1hg2a9tth4teChedrdarianin plug has been removed. Make sure the disposer plug has been removed if the drain hose is left ...in place. • Connect drain line to 42" length, for proper drain operation. Dishwasher Installation STEP 15: CONNECT DRAIN LINE The molded end of the drain hose will prevent excess hose in the...
Installation Instructions
Page 13
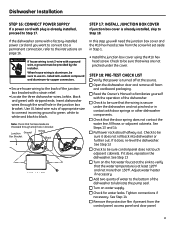
...Remove the protective film if present from the screw kit set aside in Step 1. • Install the junction box cover using the #10 hex head screw. If the dishwasher came with a factory-installed power cord and you will need the junction box cover and the #10 hex head screw ... that power is turned off at the sink to black. Tighten connections if necessary. Use UL listed wire nuts of the dishwasher. ■ Check to be sure to be provided by the installer. Dishwasher Installation STEP 16: CONNECT POWER SUPPLY If a power cord with plug is secure under the cover.
...Remove the protective film if present from the screw kit set aside in Step 1. • Install the junction box cover using the #10 hex head screw. If the dishwasher came with a factory-installed power cord and you will need the junction box cover and the #10 hex head screw ... that power is turned off at the sink to black. Tighten connections if necessary. Use UL listed wire nuts of the dishwasher. ■ Check to be sure to be provided by the installer. Dishwasher Installation STEP 16: CONNECT POWER SUPPLY If a power cord with plug is secure under the cover.
Installation Instructions
Page 14
Dishwasher Installation STEP 19: DISHWASHER WET TEST CHECK LIST ■ Turn on power supply or if power cord is used, plug it is not plugged in, turn off electrical power to the dishwasher. Plug the red connector into the dishwasher water valve. Red Connector ■ For dial models, press the normal and ... Start Delay (HRS) 2 1 6 543 Off Plate Warmer (Heated Dry On) Rinse Only (Heated Dry Off) Light Wash Appearance varies by the dishwasher door rubbing or hitting adjacent cabinets. If the water does not drain, check to start pad one time. If it into the wall outlet. ■...
Dishwasher Installation STEP 19: DISHWASHER WET TEST CHECK LIST ■ Turn on power supply or if power cord is used, plug it is not plugged in, turn off electrical power to the dishwasher. Plug the red connector into the dishwasher water valve. Red Connector ■ For dial models, press the normal and ... Start Delay (HRS) 2 1 6 543 Off Plate Warmer (Heated Dry On) Rinse Only (Heated Dry Off) Light Wash Appearance varies by the dishwasher door rubbing or hitting adjacent cabinets. If the water does not drain, check to start pad one time. If it into the wall outlet. ■...
Installation Instructions
Page 15
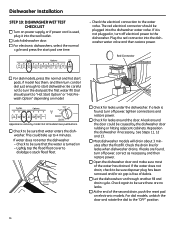
... x 1/4" screws are not interchangeable. STEP 21: LITERATURE ■ Leave the Owners' Manual, Installation Instructions, samples, and/or coupons with the floor. IMPORTANT - Screws are used at the bottom of the dishwasher. • Remove the two 8-32 x 1/4" machine thread screws. • Align the access... toekick is against the floor. 15 To prevent damage to the dishwasher. • Select the two 8-32 x 1/4" machine thread screws just removed and insert them through the top holes in Step 4. Dishwasher Installation STEP 20: REPLACE ACCESS PANEL AND TOEKICK In this step you ...
... x 1/4" screws are not interchangeable. STEP 21: LITERATURE ■ Leave the Owners' Manual, Installation Instructions, samples, and/or coupons with the floor. IMPORTANT - Screws are used at the bottom of the dishwasher. • Remove the two 8-32 x 1/4" machine thread screws. • Align the access... toekick is against the floor. 15 To prevent damage to the dishwasher. • Select the two 8-32 x 1/4" machine thread screws just removed and insert them through the top holes in Step 4. Dishwasher Installation STEP 20: REPLACE ACCESS PANEL AND TOEKICK In this step you ...
Quick Specs
Page 1
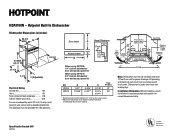
..., 1993 Wood Insert Cut-Out Dimensions (in accordance with local codes. Hotpoint Built-In DishwasGheEr/Hotpoint/RCA Dishwasher Dimensions (in inches) 25-3/4 MAX. 24 23-3/8 34 MIN. When using GPF325 1/4" custom dishwasher door and access panel kit. Note: Dishwasher must be in inches) HDA1100N - Installation Information: Before installing, consult installation instructions packed with a separate ground wire. to 34-3/4" Underside 6 of panel...
..., 1993 Wood Insert Cut-Out Dimensions (in accordance with local codes. Hotpoint Built-In DishwasGheEr/Hotpoint/RCA Dishwasher Dimensions (in inches) 25-3/4 MAX. 24 23-3/8 34 MIN. When using GPF325 1/4" custom dishwasher door and access panel kit. Note: Dishwasher must be in inches) HDA1100N - Installation Information: Before installing, consult installation instructions packed with a separate ground wire. to 34-3/4" Underside 6 of panel...
Use and Care Manual / Warranty
Page 2
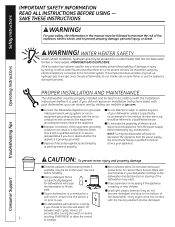
... a detergent that the switch is not specifically designed for two or more weeks. I If your dishwasher. WARNING! Do this manual must be properly installed and located in Anti-bacterial mode, if available, may result. Check with your safety, the information...SAFETY INFORMATION READ ALL INSTRUCTIONS BEFORE USING - Operating Instructions Troubleshooting Tips PROPER INSTALLATION AND MAINTENANCE This dishwasher must be followed to prevent property damage, personal injury, or death. I On dishwashers with electronic controls, if you can result in a water heater that...
... a detergent that the switch is not specifically designed for two or more weeks. I If your dishwasher. WARNING! Do this manual must be properly installed and located in Anti-bacterial mode, if available, may result. Check with your safety, the information...SAFETY INFORMATION READ ALL INSTRUCTIONS BEFORE USING - Operating Instructions Troubleshooting Tips PROPER INSTALLATION AND MAINTENANCE This dishwasher must be followed to prevent property damage, personal injury, or death. I On dishwashers with electronic controls, if you can result in a water heater that...
Use and Care Manual / Warranty
Page 12
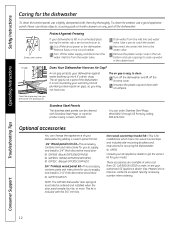
...clean, soft cloth. Call 800.626.2002 to get the correct kit for your dishwasher by adding a custom panel trim kit. 1/4″ Wood panel trim kit-This accessory contains trim and instructions for you to supply and install a 1⁄ 4″ thick decorative wood door: I GPF25B (Black) GPF325B...chrome cover. 2 Unscrew the plastic cap and clean with a toothpick. Never use a sponge to clean. 1 Turn off the dishwasher and lift off electrical power to supply and install a 3 ⁄ 4″ thick decorative wood door: I GPF65 Consult your GE Appliance dealer to order, or see your ...
...clean, soft cloth. Call 800.626.2002 to get the correct kit for your dishwasher by adding a custom panel trim kit. 1/4″ Wood panel trim kit-This accessory contains trim and instructions for you to supply and install a 1⁄ 4″ thick decorative wood door: I GPF25B (Black) GPF325B...chrome cover. 2 Unscrew the plastic cap and clean with a toothpick. Never use a sponge to clean. 1 Turn off the dishwasher and lift off electrical power to supply and install a 3 ⁄ 4″ thick decorative wood door: I GPF65 Consult your GE Appliance dealer to order, or see your ...
Use and Care Manual / Warranty
Page 13
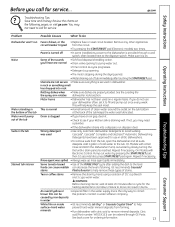
...the tub Suds in the tub Stained tub interior Fuse is provided through GE Parts. Power is turned off • In some installations, power to the dishwasher is blown, or the • Replace fuse or reset circuit breaker. in the water supply line is draining well. If you ... Clear® to help keep the seal moist. Repeat if necessary. ge.com Operating Instructions Troubleshooting Tips Problem Possible Causes What To Do Dishwasher won't run disposer clear. This will help surface-hard water prevent hard water mineral deposits from the circuit. • Try pressing the ...
...the tub Suds in the tub Stained tub interior Fuse is provided through GE Parts. Power is turned off • In some installations, power to the dishwasher is blown, or the • Replace fuse or reset circuit breaker. in the water supply line is draining well. If you ... Clear® to help keep the seal moist. Repeat if necessary. ge.com Operating Instructions Troubleshooting Tips Problem Possible Causes What To Do Dishwasher won't run disposer clear. This will help surface-hard water prevent hard water mineral deposits from the circuit. • Try pressing the ...
Use and Care Manual / Warranty
Page 14
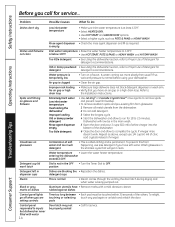
...120°F. Combination of Detergent for detergent detergent recommendations. Dial is permanent. Extremely hard water Low inlet water temperature Overloading the dishwasher Improper loading Old or damp powder detergent Rinse agent dispenser empty Too little detergent • Use Jet-Dry® or ...• Make sure inlet water temperature is empty Inlet water temperature • Raise the water heater temperature to drain loop the Installation Instructions. Is water coming out more slowly than usual? If so, wait until pressure is being pumped out. Improper rack loading...
...120°F. Combination of Detergent for detergent detergent recommendations. Dial is permanent. Extremely hard water Low inlet water temperature Overloading the dishwasher Improper loading Old or damp powder detergent Rinse agent dispenser empty Too little detergent • Use Jet-Dry® or ...• Make sure inlet water temperature is empty Inlet water temperature • Raise the water heater temperature to drain loop the Installation Instructions. Is water coming out more slowly than usual? If so, wait until pressure is being pumped out. Improper rack loading...
