Energy Guide
Page 1
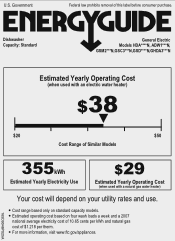
....ftc.gov/appliances. 165D9046P025A U.S. Estimated operating cost based on four wash loads a week and a 2007 national average electricity cost of 10.65 cents per therm. Dishwasher Capacity: Standard General Electric Models HDA****N, ADW1***N, GSM2***N,GSC3***N,GSD****N,GHDA3***N Estimated Yearly Operating Cost (when used with an electric water heater) $38 $20 $50...
....ftc.gov/appliances. 165D9046P025A U.S. Estimated operating cost based on four wash loads a week and a 2007 national average electricity cost of 10.65 cents per therm. Dishwasher Capacity: Standard General Electric Models HDA****N, ADW1***N, GSM2***N,GSC3***N,GSD****N,GHDA3***N Estimated Yearly Operating Cost (when used with an electric water heater) $38 $20 $50...
Installation Instructions
Page 1
...safety glasses should immediately contact your Owner's Manual for available custom panel kits. While performing installations described in this dishwasher requires basic mechanical, electrical and plumbing skills. Proper installation is not covered under the GE Appliance WGaSrrDa2n0t0y0. KEEP ...THESE INSTRUCTIONS. GE Consumer & Industrial Appliances Installation Instructions Built-In Dishwasher If you should be installed to 3 Hours. New installations require more time than replacement installations. See the Owner's Manual...
...safety glasses should immediately contact your Owner's Manual for available custom panel kits. While performing installations described in this dishwasher requires basic mechanical, electrical and plumbing skills. Proper installation is not covered under the GE Appliance WGaSrrDa2n0t0y0. KEEP ...THESE INSTRUCTIONS. GE Consumer & Industrial Appliances Installation Instructions Built-In Dishwasher If you should be installed to 3 Hours. New installations require more time than replacement installations. See the Owner's Manual...
Installation Instructions
Page 3
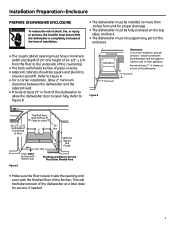
... the risk of shock, fire, or injury to persons, the installer must ensure that the dishwasher is ��l�e�ve�l�inside the opening must have a minimum width and depth of 24" and height of 34-1/2" ± 1/4" #fr2o82mFrtehncehfloor to the underside of the ...countertop. • The back wall should be free of pipes or wires. • Adjacent cabinets should be fully enclosed on the top, sides, and back. • The dishwasher must be square...
... the risk of shock, fire, or injury to persons, the installer must ensure that the dishwasher is ��l�e�ve�l�inside the opening must have a minimum width and depth of 24" and height of 34-1/2" ± 1/4" #fr2o82mFrtehncehfloor to the underside of the ...countertop. • The back wall should be free of pipes or wires. • Adjacent cabinets should be fully enclosed on the top, sides, and back. • The dishwasher must be square...
Installation Instructions
Page 4
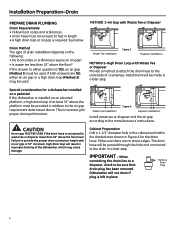
... gap according to be sure that drain plug has been removed. Remove Drain Plug 1871 Art1 4 Special consideration for a dishwasher installed on a pedestal lf the dishwasher is necessary for the drain hose. Make sure there are NO, either question is connected to the drain in place. ...platform, a high drain loop of countertop. Attachment will result in improper draining of the dishwasher, which may be used . The drain hose will not drain if plug is required. IMPORTANT - Dishwasher will be passed through this hole and connected to waste tee or disposer lower than 18...
... gap according to be sure that drain plug has been removed. Remove Drain Plug 1871 Art1 4 Special consideration for a dishwasher installed on a pedestal lf the dishwasher is necessary for the drain hose. Make sure there are NO, either question is connected to the drain in place. ...platform, a high drain loop of countertop. Attachment will result in improper draining of the dishwasher, which may be used . The drain hose will not drain if plug is required. IMPORTANT - Dishwasher will be passed through this hole and connected to waste tee or disposer lower than 18...
Installation Instructions
Page 5
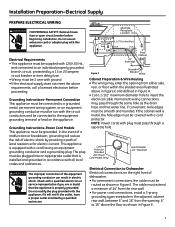
...• If the electrical supply does not meet the above in Figure E and defined in electric shock. The cable must extend a minimum of 24" from the rear wall. • For power cord connections, install a 3-prong grounding type receptacle in Figure E. #282 French 5 This appliance ...the circuit conductors and be smooth and rounded. If the cabinet wall is installed and grounded in Figure E. WARNING The improper connection of dishwasher. • For permanent connections, the cable must be routed as shown in accordance with 120V, 60 Hz., a#n28d2cForennnchected to insert the...
...• If the electrical supply does not meet the above in Figure E and defined in electric shock. The cable must extend a minimum of 24" from the rear wall. • For power cord connections, install a 3-prong grounding type receptacle in Figure E. #282 French 5 This appliance ...the circuit conductors and be smooth and rounded. If the cabinet wall is installed and grounded in Figure E. WARNING The improper connection of dishwasher. • For permanent connections, the cable must be routed as shown in accordance with 120V, 60 Hz., a#n28d2cForennnchected to insert the...
Installation Instructions
Page 6
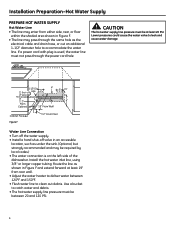
... debris. • The hot water supply line pressure must be required by local codes.) • The water connection is on the left side of the dishwasher. Installation Preparation-Hot Water Supply PREPARE HOT WATER SUPPLY Hot Water Line • The line may enter from rear wall. • Adjust the water heater...
... debris. • The hot water supply line pressure must be required by local codes.) • The water connection is on the left side of the dishwasher. Installation Preparation-Hot Water Supply PREPARE HOT WATER SUPPLY Hot Water Line • The line may enter from rear wall. • Adjust the water heater...
Installation Instructions
Page 7
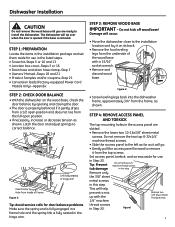
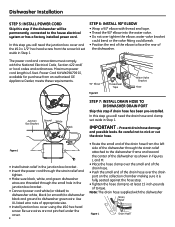
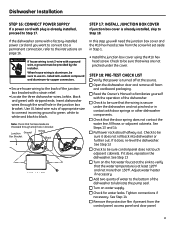
... Conversion leads (Factory-equipped Power Cord Models Only) -Appendix STEP 2: CHECK DOOR BALANCE • With the dishwasher on its back. • Remove the four leveling legs from the full open position and does not rise from the underside of Frame Figure G Tip: Avoid service calls for use... with the 1/4" machine Remove two 3/8" Sheet Metal Thread Screws thread screws in hinge arm Insert Hook Through Hole from the top screws. Dishwasher Installation CAUTION Do not remove the wood base until you are slotted. • Remove the lower two 10-16x3/8" sheet metal screws. ...
... Conversion leads (Factory-equipped Power Cord Models Only) -Appendix STEP 2: CHECK DOOR BALANCE • With the dishwasher on its back. • Remove the four leveling legs from the full open position and does not rise from the underside of Frame Figure G Tip: Avoid service calls for use... with the 1/4" machine Remove two 3/8" Sheet Metal Thread Screws thread screws in hinge arm Insert Hook Through Hole from the top screws. Dishwasher Installation CAUTION Do not remove the wood base until you are slotted. • Remove the lower two 10-16x3/8" sheet metal screws. ...
Installation Instructions
Page 8
..., black (or smooth) to dishwasher black and ground to face the rear of appropriate size. • Install junction box cover using the #10 hex head screw. Be careful not to at least 15 inch-pounds of torque. Figure J • Install strNTahoirtneea:rdCeehldeiecTkfhrTiunhSatmthHaeallrjHnueonslesciLtneioBarndascbAkoeretx ...Figure K Thread Seal Tape Water Valve Bracket Fill Hose Junction Box Bracket Ground White Black STEP 7: INSTALL DRAIN HOSE TO DISHWASHER DRAIN PORT Skip this step if drain hose has been pre-installed. Note: The drain hose supplied with the National Electrical...
..., black (or smooth) to dishwasher black and ground to face the rear of appropriate size. • Install junction box cover using the #10 hex head screw. Be careful not to at least 15 inch-pounds of torque. Figure J • Install strNTahoirtneea:rdCeehldeiecTkfhrTiunhSatmthHaeallrjHnueonslesciLtneioBarndascbAkoeretx ...Figure K Thread Seal Tape Water Valve Bracket Fill Hose Junction Box Bracket Ground White Black STEP 7: INSTALL DRAIN HOSE TO DISHWASHER DRAIN PORT Skip this step if drain hose has been pre-installed. Note: The drain hose supplied with the National Electrical...
Installation Instructions
Page 9
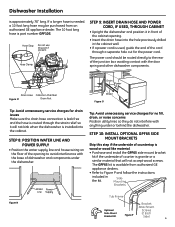
... Skip this port if present Hose Clamp STEP 9: INSERT DRAIN HOSE AND POWER CORD, IF USED, THROUGH CABINET • Upright the dishwasher and position it will not accept wood screws. Figure N Water Power Line Supply Tip: Avoid unnecessary service charges for the power cord.... through a separate hole cut for no fill, drain, or noise concerns Position utility lines so they do not interfere with anything under the dishwasher. SideMounting Brackets Tub Frame Bracket Attachment Optional Screws Side-Mount Bracket Kit Figure P (2 Each Side) 9 06F-1847H If a longer hose ...
... Skip this port if present Hose Clamp STEP 9: INSERT DRAIN HOSE AND POWER CORD, IF USED, THROUGH CABINET • Upright the dishwasher and position it will not accept wood screws. Figure N Water Power Line Supply Tip: Avoid unnecessary service charges for the power cord.... through a separate hole cut for no fill, drain, or noise concerns Position utility lines so they do not interfere with anything under the dishwasher. SideMounting Brackets Tub Frame Bracket Attachment Optional Screws Side-Mount Bracket Kit Figure P (2 Each Side) 9 06F-1847H If a longer hose ...
Installation Instructions
Page 10
... STEP 11: SLIDE DISHWASHER INTO CABINET IMPORTANT - Pull the drain hose and power cord, if equipped, through the holes in the tub opening a few inches at a time. Tip: Avoid unnecessary service charges for panel damage. r should close the door. Figure Q Do not push against ...the front panel with the springs, straighten and re-center the blanket prior to -Side • Adjust the level of the dishwasher by individually ...
... STEP 11: SLIDE DISHWASHER INTO CABINET IMPORTANT - Pull the drain hose and power cord, if equipped, through the holes in the tub opening a few inches at a time. Tip: Avoid unnecessary service charges for panel damage. r should close the door. Figure Q Do not push against ...the front panel with the springs, straighten and re-center the blanket prior to -Side • Adjust the level of the dishwasher by individually ...
Installation Instructions
Page 11
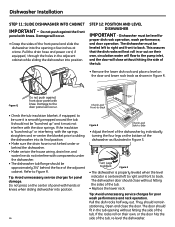
... and into the 90° elbow. • Slide the ferrule against the fill hose or water supply line. 11 Make sure the dishwasher is centered in Step 1. Interference with cabinets or countertop will need the two 5/8" Phillips head wood screws set aside in the cabinet and the ...and into the adjacent cabinets. • Make sure screws are driven straight and flush to prevent interference with the compression nut. IMPORTANT - Dishwasher must be sure the door spring does not rub or contact the fill hose or water supply line. Compression Nut Ferrule 90° ...
... and into the 90° elbow. • Slide the ferrule against the fill hose or water supply line. 11 Make sure the dishwasher is centered in Step 1. Interference with cabinets or countertop will need the two 5/8" Phillips head wood screws set aside in the cabinet and the ...and into the adjacent cabinets. • Make sure screws are driven straight and flush to prevent interference with the compression nut. IMPORTANT - Dishwasher must be sure the door spring does not rub or contact the fill hose or water supply line. Compression Nut Ferrule 90° ...

Installation Instructions
Page 12
... Fasten to Underside of Countertop with Hanger with a screw type clamp. Dishwasher will prevent excess hose in the dishwasher cavity from becoming kinked or crushed by the dishwasher. Secure the hose with Hanger 32" 18" Min. This will not...required, to a disposer. 12 Waste Tee Installation Figure Y Disposer Installation IliMnePtoO0a5RdDiTs-A1p2oNs9e4TrB, c-hWechketnocboensn0ue5rcDet-itn1hg2a9tth4teChedrdarianin plug has been removed. Dishwasher Installation STEP 15: CONNECT DRAIN LINE The molded end of the drain hose will fit 5/8" through the cabinet opening. Method ...
... Fasten to Underside of Countertop with Hanger with a screw type clamp. Dishwasher will prevent excess hose in the dishwasher cavity from becoming kinked or crushed by the dishwasher. Secure the hose with Hanger 32" 18" Min. This will not...required, to a disposer. 12 Waste Tee Installation Figure Y Disposer Installation IliMnePtoO0a5RdDiTs-A1p2oNs9e4TrB, c-hWechketnocboensn0ue5rcDet-itn1hg2a9tth4teChedrdarianin plug has been removed. Dishwasher Installation STEP 15: CONNECT DRAIN LINE The molded end of the drain hose will fit 5/8" through the cabinet opening. Method ...
Installation Instructions
Page 13
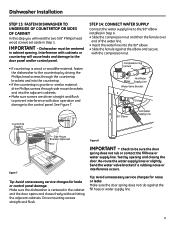
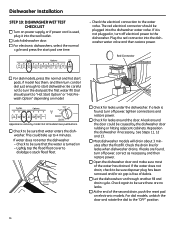
... junction box cover is aluminum, be sure to black. WARNING If house wiring is already installed, proceed to convert it does, reposition the dishwasher. STEP 18: PRE-TEST CHECK LIST ■ Verify that the door spring does not contact the water line, fill hose, or adjacent ..., a ground must be provided by the installer. Use UL listed wire nuts of the junction b#o28x2bFrreancchket with a strain relief. • Locate the three dishwasher wires, (white, black and green) with stripped ends. See Step 12 ■ Check to the instructions on water supply. ■ Check for water leaks...
... junction box cover is aluminum, be sure to black. WARNING If house wiring is already installed, proceed to convert it does, reposition the dishwasher. STEP 18: PRE-TEST CHECK LIST ■ Verify that the door spring does not contact the water line, fill hose, or adjacent ..., a ground must be provided by the installer. Use UL listed wire nuts of the junction b#o28x2bFrreancchket with a strain relief. • Locate the three dishwasher wires, (white, black and green) with stripped ends. See Step 12 ■ Check to the instructions on water supply. ■ Check for water leaks...
Installation Instructions
Page 14
... , turn off electrical power to "Hot Start Option" or "Hot Prewash Option" depending on model. The red electrical connector should point to the dishwasher. Not all models have pushbuttons. ■ Check to be sure that the water is found , turn off power, tighten connections and restore power....Delay (HRS) 2 1 6 543 Off Plate Warmer (Heated Dry On) Rinse Only (Heated Dry Off) Light Wash Appearance varies by the dishwasher door rubbing or hitting adjacent cabinets. Cycles POTS & PANS HEAVY WASH NORMAL CHINA WASH CRYSTAL RINSE ONLY HI TEMP HI TEMP HEATED RINSE WASH DRY...
... , turn off electrical power to "Hot Start Option" or "Hot Prewash Option" depending on model. The red electrical connector should point to the dishwasher. Not all models have pushbuttons. ■ Check to be sure that the water is found , turn off power, tighten connections and restore power....Delay (HRS) 2 1 6 543 Off Plate Warmer (Heated Dry On) Rinse Only (Heated Dry Off) Light Wash Appearance varies by the dishwasher door rubbing or hitting adjacent cabinets. Cycles POTS & PANS HEAVY WASH NORMAL CHINA WASH CRYSTAL RINSE ONLY HI TEMP HI TEMP HEATED RINSE WASH DRY...
Installation Instructions
Page 15
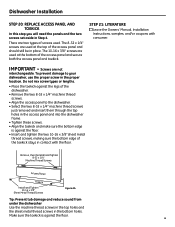
..., Installation Instructions, samples, and/or coupons with the floor. Screws are two types of the toekick stays in the access panel and into the dishwasher frame. • Tighten these screws. • Align the toekick and make sure the bottom edge is against the floor. • Insert and tighten ... the proper location. The 10-16 x 3/8" screws are used at the top of the access panel and secure both the access panel and toekick. Dishwasher Installation STEP 20: REPLACE ACCESS PANEL AND TOEKICK In this step you will need the panels and the two screws set aside in the bottom...
..., Installation Instructions, samples, and/or coupons with the floor. Screws are two types of the toekick stays in the access panel and into the dishwasher frame. • Tighten these screws. • Align the toekick and make sure the bottom edge is against the floor. • Insert and tighten ... the proper location. The 10-16 x 3/8" screws are used at the top of the access panel and secure both the access panel and toekick. Dishwasher Installation STEP 20: REPLACE ACCESS PANEL AND TOEKICK In this step you will need the panels and the two screws set aside in the bottom...

Installation Instructions
Page 16
...65533;y�m4p�0a�2�n2y5��� ge.com 16 Pub. No. 31-30218 Dwg. Appendix CONVERTING DISHWASHER WITH FACTORY EQUIPPED POWER CORD TO A PERMANENT CONNECTION This procedure requires the conversion leads set aside in these instructions to the...Remove and discard the power cord. • Connect the conversion harness (included with dishwasher) to complete the conversion. Figure CC • Return to Step 16 in Step 1. • Make sure the power cord for the dishwasher is unplugged from the wall outlet. • Remove screw from junction box cover...
...65533;y�m4p�0a�2�n2y5��� ge.com 16 Pub. No. 31-30218 Dwg. Appendix CONVERTING DISHWASHER WITH FACTORY EQUIPPED POWER CORD TO A PERMANENT CONNECTION This procedure requires the conversion leads set aside in these instructions to the...Remove and discard the power cord. • Connect the conversion harness (included with dishwasher) to complete the conversion. Figure CC • Return to Step 16 in Step 1. • Make sure the power cord for the dishwasher is unplugged from the wall outlet. • Remove screw from junction box cover...
Quick Specs
Page 1
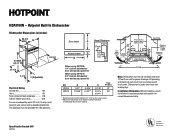
... from sink for current dimensional data. Dishwasher includes drain hose and leveling legs. Dishwashers Installation (Pub. 1-G003 pg. 131B) May 12, 1993 Wood Insert Cut-Out Dimensions (in inches) 25-3/4 MAX. 24 23-3/8 34 MIN. Kit GPF325 GPF375 A 18... countertop to 35 21-1/2 3-1/4 4 (Adjustable) 24-3/4 Electrical Rating Voltage AC 120 Hertz 60 Total connected load amperage 8.6 Calrod® heater watts max 500 For use on right 1/4 inside shaded area 19" MIN. Hotpoint Built-In DishwasGheEr/Hotpoint/RCA Dishwasher Dimensions (in inches) HDA1100N -
... from sink for current dimensional data. Dishwasher includes drain hose and leveling legs. Dishwashers Installation (Pub. 1-G003 pg. 131B) May 12, 1993 Wood Insert Cut-Out Dimensions (in inches) 25-3/4 MAX. 24 23-3/8 34 MIN. Kit GPF325 GPF375 A 18... countertop to 35 21-1/2 3-1/4 4 (Adjustable) 24-3/4 Electrical Rating Voltage AC 120 Hertz 60 Total connected load amperage 8.6 Calrod® heater watts max 500 For use on right 1/4 inside shaded area 19" MIN. Hotpoint Built-In DishwasGheEr/Hotpoint/RCA Dishwasher Dimensions (in inches) HDA1100N -
Quick Specs
Page 2
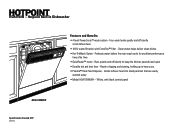
... the kitchen peaceful and quiet • Durable tub and door liner - Grinds leftover food into small particles that are easily washed away • Model HDA1100NWH - Hotpoint Built-In Dishwasher Features and Benefits • 4-level PowerScrub™ wash system - Preheats water before the main wash cycle for excellent performance time after time • QuietPower...
... the kitchen peaceful and quiet • Durable tub and door liner - Grinds leftover food into small particles that are easily washed away • Model HDA1100NWH - Hotpoint Built-In Dishwasher Features and Benefits • 4-level PowerScrub™ wash system - Preheats water before the main wash cycle for excellent performance time after time • QuietPower...
Use and Care Manual / Warranty
Page 1
... serial numbers here: Model Serial You can find them on a label on the tub wall just inside the door. 165D4700P343 49-55023-1 04-07 JR Dishwashers ge.com Safety Instructions 2, 3 Operating Instructions Care and Cleaning 12 Control Panels 6 Control Settings 4-5 Dial Cycles 7 Flashing Display Lights 8 Loading the...
... serial numbers here: Model Serial You can find them on a label on the tub wall just inside the door. 165D4700P343 49-55023-1 04-07 JR Dishwashers ge.com Safety Instructions 2, 3 Operating Instructions Care and Cleaning 12 Control Panels 6 Control Settings 4-5 Dial Cycles 7 Flashing Display Lights 8 Loading the...
Use and Care Manual / Warranty
Page 2
...of fire, explosion, electric shock, and to prevent property damage, personal injury, or death. I Contents washed in a risk of the dishwasher may be properly installed and located in doubt whether the appliance is used for two or more weeks. Damage to a grounded metal, ...the equipment-grounding conductor can receive one by or near children. I Load light, plastic items so they might come into contact with your dishwasher is connected to a wall switch, ensure that the switch is specifically recommended in your appliance. I Do not attempt to a qualified technician....
...of fire, explosion, electric shock, and to prevent property damage, personal injury, or death. I Contents washed in a risk of the dishwasher may be properly installed and located in doubt whether the appliance is used for two or more weeks. Damage to a grounded metal, ...the equipment-grounding conductor can receive one by or near children. I Load light, plastic items so they might come into contact with your dishwasher is connected to a wall switch, ensure that the switch is specifically recommended in your appliance. I Do not attempt to a qualified technician....


