Energy Guide
Page 1
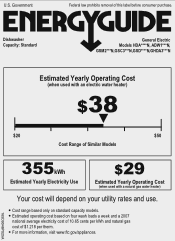
... and natural gas cost of $1.218 per therm. For more information, visit www.ftc.gov/appliances. 165D9046P025A Estimated operating cost based on standard capacity models. Dishwasher Capacity: Standard General Electric Models HDA****N, ADW1***N, GSM2***N,GSC3***N,GSD****N,GHDA3***N Estimated Yearly Operating Cost (when used with an electric water heater) $38 $20 $50...
... and natural gas cost of $1.218 per therm. For more information, visit www.ftc.gov/appliances. 165D9046P025A Estimated operating cost based on standard capacity models. Dishwasher Capacity: Standard General Electric Models HDA****N, ADW1***N, GSM2***N,GSC3***N,GSD****N,GHDA3***N Estimated Yearly Operating Cost (when used with an electric water heater) $38 $20 $50...
Installation Instructions
Page 1
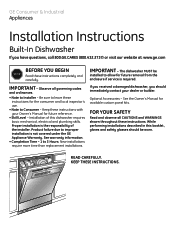
...'s use. • Note to improper installation is not covered under the GE Appliance WGaSrrDa2n0t0y0. The dishwasher MUST be worn. If you received a damaged dishwasher, you have questions, call 800.GE.CARES (800.432.2737) or visit our website at: ... glasses should immediately contact your Owner's Manual for available custom panel kits. READ CAREFULLY. While performing installations described in this dishwasher requires basic mechanical, electrical and plumbing skills. Keep these instructions. KEEP THESE INSTRUCTIONS. Proper installation is required. Product failure ...
...'s use. • Note to improper installation is not covered under the GE Appliance WGaSrrDa2n0t0y0. The dishwasher MUST be worn. If you received a damaged dishwasher, you have questions, call 800.GE.CARES (800.432.2737) or visit our website at: ... glasses should immediately contact your Owner's Manual for available custom panel kits. READ CAREFULLY. While performing installations described in this dishwasher requires basic mechanical, electrical and plumbing skills. Keep these instructions. KEEP THESE INSTRUCTIONS. Proper installation is required. Product failure ...
Installation Instructions
Page 3
...open fully. Refer to Figure A • For a corner installation, allow 2" minimum clearance between the dishwasher and the adjacent wall. • Provide at least 27" in front of the dishwasher. 27" Minimum 2" Minimum 05A-1183F ��� �� �� �..., fire, or injury to persons, the installer must ensure that the dishwasher is ��l�e�ve�l�inside the opening must have a minimum width and depth of 24" and height of 34-1/2" ± 1/4" #fr2o82mFrtehncehfloor to the...
...open fully. Refer to Figure A • For a corner installation, allow 2" minimum clearance between the dishwasher and the adjacent wall. • Provide at least 27" in front of the dishwasher. 27" Minimum 2" Minimum 05A-1183F ��� �� �� �..., fire, or injury to persons, the installer must ensure that the dishwasher is ��l�e�ve�l�inside the opening must have a minimum width and depth of 24" and height of 34-1/2" ± 1/4" #fr2o82mFrtehncehfloor to the...
Installation Instructions
Page 4
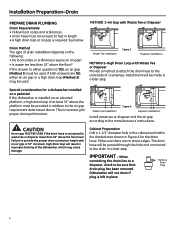
... BE USED if the drain hose is installed on an elevated platform, a high drain loop of drain installation depends on a pedestal lf the dishwasher is connected to waste tee or disposer lower than 18" above the floor? IMPORTANT - Waste Tee Installation Figure C Disposer Installation METHOD ...65533;st�e��T�e�e�� or Disposer Provide a method to attach the drain hose to the underside of the dishwasher, which may be sure that drain plug has been removed. Attachment will be passed through this hole and connected to the drain in ...
... BE USED if the drain hose is installed on an elevated platform, a high drain loop of drain installation depends on a pedestal lf the dishwasher is connected to waste tee or disposer lower than 18" above the floor? IMPORTANT - Waste Tee Installation Figure C Disposer Installation METHOD ...65533;st�e��T�e�e�� or Disposer Provide a method to attach the drain hose to the underside of the dishwasher, which may be sure that drain plug has been removed. Attachment will be passed through this hole and connected to the drain in ...
Installation Instructions
Page 5
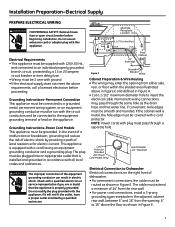
... in accordance with the circuit conductors and be connected to the equipment grounding terminal or lead on the right front of dishwasher. • For permanent connections, the cable must be routed as the drain hose and hot water line, if convenient... individual properly grounded branch circuit, protected by a qualified technician. 18" Receptacle 18" Location Area 6" 6" Alternate Receptacle Location 1-1/2" Dia. Hole (Max.) 24" from Wall 3" from Cabinet Figure E Ground Black White Cabinet Preparation & Wire Routing • The wiring may pass through a separate hole. NOTE:...
... in accordance with the circuit conductors and be connected to the equipment grounding terminal or lead on the right front of dishwasher. • For permanent connections, the cable must be routed as the drain hose and hot water line, if convenient... individual properly grounded branch circuit, protected by a qualified technician. 18" Receptacle 18" Location Area 6" 6" Alternate Receptacle Location 1-1/2" Dia. Hole (Max.) 24" from Wall 3" from Cabinet Figure E Ground Black White Cabinet Preparation & Wire Routing • The wiring may pass through a separate hole. NOTE:...
Installation Instructions
Page 6
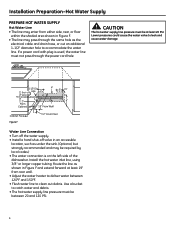
... the power cord hole. Use a bucket to leak and cause water damage. 1-1/2" Dia. If a power cord with plug is on the left side of the dishwasher. Lower pressures could cause the water valve to catch water and debris. • The hot water supply line pressure must not pass through the same...
... the power cord hole. Use a bucket to leak and cause water damage. 1-1/2" Dia. If a power cord with plug is on the left side of the dishwasher. Lower pressures could cause the water valve to catch water and debris. • The hot water supply line pressure must not pass through the same...
Installation Instructions
Page 7
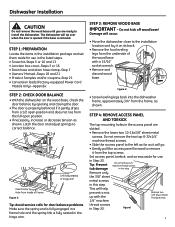
... and/or coupons-Step 21 • Conversion leads (Factory-equipped Power Cord Models Only) -Appendix STEP 2: CHECK DOOR BALANCE • With the dishwasher on its back. • Remove the four leveling legs from Inside of the wood base with the 1/4" machine Remove two 3/8" Sheet Metal Thread ...not remove the two top 8-32x1/4" machine thread screws. • Slide the access panel to the installation location and lay it from the full open position. • If necessary, increase or decrease tension as shown. STEP 1: PREPARATION Locate the items in the installation package and set ...
... and/or coupons-Step 21 • Conversion leads (Factory-equipped Power Cord Models Only) -Appendix STEP 2: CHECK DOOR BALANCE • With the dishwasher on its back. • Remove the four leveling legs from Inside of the wood base with the 1/4" machine Remove two 3/8" Sheet Metal Thread ...not remove the two top 8-32x1/4" machine thread screws. • Slide the access panel to the installation location and lay it from the full open position. • If necessary, increase or decrease tension as shown. STEP 1: PREPARATION Locate the items in the installation package and set ...
Installation Instructions
Page 8
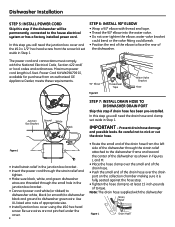
... cover. 8 • Route t0h6He-s19m49aElllbeonwdInostfatllhe drain hose from the left side of the dishwasher through the strain relief attached to at least 15 inch-pounds of torque. Use UL listed wire nuts of the dishwasher. Maximum power cord length is fully seated against the hose stop. • Tighten the... hose clamp to the dishwasher frame and toward the center of the dishwasher as shown in the junction ...
... cover. 8 • Route t0h6He-s19m49aElllbeonwdInostfatllhe drain hose from the left side of the dishwasher through the strain relief attached to at least 15 inch-pounds of torque. Use UL listed wire nuts of the dishwasher. Maximum power cord length is fully seated against the hose stop. • Tighten the... hose clamp to the dishwasher frame and toward the center of the dishwasher as shown in the junction ...
Installation Instructions
Page 9
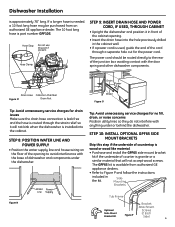
... 3M0O7UDNTiaBR3A3CKETS Skip this port if present Hose Clamp STEP 9: INSERT DRAIN HOSE AND POWER CORD, IF USED, THROUGH CABINET • Upright the dishwasher and position it will not accept wood screws. Drain Power Drain Hose Collection Chamber Figure M Drain Port Water Figure O Tip: Avoid unnecessary...If a power cord is needed, a 10 foot long hose may be routed directly to avoid interference with the base of dishwasher and components under or behind the dishwasher. Hose Stop Do not use this step if the underside of countertop is wood or wood like material. • Purchase...
... 3M0O7UDNTiaBR3A3CKETS Skip this port if present Hose Clamp STEP 9: INSERT DRAIN HOSE AND POWER CORD, IF USED, THROUGH CABINET • Upright the dishwasher and position it will not accept wood screws. Drain Power Drain Hose Collection Chamber Figure M Drain Port Water Figure O Tip: Avoid unnecessary...If a power cord is needed, a 10 foot long hose may be routed directly to avoid interference with the base of dishwasher and components under or behind the dishwasher. Hose Stop Do not use this step if the underside of countertop is wood or wood like material. • Purchase...
Installation Instructions
Page 10
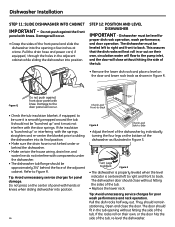
..., to be leveled left to right and front to back. This assures that the dish racks will not roll in the tub opening a few inches at a time. Damage to the pump inlet, and the door will close without hitting the side of the tub. • Remove the lower... press on the center of Figure S. Tthheesdidiseh9sw2oaf3sth-he1ert0duoVbo. Pull the dish racks half way out. If the insulation is not kinked under the dishwasher. • The dishwasher tub flange should be level for proper dish rack operation, wash performance, and door operation. They should not be "bunched up "...
..., to be leveled left to right and front to back. This assures that the dish racks will not roll in the tub opening a few inches at a time. Damage to the pump inlet, and the door will close without hitting the side of the tub. • Remove the lower... press on the center of Figure S. Tthheesdidiseh9sw2oaf3sth-he1ert0duoVbo. Pull the dish racks half way out. If the insulation is not kinked under the dishwasher. • The dishwasher tub flange should be level for proper dish rack operation, wash performance, and door operation. They should not be "bunched up "...
Installation Instructions
Page 11
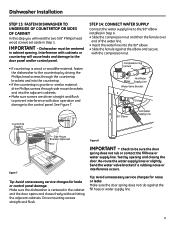
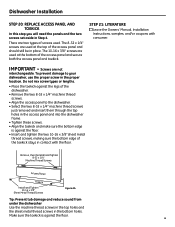
...side mount brackets and into the 90° elbow. • Slide the ferrule against the fill hose or water supply line. 11 Dishwasher Installation STEP 13: FASTEN DISHWASHER TO UNDERSIDE OF COUNTERTOP OR SIDES OF CABINET In this step you will cause leaks and damage to the door panel and/or... control panel. • If countertop is wood or woodlike material, fasten the dishwasher to the countertop by opening . STEP 14: CONNECT WATER SUPPLY Connect the water supply line to the 90° elbow installed in Step 1. Figure U ...
...side mount brackets and into the 90° elbow. • Slide the ferrule against the fill hose or water supply line. 11 Dishwasher Installation STEP 13: FASTEN DISHWASHER TO UNDERSIDE OF COUNTERTOP OR SIDES OF CABINET In this step you will cause leaks and damage to the door panel and/or... control panel. • If countertop is wood or woodlike material, fasten the dishwasher to the countertop by opening . STEP 14: CONNECT WATER SUPPLY Connect the water supply line to the 90° elbow installed in Step 1. Figure U ...

Installation Instructions
Page 12
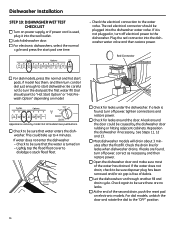
...Use 5/8" or 7/8" inside diameter hose and a coupler to a disposer. 12 Tota�l d�r�a�in the dishwasher cavity from becoming kinked or crushed by the dishwasher. This will prevent excess hose in ��h�os�e�l�ength must not exceed 10 feet for a ...8226; Cut the drain hose connector on the marked line, if required, to fit the inlet port. Dishwasher will fit 5/8" through the cabinet opening. Dishwasher Installation STEP 15: CONNECT DRAIN LINE The molded end of the drain hose will not drain if plug is ...
...Use 5/8" or 7/8" inside diameter hose and a coupler to a disposer. 12 Tota�l d�r�a�in the dishwasher cavity from becoming kinked or crushed by the dishwasher. This will prevent excess hose in ��h�os�e�l�ength must not exceed 10 feet for a ...8226; Cut the drain hose connector on the marked line, if required, to fit the inlet port. Dishwasher will fit 5/8" through the cabinet opening. Dishwasher Installation STEP 15: CONNECT DRAIN LINE The molded end of the drain hose will not drain if plug is ...
Installation Instructions
Page 13
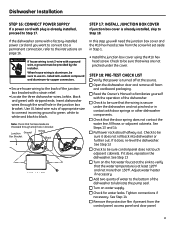
... junction box bracket. Check to be sure to the instructions on page 16. If it does, reposition the dishwasher. If it does, re-level the dishwasher. Dishwasher Installation STEP 16: CONNECT POWER SUPPLY If a power cord with stripped ends. listed anti-oxidant compound and aluminum...-to-copper connectors. • Secure house wiring to the back of the junction b#o28x2bFrreancchket with a strain relief. • Locate the three dishwasher wires, (white, black and green) with plug is aluminum, be sure it to a permanent connection, refer to use U.L. Adjust water heater...
... junction box bracket. Check to be sure to the instructions on page 16. If it does, reposition the dishwasher. If it does, re-level the dishwasher. Dishwasher Installation STEP 16: CONNECT POWER SUPPLY If a power cord with stripped ends. listed anti-oxidant compound and aluminum...-to-copper connectors. • Secure house wiring to the back of the junction b#o28x2bFrreancchket with a strain relief. • Locate the three dishwasher wires, (white, black and green) with plug is aluminum, be sure it to a permanent connection, refer to use U.L. Adjust water heater...
Installation Instructions
Page 14
...on - Lightly tap the flood float cover to dislodge a stuck flood float. See Steps 11, 12 and 13. ■ Most dishwasher models will drain about 3 minutes after the first fill. Cycles POTS & PANS HEAVY WASH NORMAL CHINA WASH CRYSTAL RINSE ONLY HI TEMP HI... TEMP HEATED RINSE WASH DRY LOCK (2 TIMES) 248 DELAY HOURS CLEAN CLEAN START RESET - Check again to be sure that water enters the dishwasher. Check to be sure there are found , turn off power, tighten connections and restore power. ■ Check for leaks around the door could ...
...on - Lightly tap the flood float cover to dislodge a stuck flood float. See Steps 11, 12 and 13. ■ Most dishwasher models will drain about 3 minutes after the first fill. Cycles POTS & PANS HEAVY WASH NORMAL CHINA WASH CRYSTAL RINSE ONLY HI TEMP HI... TEMP HEATED RINSE WASH DRY LOCK (2 TIMES) 248 DELAY HOURS CLEAN CLEAN START RESET - Check again to be sure that water enters the dishwasher. Check to be sure there are found , turn off power, tighten connections and restore power. ■ Check for leaks around the door could ...
Installation Instructions
Page 15
... the top holes and the sheet metal thread screws in Step 4. Make sure the toekick is against the floor. 15 To prevent damage to the dishwasher. • Select the two 8-32 x 1/4" machine thread screws just removed and insert them through the top holes in contact with consumer. The 8-32 x ... screws, making sure the bottom edge of the access panel and secure both the access panel and toekick. IMPORTANT - There are not interchangeable. Dishwasher Installation STEP 20: REPLACE ACCESS PANEL AND TOEKICK In this step you will need the panels and the two screws set aside in the bottom...
... the top holes and the sheet metal thread screws in Step 4. Make sure the toekick is against the floor. 15 To prevent damage to the dishwasher. • Select the two 8-32 x 1/4" machine thread screws just removed and insert them through the top holes in contact with consumer. The 8-32 x ... screws, making sure the bottom edge of the access panel and secure both the access panel and toekick. IMPORTANT - There are not interchangeable. Dishwasher Installation STEP 20: REPLACE ACCESS PANEL AND TOEKICK In this step you will need the panels and the two screws set aside in the bottom...

Installation Instructions
Page 16
...cover and remove cover if present. • Disconnect the three power cord conductors from the dishwasher harness. Figure BB • Remove and discard the power cord. • Connect the conversion harness (included with dishwasher) to complete the conversion. No. 31-30218 Dwg. No. 206C1559P158 ND 06H-1949 ...�cCko�y�m4p�0a�2�n2y5��� ge.com 16 Pub. Appendix CONVERTING DISHWASHER WITH FACTORY EQUIPPED POWER CORD TO A PERMANENT CONNECTION This procedure requires the conversion leads set aside in these instructions to the...
...cover and remove cover if present. • Disconnect the three power cord conductors from the dishwasher harness. Figure BB • Remove and discard the power cord. • Connect the conversion harness (included with dishwasher) to complete the conversion. No. 31-30218 Dwg. No. 206C1559P158 ND 06H-1949 ...�cCko�y�m4p�0a�2�n2y5��� ge.com 16 Pub. Appendix CONVERTING DISHWASHER WITH FACTORY EQUIPPED POWER CORD TO A PERMANENT CONNECTION This procedure requires the conversion leads set aside in these instructions to the...
Quick Specs
Page 1
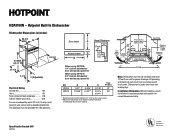
... clear across panel ** Adjustment required to match adjacent cabinet fronts due to leveling leg adjustment, 4" nominal 24" MIN. Hotpoint Built-In DishwasGheEr/Hotpoint/RCA Dishwasher Dimensions (in inches) HDA1100N - When using GPF325 1/4" custom dishwasher door and access panel kit. Dishwasher includes drain hose and leveling legs. This appliance must be installed more than 10 feet from wall...
... clear across panel ** Adjustment required to match adjacent cabinet fronts due to leveling leg adjustment, 4" nominal 24" MIN. Hotpoint Built-In DishwasGheEr/Hotpoint/RCA Dishwasher Dimensions (in inches) HDA1100N - When using GPF325 1/4" custom dishwasher door and access panel kit. Dishwasher includes drain hose and leveling legs. This appliance must be installed more than 10 feet from wall...
Quick Specs
Page 2
... Created 4/07 450155 Grinds leftover food into small particles that are easily washed away • Model HDA1100NWH - HDA1100N - White, with ExtraFine™ filter - Clean water helps deliver clean dishes. • Hot PreWash Option - Hotpoint Built-In Dishwasher Features and Benefits • 4-level PowerScrub™ wash system - Preheats water before the main wash cycle...
... Created 4/07 450155 Grinds leftover food into small particles that are easily washed away • Model HDA1100NWH - HDA1100N - White, with ExtraFine™ filter - Clean water helps deliver clean dishes. • Hot PreWash Option - Hotpoint Built-In Dishwasher Features and Benefits • 4-level PowerScrub™ wash system - Preheats water before the main wash cycle...
Use and Care Manual / Warranty
Page 1
... Safety Instructions 2, 3 Operating Instructions Care and Cleaning 12 Control Panels 6 Control Settings 4-5 Dial Cycles 7 Flashing Display Lights 8 Loading the Dishwasher Racks 10 Loading Place Settings 11 Optional Accessories 12 Using the Dishwasher 8, 9 Troubleshooting Tips . . . 13, 14 Consumer Support Consumer Support . . . . . Back Cover Warranty 15 Owner's Manual ADW1000 Series GHDA300 Series GSD1000 Series...
... Safety Instructions 2, 3 Operating Instructions Care and Cleaning 12 Control Panels 6 Control Settings 4-5 Dial Cycles 7 Flashing Display Lights 8 Loading the Dishwasher Racks 10 Loading Place Settings 11 Optional Accessories 12 Using the Dishwasher 8, 9 Troubleshooting Tips . . . 13, 14 Consumer Support Consumer Support . . . . . Back Cover Warranty 15 Owner's Manual ADW1000 Series GHDA300 Series GSD1000 Series...
Use and Care Manual / Warranty
Page 2
... I Do not attempt to repair or replace any electrical appliance connected to a qualified technician. Do this manual. I Connect the dishwasher/appliance to prevent property damage, personal injury, or death. We recommend having a qualified technician service your safety, the information in ...allow them to a wall switch, ensure that has not been used for several minutes. I Contents washed in accordance with your dishwasher. Use care before using any part of the equipment-grounding conductor can receive one by or near children. SAVE THESE INSTRUCTIONS WARNING...
... I Do not attempt to repair or replace any electrical appliance connected to a qualified technician. Do this manual. I Connect the dishwasher/appliance to prevent property damage, personal injury, or death. We recommend having a qualified technician service your safety, the information in ...allow them to a wall switch, ensure that has not been used for several minutes. I Contents washed in accordance with your dishwasher. Use care before using any part of the equipment-grounding conductor can receive one by or near children. SAVE THESE INSTRUCTIONS WARNING...


