Installation Instructions
Page 1
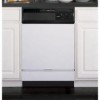
...the GE Appliance WGaSrrDa2n0t0y0. Proper installation is required. New installations require more time than replacement installations. If you received a damaged dishwasher, you have questions, call 800.GE.CARES (800.432.2737) or visit our website at: www.ge.com BEFORE YOU... Instructions Built-In Dishwasher If you should be installed to 3 Hours. Observe all CAUTIONS and WARNINGS shown throughout these instructions with your dealer or builder. Be sure to Consumer - Installation of the installer. Optional Accessories - See the Owner's Manual for future removal from...
...the GE Appliance WGaSrrDa2n0t0y0. Proper installation is required. New installations require more time than replacement installations. If you received a damaged dishwasher, you have questions, call 800.GE.CARES (800.432.2737) or visit our website at: www.ge.com BEFORE YOU... Instructions Built-In Dishwasher If you should be installed to 3 Hours. Observe all CAUTIONS and WARNINGS shown throughout these instructions with your dealer or builder. Be sure to Consumer - Installation of the installer. Optional Accessories - See the Owner's Manual for future removal from...
Installation Instructions
Page 7
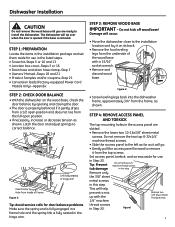
The dishwasher will help prevent a mix up with a 15/16" socket wrench. • Remove and discard wood base. Do not remove 1/4" machine thread screws in this step. Increase Tension Decrease Tension Link fully seated in hinge arm Insert Hook Through Hole from the full open position. • If ...-Steps 5 or 16 and 13 • Junction box cover-Steps 5 or 16 • Drain hose and drain hose clamp-Step 7 • Owners' Manual-Steps 18 and 21 • Product Samples and/or coupons-Step 21 • Conversion leads (Factory-equipped Power Cord Models Only) -Appendix STEP 2: CHECK ...
The dishwasher will help prevent a mix up with a 15/16" socket wrench. • Remove and discard wood base. Do not remove 1/4" machine thread screws in this step. Increase Tension Decrease Tension Link fully seated in hinge arm Insert Hook Through Hole from the full open position. • If ...-Steps 5 or 16 and 13 • Junction box cover-Steps 5 or 16 • Drain hose and drain hose clamp-Step 7 • Owners' Manual-Steps 18 and 21 • Product Samples and/or coupons-Step 21 • Conversion leads (Factory-equipped Power Cord Models Only) -Appendix STEP 2: CHECK ...
Installation Instructions
Page 13
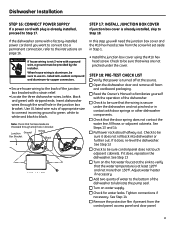
... the hot water faucet at the source. ■ Open the dishwasher door and remove all foam and cardboard packaging. ■ Read the Owner's Manual to familiarize yourself with the operation of the dishwasher to lubricate the pump seal. ■ Turn on page 16. Dishwasher Installation STEP 16: CONNECT POWER SUPPLY If a power cord with...
... the hot water faucet at the source. ■ Open the dishwasher door and remove all foam and cardboard packaging. ■ Read the Owner's Manual to familiarize yourself with the operation of the dishwasher to lubricate the pump seal. ■ Turn on page 16. Dishwasher Installation STEP 16: CONNECT POWER SUPPLY If a power cord with...
Installation Instructions
Page 15
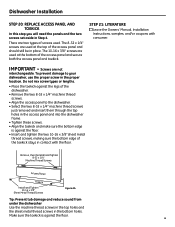
...panel and secure both the access panel and toekick. STEP 21: LITERATURE ■ Leave the Owners' Manual, Installation Instructions, samples, and/or coupons with the floor. To prevent damage to the dishwasher. • Select the two 8-32 x 1/4" machine thread screws just removed and insert them through ...Panel Toekick Install and Tighten 10-16 x 3/8" Sheet Metal Thread Screws Figure AA Tip: Prevent tub damage and reduce sound from under the dishwasher Use the machine thread screws in the top holes and the sheet metal thread screws in Step 4. There are not interchangeable. The 8-32 x...
...panel and secure both the access panel and toekick. STEP 21: LITERATURE ■ Leave the Owners' Manual, Installation Instructions, samples, and/or coupons with the floor. To prevent damage to the dishwasher. • Select the two 8-32 x 1/4" machine thread screws just removed and insert them through ...Panel Toekick Install and Tighten 10-16 x 3/8" Sheet Metal Thread Screws Figure AA Tip: Prevent tub damage and reduce sound from under the dishwasher Use the machine thread screws in the top holes and the sheet metal thread screws in Step 4. There are not interchangeable. The 8-32 x...
Use and Care Manual / Warranty
Page 1
...Manual ADW1000 Series GHDA300 Series GSD1000 Series GSD2000 Series GSD3000 Series GSD4000 Series GSM2000 Series HDA1000 Series HDA2000 Series HDA3000 Series Write the model and serial numbers here: Model Serial You can find them on a label on the tub wall just inside the door. 165D4700P343 49-55023-1 04-07 JR Dishwashers... ge.com Safety Instructions 2, 3 Operating Instructions Care and Cleaning 12 Control Panels 6 Control Settings 4-5 Dial Cycles 7 Flashing Display Lights 8 Loading the Dishwasher Racks 10 Loading Place Settings 11 ...
...Manual ADW1000 Series GHDA300 Series GSD1000 Series GSD2000 Series GSD3000 Series GSD4000 Series GSM2000 Series HDA1000 Series HDA2000 Series HDA3000 Series Write the model and serial numbers here: Model Serial You can find them on a label on the tub wall just inside the door. 165D4700P343 49-55023-1 04-07 JR Dishwashers... ge.com Safety Instructions 2, 3 Operating Instructions Care and Cleaning 12 Control Panels 6 Control Settings 4-5 Dial Cycles 7 Flashing Display Lights 8 Loading the Dishwasher Racks 10 Loading Place Settings 11 ...
Use and Care Manual / Warranty
Page 2
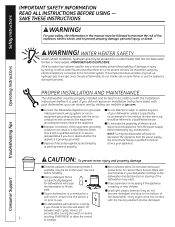
... on prior to use the appliance during this manual. I Improper connection of electric shock. Check with the Installation Instructions before it is properly grounded. Use care before using any maintenance. I If your dishwasher, you choose to turn the wall switch off...that the switch is used for dishwashers will allow 5-10 seconds after turning the switch on before attempting any electrical appliance connected to prevent property damage, personal injury, or death. I Close supervision is necessary if this manual must be properly installed and located...
... on prior to use the appliance during this manual. I Improper connection of electric shock. Check with the Installation Instructions before it is properly grounded. Use care before using any maintenance. I If your dishwasher, you choose to turn the wall switch off...that the switch is used for dishwashers will allow 5-10 seconds after turning the switch on before attempting any electrical appliance connected to prevent property damage, personal injury, or death. I Close supervision is necessary if this manual must be properly installed and located...
Use and Care Manual / Warranty
Page 3
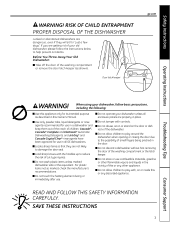
... precautions, including the following: I Load sharp knives with controls. If you are not likely to play with, on the door or dish rack of your dishwasher unless all GE dishwashers. I Use this Owner's Manual. For plastic items not so marked, check the manufacturer's recommendations. RISK OF CHILD ENTRAPMENT PROPER DISPOSAL OF THE...
... precautions, including the following: I Load sharp knives with controls. If you are not likely to play with, on the door or dish rack of your dishwasher unless all GE dishwashers. I Use this Owner's Manual. For plastic items not so marked, check the manufacturer's recommendations. RISK OF CHILD ENTRAPMENT PROPER DISPOSAL OF THE...
Use and Care Manual / Warranty
Page 6
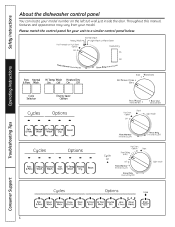
Please match the control panel for your model number on the left tub wall just inside the door. Safety Instructions Operating Instructions About the dishwasher control panel You can locate your unit to a similar control panel below. 6 Troubleshooting Tips Consumer Support Throughout this manual, features and appearance may vary from your model.
Please match the control panel for your model number on the left tub wall just inside the door. Safety Instructions Operating Instructions About the dishwasher control panel You can locate your unit to a similar control panel below. 6 Troubleshooting Tips Consumer Support Throughout this manual, features and appearance may vary from your model.
Use and Care Manual / Warranty
Page 16
...services and environments that are accepted). For greater convenience and faster service, you receive from your convenience! You can now download Owner's Manuals, order parts or even schedule service on -line and schedule your service at your door. We recognize the need to their own... Design applications, including kitchen design ideas for a wide range of all the details including your warranty expires. Try the GE Appliances Website 24 hours a day, any day of the year! Consumer Support GE Appliances Website ge.com Have a question or need assistance with disabilities,...
...services and environments that are accepted). For greater convenience and faster service, you receive from your convenience! You can now download Owner's Manuals, order parts or even schedule service on -line and schedule your service at your door. We recognize the need to their own... Design applications, including kitchen design ideas for a wide range of all the details including your warranty expires. Try the GE Appliances Website 24 hours a day, any day of the year! Consumer Support GE Appliances Website ge.com Have a question or need assistance with disabilities,...