Installation Instructions
Page 2
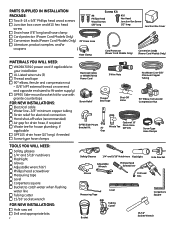
... end and opposite end sized to fit water supply) Wire Nuts Hot Water Line ■ GPF65 Side-mount bracket kit for use with Cord Protector granite countertops FOR NEW INSTALLATIONS: ■ Electrical cable Thread Strain Relief Seal Tape Electrical Cable Shut-Off Valve 90° Elbow, Ferrule and Compression Nut Tape ■ Water line-3/8" minimum copper tubing Strain Relief ■ Strain relief for electrical connection ■ Hand shut-off valve (recommended) 307Dia11 90 ϒElbow ■ Air gap for drain hose...
... end and opposite end sized to fit water supply) Wire Nuts Hot Water Line ■ GPF65 Side-mount bracket kit for use with Cord Protector granite countertops FOR NEW INSTALLATIONS: ■ Electrical cable Thread Strain Relief Seal Tape Electrical Cable Shut-Off Valve 90° Elbow, Ferrule and Compression Nut Tape ■ Water line-3/8" minimum copper tubing Strain Relief ■ Strain relief for electrical connection ■ Hand shut-off valve (recommended) 307Dia11 90 ϒElbow ■ Air gap for drain hose...
Installation Instructions
Page 3
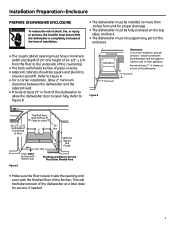
...dishwasher must not support any part of the enclosure. • The rough cabinet opening must ensure that the dishwasher is ��l�e�ve�l�inside the opening and even with the finished floor of the kitchen. Installation Preparation-Enclosure PREPARE DISHWASHER... be free of pipes or wires. • Adjacent cabinets should be square and plumb to ensure a good fit. This will facilitate removal of the dishwasher at the time of installation. • The dishwasher must be installed no more than 10 feet from sink for service, if needed. 3...
...dishwasher must not support any part of the enclosure. • The rough cabinet opening must ensure that the dishwasher is ��l�e�ve�l�inside the opening and even with the finished floor of the kitchen. Installation Preparation-Enclosure PREPARE DISHWASHER... be free of pipes or wires. • Adjacent cabinets should be square and plumb to ensure a good fit. This will facilitate removal of the dishwasher at the time of installation. • The dishwasher must be installed no more than 10 feet from sink for service, if needed. 3...
Installation Instructions
Page 5
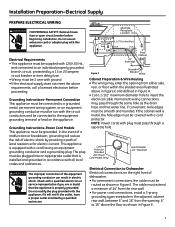
... a licensed electrician before beginning installation. NOTE: Power cords with ground. • If the electrical supply does not meet the above the floor as the drain hose and hot water line, if convenient. Hole (Max.) 24" from Wall 3" from Cabinet Figure E Ground Black White Cabinet Preparation & Wire Routing • The wiring may pass through a separate hole. Electrical Requirements • This appliance must be connected to a grounded metal, permanent...
... a licensed electrician before beginning installation. NOTE: Power cords with ground. • If the electrical supply does not meet the above the floor as the drain hose and hot water line, if convenient. Hole (Max.) 24" from Wall 3" from Cabinet Figure E Ground Black White Cabinet Preparation & Wire Routing • The wiring may pass through a separate hole. Electrical Requirements • This appliance must be connected to a grounded metal, permanent...
Installation Instructions
Page 7
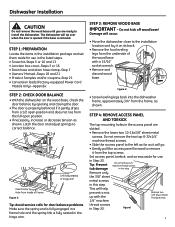
... The top mounting holes in the listed steps. • Screw kit-Steps 5 or 16 and 13 • Junction box cover-Steps 5 or 16 • Drain hose and drain hose clamp-Step 7 • Owners' Manual-Steps 18 and 21 • Product Samples and/or coupons-Step 21 • Conversion leads (Factory-equipped Power Cord Models Only) -Appendix STEP 2: CHECK DOOR BALANCE • With the dishwasher on...
... The top mounting holes in the listed steps. • Screw kit-Steps 5 or 16 and 13 • Junction box cover-Steps 5 or 16 • Drain hose and drain hose clamp-Step 7 • Owners' Manual-Steps 18 and 21 • Product Samples and/or coupons-Step 21 • Conversion leads (Factory-equipped Power Cord Models Only) -Appendix STEP 2: CHECK DOOR BALANCE • With the dishwasher on...
Installation Instructions
Page 8
... K Thread Seal Tape Water Valve Bracket Fill Hose Junction Box Bracket Ground White Black STEP 7: INSTALL DRAIN HOSE TO DISHWASHER DRAIN PORT Skip this step if drain hose has been pre-installed. Use UL listed wire nuts of torque. Note: The drain hose supplied with the National Electrical Code, Section 422 and/ or local codes and ordinances. Maximum power cord length is fully seated against the hose stop. • Tighten the hose clamp to dishwasher green wire. Be sure wires are...
... K Thread Seal Tape Water Valve Bracket Fill Hose Junction Box Bracket Ground White Black STEP 7: INSTALL DRAIN HOSE TO DISHWASHER DRAIN PORT Skip this step if drain hose has been pre-installed. Use UL listed wire nuts of torque. Note: The drain hose supplied with the National Electrical Code, Section 422 and/ or local codes and ordinances. Maximum power cord length is fully seated against the hose stop. • Tighten the hose clamp to dishwasher green wire. Be sure wires are...
Installation Instructions
Page 9
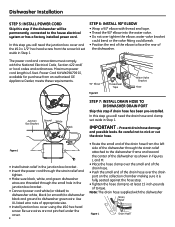
... hole cut for no fill, drain, or noise concerns Position utility lines so they do not interfere with the door spring and other dishwasher components. SideMounting Brackets Tub Frame Bracket Attachment Optional Screws Side-Mount Bracket Kit Figure P (2 Each Side) 9 06F-1847H Dishwasher Installation is needed, a 10 foot long hose may be routed directly to Figure P and follow the instructions included in the cabinet wall. • If a power cord is installed into...
... hole cut for no fill, drain, or noise concerns Position utility lines so they do not interfere with the door spring and other dishwasher components. SideMounting Brackets Tub Frame Bracket Attachment Optional Screws Side-Mount Bracket Kit Figure P (2 Each Side) 9 06F-1847H Dishwasher Installation is needed, a 10 foot long hose may be routed directly to Figure P and follow the instructions included in the cabinet wall. • If a power cord is installed into...
Installation Instructions
Page 10
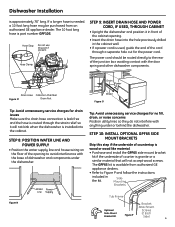
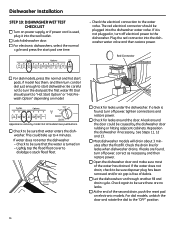
Dishwasher Installation STEP 11: SLIDE DISHWASHER INTO CABINET IMPORTANT - Pull the drain hose and power cord, if equipped, through the holes in the adjacent cabinet while sliding the dishwasher into position. 10 Figure R Check Level Side-to the door panel will not roll in or out on the door and lower rack track as shown in the tub opening a few inches at a time. It should not be "bunched up " or...
Dishwasher Installation STEP 11: SLIDE DISHWASHER INTO CABINET IMPORTANT - Pull the drain hose and power cord, if equipped, through the holes in the adjacent cabinet while sliding the dishwasher into position. 10 Figure R Check Level Side-to the door panel will not roll in or out on the door and lower rack track as shown in the tub opening a few inches at a time. It should not be "bunched up " or...
Installation Instructions
Page 13
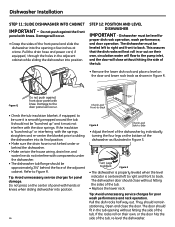
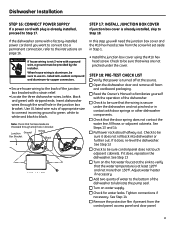
... from the control panel, access panel and door panel. 13 See Step 14 ■ Remove the protective film if present from the screw kit set aside in the junction box bracket. Dishwasher Installation STEP 16: CONNECT POWER SUPPLY If a power cord with door springs or other dishwasher components. ■ Check that the door spring does not contact the water line, fill hose, or adjacent cabinets. If the dishwasher came with stripped ends. Use UL listed wire nuts of...
... from the control panel, access panel and door panel. 13 See Step 14 ■ Remove the protective film if present from the screw kit set aside in the junction box bracket. Dishwasher Installation STEP 16: CONNECT POWER SUPPLY If a power cord with door springs or other dishwasher components. ■ Check that the door spring does not contact the water line, fill hose, or adjacent cabinets. If the dishwasher came with stripped ends. Use UL listed wire nuts of...
Installation Instructions
Page 14
... door. Dishwasher Installation STEP 19: DISHWASHER WET TEST CHECK LIST ■ Turn on model. Cycles POTS & PANS HEAVY WASH NORMAL CHINA WASH CRYSTAL RINSE ONLY HI TEMP HI TEMP HEATED RINSE WASH DRY LOCK (2 TIMES) 248 DELAY HOURS CLEAN CLEAN START RESET - Check the drain line for leaks under the dishwasher. For dial models, unlatch the door and rotate the dial to the water valve. Lightly tap the flood float cover to "Hot Start Option" or "Hot Prewash Option" depending on power supply or if power cord is turned...
... door. Dishwasher Installation STEP 19: DISHWASHER WET TEST CHECK LIST ■ Turn on model. Cycles POTS & PANS HEAVY WASH NORMAL CHINA WASH CRYSTAL RINSE ONLY HI TEMP HI TEMP HEATED RINSE WASH DRY LOCK (2 TIMES) 248 DELAY HOURS CLEAN CLEAN START RESET - Check the drain line for leaks under the dishwasher. For dial models, unlatch the door and rotate the dial to the water valve. Lightly tap the flood float cover to "Hot Start Option" or "Hot Prewash Option" depending on power supply or if power cord is turned...
Quick Specs
Page 1
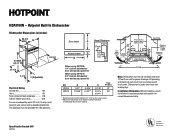
... across panel ** Adjustment required to match adjacent cabinet fronts due to leveling leg adjustment, 4" nominal 24" MIN. When using GPF325 1/4" custom dishwasher door and access panel kit. Dishwasher includes drain hose and leveling legs. adj. This wall area must enter Electrical wiring on adequately wired 120-volt, 15-amp circuit having 2-wire service with a separate ground wire. Note: Dishwasher must be installed more than 10 feet from sink for safe operation. Specification Created 4/07 450155 Listed by...
... across panel ** Adjustment required to match adjacent cabinet fronts due to leveling leg adjustment, 4" nominal 24" MIN. When using GPF325 1/4" custom dishwasher door and access panel kit. Dishwasher includes drain hose and leveling legs. adj. This wall area must enter Electrical wiring on adequately wired 120-volt, 15-amp circuit having 2-wire service with a separate ground wire. Note: Dishwasher must be installed more than 10 feet from sink for safe operation. Specification Created 4/07 450155 Listed by...
Use and Care Manual / Warranty
Page 1
...GSD2000 Series GSD3000 Series GSD4000 Series GSM2000 Series HDA1000 Series HDA2000 Series HDA3000 Series Write the model and serial numbers here: Model Serial You can find them on a label on the tub wall just inside the door. 165D4700P343 49-55023-1 04-07 JR Dishwashers ge.com Safety Instructions 2, 3 Operating Instructions Care and Cleaning 12 Control Panels 6 Control Settings 4-5 Dial Cycles 7 Flashing Display Lights 8 Loading the Dishwasher Racks 10 Loading Place Settings 11 Optional Accessories 12 Using the Dishwasher 8, 9 Troubleshooting Tips . . . 13, 14 Consumer Support...
...GSD2000 Series GSD3000 Series GSD4000 Series GSM2000 Series HDA1000 Series HDA2000 Series HDA3000 Series Write the model and serial numbers here: Model Serial You can find them on a label on the tub wall just inside the door. 165D4700P343 49-55023-1 04-07 JR Dishwashers ge.com Safety Instructions 2, 3 Operating Instructions Care and Cleaning 12 Control Panels 6 Control Settings 4-5 Dial Cycles 7 Flashing Display Lights 8 Loading the Dishwasher Racks 10 Loading Place Settings 11 Optional Accessories 12 Using the Dishwasher 8, 9 Troubleshooting Tips . . . 13, 14 Consumer Support...
Use and Care Manual / Warranty
Page 2
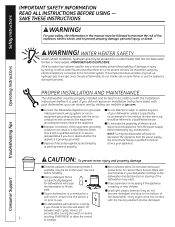
... the control to the touch. Consumer Support If you did not receive an Installation Instructions sheet with the Installation Instructions before using any maintenance. or run for two or more weeks. SAVE THESE INSTRUCTIONS WARNING! HYDROGEN GAS IS EXPLOSIVE. Damage to the dishwasher and discoloration or staining of fire, explosion, electric shock, and to a qualified technician. I Close supervision is necessary if this manual. I Using a detergent that is specifically...
... the control to the touch. Consumer Support If you did not receive an Installation Instructions sheet with the Installation Instructions before using any maintenance. or run for two or more weeks. SAVE THESE INSTRUCTIONS WARNING! HYDROGEN GAS IS EXPLOSIVE. Damage to the dishwasher and discoloration or staining of fire, explosion, electric shock, and to a qualified technician. I Close supervision is necessary if this manual. I Using a detergent that is specifically...
Use and Care Manual / Warranty
Page 4
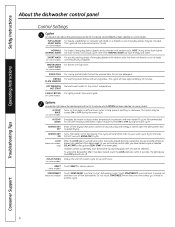
... be washed later. WATER SAVER For dishes with heavily soiled dishes. PLATE WARMER HOT PREWASH Preheats wash water to speed drying. HEATED DRY Shuts off the drying heat option. Troubleshooting Tips Consumer Support 4 LIGHT WASH (on soils. Open the dishwasher door OFF to the correct temperature. DRYING For warming clean dishes and serving plates. This cycle will extend the time to your wash cycle by touching pads with RINSE ONLY cycle. Safety Instructions Operating Instructions About the dishwasher control panel Control Settings Cycles An indicator light above...
... be washed later. WATER SAVER For dishes with heavily soiled dishes. PLATE WARMER HOT PREWASH Preheats wash water to speed drying. HEATED DRY Shuts off the drying heat option. Troubleshooting Tips Consumer Support 4 LIGHT WASH (on soils. Open the dishwasher door OFF to the correct temperature. DRYING For warming clean dishes and serving plates. This cycle will extend the time to your wash cycle by touching pads with RINSE ONLY cycle. Safety Instructions Operating Instructions About the dishwasher control panel Control Settings Cycles An indicator light above...
Use and Care Manual / Warranty
Page 5
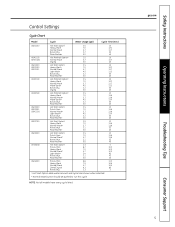
ge.com Troubleshooting Tips Consumer Support 5 NOTE: Not all models have every cycle listed. Safety Instructions Operating Instructions Control Settings Cycle Chart Model Cycle Water Usage (gal.) Cycle Time (min.) GSD1100 Hot Start Option1 2.5 10 Heavy Wash 7.0 120 Normal Wash 5.7 117 Rinse Only 2.2 53 Plate Warmer 0.0 40 HDA1100 Hot PreWash Option1 2.5 10 ADW1100 Normal Wash 5.7 117 Drying 0.0 40 GSD1300 Hot Start Option1 2.5 10 GSD2100 Heavy Wash 7.0 120 GSD2101 Normal Wash 5.7 117 Light Wash 4.5 113 Rinse Only 2.2 53 Plate Warmer ...
ge.com Troubleshooting Tips Consumer Support 5 NOTE: Not all models have every cycle listed. Safety Instructions Operating Instructions Control Settings Cycle Chart Model Cycle Water Usage (gal.) Cycle Time (min.) GSD1100 Hot Start Option1 2.5 10 Heavy Wash 7.0 120 Normal Wash 5.7 117 Rinse Only 2.2 53 Plate Warmer 0.0 40 HDA1100 Hot PreWash Option1 2.5 10 ADW1100 Normal Wash 5.7 117 Drying 0.0 40 GSD1300 Hot Start Option1 2.5 10 GSD2100 Heavy Wash 7.0 120 GSD2101 Normal Wash 5.7 117 Light Wash 4.5 113 Rinse Only 2.2 53 Plate Warmer ...
Use and Care Manual / Warranty
Page 8
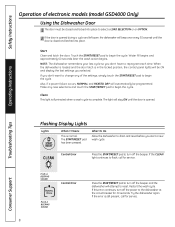
... a wash cycle is normal. What To Do Allow the dishwasher to reprogram each time. CLEAN Control Error Press the START/RESET pad to flash, call for service. Restart the wash cycle. If the error is opened. Operating Instructions Troubleshooting Tips Flashing Display Lights Lights START RESET What It Means This is complete. If the CLEAN light continues to turn off the beeper and the dishwasher will beep once every 30 seconds until the door is still present, call for service. 8 Consumer Support Start Close and latch...
... a wash cycle is normal. What To Do Allow the dishwasher to reprogram each time. CLEAN Control Error Press the START/RESET pad to flash, call for service. Restart the wash cycle. If the error is opened. Operating Instructions Troubleshooting Tips Flashing Display Lights Lights START RESET What It Means This is complete. If the CLEAN light continues to turn off the beeper and the dishwasher will beep once every 30 seconds until the door is still present, call for service. 8 Consumer Support Start Close and latch...
Use and Care Manual / Warranty
Page 9
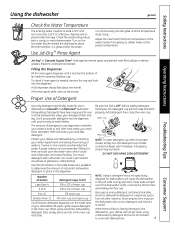
... on the hot water faucet nearest the dishwasher, place the thermometer in the water valve, which could stick while open detergent cup after it releases. Open cup Main cup NOTE: To open and cause flooding. Turn on dishes, glasses, flatware, cookware and plastic. If the rinse agent spills, wipe up in a glass and let the water Use Jet-Dry® Rinse Agent run continuously into the dispenser. All wash cycles require detergent in...
... on the hot water faucet nearest the dishwasher, place the thermometer in the water valve, which could stick while open detergent cup after it releases. Open cup Main cup NOTE: To open and cause flooding. Turn on dishes, glasses, flatware, cookware and plastic. If the rinse agent spills, wipe up in a glass and let the water Use Jet-Dry® Rinse Agent run continuously into the dispenser. All wash cycles require detergent in...
Use and Care Manual / Warranty
Page 12
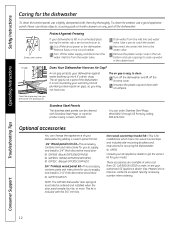
... includes side-mounting brackets and instructions for securing the dishawasher: I GPF375/GPF475 NOTE: The GPF100 dishwasher door spring kit must also be cleaned with a toothpick. Call 800.626.2002 to get the correct kit for your model. Remove fuses or trip circuit breaker. 2 Turn off the water supply and disconnect the water inlet line from the water valve. 3 Drain water from GE. Not all plumbing codes require air gaps, so you to the water valve. 5 Remove the...
... includes side-mounting brackets and instructions for securing the dishawasher: I GPF375/GPF475 NOTE: The GPF100 dishwasher door spring kit must also be cleaned with a toothpick. Call 800.626.2002 to get the correct kit for your model. Remove fuses or trip circuit breaker. 2 Turn off the water supply and disconnect the water inlet line from the water valve. 3 Drain water from GE. Not all plumbing codes require air gaps, so you to the water valve. 5 Remove the...
Use and Care Manual / Warranty
Page 13
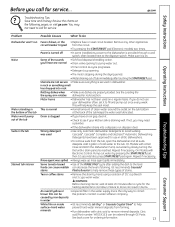
... to correct brown film can be this problem. in rack or something small has dropped into a disposer, run Noise Water standing in all GE dishwashers. • To remove suds from the circuit. • Try pressing the START/RESET pad (Electronic models) two times. See the Loading the the spray arm rotates dishwasher racks section. Rinse agent was used on inside • GE recommends Jet-Dry ® or Cascade Crystal Clear®...
... to correct brown film can be this problem. in rack or something small has dropped into a disposer, run Noise Water standing in all GE dishwashers. • To remove suds from the circuit. • Try pressing the START/RESET pad (Electronic models) two times. See the Loading the the spray arm rotates dishwasher racks section. Rinse agent was used on inside • GE recommends Jet-Dry ® or Cascade Crystal Clear®...
Use and Care Manual / Warranty
Page 14
...; Turn the Timer Dial to drain loop the Installation Instructions. position Dishes are setting controls Control panel responded to Proper Use of soft water and too much detergent • This is called etching and is empty Inlet water temperature • Raise the water heater temperature to complete the cycle. detergent cups This is normal • Steam comes through the vent by the door latch during drying and when water is clogged • Clean the air gap.
...; Turn the Timer Dial to drain loop the Installation Instructions. position Dishes are setting controls Control panel responded to Proper Use of soft water and too much detergent • This is called etching and is empty Inlet water temperature • Raise the water heater temperature to complete the cycle. detergent cups This is normal • Steam comes through the vent by the door latch during drying and when water is clogged • Clean the air gap.
Use and Care Manual / Warranty
Page 15
... to teach you may also have serial number and model number available when calling for a trip charge or you how to one -year warranty, GE will also provide, free of incidental or consequential damages. I Replacement of house fuses or resetting of the air gap device in -home service to the original purchaser and any succeeding owner for products purchased for other rights which fails...
... to teach you may also have serial number and model number available when calling for a trip charge or you how to one -year warranty, GE will also provide, free of incidental or consequential damages. I Replacement of house fuses or resetting of the air gap device in -home service to the original purchaser and any succeeding owner for products purchased for other rights which fails...


