Product Manual
Page 3
... nearest you for warranty service of Hoover® authorized dealer locations (U.S. Please enter the complete model and manufacturing code in China MANUFACTURING CODE (Label located on bottom of vacuum) CONTENTS Important Safety Instructions 3 Vacuum Assembly 5 Carton Contents 5 Attach Handle 5 Attach Dirt Cup 5 Position Tools 5 How To Use...6 Vacuum Description 6 On-Off Switch 6 Carry Handle...
... nearest you for warranty service of Hoover® authorized dealer locations (U.S. Please enter the complete model and manufacturing code in China MANUFACTURING CODE (Label located on bottom of vacuum) CONTENTS Important Safety Instructions 3 Vacuum Assembly 5 Carton Contents 5 Attach Handle 5 Attach Dirt Cup 5 Position Tools 5 How To Use...6 Vacuum Description 6 On-Off Switch 6 Carry Handle...

Product Manual
Page 6
... to pick up anything that is burning or smoking, such as cigarettes, matches, or hot ashes. • Do not use and before operating. • Operate vacuum only at bottom of cleaner. • Do not leave appliance when plugged in areas where they may be present. • Do not pick up flammable...
... to pick up anything that is burning or smoking, such as cigarettes, matches, or hot ashes. • Do not use and before operating. • Operate vacuum only at bottom of cleaner. • Do not leave appliance when plugged in areas where they may be present. • Do not pick up flammable...
Product Manual
Page 10
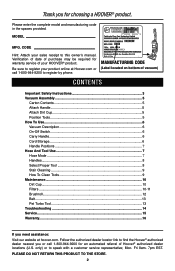
...G C. Pet Turbo Tool* F. ATTACH HANDLE 1.2 Insert handle section into vacuum base. 1.3 To remove handle press button on side of vacuum. 1.5 NOTE: On board storage is only available for the 2-in -1 Combination Tool E. Pivot cup into vacuum body first. Vacuum Base and Dirt Cup D. 2-in -1 combination tool. 5 1.6 B Black... Mesh Bag with Logo H Remove all parts are located before disposing of dirt cup into vacuum. 1.4 POSITION TOOLS 1.5 For storage mode, push dusting brush all the way down onto crevice tool. 1.6 Assemble combination tool onto...
...G C. Pet Turbo Tool* F. ATTACH HANDLE 1.2 Insert handle section into vacuum base. 1.3 To remove handle press button on side of vacuum. 1.5 NOTE: On board storage is only available for the 2-in -1 Combination Tool E. Pivot cup into vacuum body first. Vacuum Base and Dirt Cup D. 2-in -1 combination tool. 5 1.6 B Black... Mesh Bag with Logo H Remove all parts are located before disposing of dirt cup into vacuum. 1.4 POSITION TOOLS 1.5 For storage mode, push dusting brush all the way down onto crevice tool. 1.6 Assemble combination tool onto...
Product Manual
Page 11
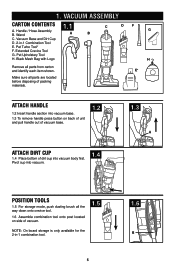
Dirt Cup 7. Cord Clip 13. To turn vacuum OFF, push switch again. HOW TO USE VACUUM DESCRIPTION 1. Wand 1 4. Filter made with vacuum in -1 Combination Tool 18. Cord 7 17. 2-in the upright position. Rinsable Filter Access 8 19 Operate cleaner only at voltage specified on data plate on cord ... be moved by using the carry handle (C). Hose Connector 19. Hose Port (above floor cleaning) 10 5 14 10. ON/OFF Power Switch 11. To turn vacuum ON, push ON/OFF switch (A) once. 2. Cord Release 18 16. Carry Handle 2 6.
Dirt Cup 7. Cord Clip 13. To turn vacuum OFF, push switch again. HOW TO USE VACUUM DESCRIPTION 1. Wand 1 4. Filter made with vacuum in -1 Combination Tool 18. Cord 7 17. 2-in the upright position. Rinsable Filter Access 8 19 Operate cleaner only at voltage specified on data plate on cord ... be moved by using the carry handle (C). Hose Connector 19. Hose Port (above floor cleaning) 10 5 14 10. ON/OFF Power Switch 11. To turn vacuum ON, push ON/OFF switch (A) once. 2. Cord Release 18 16. Carry Handle 2 6.
Product Manual
Page 14
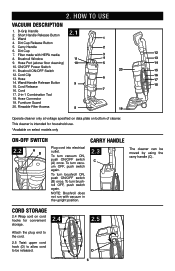
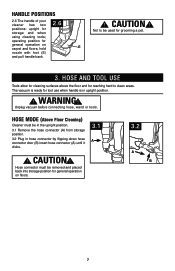
...handle back. 2.6 ! HOSE AND TOOL USE Tools allow for cleaning surfaces above the floor and for general operation on carpet and floors; Unplug vacuum before connecting hose, wand or tools. HOSE MODE (Above Floor Cleaning) Cleaner must be removed and placed back into storage position for reaching hard... for tool use when handle is in hose connector by flipping down hose connector door (B) insert hose connector (A) until it clicks. 3.1 A ! The vacuum is ready for general operation on floors. 3.2 A B 7 Hose connector must be used for storage and when using cleaning tools;
...handle back. 2.6 ! HOSE AND TOOL USE Tools allow for cleaning surfaces above the floor and for general operation on carpet and floors; Unplug vacuum before connecting hose, wand or tools. HOSE MODE (Above Floor Cleaning) Cleaner must be removed and placed back into storage position for reaching hard... for tool use when handle is in hose connector by flipping down hose connector door (B) insert hose connector (A) until it clicks. 3.1 A ! The vacuum is ready for general operation on floors. 3.2 A B 7 Hose connector must be used for storage and when using cleaning tools;
Product Manual
Page 19
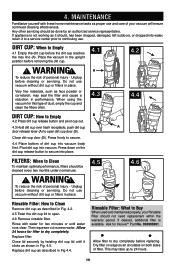
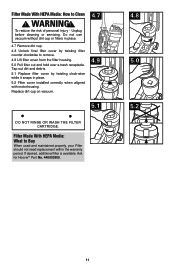
...button to continuing use and care of personal injury - When using the vacuum for Hoover® Part No. 303903001. Allow 24 hours for two minutes or until it to a ...service center prior to secure into vacuum. If appliance is available. To reduce the ... to Clean To maintain optimal performance, filters should , has been dropped, damaged, left outdoors, or dropped into vacuum body first. FILTERS: When to secure. 4.4 Place bottom of personal injury - Replace filter. If desired, additional...
...button to continuing use and care of personal injury - When using the vacuum for Hoover® Part No. 303903001. Allow 24 hours for two minutes or until it to a ...service center prior to secure into vacuum. If appliance is available. To reduce the ... to Clean To maintain optimal performance, filters should , has been dropped, damaged, left outdoors, or dropped into vacuum body first. FILTERS: When to secure. 4.4 Place bottom of personal injury - Replace filter. If desired, additional...
Product Manual
Page 22
.... 4.9 Lift filter cover from the filter housing. 5.0 Pull filter out and hold over a trash receptacle. Ask for Hoover® Part No. 440003905. 4.8 5.0 5.2 11 WARNING! Do not use vacuum without dirt cup or filters in place. 4.7 Remove dirt cup. 4.8 Unlock final filter cover by twisting clock-wise while... Replace filter cover by twisting filter counter-clockwise to Clean ! To reduce the risk of personal injury - Replace dirt cup on vacuum. 4.7 4.9 5.1 DO NOT RINSE OR WASH THE FILTER CARTRIDGE. Unplug before cleaning or servicing. If desired, additional filter is available.
.... 4.9 Lift filter cover from the filter housing. 5.0 Pull filter out and hold over a trash receptacle. Ask for Hoover® Part No. 440003905. 4.8 5.0 5.2 11 WARNING! Do not use vacuum without dirt cup or filters in place. 4.7 Remove dirt cup. 4.8 Unlock final filter cover by twisting clock-wise while... Replace filter cover by twisting filter counter-clockwise to Clean ! To reduce the risk of personal injury - Replace dirt cup on vacuum. 4.7 4.9 5.1 DO NOT RINSE OR WASH THE FILTER CARTRIDGE. Unplug before cleaning or servicing. If desired, additional filter is available.
Product Manual
Page 23
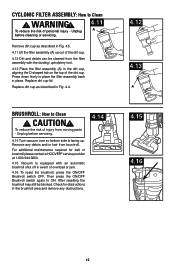
... ON. Remove any obstructions. 4.14 4.12 4.13 A 4.15 4.16 12 Check for belt or brushroll please contact a HOOVER® service provider at 1-800-944-9200. 4.15 Vacuum is facing up out of the dirt cup. 4.12 Dirt and debris can be blocked. CAUTION ! WARNING! To reduce the... cup lid. For additional maintenance required for obstructions in Fig. 4.5. 4.11 Lift the filter assembly (A) up . Unplug before servicing. 4.14 Turn vacuum over so bottom side is equipped with the dusting/ upholstery tool. 4.13 Place the filter assembly (A) in event of personal injury - Press down ...
... ON. Remove any obstructions. 4.14 4.12 4.13 A 4.15 4.16 12 Check for belt or brushroll please contact a HOOVER® service provider at 1-800-944-9200. 4.15 Vacuum is facing up out of the dirt cup. 4.12 Dirt and debris can be blocked. CAUTION ! WARNING! To reduce the... cup lid. For additional maintenance required for obstructions in Fig. 4.5. 4.11 Lift the filter assembly (A) up . Unplug before servicing. 4.14 Turn vacuum over so bottom side is equipped with the dusting/ upholstery tool. 4.13 Place the filter assembly (A) in event of personal injury - Press down ...
Product Manual
Page 26
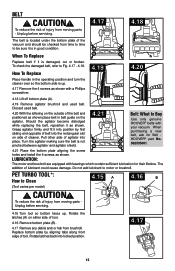
... Remove any debris and/ or hair from time to time to Buy Use only genuine HOOVER® belts with your vacuum. Grasp agitator firmly and fit it into the rectangular slot on either side of the vacuum and should be sure it is damaged, cut or broken. LUBRICATION: The motor and brushroll... of agitator into locked position. 4.17 13 When To Replace A Replace belt if it as shown with bearings which contain sufficient lubrication for Belt HOOVER® part No. 562535001. 4.21 Place the bottom plate aligning the screw holes and install the 4 screws as shown place belt in good ...
... Remove any debris and/ or hair from time to time to Buy Use only genuine HOOVER® belts with your vacuum. Grasp agitator firmly and fit it into the rectangular slot on either side of the vacuum and should be sure it is damaged, cut or broken. LUBRICATION: The motor and brushroll... of agitator into locked position. 4.17 13 When To Replace A Replace belt if it as shown with bearings which contain sufficient lubrication for Belt HOOVER® part No. 562535001. 4.21 Place the bottom plate aligning the screw holes and install the 4 screws as shown place belt in good ...
Product Manual
Page 27
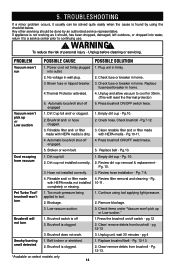
... - Pg. 7-8. 4. Review filter removal and cleaning - Check items under "Vacuum won 't run 1. pg 4 Smoky/burning smell detected 1. Pg. 12-13. *Available on /off engaged 5. 5. Unplug and allow vacuum to tool. 2. Pg.10-11. 4. Too much pressure being applied to ...problem occurs, it to a service center prior to continuing use. ! Blown fuse or tripped breaker. 3. Dust escaping from vacuum 1. completely or missing. Vacuum won 't turn 1. Brushroll and/ or hose clogged. 3. Broken or worn belt. 5. Replace brushroll belt - Automatic brushroll ...
... - Pg. 7-8. 4. Review filter removal and cleaning - Check items under "Vacuum won 't run 1. pg 4 Smoky/burning smell detected 1. Pg. 12-13. *Available on /off engaged 5. 5. Unplug and allow vacuum to tool. 2. Pg.10-11. 4. Too much pressure being applied to ...problem occurs, it to a service center prior to continuing use. ! Blown fuse or tripped breaker. 3. Dust escaping from vacuum 1. completely or missing. Vacuum won 't turn 1. Brushroll and/ or hose clogged. 3. Broken or worn belt. 5. Replace brushroll belt - Automatic brushroll ...

Product Manual
Page 30
...Toronto: 755 Progress Ave., Scarborough, ON M1H 2W7 OR Hoover® Canada, Edmonton: 18129-111 Ave., Edmonton, AB T5W 2P2, Phone: 1-800-944-9200, Mon-Fri 8am-7pm EST. ! A Thermal Protector has been designed into your vacuum to find the service outlet nearest you need further assistance:... 1-800-944-9200. If this product to activate after following the above steps, your vacuum by : • Checking the Yellow Pages under "Vacuum Cleaners" or "Household". • Visit our website at hoover.com (U.S. When cleaner is unplugged and motor has cooled for any obstructions. Turn cleaner...
...Toronto: 755 Progress Ave., Scarborough, ON M1H 2W7 OR Hoover® Canada, Edmonton: 18129-111 Ave., Edmonton, AB T5W 2P2, Phone: 1-800-944-9200, Mon-Fri 8am-7pm EST. ! A Thermal Protector has been designed into your vacuum to find the service outlet nearest you need further assistance:... 1-800-944-9200. If this product to activate after following the above steps, your vacuum by : • Checking the Yellow Pages under "Vacuum Cleaners" or "Household". • Visit our website at hoover.com (U.S. When cleaner is unplugged and motor has cooled for any obstructions. Turn cleaner...


