Product Manual
Page 2
For assistance, please call Customer Service at 1-800-944-9200 Mon-Fri 8am-7pm EST. página E1 www.hoover.com IMPORTANT: READ CAREFULLY BEFORE ASSEMBLY AND USE. Questions or concerns? PLEASE DO NOT RETURN THIS PRODUCT TO THE STORE. IF USED COMMERCIALLY WARRANTY IS VOID. ©2014 Techtronic Floor Care Technology Limited. All rights reserved. #961151938 ID112542-R0 THIS PRODUCT IS INTENDED FOR HOUSEHOLD USE ONLY. OWNER'S MANUAL Operating and Servicing Instructions Español -
For assistance, please call Customer Service at 1-800-944-9200 Mon-Fri 8am-7pm EST. página E1 www.hoover.com IMPORTANT: READ CAREFULLY BEFORE ASSEMBLY AND USE. Questions or concerns? PLEASE DO NOT RETURN THIS PRODUCT TO THE STORE. IF USED COMMERCIALLY WARRANTY IS VOID. ©2014 Techtronic Floor Care Technology Limited. All rights reserved. #961151938 ID112542-R0 THIS PRODUCT IS INTENDED FOR HOUSEHOLD USE ONLY. OWNER'S MANUAL Operating and Servicing Instructions Español -
Product Manual
Page 3
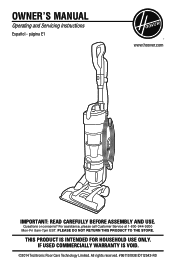
... Instructions 3 Vacuum Assembly 5 Carton Contents 5 Attach Handle 5 Attach Dirt Cup 5 Position Tools 5 How To Use...6 Vacuum Description 6 On-Off Switch 6 Carry Handle...6 Cord Storage 6 Handle Positions 7 Hose And Tool Use 7 Hose Mode...7 Handles...8 Select Proper Tool 8 Stair Cleaning 9 How To Clean Tools 9 Maintenance...10 Dirt Cup...10 Filters...10-11 Brushroll...12 Belt...13 Pet Turbo Tool 13 Troubleshooting 14 Service...15 Warranty...16 If you or call 1-800-944-9200 to register by phone. Be sure to find the Hoover® authorized dealer nearest you need...
... Instructions 3 Vacuum Assembly 5 Carton Contents 5 Attach Handle 5 Attach Dirt Cup 5 Position Tools 5 How To Use...6 Vacuum Description 6 On-Off Switch 6 Carry Handle...6 Cord Storage 6 Handle Positions 7 Hose And Tool Use 7 Hose Mode...7 Handles...8 Select Proper Tool 8 Stair Cleaning 9 How To Clean Tools 9 Maintenance...10 Dirt Cup...10 Filters...10-11 Brushroll...12 Belt...13 Pet Turbo Tool 13 Troubleshooting 14 Service...15 Warranty...16 If you or call 1-800-944-9200 to register by phone. Be sure to find the Hoover® authorized dealer nearest you need...

Product Manual
Page 6
... handle plug or appliance with any object into openings. keep children away from product, and do not allow to pick up anything that is burning or smoking, such as cigarettes, matches, or hot ashes. • Do not use without Dirt Cup and/or Filters in use and before cleaning or servicing. • Do not use outdoors or on cord. Not intended for use by pulling on wet...
... handle plug or appliance with any object into openings. keep children away from product, and do not allow to pick up anything that is burning or smoking, such as cigarettes, matches, or hot ashes. • Do not use without Dirt Cup and/or Filters in use and before cleaning or servicing. • Do not use outdoors or on cord. Not intended for use by pulling on wet...

Product Manual
Page 7
...• Avoid picking up hard, sharp objects with this product, as they can result. This plug will fit in a polarized outlet only one location for an extended period of time, as they may cause damage. • Do not use sharp objects to clean out hose as damage to floor can cause damage.... • Store appropriately indoors in a dry place. If it still does not fit, contact a 4 Do not expose machine to freezing temperatures. • With brushroll on, do not allow cleaner to sit in the outlet, reverse the plug...
...• Avoid picking up hard, sharp objects with this product, as they can result. This plug will fit in a polarized outlet only one location for an extended period of time, as they may cause damage. • Do not use sharp objects to clean out hose as damage to floor can cause damage.... • Store appropriately indoors in a dry place. If it still does not fit, contact a 4 Do not expose machine to freezing temperatures. • With brushroll on, do not allow cleaner to sit in the outlet, reverse the plug...
Product Manual
Page 10
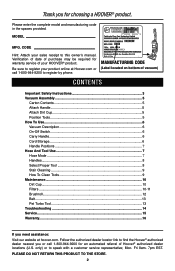
... TOOLS 1.5 For storage mode, push dusting brush all the way down onto crevice tool. 1.6 Assemble combination tool onto post located on side of packing materials. Extended Crevice Tool G. Black Mesh Bag with Logo H Remove all parts are located before disposing of vacuum. 1.5 NOTE: On board storage is only available for the 2-in -1 Combination Tool E. Pivot cup into vacuum body first. Pet Turbo Tool* F. Vacuum Base and Dirt Cup D. 2-in -1 combination tool. 5 1.6 B VACUUM ASSEMBLY CARTON CONTENTS A. 1. Handle / Hose Assembly...
... TOOLS 1.5 For storage mode, push dusting brush all the way down onto crevice tool. 1.6 Assemble combination tool onto post located on side of packing materials. Extended Crevice Tool G. Black Mesh Bag with Logo H Remove all parts are located before disposing of vacuum. 1.5 NOTE: On board storage is only available for the 2-in -1 Combination Tool E. Pivot cup into vacuum body first. Pet Turbo Tool* F. Vacuum Base and Dirt Cup D. 2-in -1 combination tool. 5 1.6 B VACUUM ASSEMBLY CARTON CONTENTS A. 1. Handle / Hose Assembly...
Product Manual
Page 11
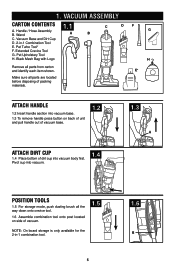
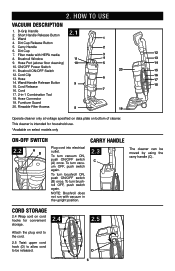
... Power Switch 11. Cord Clip 13. Hose Port (above floor cleaning) 10 5 14 10. Cord Release 18 16. To turn brushroll OFF, push switch again. CARRY HANDLE 2.3 C The cleaner can be released. 2.5 D 6 HOW TO USE VACUUM DESCRIPTION 1. Dirt Cup Release Button 5. Furniture Guard 20. To turn brushroll ON, push ON/OFF switch (B) once. Filter made with vacuum in -1 Combination Tool 18. Hose Connector 19. To turn vacuum OFF, push switch again. Wand 1 4. Wand/Handle Release Button 9 15. To turn vacuum ON, push ON/OFF switch (A) once. CORD...
... Power Switch 11. Cord Clip 13. Hose Port (above floor cleaning) 10 5 14 10. Cord Release 18 16. To turn brushroll OFF, push switch again. CARRY HANDLE 2.3 C The cleaner can be released. 2.5 D 6 HOW TO USE VACUUM DESCRIPTION 1. Dirt Cup Release Button 5. Furniture Guard 20. To turn brushroll ON, push ON/OFF switch (B) once. Filter made with vacuum in -1 Combination Tool 18. Hose Connector 19. To turn vacuum OFF, push switch again. Wand 1 4. Wand/Handle Release Button 9 15. To turn vacuum ON, push ON/OFF switch (A) once. CORD...
Product Manual
Page 14
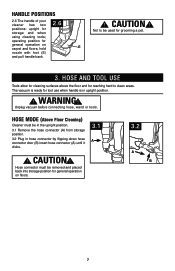
... vacuum before connecting hose, wand or tools. CAUTION ! Hose connector must be removed and placed back into storage position for storage and when using cleaning tools; operating position for tool use when handle is in hose connector by flipping down hose connector door (B) insert hose connector (A) until it clicks. 3.1 A ! hold nozzle with foot (E) and pull handle back. 2.6 ! HANDLE POSITIONS 2.6 The handle of your cleaner has two positions: upright for general operation on carpet and floors; HOSE...
... vacuum before connecting hose, wand or tools. CAUTION ! Hose connector must be removed and placed back into storage position for storage and when using cleaning tools; operating position for tool use when handle is in hose connector by flipping down hose connector door (B) insert hose connector (A) until it clicks. 3.1 A ! hold nozzle with foot (E) and pull handle back. 2.6 ! HANDLE POSITIONS 2.6 The handle of your cleaner has two positions: upright for general operation on carpet and floors; HOSE...
Product Manual
Page 15
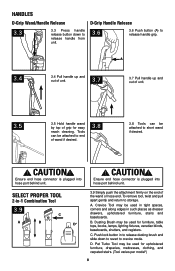
..., stairs and baseboards. C. Pet Turbo Tool may be attached to short wand if desired. ! CAUTION ! SELECT PROPER TOOL 2-in to release dusting brush and slide down to crevice mode. Dusting Brush may be used for upholstered furniture, draperies, mattresses, clothing, and carpeted stairs. (Tool varies per model*) 8 Ensure end hose connector is plugged into hose port behind unit. ! D* B. Push lock button in -1 Combination Tool 3.9 C A B 3.9 Simply push the attachment firmly on the...
..., stairs and baseboards. C. Pet Turbo Tool may be attached to short wand if desired. ! CAUTION ! SELECT PROPER TOOL 2-in to release dusting brush and slide down to crevice mode. Dusting Brush may be used for upholstered furniture, draperies, mattresses, clothing, and carpeted stairs. (Tool varies per model*) 8 Ensure end hose connector is plugged into hose port behind unit. ! D* B. Push lock button in -1 Combination Tool 3.9 C A B 3.9 Simply push the attachment firmly on the...
Product Manual
Page 18
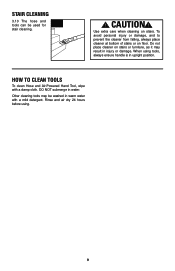
... be used for stair cleaning. ! STAIR CLEANING 3.10 The hose and tools can be washed in warm water with a damp cloth. To avoid personal injury or damage, and to prevent the cleaner from falling, always place cleaner at bottom of stairs or on stairs. Rinse and air dry 24 hours before using tools, always ensure handle is in upright position. When using . 9 HOW TO CLEAN TOOLS To clean Hose and Air-Powered Hand Tool...
... be used for stair cleaning. ! STAIR CLEANING 3.10 The hose and tools can be washed in warm water with a damp cloth. To avoid personal injury or damage, and to prevent the cleaner from falling, always place cleaner at bottom of stairs or on stairs. Rinse and air dry 24 hours before using tools, always ensure handle is in upright position. When using . 9 HOW TO CLEAN TOOLS To clean Hose and Air-Powered Hand Tool...
Product Manual
Page 19
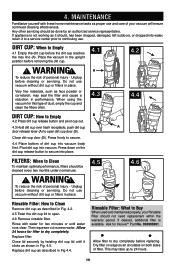
... continuing use and care of dust, empty the cup and clean the filters often. Allow filter to 24 hours. 10 WARNING! Then squeeze out excess water. Dry filter on edge so air circulates on the dirt cup release button to dry completely. If desired, additional filter is not working as face powder or cornstarch, may take up to dry completely before replacing. Any other servicing should not need replacement within the warranty period...
... continuing use and care of dust, empty the cup and clean the filters often. Allow filter to 24 hours. 10 WARNING! Then squeeze out excess water. Dry filter on edge so air circulates on the dirt cup release button to dry completely. If desired, additional filter is not working as face powder or cornstarch, may take up to dry completely before replacing. Any other servicing should not need replacement within the warranty period...
Product Manual
Page 22
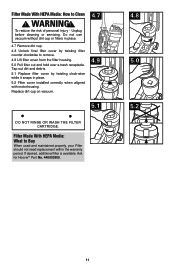
Filter Made With HEPA Media: How to Buy When used and maintained properly, your Filter should not need replacement within the warranty period. If desired, additional filter is available. Unplug before cleaning or servicing. Filter Made With HEPA Media: What to Clean ! Ask for Hoover® Part No. 440003905. 4.8 5.0 5.2 11 Tap out dirt and debris. 5.1 Replace filter cover by twisting clock-wise while it snaps in place. 4.7 Remove dirt cup. 4.8 Unlock final filter cover...
Filter Made With HEPA Media: How to Buy When used and maintained properly, your Filter should not need replacement within the warranty period. If desired, additional filter is available. Unplug before cleaning or servicing. Filter Made With HEPA Media: What to Clean ! Ask for Hoover® Part No. 440003905. 4.8 5.0 5.2 11 Tap out dirt and debris. 5.1 Replace filter cover by twisting clock-wise while it snaps in place. 4.7 Remove dirt cup. 4.8 Unlock final filter cover...
Product Manual
Page 23
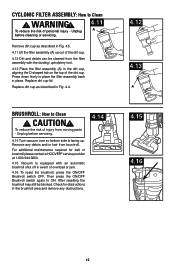
... switch again to Clean ! Replace dirt cup lid. CAUTION ! Remove any obstructions. 4.14 4.12 4.13 A 4.15 4.16 12 After resetting the brushroll may still be cleaned from the filter assembly with an automatic brushroll shut off in Fig. 4.5. 4.11 Lift the filter assembly (A) up . CYCLONIC FILTER ASSEMBLY: How to place the filter assembly back in Fig. 4.4. To reduce the risk of injury from brushroll. Unplug before servicing. 4.14 Turn vacuum...
... switch again to Clean ! Replace dirt cup lid. CAUTION ! Remove any obstructions. 4.14 4.12 4.13 A 4.15 4.16 12 After resetting the brushroll may still be cleaned from the filter assembly with an automatic brushroll shut off in Fig. 4.5. 4.11 Lift the filter assembly (A) up . CYCLONIC FILTER ASSEMBLY: How to place the filter assembly back in Fig. 4.4. To reduce the risk of injury from brushroll. Unplug before servicing. 4.14 Turn vacuum...
Product Manual
Page 26
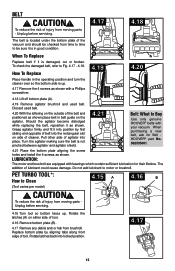
... it is up . To check the damaged belt, refer to motor or brushroll. How To Replace 4.19 4.20 Place handle in belt guide on the outside of lubricant could cause damage. Turn the agitator making sure the belt is located under the bottom plate of tool. PET TURBO TOOL*: How to Buy Use only genuine HOOVER® belts with bearings which contain sufficient lubrication for Belt HOOVER® part No. 562535001. 4.21 Place...
... it is up . To check the damaged belt, refer to motor or brushroll. How To Replace 4.19 4.20 Place handle in belt guide on the outside of lubricant could cause damage. Turn the agitator making sure the belt is located under the bottom plate of tool. PET TURBO TOOL*: How to Buy Use only genuine HOOVER® belts with bearings which contain sufficient lubrication for Belt HOOVER® part No. 562535001. 4.21 Place...
Product Manual
Page 27
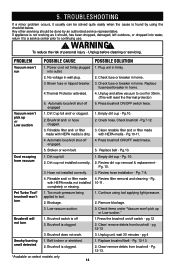
...! Hose not installed correctly. 3. Pg. 12-13. 2. TROUBLESHOOTING If a minor problem occurs, it usually can be done by using tool applying light pressure. 2. Check fuse or breaker in home. 3. Press brushroll ON/OFF switch twice. Pg.10-11. 4. Empty dirt cup - Pg. PROBLEM POSSIBLE CAUSE POSSIBLE SOLUTION Vacuum won 't pick up or Low suction 1. Press brushroll ON/OFF switch twice. 5. Continue using the checklist below. Unplug before cleaning or servicing. into water...
...! Hose not installed correctly. 3. Pg. 12-13. 2. TROUBLESHOOTING If a minor problem occurs, it usually can be done by using tool applying light pressure. 2. Check fuse or breaker in home. 3. Press brushroll ON/OFF switch twice. Pg.10-11. 4. Empty dirt cup - Pg. PROBLEM POSSIBLE CAUSE POSSIBLE SOLUTION Vacuum won 't pick up or Low suction 1. Press brushroll ON/OFF switch twice. 5. Continue using the checklist below. Unplug before cleaning or servicing. into water...

Product Manual
Page 30
... the thermal protector activates the cleaner will deactivate and cleaning may continue. Turn cleaner OFF and unplug it from the electrical outlet. 2. Inspect the nozzle inlet, hose connector, hose, dirt cup inlet, cyclonic filter, rinsable filter, and HEPA filter for 30 minutes, the thermal protector will stop running. SERVICE To obtain approved Hoover® service and genuine Hoover® parts, locate the nearest Authorized Hoover® Warranty Service Dealer (Depot) by the complete model number when requesting information or ordering parts. (The model number appears...
... the thermal protector activates the cleaner will deactivate and cleaning may continue. Turn cleaner OFF and unplug it from the electrical outlet. 2. Inspect the nozzle inlet, hose connector, hose, dirt cup inlet, cyclonic filter, rinsable filter, and HEPA filter for 30 minutes, the thermal protector will stop running. SERVICE To obtain approved Hoover® service and genuine Hoover® parts, locate the nearest Authorized Hoover® Warranty Service Dealer (Depot) by the complete model number when requesting information or ordering parts. (The model number appears...
Product Manual
Page 31
... rental services), brushroll, belt, improper maintenance of the product, damage due to misuse, acts of God, nature, vandalism or other acts beyond the control of Hoover®, owner's acts or omissions, use of the product in accordance with the Owner's Manual, your product to a Hoover® Sales and Service Center for a full five year from state to you specific rights; During the Warranty Period, Hoover®...
... rental services), brushroll, belt, improper maintenance of the product, damage due to misuse, acts of God, nature, vandalism or other acts beyond the control of Hoover®, owner's acts or omissions, use of the product in accordance with the Owner's Manual, your product to a Hoover® Sales and Service Center for a full five year from state to you specific rights; During the Warranty Period, Hoover®...


