Hoover UH70602 Support and Manuals
Get Help and Manuals for this Hoover item
View All Support Options Below
Free Hoover UH70602 manuals!
Problems with Hoover UH70602?
Ask a Question
Free Hoover UH70602 manuals!
Problems with Hoover UH70602?
Ask a Question
Popular Hoover UH70602 Manual Pages
Owners Manual - Page 1

Owner's Manual
ENGLISH -I, pp. 1-14 ESPANOL -I, pag 15-22 FRANGAIS -i, p 23-30
@"
www.hoover.com
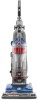
This product was designed for your purchase! HOOVER_ Bagless Upright
Thank you for easy assembly (see page 3)
Owners Manual - Page 2

...Problem 13
Clearing B!ockages 13
Important Safeguards Maintenance
2
Authorized Service 12
Cleaning Filters 9=10
Emptying Dirt Cup 8
Lubrication
12
Replacing Agitator Brush Ro[[ ...... 12
Replacing Belt
1t
Replacing Headlight 10=11 Thermal Protector 12
Warranty
14
®
© 2002 The Hoover Company www, hoover...hazards. Review this manual before servicing the ...
Owners Manual - Page 3

... not return this product to find the service outlet nearest you need any assistance:
Visit our website at www.hoover.com. Handle section
B. only) OR
Call 1-330-499-9499 to speak with
C
some models include a crevice wand)
D. Handle bolts and nuts packet (in bag with owner's manual)
*Included with a representative in OFF position. Slide...
Owners Manual - Page 4

...over slots (B) in dirt duct. Position tools
Place smaller unridged end of wand into cleaner. Some models include a long crevice wand (D) instead of the short crevice tool. Place it into place. ... and twist hose to lock it inside one of the extension wands.
Repeat with a Phillips screw driver. The crevice wand is
packed inside a wand for
Align end of hose with projections (A) over ...
Owners Manual - Page 5

...one blade is intended for easy cord release.
13. Long crevice wand*: stores inside cup)
*Some models only
8. Dirt cup 21. P:5 The top hook rotates right or left rear corner of carpet ...on lever to lower handle to install the proper outlet. Dirt cup lid 20. Pre-filter assembly
(inside wand
17. Nozzle control knob: slide
knob to correct setting for storage. Polarized plug
To ...
Owners Manual - Page 6
...; tion for general operation on rear wheels.
The nozzle wi[[ not move into the adjusted position until the cleaner handle is lowered to the desired setting.
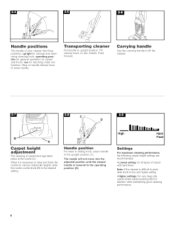
Handle position
For ease in sliding knob, place handle in upright position.
upright for reaching under low furniture. High
Hard Floor
Carpet height
The cleaning...
Owners Manual - Page 7

...for upholstered furniture, draperies, mattresses, clothing, automobile interiors, and carpeted stairs.
Avoid tipping cleaner or setting it at the bottom of the stairs. Lower cover (B) onto hose tube. D.
Continue to ... on both sides of the nozzle to prevent the cleaner from bottom to cleaner. Guide either side of nozzle parallel to rotate. The cleaner is ready for cleaning surfaces ...
Owners Manual - Page 8

...screen will collect fine particles that the dirt cup be seen collecting in the left side of the following parts: Lid (A) Dirt Cup (B) Pre-filter Assembly (C) Pleated Filter (D) (behind pre-filter) Dirt Opening ... detach hose, reverse procedure. When to tighten or loosen the connection. Remove cup - Replace cup - Replace dirt cup lid. Follow the steps below for this type of cup until no more ...
Owners Manual - Page 9

...will not close completely, the pre-filter assembly is not positioned correctly.
Replace dirt cup. Make sure all the way to bottom of the pre-...filter gasket below the pre-filter edge. Do not tap the soft, pleated part of filter until 4 tabs (G) (2 on either side of filter) are...-filter assembly all filter pleats are set in "How to empty dirt cup".
Pivot pre-filter assembly and snap...
Owners Manual - Page 10

...Replace dirt cup. Check agitator shield
Because your cleaner's excellent pick up so well, we strongly recommend you check for HOOVER part No. 40110004. Disconnect cleaner from electrical outlet. Check for HOOVER part... secondary filter
Disconnect outlet.
Removing and replacing filter
Lift out filter (H) and hand wash it on the side of socket. Install bulb - Pull old bulb straight out...
Owners Manual - Page 11

... belt. Install new belt
With lettering on outside of belt and positioned as shown in box on side of the cleaner.
How to replace
Disconnect cleaner from electrical outlet.
Should the agitator shield (M) become dislodged while replacing the belt or the agitator, reposition it as shown with a Phillips screwdriver. Turn agitator making sure belt is important for HOOVER part...
Owners Manual - Page 12

... Company on the bottom of the cleaner.)
Hoover cleaning performance
This Hoover Cleaning Performance System is for comparing the relative progressive performance of authorized service outlet locations (U.S. Refer to replace
When agitator brushes are worn, the agitator should be replaced.
The majority of the motor. HOOVER part No. 48414115. Lubrication
The motor is equipped with two...
Owners Manual - Page 13

...8226; Belt broken or stretched • Replace agitator brush roll belt as described in "Filter assembly" section
• Dirt cup not properly installed •...worn belt
• Replace belt
• Agitator brush roll worn • Replace brush roll
• Dirt cup full • Empty cup
• Incorrect carpet height setting ... problem occurs, it .
13
Check connection at end of dirt...
Owners Manual - Page 14

...specific legal rights, you mail your appliance to one of the following Authorized Warranty Service outlets, Proof of parts only.
Phone 1-800-263-6376.
14 Full One Year Warranty
(Domestic Use)
Your HOOVER c_appliance is warranted in normal household use, in accordance with the Owner's Manual...at www, hoover.com
This warranty does not cover pick up, delivery, or house calls; however,...
Owners Manual - Page 32

HOOVER y
son marcas registradas
des marques depos6es
HOOVER and _}
are registered trademarks
R2 11-03 U5150-/54-900, U5344-950, U5347-/51-900
Printed in Mexico
56511-B49
Hoover UH70602 Reviews
We have not received any reviews for Hoover yet.