
Manual
Page 1
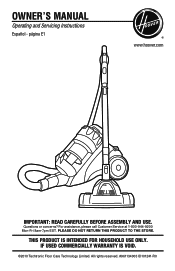
PLEASE DO NOT RETURN THIS PRODUCT TO THE STORE. Owner's Manual Operating and Servicing Instructions Español - All rights reserved. #961134003 ID101241-R0 For assistance, please call Customer Service at 1-800-944-9200 Mon-Fri 8am-7pm EST. página E1 www.hoover.com IMPORTANT: READ CAREFULLY BEFORE ASSEMBLY AND USE. THIS PRODUCT IS INTENDED FOR HOUSEHOLD USE ONLY. IF USED COMMERCIALLY WARRANTY IS VOID. ©2010 Techtronic Floor Care Technology Limited. Questions or concerns?
PLEASE DO NOT RETURN THIS PRODUCT TO THE STORE. Owner's Manual Operating and Servicing Instructions Español - All rights reserved. #961134003 ID101241-R0 For assistance, please call Customer Service at 1-800-944-9200 Mon-Fri 8am-7pm EST. página E1 www.hoover.com IMPORTANT: READ CAREFULLY BEFORE ASSEMBLY AND USE. THIS PRODUCT IS INTENDED FOR HOUSEHOLD USE ONLY. IF USED COMMERCIALLY WARRANTY IS VOID. ©2010 Techtronic Floor Care Technology Limited. Questions or concerns?
Manual
Page 2
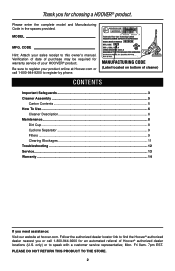
Please enter the complete model and Manufacturing Code in the spaces provided. CODE Hint: Attach your sales receipt to this product to the store. 2 Manufacturing code (Label located on bottom of cleaner) Contents Important Safeguards 3 Cleaner Assembly...5 Carton Contents...5 How To Use...6 Cleaner Description 6 Maintenance...8 Dirt Cup...8 Cyclone Separator 9 Filters...9 Clearing Blockages 11 Troubleshooting...12 Service...13 Warranty...14 If you need assistance: Visit our website at Hoover.com or call 1-800-944...
Please enter the complete model and Manufacturing Code in the spaces provided. CODE Hint: Attach your sales receipt to this product to the store. 2 Manufacturing code (Label located on bottom of cleaner) Contents Important Safeguards 3 Cleaner Assembly...5 Carton Contents...5 How To Use...6 Cleaner Description 6 Maintenance...8 Dirt Cup...8 Cyclone Separator 9 Filters...9 Clearing Blockages 11 Troubleshooting...12 Service...13 Warranty...14 If you need assistance: Visit our website at Hoover.com or call 1-800-944...
Manual
Page 3
...; Hold plug when rewinding onto cord reel. To unplug, grasp the plug, not the cord. • Do not handle plug or appliance with any opening blocked; Do not use with wet hands. • Do not put any openings. • Use only as gasoline, or use in use without Dirt Cup and / or Filters in place. • WARNING: This product contains chemicals known to be used near children. If hose appears damaged...
...; Hold plug when rewinding onto cord reel. To unplug, grasp the plug, not the cord. • Do not handle plug or appliance with any opening blocked; Do not use with wet hands. • Do not put any openings. • Use only as gasoline, or use in use without Dirt Cup and / or Filters in place. • WARNING: This product contains chemicals known to be used near children. If hose appears damaged...
Manual
Page 4
... a qualified electrican to clean out hose as they can cause damage. CAUTION: TO REDUCE THE RISK OF DAMAGE: • Avoid picking up hard, sharp objects with this appliance has a polarized plug (one way. This plug will fit in a dry place. Do not expose machine to freezing temperatures. • Do not use sharp objects to install the proper outlet...
... a qualified electrican to clean out hose as they can cause damage. CAUTION: TO REDUCE THE RISK OF DAMAGE: • Avoid picking up hard, sharp objects with this appliance has a polarized plug (one way. This plug will fit in a dry place. Do not expose machine to freezing temperatures. • Do not use sharp objects to install the proper outlet...
Manual
Page 5
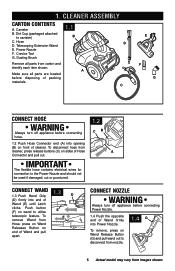
... of cleaner. Cleaner ASSEMBLY Carton contents A. Canister 1.1 B. Connect Wand 1.3 1.3 Push Hand Grip D (D) firmly into opening (B) on front of Hose A Connector and pull out. To F remove Wand from Hose, press on Wand Releases Button on Wand Release Button (G) and pull wand out to utilize E telescopic feature. Dirt Cup (packaged attached to the Power Nozzle and should not be used if damaged, cut or punctured. Telescoping Extension Wand E. A Make sure all parts from images shown. Hose D D. Dusting Brush Remove all parts are located before...
... of cleaner. Cleaner ASSEMBLY Carton contents A. Canister 1.1 B. Connect Wand 1.3 1.3 Push Hand Grip D (D) firmly into opening (B) on front of Hose A Connector and pull out. To F remove Wand from Hose, press on Wand Releases Button on Wand Release Button (G) and pull wand out to utilize E telescopic feature. Dirt Cup (packaged attached to the Power Nozzle and should not be used if damaged, cut or punctured. Telescoping Extension Wand E. A Make sure all parts from images shown. Hose D D. Dusting Brush Remove all parts are located before...
Manual
Page 6
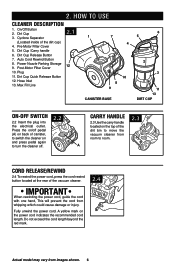
... When rewinding the power cord, guide the cord with one hand, This will prevent the cord from room to room. 2.3 A Cord Release/Rewind 2.4 To rewind the power cord, press the cord rewind button located at the rear of the dirt cup) 4. Do not exceed the cord length beyond the red mark. 2.4 Actual model may vary from images shown. 6 Cyclone Separator 2.1 1 (Located inside of the vacuum cleaner. Hose Inlet 13. Dirt Cup /Carry handle 6. Post-Motor Filter Cover 10. Max Fill Line 7 4 10 8 9 CANISTER...
... When rewinding the power cord, guide the cord with one hand, This will prevent the cord from room to room. 2.3 A Cord Release/Rewind 2.4 To rewind the power cord, press the cord rewind button located at the rear of the dirt cup) 4. Do not exceed the cord length beyond the red mark. 2.4 Actual model may vary from images shown. 6 Cyclone Separator 2.1 1 (Located inside of the vacuum cleaner. Hose Inlet 13. Dirt Cup /Carry handle 6. Post-Motor Filter Cover 10. Max Fill Line 7 4 10 8 9 CANISTER...
Manual
Page 7
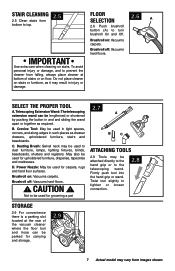
.... FLOOR SELECTION 2.6 A 2.6 Push brushroll button (A) to the telescoping wand. Crevice Tool: May be used for upholstered furniture, draperies, tapestries and mattresses. Dusting Brush: Swivel neck may be used to top. Stair Cleaning 2.5 2.5 Clean stairs from bottom to dust furniture, lamps, lighting fixtures, blinds, baseboards, shutters and registers. Select the Proper Tool 2.7 A. B C C. IMPORTANT Use extra care when cleaning on : Vacuums carpets. Power Nozzle: May be attached directly to the hand grip or to turn...
.... FLOOR SELECTION 2.6 A 2.6 Push brushroll button (A) to the telescoping wand. Crevice Tool: May be used for upholstered furniture, draperies, tapestries and mattresses. Dusting Brush: Swivel neck may be used to top. Stair Cleaning 2.5 2.5 Clean stairs from bottom to dust furniture, lamps, lighting fixtures, blinds, baseboards, shutters and registers. Select the Proper Tool 2.7 A. B C C. IMPORTANT Use extra care when cleaning on : Vacuums carpets. Power Nozzle: May be attached directly to the hand grip or to turn...
Manual
Page 8
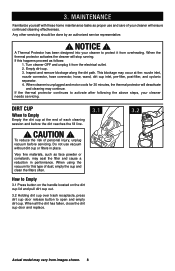
... each cleaning session and before servicing. When using the vacuum for 30 minutes, the thermal protector will stop running. Any other servicing should be done by an authorized service representative. ! When cleaner is unplugged and motor cools for this happens proceed as face powder or cornstarch, may continue. Dirt Cup When to Empty Empty the dirt cup at the: nozzle inlet, nozzle connector, hose connector, hose, wand, dirt cup inlet, pre-filter, post-filter, and cyclonic...
... each cleaning session and before servicing. When using the vacuum for 30 minutes, the thermal protector will stop running. Any other servicing should be done by an authorized service representative. ! When cleaner is unplugged and motor cools for this happens proceed as face powder or cornstarch, may continue. Dirt Cup When to Empty Empty the dirt cup at the: nozzle inlet, nozzle connector, hose connector, hose, wand, dirt cup inlet, pre-filter, post-filter, and cyclonic...
Manual
Page 9
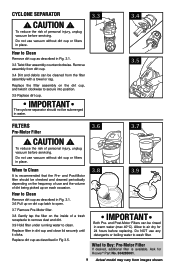
... checked and cleaned periodically depending on the frequency of use any detergents or boiling water to wash filter. Ask for 24 hours before servicing. Replace the filter assembly on the inside of dirt being picked up on each occasion. 3.8 3.9 How to Clean Remove dirt cup as described in Fig. 3.1. 3.6 Pull up on dirt cup latch to air dry for Hoover® Part No. 304285001. 9 Actual model may vary from images shown. IMPORTANT The cyclone...
... checked and cleaned periodically depending on the frequency of use any detergents or boiling water to wash filter. Ask for 24 hours before servicing. Replace the filter assembly on the inside of dirt being picked up on each occasion. 3.8 3.9 How to Clean Remove dirt cup as described in Fig. 3.1. 3.6 Pull up on dirt cup latch to air dry for Hoover® Part No. 304285001. 9 Actual model may vary from images shown. IMPORTANT The cyclone...
Manual
Page 10
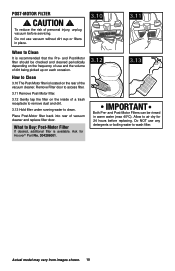
... before servicing. How to air dry for Hoover® Part No. 304286001. 3.12 3.13 IMPORTANT Both Pre- Allow to Clean 3.10 The Post-Motor filter is located on the inside of the vacuum cleaner. CAUTION ! Do not use vacuum without dirt cup or filters in warm water (max 40°C). Remove Filter door to access filter. 3.11 Remove Post-Motor filter. 3.12 Gently tap the filter on the rear of a trash receptacle to remove dust and dirt...
... before servicing. How to air dry for Hoover® Part No. 304286001. 3.12 3.13 IMPORTANT Both Pre- Allow to Clean 3.10 The Post-Motor filter is located on the inside of the vacuum cleaner. CAUTION ! Do not use vacuum without dirt cup or filters in warm water (max 40°C). Remove Filter door to access filter. 3.11 Remove Post-Motor filter. 3.12 Gently tap the filter on the rear of a trash receptacle to remove dust and dirt...

Manual
Page 11
.... 3.16 Remove power nozzle from wand and attach wand to access brushroll. 3.19 Clean debris from brushroll. 3.14 3.16 3.18 3.15 3.17 3.19 Actual model may be disconnected from the vacuum cleaner by pressing the release button on , and check hose end for suction and remove any blockages found : 3.14 The flexible hose can be due to a blockage in , turn over to top and open hinged nozzle cover to hose. To...
.... 3.16 Remove power nozzle from wand and attach wand to access brushroll. 3.19 Clean debris from brushroll. 3.14 3.16 3.18 3.15 3.17 3.19 Actual model may be disconnected from the vacuum cleaner by pressing the release button on , and check hose end for suction and remove any blockages found : 3.14 The flexible hose can be due to a blockage in , turn over to top and open hinged nozzle cover to hose. To...
Manual
Page 12
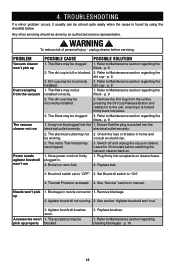
... servicing. Plug firmly into place. 3. Set Brushroll switch to Maintenance section regarding the filters - Agitator brushroll not running. 2. PROBLEM Vacuum cleaner won't pick up 1. p. 9 1. Hose power cord not firmly plugged in home and consult an electrician. 3. Refer to "ON". 4. Nozzle won 't run POSSIBLE CAUSE POSSIBLE SOLUTION 1. See section "Agitator brushroll won 't pick up Dust escaping from the unit by an authorized service representative. ! Replace brushes. 1. p. 10 12 Remove the Dirt Cup from the vacuum The vacuum cleaner not run Power nozzle...
... servicing. Plug firmly into place. 3. Set Brushroll switch to Maintenance section regarding the filters - Agitator brushroll not running. 2. PROBLEM Vacuum cleaner won't pick up 1. p. 9 1. Hose power cord not firmly plugged in home and consult an electrician. 3. Refer to "ON". 4. Nozzle won 't run POSSIBLE CAUSE POSSIBLE SOLUTION 1. See section "Agitator brushroll won 't pick up Dust escaping from the unit by an authorized service representative. ! Replace brushes. 1. p. 10 12 Remove the Dirt Cup from the vacuum The vacuum cleaner not run Power nozzle...
Manual
Page 13
.... Always identify your vacuum to find the service outlet nearest you need further assistance: To speak with a customer service representative call 1-800-944-9200. Customers) or hoover.ca (Canadian customers). 5. Service To obtain approved Hoover® service and genuine Hoover® parts, locate the nearest Authorized Hoover® Warranty Service Dealer (Depot) by the complete model number when requesting information or ordering parts. (The model number appears on the...
.... Always identify your vacuum to find the service outlet nearest you need further assistance: To speak with a customer service representative call 1-800-944-9200. Customers) or hoover.ca (Canadian customers). 5. Service To obtain approved Hoover® service and genuine Hoover® parts, locate the nearest Authorized Hoover® Warranty Service Dealer (Depot) by the complete model number when requesting information or ordering parts. (The model number appears on the...
Manual
Page 14
... United States, including its territories and possessions, outside the country in a commercial operation (such as warranted, take or send the product to either a Hoover® Sales and Service Center or Hoover® Authorized Warranty Service Dealer along with the Owner's Manual, your product to authorized service outlets in material and workmanship for warranty service, cost of shipping will be governed and construed under this...
... United States, including its territories and possessions, outside the country in a commercial operation (such as warranted, take or send the product to either a Hoover® Sales and Service Center or Hoover® Authorized Warranty Service Dealer along with the Owner's Manual, your product to authorized service outlets in material and workmanship for warranty service, cost of shipping will be governed and construed under this...


