Manual
Page 1
www.hoover.com Hoover® TM WindTunnel Canister Cleaner with Powered Hand Tool Owner's Manual English ➜ pp. 1-14 Español ➜ pàg.15-21 Français ➜ p. 22-28 Review this manual before operating cleaner.
www.hoover.com Hoover® TM WindTunnel Canister Cleaner with Powered Hand Tool Owner's Manual English ➜ pp. 1-14 Español ➜ pàg.15-21 Français ➜ p. 22-28 Review this manual before operating cleaner.
Manual
Page 2
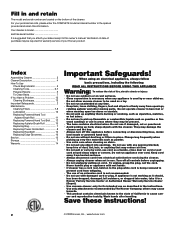
... damaged cord or plug. Index Assembling Cleaner 3 Cleaner Description 4 How To Use Check Bag Indicator 5 Cleaning Tools 6-7 Powered Nozzle 5 To Clean Stairs 7 If You Have a Problem 13 Clearing Blockages 13 Important Safeguards 2 Maintenance Cleaning Filters 7-8 Lubrication 12 Replacing Powered Hand Tool Agitator Brush Roll 11 Replacing Powered Hand Tool Belt......... 12 Replacing Agitator Brush Roll 10 Replacing Bag 7 Replacing Power Nozzle Belt 8 Replacing Headlight 10 Replacing Edge Groomers 10 Service 12 Storage 7 Warranty 14 Important Safeguards! Do not operate cleaner...
... damaged cord or plug. Index Assembling Cleaner 3 Cleaner Description 4 How To Use Check Bag Indicator 5 Cleaning Tools 6-7 Powered Nozzle 5 To Clean Stairs 7 If You Have a Problem 13 Clearing Blockages 13 Important Safeguards 2 Maintenance Cleaning Filters 7-8 Lubrication 12 Replacing Powered Hand Tool Agitator Brush Roll 11 Replacing Powered Hand Tool Belt......... 12 Replacing Agitator Brush Roll 10 Replacing Bag 7 Replacing Power Nozzle Belt 8 Replacing Headlight 10 Replacing Edge Groomers 10 Service 12 Storage 7 Warranty 14 Important Safeguards! Do not operate cleaner...
Manual
Page 3
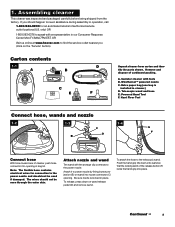
... remove wand. Attach nozzle and wand The wand with tools B. Attach it to the power nozzle. Assembling cleaner This cleaner was inspected and packaged carefully before being shipped from carton and identify the parts shown. Carton contents 1-1 A B C E D F Unpack cleaner from the factory. Extra paper bag (one bag is locked in cleaner) D. Powered Hand Tool F. Be sure nozzle is installed in place. WindTunnel™ powered nozzle C. Canister cleaner with the storage clip connects to power nozzle by fitting button projection (B) on the "Service" button...
... remove wand. Attach nozzle and wand The wand with tools B. Attach it to the power nozzle. Assembling cleaner This cleaner was inspected and packaged carefully before being shipped from carton and identify the parts shown. Carton contents 1-1 A B C E D F Unpack cleaner from the factory. Extra paper bag (one bag is locked in cleaner) D. Powered Hand Tool F. Be sure nozzle is installed in place. WindTunnel™ powered nozzle C. Canister cleaner with the storage clip connects to power nozzle by fitting button projection (B) on the "Service" button...
Manual
Page 4
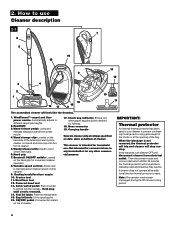
... intended for fullness. 18. Hard floor tool 12. Cord rewind pedal: Step on the hand grip for storage. WindTunnel™ carpet and floor power nozzle: Automatically adjusts to use . Hold plug until cord is not removed, the thermal protector will trip and cleaner will cool and automatically reset and cleaning may resume. Brushroll ON/OFF switch: Located on pedal to rewind cord for convenient cleaner operation. 8.Variable speed control: Allows user to reset. When the blockage is rewound...
... intended for fullness. 18. Hard floor tool 12. Cord rewind pedal: Step on the hand grip for storage. WindTunnel™ carpet and floor power nozzle: Automatically adjusts to use . Hold plug until cord is not removed, the thermal protector will trip and cleaner will cool and automatically reset and cleaning may resume. Brushroll ON/OFF switch: Located on pedal to rewind cord for convenient cleaner operation. 8.Variable speed control: Allows user to reset. When the blockage is rewound...
Manual
Page 5
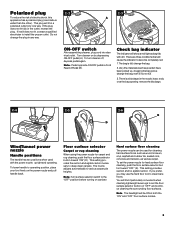
... a red light as powder) have been picked up, clogging the bag pores; change the bag, even if it particularly convenient when cleaning lightweight area rugs to clean bare floors. remove the blockage. 2-4 2-5 2-6 E D WindTunnel power nozzle Handle positions The handle has two positions when used for carpet and rug cleaning, push the floor surface selector button toward "OFF" (E). This setting provides the suction and agitator action necessary to operating position, place your foot firmly on canister. Turn cleaner on...
... a red light as powder) have been picked up, clogging the bag pores; change the bag, even if it particularly convenient when cleaning lightweight area rugs to clean bare floors. remove the blockage. 2-4 2-5 2-6 E D WindTunnel power nozzle Handle positions The handle has two positions when used for carpet and rug cleaning, push the floor surface selector button toward "OFF" (E). This setting provides the suction and agitator action necessary to operating position, place your foot firmly on canister. Turn cleaner on...
Manual
Page 6
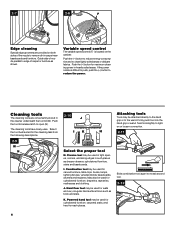
... or to remove dirt in such places as dresser drawers, upholstered furniture, stairs and baseboards. Attaching tools Tools may be used for carved furniture, table tops, books, lamps, lighting fixtures, venetian blinds, baseboards, shutters and registers. J. Firmly push tool into the hand grip or wand. Twist tool slightly to tighten or loosen connection. 2-11 Slide combination tool apart to open (N). Push the tool lid release latch to...
... or to remove dirt in such places as dresser drawers, upholstered furniture, stairs and baseboards. Attaching tools Tools may be used for carved furniture, table tops, books, lamps, lighting fixtures, venetian blinds, baseboards, shutters and registers. J. Firmly push tool into the hand grip or wand. Twist tool slightly to tighten or loosen connection. 2-11 Slide combination tool apart to open (N). Push the tool lid release latch to...
Manual
Page 7
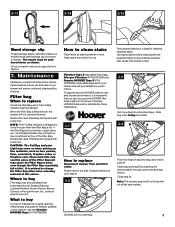
... out used bag. If the Filter Bag is advised to change the Filter Bag often when removing material of bag into bag cavity below seal (A). Allergen Filtration (P/N 4010100S) and Regular HOOVER® Type S (P/N 4010064S) disposable bags also fit your cleaner will not operate efficiently. Rotate hose to replace Check the Filter Bag when the Full Bag Indicator Light shows Red. It is full of your cleaner and will not close without a filter bag in place. 7 The powered hand tool...
... out used bag. If the Filter Bag is advised to change the Filter Bag often when removing material of bag into bag cavity below seal (A). Allergen Filtration (P/N 4010100S) and Regular HOOVER® Type S (P/N 4010064S) disposable bags also fit your cleaner will not operate efficiently. Rotate hose to replace Check the Filter Bag when the Full Bag Indicator Light shows Red. It is full of your cleaner and will not close without a filter bag in place. 7 The powered hand tool...
Manual
Page 8
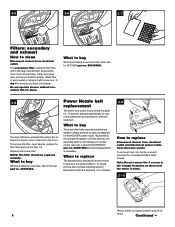
... the HOOVER power nozzle. 3-5 3-6 3-7 Filters: secondary and exhaust How to the room. A dry filter must be replaced annually. Replace with a new one. What to be checked from electrical outlet. When to replace The belt should be put back into cleaner. The secondary filter, located behind the grill in place. Do not operate cleaner without secondary filter in the bag compartment, protects the motor from extension wands. Replace the belt if it with a new filter. Use only a genuine HOOVER Belt part...
... the HOOVER power nozzle. 3-5 3-6 3-7 Filters: secondary and exhaust How to the room. A dry filter must be replaced annually. Replace with a new one. What to be checked from electrical outlet. When to replace The belt should be put back into cleaner. The secondary filter, located behind the grill in place. Do not operate cleaner without secondary filter in the bag compartment, protects the motor from extension wands. Replace the belt if it with a new filter. Use only a genuine HOOVER Belt part...
Manual
Page 9
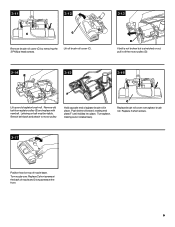
... into place. Lettering on top of agitator brush roll in place. Push belt end forward, rotating end plate (F) until it rotates freely. 3-11 3-12 C C Remove brush roll cover (C) by removing the 3 Phillips head screws. Stretch belt back and attach to motor pulley. Turn nozzle over agitator brush roll. C Replace brush roll cover over . Replace 2 short screws at the front. 9 Lift off brush roll cover (C). 3-13 D If belt is not broken but is stretched or cut, pull...
... into place. Lettering on top of agitator brush roll in place. Push belt end forward, rotating end plate (F) until it rotates freely. 3-11 3-12 C C Remove brush roll cover (C) by removing the 3 Phillips head screws. Stretch belt back and attach to motor pulley. Turn nozzle over agitator brush roll. C Replace brush roll cover over . Replace 2 short screws at the front. 9 Lift off brush roll cover (C). 3-13 D If belt is not broken but is stretched or cut, pull...
Manual
Page 10
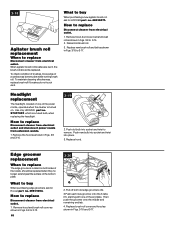
... and twist into socket and twist to buy When purchasing a new agitator brush roll, ask for Hoover part no longer extend past the surface of a card across bottom plate while turning brush roll. 3-18 Agitator brush roll replacement When to replace Disconnect cleaner from electrical outlet. 1. How to replace Disconnect cleaner from electrical outlet and disconnect power nozzle from electrical outlet. 1. Discard old brush roll. 3. How to replace Disconnect cleaner from electrical outlet. Replace hood. Then push the groomer onto...
... and twist into socket and twist to buy When purchasing a new agitator brush roll, ask for Hoover part no longer extend past the surface of a card across bottom plate while turning brush roll. 3-18 Agitator brush roll replacement When to replace Disconnect cleaner from electrical outlet. 1. How to replace Disconnect cleaner from electrical outlet and disconnect power nozzle from electrical outlet. 1. Discard old brush roll. 3. How to replace Disconnect cleaner from electrical outlet. Replace hood. Then push the groomer onto...
Manual
Page 11
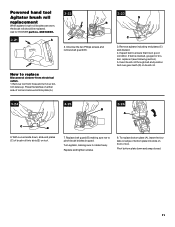
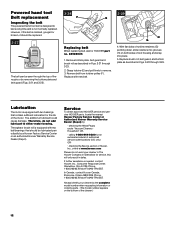
...). 5. Turn agitator, making sure not to ensure that it so bottom faces up. Press the latches on either side of bottom plate into slots (E) on front of tool. If belt is in guard. Powered hand tool Agitator brush roll replacement When agitator brush roll brushes are worn, the brush roll should be replaced. Unscrew the two Philips screws and remove belt guard (B). Replace and tighten screws. 8. Remove tool from electrical outlet. 1. Insert brush roll through belt and position belt...
...). 5. Turn agitator, making sure not to ensure that it so bottom faces up. Press the latches on either side of bottom plate into slots (E) on front of tool. If belt is in guard. Powered hand tool Agitator brush roll replacement When agitator brush roll brushes are worn, the brush roll should be replaced. Unscrew the two Philips screws and remove belt guard (B). Replace and tighten screws. 8. Remove tool from electrical outlet. 1. Insert brush roll through belt and position belt...
Manual
Page 12
... HOOVER parts, locate the nearest Hoover Factory Service Center or Authorized Hoover Warranty Service Dealer (Depot) by the complete model number when requesting information or ordering parts. (The model number appears on both sides of tool housing and snap into grooves (H) on the bottom of the nozzle or by a Hoover Factory Service Center or an authorized Hoover Warranty Service Dealer (Depot). Always identify your cleaner to either motor bearing. Remove bottom plate, belt guard and brush roll...
... HOOVER parts, locate the nearest Hoover Factory Service Center or Authorized Hoover Warranty Service Dealer (Depot) by the complete model number when requesting information or ordering parts. (The model number appears on both sides of tool housing and snap into grooves (H) on the bottom of the nozzle or by a Hoover Factory Service Center or an authorized Hoover Warranty Service Dealer (Depot). Always identify your cleaner to either motor bearing. Remove bottom plate, belt guard and brush roll...
Manual
Page 13
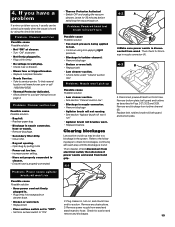
...; Clean filter. • Bag not opening. • Open bag by using tool applying light pressure. • Blockage in , turn Possible cause Possible solution • Too much pressure being applied to "ON". • Thermo Protector Activated • Switch OFF and unplug the vacuum cleaner. Then check for suction and remove any blockages. 4-2 A 4.Make sure power nozzle is found : 1.Turn cleaner off and disconnect from hose. Problem: Powered hand tool brush roll won 't run " • Agitator brush roll brushes worn. • Replace brushes. Clearing blockages Low suction or pick...
...; Clean filter. • Bag not opening. • Open bag by using tool applying light pressure. • Blockage in , turn Possible cause Possible solution • Too much pressure being applied to "ON". • Thermo Protector Activated • Switch OFF and unplug the vacuum cleaner. Then check for suction and remove any blockages. 4-2 A 4.Make sure power nozzle is found : 1.Turn cleaner off and disconnect from hose. Problem: Powered hand tool brush roll won 't run " • Agitator brush roll brushes worn. • Replace brushes. Clearing blockages Low suction or pick...
Manual
Page 14
... Warranty (Domestic Use) WHAT THIS WARRANTY COVERS When used and maintained in normal household use and in accordance with the Owner's Manual, your product to misuse, acts of God, nature, vandalism or other acts beyond the control of Hoover, owner's acts or omissions, use of the product in a commercial operation (such as warranted, take or send the product to either a Hoover Sales and Service Center or Hoover Authorized Warranty Service...
... Warranty (Domestic Use) WHAT THIS WARRANTY COVERS When used and maintained in normal household use and in accordance with the Owner's Manual, your product to misuse, acts of God, nature, vandalism or other acts beyond the control of Hoover, owner's acts or omissions, use of the product in a commercial operation (such as warranted, take or send the product to either a Hoover Sales and Service Center or Hoover Authorized Warranty Service...


