Hoover U5415-900 - TurboPower 5100 WindTunnel Vacuum Cleaner Support and Manuals
Get Help and Manuals for this Hoover item
View All Support Options Below
Free Hoover U5415-900 manuals!
Problems with Hoover U5415-900?
Ask a Question
Free Hoover U5415-900 manuals!
Problems with Hoover U5415-900?
Ask a Question
Most Recent Hoover U5415-900 Questions

Is Mach 2 Windtunnel Model Bagless?
(Posted by jennydee8 10 years ago)
Popular Hoover U5415-900 Manual Pages
Owners Manual - Page 1

TurboPower™ Upright Vacuum Cleaner
Owner's Manual
English § pp. 1-14 Spanish § pág. 15-22 French § p. 23-29
Review this manual before operating cleaner.
®
Owners Manual - Page 2
... To Use
Cleaning Tools 9-10 Upright Cleaner 13-15 If You Have a Problem 13 Important Safeguards 2 Lubrication 13 Maintenance Authotized Service 14 Replacing Agitator 12-13 Replacing Belt 11-12 Replacing Headlight 11 Replacing Filter Bag 11 Unpacking Cleaner 3 Warranty 14
©1995, 2001 The Hoover Company
Thank you (click on cord or pull cord
around sharp edges...
Owners Manual - Page 3

...-9200 for househoId use. A. Cleaner body H. only) or 1-330-499-9499 to read and follow all the instruction steps in our Consumer Response Center.
If you need assistance with a representative in order. Make sure all parts from carton and identify each item shown. Lower handle C.
Cord D. Hose and cleaning tools
D
AB
C
F G
J
H I .
Upper...
Owners Manual - Page 5
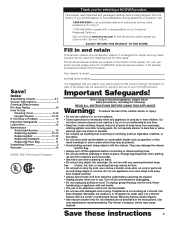
...Slide rack down until upper hooks (P) snap into handle. Slide rack down handle.
1-16
Continue to handle. Set bag door aside.
1-19
U
R
T
T
S
Slide large tab (R) on bottom, back of bag compartment ...into hole on lower front of rack is needed on this model. Pull on bag compartment to snap both hooks into slots (Q) on back of handle. 1-11
1-12
1-...
Owners Manual - Page 6

...22
E
V
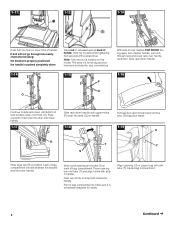
Push bag collar firmly onto dirt tube. Attach hose and tools 1-23
To replace bag door, insert the tabs (V) on bottom of rack.
1-28
X
With smaller end toward...of bag into place.
Break off during assembly make sure switch is in the OFF position (down on lower part of rack and snap into bag compartment. Tuck top and bottom of paper bag are completely inside the bag ...
Owners Manual - Page 7

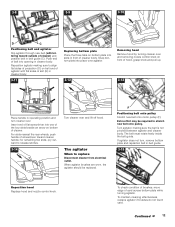
... door latch 4. Hose door: open door to connect hose to correct setting for height of carpet being cleaned.
10. Furniture nozzle 19. How...ON/OFF switch: located on lower edge of handle. 5. Headlight (some models only) 11. Discard foam retainer.
2. Fill out and return the ...retainer (Z), if present, (part of cleaner.
7 Snap into place. Bag door 6. Hose 15. 1-29
Y
Z
...
Owners Manual - Page 8

...is desired, while maintaining good deaning performance. For maximum cleaning performance the following carpet height settings are recommended. Turn cleaner on , push switch up.
Note: If the cleaner is ...the knob to install
the proper outlet. Cleaner nozzle settings:
• Lowest setting (1): for bare floors and low pile, level loop, kitchen type carpet.
• Next setting (2):for other ...
Owners Manual - Page 9

...edge, push down on stairs. Guide either side of nozzle parallel to edge of stair cleaning handle and guide cleaner with any of this Owner's Manual. With handle in carpet near ... lightweight rugs
To clean lightweight flexible rugs, stand on stairs.
2-14
1
2
Cleaning tools
The tool set includes a hose, wand, crevice tool, furniture nozzle and dusting brush.
9
C
Attach hose to cleaner...
Owners Manual - Page 10

... wand in the same manner. If no obstruction is found and a problem persists, contact your cleaner. If no obstruction is found , check hose and tools.
What to replace Check bag from electrical outlet; Rinse with your Hoover Factory Service Center or an Authorized Warranty Service Dealer (Depot).
3. Attach wand and tools
The tools are concerned...
Owners Manual - Page 11

... is important for Hoover part No. 40201190.
11
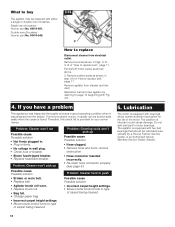
How to replace
Disconnect cleaner from ...belt is stretched, cut , proceed with your HOOVER cleaner causes the agitator to the rear. Pull up .
The headlight
3-4
3-5
(some models only)
What to be checked from tube.
Discard used belt
Remove agitator and broken agitator belt.
(If belt is not broken but is in "How to replace belt...
Owners Manual - Page 12
... sides of projection (D) on front of cleaner) and position belt in belt guide.
3-15
Reposition hood Replace hood and nozzle control knob. Continued §
12 3-8
3-9
3-10
E
D
C
Positioning belt and agitator
Slip agitator through new belt (with flat sides of cleaner body.
F
Positioning belt onto pulley Stretch new belt onto motor pulley (F). for remaining two slots, pry...
Owners Manual - Page 13
.... The addition of "How to replace belt," page 11.
Single row of brushes Hoover part No. 48414-051, Double row of brushes. Reposition belt and new agitator by a Hoover Factory Service Center or an Authorized Hoover Warranty Service Dealer (Depot).
13
Remove agitator from electrical outlet. Therefore, this check list is found. Problem: Cleaner won't run
Possible cause...
Owners Manual - Page 14

... to you, all labor and parts to one way. S.
Warranty service can only be obtained by the complete model number when requesting information or ordering parts. (The model number appears on the bottom of parts only. For an automated referral of the following authorized warranty service outlets. If further assistance is needed , contact The Hoover Company Consumer Response Center, North...
Hoover U5415-900 Reviews
We have not received any reviews for Hoover yet.