Manual
Page 2
...spills 10 If You Have a Problem 12 Service 12 Important Safeguards 2 Maintenance 10-11 Cleaning the brushes .........10-11 Cleaning the nozzle 11 Warranty 13 © 2001 The Hoover Company www.hoover.com 2 Important Safeguards! If an extension cord is absolutely necessary, use in the instructions. Keep ... materials such as described in areas where present. • Avoid picking up chlorine bleach, pine based cleaners, drain cleaner, or any opening blocked; They may be used as a handle, close door on bare floors or sealed wood floors. To unplug, grasp the plug, not the...
...spills 10 If You Have a Problem 12 Service 12 Important Safeguards 2 Maintenance 10-11 Cleaning the brushes .........10-11 Cleaning the nozzle 11 Warranty 13 © 2001 The Hoover Company www.hoover.com 2 Important Safeguards! If an extension cord is absolutely necessary, use in the instructions. Keep ... materials such as described in areas where present. • Avoid picking up chlorine bleach, pine based cleaners, drain cleaner, or any opening blocked; They may be used as a handle, close door on bare floors or sealed wood floors. To unplug, grasp the plug, not the...
Manual
Page 3
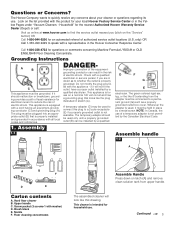
...: Visit us online at www.hoover.com to speak with a qualified electrician or service person if you (click on latch (A) and remove clean solution tank from the adapter must be used , it must be plugged into an appropriate outlet (B) that looks like the plug illustrated in sketch (A). Brush block E. Questions or Concerns? Nozzle...
...: Visit us online at www.hoover.com to speak with a qualified electrician or service person if you (click on latch (A) and remove clean solution tank from the adapter must be used , it must be plugged into an appropriate outlet (B) that looks like the plug illustrated in sketch (A). Brush block E. Questions or Concerns? Nozzle...

Manual
Page 4
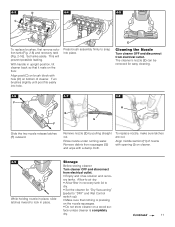
Align post (D) on brush block with opening (H) on the floor. Press brush assembly firmly to back of cleaner, Insert two screws into back of handle push upper handle down into cord clip (I Cord clip To help keep ... screw with a Phillips screwdriver. You will hear a "click" when the switch rod is in upright position. To install brushes, place handle in place. 1-6 1-7 E 1-8 D Replace clean solution tank by positioning bottom first. Turn brushes slightly until post fits easily into place. While holding nozzle in place, slide latches inward to connect switch rod...
Align post (D) on brush block with opening (H) on the floor. Press brush assembly firmly to back of cleaner, Insert two screws into back of handle push upper handle down into cord clip (I Cord clip To help keep ... screw with a Phillips screwdriver. You will hear a "click" when the switch rod is in upright position. To install brushes, place handle in place. 1-6 1-7 E 1-8 D Replace clean solution tank by positioning bottom first. Turn brushes slightly until post fits easily into place. While holding nozzle in place, slide latches inward to connect switch rod...
Manual
Page 11
...and disconnect from squeegee (G) and wipe with a damp cloth. Align middle section (H) of cleaner. Rinse nozzle under running water. Align post (C) on brush block with opening (I G F Slide the two nozzle release latches (F) outward. Storage Before storing cleaner: Turn cleaner OFF and disconnect from electrical outlet. ... fits easily into place. 4-3 D 4-4 4-5 C PUSH TO SELECT DRY OR WET HANDLE RELEASE DRY PICKUP WET PICKUP SCRUB To replace brushes, first remove solution tank (Fig. 2-8) and recovery tank (Fig. 2-16). Set tanks aside. Allow to air dry. • Allow...
...and disconnect from squeegee (G) and wipe with a damp cloth. Align middle section (H) of cleaner. Rinse nozzle under running water. Align post (C) on brush block with opening (I G F Slide the two nozzle release latches (F) outward. Storage Before storing cleaner: Turn cleaner OFF and disconnect from electrical outlet. ... fits easily into place. 4-3 D 4-4 4-5 C PUSH TO SELECT DRY OR WET HANDLE RELEASE DRY PICKUP WET PICKUP SCRUB To replace brushes, first remove solution tank (Fig. 2-8) and recovery tank (Fig. 2-16). Set tanks aside. Allow to air dry. • Allow...


