Manual
Page 1
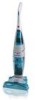
... happen to need assistance during assembly or operation: Visit us online at www.hoover.com to speak with SpinScrub™ Brushes The Hard Floor Cleaner Thank you (click on the "Service" button) or Call 1-800-944-9200 for selecting a HOOVER product. only) or Call 1-330-499-9499 to find the service outlet nearest you for an automated referral of authorized service outlet locations (U.S. Review this manual before...
... happen to need assistance during assembly or operation: Visit us online at www.hoover.com to speak with SpinScrub™ Brushes The Hard Floor Cleaner Thank you (click on the "Service" button) or Call 1-800-944-9200 for selecting a HOOVER product. only) or Call 1-330-499-9499 to find the service outlet nearest you for an automated referral of authorized service outlet locations (U.S. Review this manual before...
Manual
Page 2
... and retain The model and serial number are located at any time. • Keep hair, loose clothing, fingers, feet and all chemicals used with wet hands. • Connect to clean 9-10 Recommended cleaning sequence 9 To clean floor 9 Cleaning sealed wood floors ..10 Picking up hard, sharp objects with damaged cord or plug. Fill in a dry place. Index Assembly 3-4 Cleaner descriptions 5 How to use 5-8 Automatic shut-off all moving parts. • Do not...
... and retain The model and serial number are located at any time. • Keep hair, loose clothing, fingers, feet and all chemicals used with wet hands. • Connect to clean 9-10 Recommended cleaning sequence 9 To clean floor 9 Cleaning sealed wood floors ..10 Picking up hard, sharp objects with damaged cord or plug. Fill in a dry place. Index Assembly 3-4 Cleaner descriptions 5 How to use 5-8 Automatic shut-off all moving parts. • Do not...
Manual
Page 3
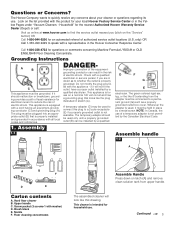
... household use on the "Service" button) OR Call 1-800-944-9200 for your cleaner or questions regarding its use of a temporary adapter is properly grounded. Upper handle C. Look on latch (A) and remove clean solution tank from the adapter must be connected to a permanent ground (G) such as to speak with a cord having an equipment-grounding conductor (C) and grounding plug (A). Nozzle F. Grounding Instructions A B C This...
... household use on the "Service" button) OR Call 1-800-944-9200 for your cleaner or questions regarding its use of a temporary adapter is properly grounded. Upper handle C. Look on latch (A) and remove clean solution tank from the adapter must be connected to a permanent ground (G) such as to speak with a cord having an equipment-grounding conductor (C) and grounding plug (A). Nozzle F. Grounding Instructions A B C This...

Manual
Page 4
... hear a "click" when the switch rod is in upright position. While holding nozzle in place. 1-11 I Cord clip To help keep the cord out of handle push upper handle down into place. 1-9 G F H 1-10 F To install nozzle, make sure latches (F) are out. Press brush assembly firmly to lock in place, slide latches inward to snap into cord clip (I), located on the floor. Tilt cleaner back so that it...
... hear a "click" when the switch rod is in upright position. While holding nozzle in place. 1-11 I Cord clip To help keep the cord out of handle push upper handle down into place. 1-9 G F H 1-10 F To install nozzle, make sure latches (F) are out. Press brush assembly firmly to lock in place, slide latches inward to snap into cord clip (I), located on the floor. Tilt cleaner back so that it...
Manual
Page 5
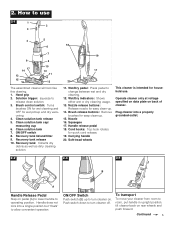
... data plate on . ON/OFF Switch Push switch (B) up to allow convenient operation. To transport To move your cleaner from room to change between wet and dry cleaning. 12. Clean solution tank release 5. Recovery tank lid and filter 9. Nozzle 16. Cord hooks: Top hook rotates for wet pickup and dry vacuuming. 4. Continued 5 Clean solution tank cap/ measuring cup 6. Wet/Dry pedal: Press pedal to room, put handle in upright position; Squeegee 17. Plug cleaner into...
... data plate on . ON/OFF Switch Push switch (B) up to allow convenient operation. To transport To move your cleaner from room to change between wet and dry cleaning. 12. Clean solution tank release 5. Recovery tank lid and filter 9. Nozzle 16. Cord hooks: Top hook rotates for wet pickup and dry vacuuming. 4. Continued 5 Clean solution tank cap/ measuring cup 6. Wet/Dry pedal: Press pedal to room, put handle in upright position; Squeegee 17. Plug cleaner into...
Manual
Page 6
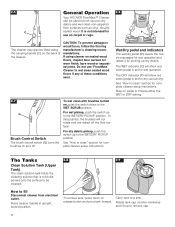
Wet/Dry pedal and indicators The wet/dry pedal (D) lowers the nozzle squeegee for wet operation and raises it for dry vacuuming. The DRY indicator (F) will show red when pedal is not intended for use 'FloorMate' Cleaner to clean" section for complete cleaner setup instructions. To wet clean with brushes turned on and off the floor surface. How to a sink. Place cleaner handle in upright, locked position. If using the carrying handle (C) on release button and pivot tank forward. The...
Wet/Dry pedal and indicators The wet/dry pedal (D) lowers the nozzle squeegee for wet operation and raises it for dry vacuuming. The DRY indicator (F) will show red when pedal is not intended for use 'FloorMate' Cleaner to clean" section for complete cleaner setup instructions. To wet clean with brushes turned on and off the floor surface. How to a sink. Place cleaner handle in upright, locked position. If using the carrying handle (C) on release button and pivot tank forward. The...
Manual
Page 7
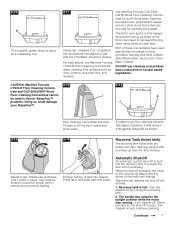
Check for proper performance and to clean floor. Cap must be locked in your SteamVac™. 2-12 I ) (1 quart) with warm water. Automatic Shut-Off An automatic suction shut-off to the upright position while the motor was raised to reset. Using cap, measure 2 oz. K Pour cleaning concentrate into place. Press latch and snap tank into tank. Turn the cleaner off . Turn cleaner off and empty...
Check for proper performance and to clean floor. Cap must be locked in your SteamVac™. 2-12 I ) (1 quart) with warm water. Automatic Shut-Off An automatic suction shut-off to the upright position while the motor was raised to reset. Using cap, measure 2 oz. K Pour cleaning concentrate into place. Press latch and snap tank into tank. Turn the cleaner off . Turn cleaner off and empty...

Manual
Page 8
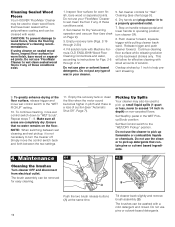
... to air dry between uses. Remove filter lid (S), then remove filter. How to be refilled at this filter when suction is low or reduced. It may also be rinsed for satisfactory performance, it is recommended that the recovery tank be emptied after dry vacuuming and before wet operation. Remove recovery tank and lid (Fig. 216 & 2-17). Although not necessary for additional cleaning. To Clean Filter 2-21 S 2-22 Turn cleaner OFF...
... to air dry between uses. Remove filter lid (S), then remove filter. How to be refilled at this filter when suction is low or reduced. It may also be rinsed for satisfactory performance, it is recommended that the recovery tank be emptied after dry vacuuming and before wet operation. Remove recovery tank and lid (Fig. 216 & 2-17). Although not necessary for additional cleaning. To Clean Filter 2-21 S 2-22 Turn cleaner OFF...
Manual
Page 9
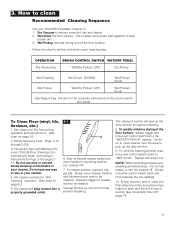
... with steps 7-9. Do not use pine or solvent based cleaning concentrates in your HOOVER 'FloorMate' Cleaner to instructions for Figs. 2-8 through 2-20). 3. To release solution, squeeze trigger (A). Squeeze trigger to "WET Scrub". The cleaner's suction will provide light agitation to set the controls for Dry Vacuuming operation and vacuum floor. (See chart on page 9.) 5. NOTE: When switching between the two settings. 10. Simply move wet control switch down to release solution as...
... with steps 7-9. Do not use pine or solvent based cleaning concentrates in your HOOVER 'FloorMate' Cleaner to instructions for Figs. 2-8 through 2-20). 3. To release solution, squeeze trigger (A). Squeeze trigger to "WET Scrub". The cleaner's suction will provide light agitation to set the controls for Dry Vacuuming operation and vacuum floor. (See chart on page 9.) 5. NOTE: When switching between the two settings. 10. Simply move wet control switch down to release solution as...
Manual
Page 10
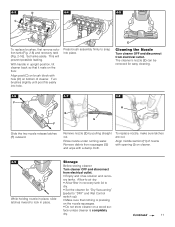
...; Set Wet/Dry pedal in the WET Pickup/Scrub position. The brush assembly can be removed for Dry Vacuuming operation and vacuum floor (see "Automatic Shut-Off", Page 7). Empty recovery tank (Figs. 2-16 through 2-12. Set Wet Control switch to help prevent streaking. 9. Set cleaner for easy cleaning. 4-2 B A Push the two brush release buttons (A) at the same time. NOTE: When switching between the two settings. 11. Do not use 'FloorMate' Cleaner to wet clean sealed wood floors if any type...
...; Set Wet/Dry pedal in the WET Pickup/Scrub position. The brush assembly can be removed for Dry Vacuuming operation and vacuum floor (see "Automatic Shut-Off", Page 7). Empty recovery tank (Figs. 2-16 through 2-12. Set Wet Control switch to help prevent streaking. 9. Set cleaner for easy cleaning. 4-2 B A Push the two brush release buttons (A) at the same time. NOTE: When switching between the two settings. 11. Do not use 'FloorMate' Cleaner to wet clean sealed wood floors if any type...
Manual
Page 11
... SELECT DRY OR WET HANDLE RELEASE DRY PICKUP WET PICKUP SCRUB To replace brushes, first remove solution tank (Fig. 2-8) and recovery tank (Fig. 2-16). With handle in recovery tank lid to air dry. • Allow filter in upright position, tilt cleaner back so that nothing is completely dry. To replace nozzle, make sure latches are out. Rinse nozzle under running water. Allow to dry. • Set the cleaner for easy cleaning. 4-6 4-7 4-8 F E H I ) on bottom of nozzle with opening...
... SELECT DRY OR WET HANDLE RELEASE DRY PICKUP WET PICKUP SCRUB To replace brushes, first remove solution tank (Fig. 2-8) and recovery tank (Fig. 2-16). With handle in recovery tank lid to air dry. • Allow filter in upright position, tilt cleaner back so that nothing is completely dry. To replace nozzle, make sure latches are out. Rinse nozzle under running water. Allow to dry. • Set the cleaner for easy cleaning. 4-6 4-7 4-8 F E H I ) on bottom of nozzle with opening...
Manual
Page 12
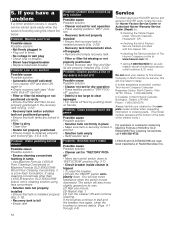
... • Cleaner not set for "WET/DRY PICK- Problem: Brushes won 't run Possible cause Possible solution • Not firmly plugged in • Plug unit in firmly. • No voltage in position. • Solution tank empty • Refill solution tank. If further assistance is securely locked in wall plug • Check fuse or breaker. • Blown fuse/tripped breaker • Replace fuse/reset breaker. Problem: Low or no suction Possible cause...
... • Cleaner not set for "WET/DRY PICK- Problem: Brushes won 't run Possible cause Possible solution • Not firmly plugged in • Plug unit in firmly. • No voltage in position. • Solution tank empty • Refill solution tank. If further assistance is securely locked in wall plug • Check fuse or breaker. • Blown fuse/tripped breaker • Replace fuse/reset breaker. Problem: Low or no suction Possible cause...
Manual
Page 13
...Warranty (Domestic Use) Your HOOVER® appliance is warranted in normal household use, in accordance with the Owner's Manual against original defects in material and workmanship for warranty service, transportation will be required before service is rendered. 1. S. Warranty service can only be paid one way. If further assistance is needed... a commercial or rental application. This warranty provides, at www.hoover.com This warranty does not cover pick up, delivery, or house calls; Appliances purchased elsewhere are questions concerning this appliance in correct operating condition ...
...Warranty (Domestic Use) Your HOOVER® appliance is warranted in normal household use, in accordance with the Owner's Manual against original defects in material and workmanship for warranty service, transportation will be required before service is rendered. 1. S. Warranty service can only be paid one way. If further assistance is needed... a commercial or rental application. This warranty provides, at www.hoover.com This warranty does not cover pick up, delivery, or house calls; Appliances purchased elsewhere are questions concerning this appliance in correct operating condition ...


