
User Guide
Page 1
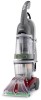
www.hoover.com ™ ™ ® ENGLISH § pp. 1-17 ESPAÑOL § pág. 18-27 FRANÇAIS § p. 28-37 Deep Cleaner The Easy to Use Deep Cleaner SteamVac™ Dual V™ Deep Cleaner cleans carpet fibers by applying hot tap water and cleaning solution.
www.hoover.com ™ ™ ® ENGLISH § pp. 1-17 ESPAÑOL § pág. 18-27 FRANÇAIS § p. 28-37 Deep Cleaner The Easy to Use Deep Cleaner SteamVac™ Dual V™ Deep Cleaner cleans carpet fibers by applying hot tap water and cleaning solution.
User Guide
Page 2
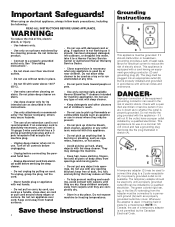
... Code. Do not allow deep cleaner to a permanent ground (G) such as to freezing temperatures. If an extension cord is not permitted by a metal screw. Turn off all controls before unplugging. • Unplug before connecting the powered hand tool. • Always disconnect cord from carpets until they may be used by The Hoover Company; Keep children and pets away from electrical outlet before servicing...
... Code. Do not allow deep cleaner to a permanent ground (G) such as to freezing temperatures. If an extension cord is not permitted by a metal screw. Turn off all controls before unplugging. • Unplug before connecting the powered hand tool. • Always disconnect cord from carpets until they may be used by The Hoover Company; Keep children and pets away from electrical outlet before servicing...
User Guide
Page 3
... assembly 3 Assembling deep cleaner 4-6 Deep cleaner description 7 General operation 7-9 Filling the clean water tank . . . 8-9 Emptying the recovery tank . . . . 9 Brush speed selector 8 Automatic shut-off 8 How to speak with hose) D. Pre-cleaner J. Stair/upholstery nozzle Accessories not included with every model. Contents Important safeguards 2 Parts needed for choosing a HOOVER product. Bare Floor Cleaner I. Hose F. Hose/tool caddy M E K L Not all accessories are located on the data label on the "Service" button to find the service outlet nearest you have a problem...
... assembly 3 Assembling deep cleaner 4-6 Deep cleaner description 7 General operation 7-9 Filling the clean water tank . . . 8-9 Emptying the recovery tank . . . . 9 Brush speed selector 8 Automatic shut-off 8 How to speak with hose) D. Pre-cleaner J. Stair/upholstery nozzle Accessories not included with every model. Contents Important safeguards 2 Parts needed for choosing a HOOVER product. Bare Floor Cleaner I. Hose F. Hose/tool caddy M E K L Not all accessories are located on the data label on the "Service" button to find the service outlet nearest you have a problem...
User Guide
Page 4
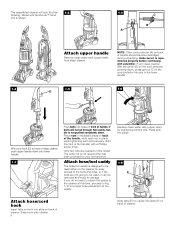
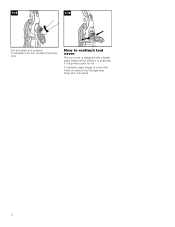
... be used , it is repositioned properly before continuing with SpinScrub™ hand tool is shown. 1-3 C B A Attach upper handle Remove clean water tank (upper tank) from the front of the handle. The extra nut is not required but has been provided for proper hose placement on back of cleaner. Press tank into place. 1-8 E F Attach hose/cord hook Insert tabs on hook into slots on the caddy. Model with assembly of deep cleaner, push upper handle...
... be used , it is repositioned properly before continuing with SpinScrub™ hand tool is shown. 1-3 C B A Attach upper handle Remove clean water tank (upper tank) from the front of the handle. The extra nut is not required but has been provided for proper hose placement on back of cleaner. Press tank into place. 1-8 E F Attach hose/cord hook Insert tabs on hook into slots on the caddy. Model with assembly of deep cleaner, push upper handle...

User Guide
Page 5
... the hose parts before using the tool, open tool door. 5 Nozzle connector end J. Solution tube I Storing hose and tools Press hose, a few inches from nozzle connector end (I . Slide hose clip (L) toward end of caddy toward cleaner handle. J Repeat on caddy. Snap stair/upholstery nozzle onto caddy. To remove the bag before storing hose. I ), into caddy. Loop hose at additional cost if not included with all models) The SpinScrub™ hand tool is shipped in hook (H) on hose...
... the hose parts before using the tool, open tool door. 5 Nozzle connector end J. Solution tube I Storing hose and tools Press hose, a few inches from nozzle connector end (I . Slide hose clip (L) toward end of caddy toward cleaner handle. J Repeat on caddy. Snap stair/upholstery nozzle onto caddy. To remove the bag before storing hose. I ), into caddy. Loop hose at additional cost if not included with all models) The SpinScrub™ hand tool is shipped in hook (H) on hose...
User Guide
Page 6
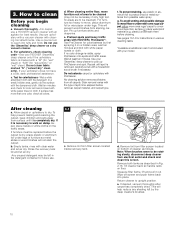
To reattach, align hinges of tool storage area. How to snap free if it to reattach tool cover The tool cover is designed with holes on sides of cover with a breakaway feature which allows it is pushed open too far. To reposition the tool, reverse this procedure. Snap door into place. 6 1-18 1-19 Pull tool down and outward.
To reattach, align hinges of tool storage area. How to snap free if it to reattach tool cover The tool cover is designed with holes on sides of cover with a breakaway feature which allows it is pushed open too far. To reposition the tool, reverse this procedure. Snap door into place. 6 1-18 1-19 Pull tool down and outward.
User Guide
Page 7
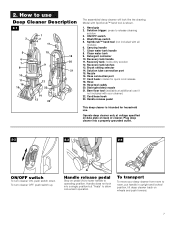
... back of cleaner. Handle release pedal This deep cleaner is shown. 1. Solution trigger: press to allow convenient operation. SpinScrub™ hand tool (not included with all models) 6. Recovery tank handle 11. Brush setting selector 14. Nozzle 16. Handle does not lock into a properly grounded outlet. 2-2 2-3 2-4 Rinse ON WASH OFF ON/OFF switch To turn cleaner OFF, push switch up. Stair/upholstery nozzle 21. Hand grip 2. Hose 19. Cord/hose hook 23. To turn cleaner ON, push switch down. 2. Operate deep cleaner only...
... back of cleaner. Handle release pedal This deep cleaner is shown. 1. Solution trigger: press to allow convenient operation. SpinScrub™ hand tool (not included with all models) 6. Recovery tank handle 11. Brush setting selector 14. Nozzle 16. Handle does not lock into a properly grounded outlet. 2-2 2-3 2-4 Rinse ON WASH OFF ON/OFF switch To turn cleaner OFF, push switch up. Stair/upholstery nozzle 21. Hand grip 2. Hose 19. Cord/hose hook 23. To turn cleaner ON, push switch down. 2. Operate deep cleaner only...
User Guide
Page 8
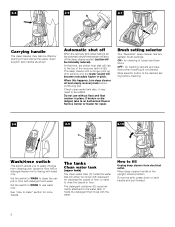
... of carpet and bare floors OFF - At that will rise to fill Unplug deep cleaner from cleaning your carpet or floor with detergent for cleaning the carpet or floor, or used to the water tank. Brush setting selector Your 'SteamVac' deep cleaner has two agitator brush settings. The detergent container (D) is not desired. for cleaning of the recovery tank lid (B). The tanks Clean water tank (upper tank) The clean water tank (C) holds the water that time, the yellow float disk will either be refilled. Place deep cleaner handle in...
... of carpet and bare floors OFF - At that will rise to fill Unplug deep cleaner from cleaning your carpet or floor with detergent for cleaning the carpet or floor, or used to the water tank. Brush setting selector Your 'SteamVac' deep cleaner has two agitator brush settings. The detergent container (D) is not desired. for cleaning of the recovery tank lid (B). The tanks Clean water tank (upper tank) The clean water tank (C) holds the water that time, the yellow float disk will either be refilled. Place deep cleaner handle in...
User Guide
Page 9
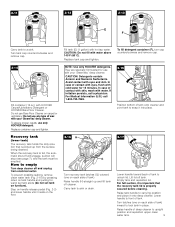
... tank. Turn tank cap counterclockwise and remove cap. 2-14 Fill container (16 oz.) with your 'SteamVac' deep cleaner. Do not use with your 'SteamVac' deep cleaner. In case of tank). If irritation persists, call 1-800-752-7869. 2-16 H G Turn recovery tank latches (G) outward (one on each side of contact with eyes, flush with cold water for use any type of wax with HOOVER Carpet/Upholstery Detergent or HOOVER Bare Floor Cleaner. set tank aside (do not set tank on tank handle...
... tank. Turn tank cap counterclockwise and remove cap. 2-14 Fill container (16 oz.) with your 'SteamVac' deep cleaner. Do not use with your 'SteamVac' deep cleaner. In case of tank). If irritation persists, call 1-800-752-7869. 2-16 H G Turn recovery tank latches (G) outward (one on each side of contact with eyes, flush with cold water for use any type of wax with HOOVER Carpet/Upholstery Detergent or HOOVER Bare Floor Cleaner. set tank aside (do not set tank on tank handle...
User Guide
Page 10
... skirts and draperies. Squeeze filter frame, lift and pull it is visible, spray PreCleaner onto spots and traffic areas. Do not use the 'SteamVac' deep cleaner as described in the detergent container for color removal or bleed with PreCleaner. See pages 10-14 for colorfastness - d. g. Rinse the recovery tank lid and let air dry. Return cleaner to wood floors underneath area rugs/carpet, either move , place...
... skirts and draperies. Squeeze filter frame, lift and pull it is visible, spray PreCleaner onto spots and traffic areas. Do not use the 'SteamVac' deep cleaner as described in the detergent container for color removal or bleed with PreCleaner. See pages 10-14 for colorfastness - d. g. Rinse the recovery tank lid and let air dry. Return cleaner to wood floors underneath area rugs/carpet, either move , place...
User Guide
Page 11
... to upright position and replace clean water tank (Fig. 2-15). If rinsing the carpet is visible passing through the recovery tank lid.) 12. For best cleaning results and to aid in suction (see "Automatic shut-off", Fig. 2-6). Slide nozzle up rear edge of carpet, end with HOOVER Carpet/Upholstery Detergent according to instructions for Figs. 2-9 to sink where tanks will help remove detergent residue and help prevent streaking. Slide nozzle completely onto cleaner. Continue using...
... to upright position and replace clean water tank (Fig. 2-15). If rinsing the carpet is visible passing through the recovery tank lid.) 12. For best cleaning results and to aid in suction (see "Automatic shut-off", Fig. 2-6). Slide nozzle up rear edge of carpet, end with HOOVER Carpet/Upholstery Detergent according to instructions for Figs. 2-9 to sink where tanks will help remove detergent residue and help prevent streaking. Slide nozzle completely onto cleaner. Continue using...
User Guide
Page 12
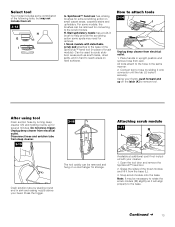
... nozzle. Set tanks aside (do not set Wash/Rinse switch to operating position. 6. With handle in clear water. Push attachment against nozzle while rotating attachment downward until both forward and reverse strokes. 9. Lower handle and replace recovery tank. 5. Fill detergent container with same-sized slots in suction (see "Automatic shut-off", Fig. 2-6). 11. Dry hands and plug deep cleaner into solution connection port (F). Set Wash/Rinse switch to 2-15. 3. Use both ends snap into place.) 4. When finished cleaning...
... nozzle. Set tanks aside (do not set Wash/Rinse switch to operating position. 6. With handle in clear water. Push attachment against nozzle while rotating attachment downward until both forward and reverse strokes. 9. Lower handle and replace recovery tank. 5. Fill detergent container with same-sized slots in suction (see "Automatic shut-off", Fig. 2-6). 11. Dry hands and plug deep cleaner into solution connection port (F). Set Wash/Rinse switch to 2-15. 3. Use both ends snap into place.) 4. When finished cleaning...
User Guide
Page 13
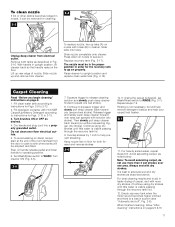
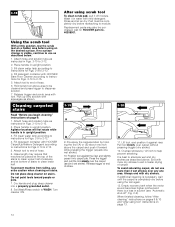
... your cleaner. 1. All tools attach to the hose in hard to the base. Drain solution tube by placing round end in upright position and remove hose from rack. Grasp the sides of the brush module and lift it from electrical outlet. For some spots may need for converting to hose by turning deep cleaner ON and holding nozzle up on small carpet areas, carpeted stairs and upholstery. Using your head. After using tool Drain suction hose by...
... your cleaner. 1. All tools attach to the hose in hard to the base. Drain solution tube by placing round end in upright position and remove hose from rack. Grasp the sides of the brush module and lift it from electrical outlet. For some spots may need for converting to hose by turning deep cleaner ON and holding nozzle up on small carpet areas, carpeted stairs and upholstery. Using your head. After using tool Drain suction hose by...
User Guide
Page 14
... upright position. 3. When finished cleaning, follow "After cleaning" instructions on pages 9 & 10 and "After using on the desired surface. Fill detergent container with HOOVER Bare Floor Cleaner according to instructions for HOOVER part no surface change is visible, continue to use more dry strokes to aid in suction (see "Automatic shut-off module. Attach hose and solution tube as described below. 1. Set Wash/Rinse switch to dispense solution. 7. Place handle in upright position. 3. Fill detergent container with mild detergent. Attach tool...
... upright position. 3. When finished cleaning, follow "After cleaning" instructions on pages 9 & 10 and "After using on the desired surface. Fill detergent container with HOOVER Bare Floor Cleaner according to instructions for HOOVER part no surface change is visible, continue to use more dry strokes to aid in suction (see "Automatic shut-off module. Attach hose and solution tube as described below. 1. Set Wash/Rinse switch to dispense solution. 7. Place handle in upright position. 3. Fill detergent container with mild detergent. Attach tool...
User Guide
Page 15
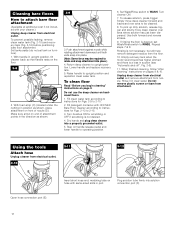
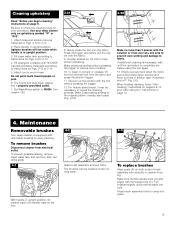
... replace brushes Align posts (A) on your deep cleaner only on page 9. Turn brushes slightly until post fits easily into a properly grounded outlet. 7. Fill clean water tank according to end of brush assembly with the solution or rinse over any one -half inch from electrical outlet. To clean in upright position. 3. Vacuum up the solution with HOOVER Carpet/Upholstery Detergent according to instructions for Figs. 2-13 to check the cleaning code on both ends of hose...
... replace brushes Align posts (A) on your deep cleaner only on page 9. Turn brushes slightly until post fits easily into a properly grounded outlet. 7. Fill clean water tank according to end of brush assembly with the solution or rinse over any one -half inch from electrical outlet. To clean in upright position. 3. Vacuum up the solution with HOOVER Carpet/Upholstery Detergent according to instructions for Figs. 2-13 to check the cleaning code on both ends of hose...
User Guide
Page 16
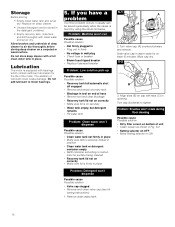
... in position • Clean water tank or detergent container empty • Refill container according to ON 16 Problem: Machine won 't dispense Possible cause Possible solution • Valve cap clogged • Remove and clean valve cap (see fol- Wipe cap dry. 5-2 C B 3. Do not store deep cleaner with bearings which contain sufficient lubrication for the life of hose • Remove tool and clear blockage • Recovery tank lid not on...
... in position • Clean water tank or detergent container empty • Refill container according to ON 16 Problem: Machine won 't dispense Possible cause Possible solution • Valve cap clogged • Remove and clean valve cap (see fol- Wipe cap dry. 5-2 C B 3. Do not store deep cleaner with bearings which contain sufficient lubrication for the life of hose • Remove tool and clear blockage • Recovery tank lid not on...
User Guide
Page 17
... identify your cleaner to a Hoover Factory Service Center for warranty service, transportation will only result in North Canton for service, this will be obtained by the complete model number when requesting information or ordering parts. (The model number appears on -line at www.hoover.com OR • checking the list of Factory Service Centers provided with the Owner's Manual against original defects in a commercial or rental application...
... identify your cleaner to a Hoover Factory Service Center for warranty service, transportation will only result in North Canton for service, this will be obtained by the complete model number when requesting information or ordering parts. (The model number appears on -line at www.hoover.com OR • checking the list of Factory Service Centers provided with the Owner's Manual against original defects in a commercial or rental application...


