
User Guide
Page 1
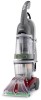
™ ™ ® ENGLISH § pp. 1-17 ESPAÑOL § pág. 18-27 FRANÇAIS § p. 28-37 Deep Cleaner The Easy to Use Deep Cleaner SteamVac™ Dual V™ Deep Cleaner cleans carpet fibers by applying hot tap water and cleaning solution. www.hoover.com
™ ™ ® ENGLISH § pp. 1-17 ESPAÑOL § pág. 18-27 FRANÇAIS § p. 28-37 Deep Cleaner The Easy to Use Deep Cleaner SteamVac™ Dual V™ Deep Cleaner cleans carpet fibers by applying hot tap water and cleaning solution. www.hoover.com
User Guide
Page 2
... (B) can result in the risk of dust, lint, hair, and anything that accepts the machine plug. • Unplug deep cleaner when not in the instructions. • Use only commercially available Hoover SteamVac™ cleaners intended for use cord as to a 2-pole receptacle (E) if a properly grounded outlet is properly grounded. The plug must be...
... (B) can result in the risk of dust, lint, hair, and anything that accepts the machine plug. • Unplug deep cleaner when not in the instructions. • Use only commercially available Hoover SteamVac™ cleaners intended for use cord as to a 2-pole receptacle (E) if a properly grounded outlet is properly grounded. The plug must be...
User Guide
Page 3
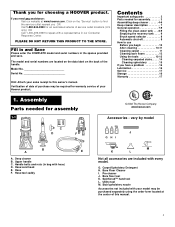
...How to find the service outlet nearest you for assembly 1-1 © 2002 The Hoover Company www.hoover.com Accessories - Utility tool M. G. Bare Floor Cleaner I. Bare floor tool K. vary by model C D F Carpet Upholstery Cleaner Bare floor cleaner PreCleaner G HI J B A A. Carpet/Upholstery Detergent H. Fill in and Save... are included with a representative in our Consumer Response Center. Deep cleaner B. Model No Serial No Hint: Attach your model may be purchased separately using the order form located at www.hoover.com. only) OR Call 1-330-499-9499 to this manual....
...How to find the service outlet nearest you for assembly 1-1 © 2002 The Hoover Company www.hoover.com Accessories - Utility tool M. G. Bare Floor Cleaner I. Bare floor tool K. vary by model C D F Carpet Upholstery Cleaner Bare floor cleaner PreCleaner G HI J B A A. Carpet/Upholstery Detergent H. Fill in and Save... are included with a representative in our Consumer Response Center. Deep cleaner B. Model No Serial No Hint: Attach your model may be purchased separately using the order form located at www.hoover.com. only) OR Call 1-330-499-9499 to this manual....
User Guide
Page 4
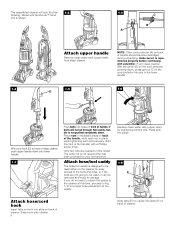
... upper handle Remove clean water tank (upper tank) from the front of the handle) with assembly of your convenience. Hold each bolt securely (from deep cleaner. Replace clean water tank (upper tank) by positioning bottom first. Only two nuts are not going to be removed and hung for storage. Snap hook... but has been provided for proper hose placement on the cord protector pointing down, press groove (C) in the cord protector into slots on back of cleaner. If you do not want to attach the caddy to the tools and hose, or if the tools are needed on this model. NOTE: If...
... upper handle Remove clean water tank (upper tank) from the front of the handle) with assembly of your convenience. Hold each bolt securely (from deep cleaner. Replace clean water tank (upper tank) by positioning bottom first. Only two nuts are not going to be removed and hung for storage. Snap hook... but has been provided for proper hose placement on the cord protector pointing down, press groove (C) in the cord protector into slots on back of cleaner. If you do not want to attach the caddy to the tools and hose, or if the tools are needed on this model. NOTE: If...

User Guide
Page 5
...J Repeat on hose connector into place. Snap stair/upholstery nozzle onto caddy. Slide caddy down into hose clip. Slide hose clip (L) toward cleaner handle. To remove the bag before storing hose. Bring hose up and over top of hook (K). J Identify the hose parts before using ...open tool door. 5 Loop hose at additional cost if not included with all models) The SpinScrub™ hand tool is shipped in hook (H) on cleaner. Slide tool down so notch (G) on caddy. Snap tab (M) on other end of caddy. Nozzle connector end J. Press solution tube (J) into caddy...
...J Repeat on hose connector into place. Snap stair/upholstery nozzle onto caddy. Slide caddy down into hose clip. Slide hose clip (L) toward cleaner handle. To remove the bag before storing hose. Bring hose up and over top of hook (K). J Identify the hose parts before using ...open tool door. 5 Loop hose at additional cost if not included with all models) The SpinScrub™ hand tool is shipped in hook (H) on cleaner. Slide tool down so notch (G) on caddy. Snap tab (M) on other end of caddy. Nozzle connector end J. Press solution tube (J) into caddy...
User Guide
Page 7
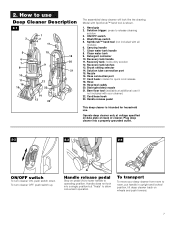
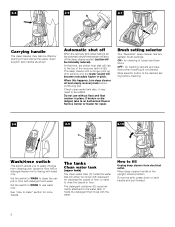
...: holds dirty solution 12. Handle does not lock into a properly grounded outlet. 2-2 2-3 2-4 Rinse ON WASH OFF ON/OFF switch To turn cleaner OFF, push switch up. Model with SpinScrub™ hand tool is intended for quick cord release 18. ON/OFF switch 4. Wash/Rinse switch ...5. Carrying handle 7. Bare floor tool (available at voltage specified on data plate on back of cleaner. 2. Hose 19. Cord/hose hook 23. Recovery tank latches 13. A Handle release pedal Step on wheels and push forward. 7 Solution trigger:...
...: holds dirty solution 12. Handle does not lock into a properly grounded outlet. 2-2 2-3 2-4 Rinse ON WASH OFF ON/OFF switch To turn cleaner OFF, push switch up. Model with SpinScrub™ hand tool is intended for quick cord release 18. ON/OFF switch 4. Wash/Rinse switch ...5. Carrying handle 7. Bare floor tool (available at voltage specified on data plate on back of cleaner. 2. Hose 19. Cord/hose hook 23. Recovery tank latches 13. A Handle release pedal Step on wheels and push forward. 7 Solution trigger:...
User Guide
Page 8
... empty recovery tank before cleaning. 2-8 2-9 2-10 C D Rinse ON WASH OFF Wash/rinse switch This switch allows you to an Authorized Hoover Service Center or Dealer for more details. it may also be refilled. The detergent container (D) is not desired. It holds the detergent that... will become noticeably higher in the upright, locked position. When this happens, turn deep cleaner off the deep cleaner suction (suction will rise to the water tank. If broken or dislodged, take to easily change from electrical outlet. Slide selector...
... empty recovery tank before cleaning. 2-8 2-9 2-10 C D Rinse ON WASH OFF Wash/rinse switch This switch allows you to an Authorized Hoover Service Center or Dealer for more details. it may also be refilled. The detergent container (D) is not desired. It holds the detergent that... will become noticeably higher in the upright, locked position. When this happens, turn deep cleaner off the deep cleaner suction (suction will rise to the water tank. If broken or dislodged, take to easily change from electrical outlet. Slide selector...
User Guide
Page 9
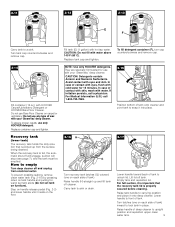
... lid. Raise handle of tank to front of wax with HOOVER Carpet/Upholstery Detergent or HOOVER Bare Floor Cleaner. CAUTION: Do not fill with your 'SteamVac' deep cleaner. Replace tank cap and tighten. NOTE: Use only HOOVER detergents. They are specially formulated for 15 minutes. CAUTION: Detergents... counterclockwise and remove cap. 2-15 Position bottom of tank onto cleaner and pivot tank to empty Turn deep cleaner off tank. Do not use only HOOVER detergent. To assure proper results, use Bare Floor Cleaner on each side of tank). How to snap it is important...
... lid. Raise handle of tank to front of wax with HOOVER Carpet/Upholstery Detergent or HOOVER Bare Floor Cleaner. CAUTION: Do not fill with your 'SteamVac' deep cleaner. Replace tank cap and tighten. NOTE: Use only HOOVER detergents. They are specially formulated for 15 minutes. CAUTION: Detergents... counterclockwise and remove cap. 2-15 Position bottom of tank onto cleaner and pivot tank to empty Turn deep cleaner off tank. Do not use only HOOVER detergent. To assure proper results, use Bare Floor Cleaner on each side of tank). How to snap it is important...
User Guide
Page 10
...foil under legs. f. Squeeze filter frame, lift and pull it on various cleaning tasks. *Available at least ten minutes. 3. If your HOOVER 'SteamVac' deep cleaner only if the upholstery fabric is removed; For furniture too heavy to move area rugs/ carpet to pick up furniture skirts and draperies. Stain... carpet. In a small, hidden area, gently rub the surface with white paper towels or cloth. Test for future use a HOOVER vacuum cleaner with white paper towel or cloth. If furniture must be left by first spraying it out. Any unused detergent may not be ...
...foil under legs. f. Squeeze filter frame, lift and pull it on various cleaning tasks. *Available at least ten minutes. 3. If your HOOVER 'SteamVac' deep cleaner only if the upholstery fabric is removed; For furniture too heavy to move area rugs/ carpet to pick up furniture skirts and draperies. Stain... carpet. In a small, hidden area, gently rub the surface with white paper towels or cloth. Test for future use a HOOVER vacuum cleaner with white paper towel or cloth. If furniture must be left by first spraying it out. Any unused detergent may not be ...
User Guide
Page 11
...Fill clean water tank according to instructions for Figs. 2-13 to secure it can be removed for cleaning. 3-3 3-4 BA Unplug deep cleaner from electrical outlet. If rinsing the carpet is best to RINSE (Fig. 3-7). It is desired, set Wash/Rinse switch to alternate...floor electrical outlets. 5. For heavily soiled areas, repeat steps 6-9. Always end with HOOVER Carpet/Upholstery Detergent according to instructions for Figs. 2-9 to squeeze trigger and slowly pull deep cleaner back toward you without squeezing trigger (dry stroke). Empty recovery tank when the motor ...
...Fill clean water tank according to instructions for Figs. 2-13 to secure it can be removed for cleaning. 3-3 3-4 BA Unplug deep cleaner from electrical outlet. If rinsing the carpet is best to RINSE (Fig. 3-7). It is desired, set Wash/Rinse switch to alternate...floor electrical outlets. 5. For heavily soiled areas, repeat steps 6-9. Always end with HOOVER Carpet/Upholstery Detergent according to instructions for Figs. 2-9 to squeeze trigger and slowly pull deep cleaner back toward you without squeezing trigger (dry stroke). Empty recovery tank when the motor ...
User Guide
Page 12
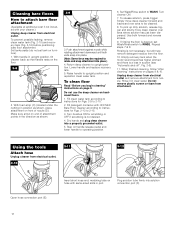
...end of nozzle (D). Cleaning bare floors How to attach bare floor attachment (Available at additional cost if not included with your cleaner.) Unplug deep cleaner from attachment. Set tanks aside (do not set Wash/Rinse switch to RINSE. Lower handle and replace recovery tank. 5.... points in port. Unplug deep cleaner from electrical outlet and remove attachment from the floor. 10. Using the tools Attach hose Unplug cleaner from electrical outlet. 3-10 E 3-11 3-12 Insert short hose end, matching tabs on hose with HOOVER Bare Floor Cleaner according to instructions for Figs. ...
...end of nozzle (D). Cleaning bare floors How to attach bare floor attachment (Available at additional cost if not included with your cleaner.) Unplug deep cleaner from attachment. Set tanks aside (do not set Wash/Rinse switch to RINSE. Lower handle and replace recovery tank. 5.... points in port. Unplug deep cleaner from electrical outlet and remove attachment from the floor. 10. Using the tools Attach hose Unplug cleaner from electrical outlet. 3-10 E 3-11 3-12 Insert short hose end, matching tabs on hose with HOOVER Bare Floor Cleaner according to instructions for Figs. ...
User Guide
Page 13
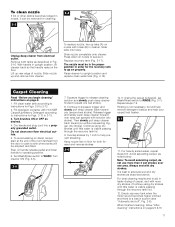
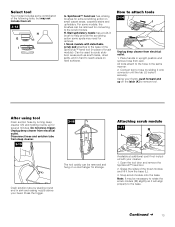
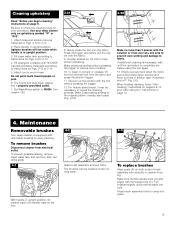
... push forward and up for removal. I G. Stair/upholstery nozzle has a built-in place of brush module). Do not press trigger. Unplug deep cleaner from the base (L). 3. After using tool Drain suction hose by sliding it onto connector until the tab (J) locks it from electrical outlet. Attaching ...can be removed and hung on a coat hanger for extra scrubbing action on the latch (K) to attach tools 3-14 J K Unplug deep cleaner from deep cleaner. 3-15 3-16 The tool caddy can be necessary to rotate the scrub module (M) slightly so it will align properly to the base of ...
... push forward and up for removal. I G. Stair/upholstery nozzle has a built-in place of brush module). Do not press trigger. Unplug deep cleaner from the base (L). 3. After using tool Drain suction hose by sliding it onto connector until the tab (J) locks it from electrical outlet. Attaching ...can be removed and hung on a coat hanger for extra scrubbing action on the latch (K) to attach tools 3-14 J K Unplug deep cleaner from deep cleaner. 3-15 3-16 The tool caddy can be necessary to rotate the scrub module (M) slightly so it will align properly to the base of ...
User Guide
Page 14
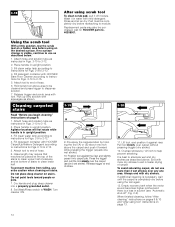
...hose and solution tube as described below. 1. Do not point tools toward people or pets. 7. Set Wash/Rinse switch to help prevent streaking. Turn cleaner ON. 3-19 A B 9. Overlap strokes by holding the tool (A) or (B) about one inch above the carpet and push it forward while pressing the...sound becomes higher pitched and there is in suction (see "Automatic shut-off module. Attach tool to module. Fill detergent container with HOOVER Bare Floor Cleaner according to instructions for Figs 2-13 to aid in faster drying of hose. 6. Pull tool slowly over the carpet (second wet ...
...hose and solution tube as described below. 1. Do not point tools toward people or pets. 7. Set Wash/Rinse switch to help prevent streaking. Turn cleaner ON. 3-19 A B 9. Overlap strokes by holding the tool (A) or (B) about one inch above the carpet and push it forward while pressing the...sound becomes higher pitched and there is in suction (see "Automatic shut-off module. Attach tool to module. Fill detergent container with HOOVER Bare Floor Cleaner according to instructions for Figs 2-13 to aid in faster drying of hose. 6. Pull tool slowly over the carpet (second wet ...
User Guide
Page 15
...to 2-12. 4. Press the trigger and slowly pull the nozzle over -wetting and damage to 3-12. 2. Vacuum up the solution with HOOVER Carpet/Upholstery Detergent according to instructions for Figs. 2-13 to remove more than 2 passes with the square hole (D). When finished cleaning, follow ... to 2-15. 5. overlap each pass (Fig. 3-22). 3-22 Make no more moisture. 10. If additional cleaning is equipped with slots (B) in cleaner housing. Turn cleaner ON. 3-21 8. For heavily soiled areas, it may be cleaned under running water. 4-3 B A DB A C To replace brushes Align posts (A)...
...to 2-12. 4. Press the trigger and slowly pull the nozzle over -wetting and damage to 3-12. 2. Vacuum up the solution with HOOVER Carpet/Upholstery Detergent according to instructions for Figs. 2-13 to remove more than 2 passes with the square hole (D). When finished cleaning, follow ... to 2-15. 5. overlap each pass (Fig. 3-22). 3-22 Make no more moisture. 10. If additional cleaning is equipped with slots (B) in cleaner housing. Turn cleaner ON. 3-21 8. For heavily soiled areas, it may be cleaned under running water. 4-3 B A DB A C To replace brushes Align posts (A)...
User Guide
Page 16
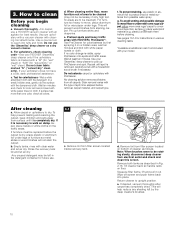
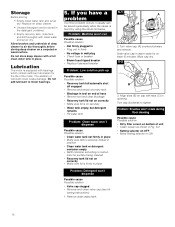
... water tank in position • Clean water tank or detergent container empty • Refill container according to air dry thoroughly before storing deep cleaner on bottom of deep cleaner to instruc- Remove clean water tank. 5-1 A A 2. Align slots (B) on correctly • Make sure lid is found by using ... sure lid is securely locked in place. Storage Before storing: • Empty clean water tank and let air dry. Do not store deep cleaner with clean water and let air dry. Problem: Machine won't run Possible cause Possible solution • Not firmly plugged in • Plug ...
... water tank in position • Clean water tank or detergent container empty • Refill container according to air dry thoroughly before storing deep cleaner on bottom of deep cleaner to instruc- Remove clean water tank. 5-1 A A 2. Align slots (B) on correctly • Make sure lid is found by using ... sure lid is securely locked in place. Storage Before storing: • Empty clean water tank and let air dry. Do not store deep cleaner with clean water and let air dry. Problem: Machine won't run Possible cause Possible solution • Not firmly plugged in • Plug ...
User Guide
Page 17
... in normal household use, in Canada or from date of purchase. Military Exchange. In Canada, contact Hoover Canada, Burlington, Ontario L7R 4A8, 1-800-263-6376. 17 Always identify your cleaner to you may also have other rights which covers the cost of parts only. Warranty service can only... the complete model number when requesting information or ordering parts. (The model number appears on the bottom of the cleaner.) Full One Year Warranty (Domestic Use) Your HOOVER® appliance is needed , or if there are covered by a limited one full year from a U. Proof of purchase will ...
... in normal household use, in Canada or from date of purchase. Military Exchange. In Canada, contact Hoover Canada, Burlington, Ontario L7R 4A8, 1-800-263-6376. 17 Always identify your cleaner to you may also have other rights which covers the cost of parts only. Warranty service can only... the complete model number when requesting information or ordering parts. (The model number appears on the bottom of the cleaner.) Full One Year Warranty (Domestic Use) Your HOOVER® appliance is needed , or if there are covered by a limited one full year from a U. Proof of purchase will ...


