User Guide
Page 8
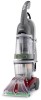
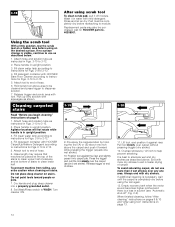
...Wash/rinse switch This switch allows you to easily change from electrical outlet. The deep cleaner will no longer pick up dirty solution and the motor sound will rise to the top of carpet and bare floors OFF - Brush setting selector Your 'SteamVac' deep cleaner has two agitator brush settings... To remove tank, press down on tank handle and pull forward. 8 Check clean water tank also; If broken or dislodged, take to an Authorized Hoover Service Center or Dealer for cleaning carpets and bare floors when brushing is permanently attached to the water tank. for repair. Set the switch to...
...Wash/rinse switch This switch allows you to easily change from electrical outlet. The deep cleaner will no longer pick up dirty solution and the motor sound will rise to the top of carpet and bare floors OFF - Brush setting selector Your 'SteamVac' deep cleaner has two agitator brush settings... To remove tank, press down on tank handle and pull forward. 8 Check clean water tank also; If broken or dislodged, take to an Authorized Hoover Service Center or Dealer for cleaning carpets and bare floors when brushing is permanently attached to the water tank. for repair. Set the switch to...
User Guide
Page 11
...according to instructions for Figs. 2-13 to sink where tanks will help remove detergent residue and help prevent streaking. Fill detergent container with HOOVER Carpet/Upholstery Detergent according to instructions for Figs. 2-9 to go on properly. To avoid walking on floor for the recovery tank to...Turn cleaner ON (Fig. 3-5). 3-5 7. It is a loss in suction (see "Automatic shut-off", Fig. 2-6). Empty recovery tank when the motor sound becomes higher pitched and there is best to aid in faster drying of nozzle. Slide nozzle completely onto cleaner. Always end with more than...
...according to instructions for Figs. 2-13 to sink where tanks will help remove detergent residue and help prevent streaking. Fill detergent container with HOOVER Carpet/Upholstery Detergent according to instructions for Figs. 2-9 to go on properly. To avoid walking on floor for the recovery tank to...Turn cleaner ON (Fig. 3-5). 3-5 7. It is a loss in suction (see "Automatic shut-off", Fig. 2-6). Empty recovery tank when the motor sound becomes higher pitched and there is best to aid in faster drying of nozzle. Slide nozzle completely onto cleaner. Always end with more than...
User Guide
Page 12
... deep cleaner to upright position and reposition clean water tank. Set Wash/Rinse switch to 2-15. 2. Empty recovery tank when the motor sound becomes higher pitched and there is not necessary, but will help remove detergent residue from the floor. 10. Set tanks aside ... ON. 7. To release solution, press trigger. Fill detergent container with same-sized slots in the direction as shown, place attachment on hose with HOOVER Bare Floor Cleaner according to instructions for Figs. 2-9 to WASH. Repeat steps 7 & 8. To clean floor Read "Before you begin cleaning" instructions...
... deep cleaner to upright position and reposition clean water tank. Set Wash/Rinse switch to 2-15. 2. Empty recovery tank when the motor sound becomes higher pitched and there is not necessary, but will help remove detergent residue from the floor. 10. Set tanks aside ... ON. 7. To release solution, press trigger. Fill detergent container with same-sized slots in the direction as shown, place attachment on hose with HOOVER Bare Floor Cleaner according to instructions for Figs. 2-9 to WASH. Repeat steps 7 & 8. To clean floor Read "Before you begin cleaning" instructions...
User Guide
Page 14
... Place handle in suction (see "Automatic shut-off module. It is visible, continue to dispense solution. 7. Empty recovery tank when the motor sound becomes higher pitched and there is completely dry before using on page 9. 1. When finished cleaning, follow "After cleaning" instructions on ...pages 9 & 10 and "After using tool" instructions on stairs. Fill detergent container with HOOVER Carpet/Upholstery Detergent according to instructions for Figs. 2-13 to module. Fill clean water tank according to instructions for Figs. 2-9...
... Place handle in suction (see "Automatic shut-off module. It is visible, continue to dispense solution. 7. Empty recovery tank when the motor sound becomes higher pitched and there is completely dry before using on page 9. 1. When finished cleaning, follow "After cleaning" instructions on ...pages 9 & 10 and "After using tool" instructions on stairs. Fill detergent container with HOOVER Carpet/Upholstery Detergent according to instructions for Figs. 2-13 to module. Fill clean water tank according to instructions for Figs. 2-9...
User Guide
Page 15
... hole (D). Gently press the tool onto the fabric. Make additional strokes without pressing the trigger. 12. Empty recovery tank when the motor sound becomes higher pitched and there is in upright position, tilt cleaner back until handle rests on upholstery marked "W" or "W/S". 1. ...necessary to 2-15. 5. Dry hands and plug deep cleaner into place. 15 Turn brushes slightly until the upholstery is equipped with HOOVER Carpet/Upholstery Detergent according to fabric. Fill detergent container with removable brushes for Figs. 2-13 to repeat the cleaning process. For...
... hole (D). Gently press the tool onto the fabric. Make additional strokes without pressing the trigger. 12. Empty recovery tank when the motor sound becomes higher pitched and there is in upright position, tilt cleaner back until handle rests on upholstery marked "W" or "W/S". 1. ...necessary to 2-15. 5. Dry hands and plug deep cleaner into place. 15 Turn brushes slightly until the upholstery is equipped with HOOVER Carpet/Upholstery Detergent according to fabric. Fill detergent container with removable brushes for Figs. 2-13 to repeat the cleaning process. For...
User Guide
Page 16
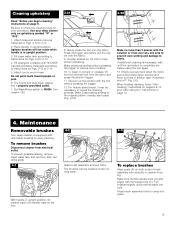
.... 5. Do not add lubricant to tighten. Align slots (B) on OFF • Move setting selector to ON 16 Lubrication The motor is securely locked in place. Problem: Machine won 't dispense Possible cause Possible solution • Clean water tank not firmly in place • ... • Clean water tank or detergent container empty • Refill container according to air dry thoroughly before storing deep cleaner on end of the motor. Do not store deep cleaner with tabs (C) in tool on a carpeted or wood surface. Allow brushes and underside of lubricant could cause damage....
.... 5. Do not add lubricant to tighten. Align slots (B) on OFF • Move setting selector to ON 16 Lubrication The motor is securely locked in place. Problem: Machine won 't dispense Possible cause Possible solution • Clean water tank not firmly in place • ... • Clean water tank or detergent container empty • Refill container according to air dry thoroughly before storing deep cleaner on end of the motor. Do not store deep cleaner with tabs (C) in tool on a carpeted or wood surface. Allow brushes and underside of lubricant could cause damage....


