
Product Manual
Page 2
...product. Follow the authorized dealer locator link to find the Hoover® authorized dealer nearest you need assistance: Visit our website at Hoover.com or call 1-800-944-9200 for warranty service of Hoover® authorized dealer locations (U.S. Mon- Model MFG. only) or to Charger 6 Using The Appliance...Be sure to register your sales receipt to this product to register by phone. Fri 8am- 7pm EST. Please enter the complete model and Manufacturing Code in the spaces provided. Please do not return this owner's manual. Manufacturing code (Label located on back of handheld...
...product. Follow the authorized dealer locator link to find the Hoover® authorized dealer nearest you need assistance: Visit our website at Hoover.com or call 1-800-944-9200 for warranty service of Hoover® authorized dealer locations (U.S. Mon- Model MFG. only) or to Charger 6 Using The Appliance...Be sure to register your sales receipt to this product to register by phone. Fri 8am- 7pm EST. Please enter the complete model and Manufacturing Code in the spaces provided. Please do not return this owner's manual. Manufacturing code (Label located on back of handheld...

Product Manual
Page 5
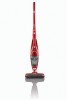
You must feel and hear it lock into place. 1.4 1.6 1.3 B A 1.5 5 Actual model may vary from images shown. Nozzle is stable and always protected from heat and moisture during charging. 1.2 Push the upper portion of the charging station ...
You must feel and hear it lock into place. 1.4 1.6 1.3 B A 1.5 5 Actual model may vary from images shown. Nozzle is stable and always protected from heat and moisture during charging. 1.2 Push the upper portion of the charging station ...

Product Manual
Page 6
...5 13. Fully deplete battery before returning appliance to the charging base and while charging. The charging indicator light is lit. Actual model may vary from images shown. 6 Stick Vac Handle 2.1 6 2. IMPORTANT Charge battery for both the stick cleaner (O = OFF...Switch 8. AC Adapter 14. Folding Handle Button 16 4. Charging Station Contact Points 4 12. WARNING ! 2.2 B A 2.3 Use only the Hoover® charger part #44000295 supplied by the manufacturer to charger ! WARNING ! Upholstery Tool C. When the batteries are in 6-8 hours. 2.2 Insert...
...5 13. Fully deplete battery before returning appliance to the charging base and while charging. The charging indicator light is lit. Actual model may vary from images shown. 6 Stick Vac Handle 2.1 6 2. IMPORTANT Charge battery for both the stick cleaner (O = OFF...Switch 8. AC Adapter 14. Folding Handle Button 16 4. Charging Station Contact Points 4 12. WARNING ! 2.2 B A 2.3 Use only the Hoover® charger part #44000295 supplied by the manufacturer to charger ! WARNING ! Upholstery Tool C. When the batteries are in 6-8 hours. 2.2 Insert...

Product Manual
Page 7
... for use/ Storage 2.4 2.4 Take the appliance off handheld before use . 2.5 ! Make sure the handle is secure when you hear and feel it is secure. 7 Actual model may vary from Stick Vac. 2.6 To replace, place bottom of Handheld into Stick vac body and pivot into vac. Using the appliance as a handheld REMOVE...
... for use/ Storage 2.4 2.4 Take the appliance off handheld before use . 2.5 ! Make sure the handle is secure when you hear and feel it is secure. 7 Actual model may vary from Stick Vac. 2.6 To replace, place bottom of Handheld into Stick vac body and pivot into vac. Using the appliance as a handheld REMOVE...

Product Manual
Page 8
... Brush/Sofa Brush, slide dust brush insert off for a prolonged time empty the dust container and dispose of dirt and dust contents properly. 2.9 2.11 8 Actual model may vary from images shown. Suggested use : Corners and crevices in couch and stairs. 2.9 Combination Upholstery/Dusting Brush can be attached directly to Crevice tool...
... Brush/Sofa Brush, slide dust brush insert off for a prolonged time empty the dust container and dispose of dirt and dust contents properly. 2.9 2.11 8 Actual model may vary from images shown. Suggested use : Corners and crevices in couch and stairs. 2.9 Combination Upholstery/Dusting Brush can be attached directly to Crevice tool...

Product Manual
Page 9
... onto cyclonic separator, insert back into your cleaner to protect it to a service center prior to directions below for Hoover® Part No. 440002094 9 Actual model may continue. MAINTENANCE Familiarize yourself with a slightly damp cloth. If this is available at least 24 hours before replacing...container pointing downwards so that no dust will ensure continued cleaning effectiveness. Inspect the nozzle inlet, nozzle/dirt passage and filter for at Hoover.com or call 1-800-944-9200. DIRT CUP REMOVAL AND Cleaning 3.1 3.2 IMPORTANT A FOR BEST RESULT, CLEAN AFTER USE. Hold...
... onto cyclonic separator, insert back into your cleaner to protect it to a service center prior to directions below for Hoover® Part No. 440002094 9 Actual model may continue. MAINTENANCE Familiarize yourself with a slightly damp cloth. If this is available at least 24 hours before replacing...container pointing downwards so that no dust will ensure continued cleaning effectiveness. Inspect the nozzle inlet, nozzle/dirt passage and filter for at Hoover.com or call 1-800-944-9200. DIRT CUP REMOVAL AND Cleaning 3.1 3.2 IMPORTANT A FOR BEST RESULT, CLEAN AFTER USE. Hold...

Product Manual
Page 10
...position. 3.5 A 3.6 B C 4. Fully deplete battery before charging. 1. Visit hoover.com or call 1-800-944-9200 for nearest authorized Hoover® dealer. 1. Charge battery. 4. Review Dirt Cup Removal & Replacement. 3.... If appliance is found by pressing release button (see section 1.5) and remove obstruction. 1. Handvac not turned off before cleaning or servicing. 3.5 Use a coin to continuing use. ! Dirt Cup not installed correctly. 2. Empty dirt cup. 2. Actual model...
...position. 3.5 A 3.6 B C 4. Fully deplete battery before charging. 1. Visit hoover.com or call 1-800-944-9200 for nearest authorized Hoover® dealer. 1. Charge battery. 4. Review Dirt Cup Removal & Replacement. 3.... If appliance is found by pressing release button (see section 1.5) and remove obstruction. 1. Handvac not turned off before cleaning or servicing. 3.5 Use a coin to continuing use. ! Dirt Cup not installed correctly. 2. Empty dirt cup. 2. Actual model...

Product Manual
Page 11
... representative call 1-800-944-9200. Follow the service center link to Hoover®, Inc., Company in delay. Customers) or hoover.ca (Canadian customers). To obtain approved Hoover® service and genuine Hoover® parts, locate the nearest Authorized Hoover® Warranty Service Dealer (Depot) by the complete model number when requesting information or ordering parts. (The...
... representative call 1-800-944-9200. Follow the service center link to Hoover®, Inc., Company in delay. Customers) or hoover.ca (Canadian customers). To obtain approved Hoover® service and genuine Hoover® parts, locate the nearest Authorized Hoover® Warranty Service Dealer (Depot) by the complete model number when requesting information or ordering parts. (The...

