
Product Manual
Page 1
All Rights Reserved. #961151003 ID102927-R0 página E1 hoover.com IMPORTANT: READ CAREFULLY BEFORE ASSEMBLY AND USE. Owner's Manual Operating and Servicing Instructions Español - Questions or concerns? PLEASE DO NOT RETURN THIS PRODUCT TO THE STORE. THIS PRODUCT IS INTENDED FOR HOUSEHOLD USE ONLY. For assistance, please call Customer Service at 1-800-944-9200 Mon-Fri 8am-7pm EST. IF USED COMMERCIALLY WARRANTY IS VOID. ©2011 Techtronic Floor Care Technology Limited.
All Rights Reserved. #961151003 ID102927-R0 página E1 hoover.com IMPORTANT: READ CAREFULLY BEFORE ASSEMBLY AND USE. Owner's Manual Operating and Servicing Instructions Español - Questions or concerns? PLEASE DO NOT RETURN THIS PRODUCT TO THE STORE. THIS PRODUCT IS INTENDED FOR HOUSEHOLD USE ONLY. For assistance, please call Customer Service at 1-800-944-9200 Mon-Fri 8am-7pm EST. IF USED COMMERCIALLY WARRANTY IS VOID. ©2011 Techtronic Floor Care Technology Limited.

Product Manual
Page 2
... for Use/Storage 7 Stick Vac On-Off Switch 7 Using The Appliance as an Upright 7 Handle Adjustment for choosing a HOOVER® product. Fri 8am- 7pm EST. only) or to register your HOOVER® product. Follow the authorized dealer locator link to Charger 6 Using The Appliance as a Handheld 7 Remove/Replace Handheld Vac 7 Handheld Vac On-Off Switch 7 3-In-1 Tool...8 Storage...8 Maintenance...9 Dirt Cup Removal and Cleaning 9 Filter Cleaning...9 After Cleaning...9 Cleaning the Brushroll 10 Troubleshooting...10 Service...11 Warranty...12 If you need...
... for Use/Storage 7 Stick Vac On-Off Switch 7 Using The Appliance as an Upright 7 Handle Adjustment for choosing a HOOVER® product. Fri 8am- 7pm EST. only) or to register your HOOVER® product. Follow the authorized dealer locator link to Charger 6 Using The Appliance as a Handheld 7 Remove/Replace Handheld Vac 7 Handheld Vac On-Off Switch 7 3-In-1 Tool...8 Storage...8 Maintenance...9 Dirt Cup Removal and Cleaning 9 Filter Cleaning...9 After Cleaning...9 Cleaning the Brushroll 10 Troubleshooting...10 Service...11 Warranty...12 If you need...

Product Manual
Page 3
.... Keep cord away from openings and moving parts. • Use extra care when cleaning on cord, or pull cord around sharp edges or corners. To unplug charger, grasp the plug, not the cord. • Do not handle charger including charger plug and charger terminals, or appliance with wet hands. • Do not put any object into any opening blocked; Do not place product on the skin (1) wash quickly...
.... Keep cord away from openings and moving parts. • Use extra care when cleaning on cord, or pull cord around sharp edges or corners. To unplug charger, grasp the plug, not the cord. • Do not handle charger including charger plug and charger terminals, or appliance with wet hands. • Do not put any object into any opening blocked; Do not place product on the skin (1) wash quickly...

Product Manual
Page 4
..., or carpeted stairs. • With brushes on and handle is burning or smoking, such as cigarettes, matches, or hot ashes. • Do not use without filter and/or dirt cup in place. • WARNING: This product contains chemicals known to the State of time, as damage to turn off this appliance before connecting or disconnecting motorized nozzle. • Do not pick up...
..., or carpeted stairs. • With brushes on and handle is burning or smoking, such as cigarettes, matches, or hot ashes. • Do not use without filter and/or dirt cup in place. • WARNING: This product contains chemicals known to the State of time, as damage to turn off this appliance before connecting or disconnecting motorized nozzle. • Do not pick up...

Product Manual
Page 5
... motorized nozzle. 1.4 Align bottom inlet on Stick Vac body and remove. You must feel and hear it click into place. 1.3 Insert AC Adapter plug (A) into bottom of packing materials. *Hand Vac comes packed attached to Stick Vac. Make sure all parts from images shown. Nozzle is stable and always protected from Stick Vac, press Nozzle release button located above nozzle on Stick Vac body with IntelliCharge™ System E. Nozzle F. 1. Vacuum ASSEMBLY...
... motorized nozzle. 1.4 Align bottom inlet on Stick Vac body and remove. You must feel and hear it click into place. 1.3 Insert AC Adapter plug (A) into bottom of packing materials. *Hand Vac comes packed attached to Stick Vac. Make sure all parts from images shown. Nozzle is stable and always protected from Stick Vac, press Nozzle release button located above nozzle on Stick Vac body with IntelliCharge™ System E. Nozzle F. 1. Vacuum ASSEMBLY...

Product Manual
Page 6
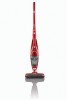
... Vac On/Off Switch 2 1 3. Nozzle With Rotating Brushroll 9. IMPORTANT Charge battery for both the stick cleaner (O = OFF) and the handheld are fully charged the charging indicator light turns green. ! 2. Charging Station Base 5 17 11 4 5 13. Power Indicator Light/ Dirt Cup 10 Release Button 13 14 11. Crevice Tool 17. 3-In-1 Tool Storage Connect to recharge. After three uses, the battery will charge in 6-8 hours. 2.2 Insert AC Adapter plug...
... Vac On/Off Switch 2 1 3. Nozzle With Rotating Brushroll 9. IMPORTANT Charge battery for both the stick cleaner (O = OFF) and the handheld are fully charged the charging indicator light turns green. ! 2. Charging Station Base 5 17 11 4 5 13. Power Indicator Light/ Dirt Cup 10 Release Button 13 14 11. Crevice Tool 17. 3-In-1 Tool Storage Connect to recharge. After three uses, the battery will charge in 6-8 hours. 2.2 Insert AC Adapter plug...

Product Manual
Page 7
... power switch DOWN to be used for use . 2.5 ! After use . The power indicator lights up into the upright position until you hear and feel it is secure when you hear D a click. ! WARNING ! Empty the dust container after use / Storage 2.4 2.4 Take the appliance off handheld before use . Using the appliance as an upright Handle Adjustment for grooming a pet. Using the appliance as a handheld REMOVE/replace HANDHELD Vac 2.6 Press the Handheld release button...
... power switch DOWN to be used for use . 2.5 ! After use . The power indicator lights up into the upright position until you hear and feel it is secure when you hear D a click. ! WARNING ! Empty the dust container after use / Storage 2.4 2.4 Take the appliance off handheld before use . Using the appliance as an upright Handle Adjustment for grooming a pet. Using the appliance as a handheld REMOVE/replace HANDHELD Vac 2.6 Press the Handheld release button...

Product Manual
Page 8
... be used for Cleaning. CAUTION ! Tool Storage 2.11 To store tools, attach Upholstery/Dusting brush to Crevice tool and insert in tool storage area located on front of dirt and dust contents properly. 2.9 2.11 8 Actual model may vary from images shown. Before storing for a prolonged time empty the dust container and dispose of handheld. 2.8 Crevice Tool can be connected directly to Handheld Vac or to crevice tool to...
... be used for Cleaning. CAUTION ! Tool Storage 2.11 To store tools, attach Upholstery/Dusting brush to Crevice tool and insert in tool storage area located on front of dirt and dust contents properly. 2.9 2.11 8 Actual model may vary from images shown. Before storing for a prolonged time empty the dust container and dispose of handheld. 2.8 Crevice Tool can be connected directly to Handheld Vac or to crevice tool to...

Product Manual
Page 9
... from overheating. NOTICE ! turn vacuum off the motor unit (C). 3.2 Remove dust container from dust container and cleaning filter if needed , refer to protect it should be done by an authorized service representative. Press Hand Vac release button and remove Hand Vac from Stick Vac. 3.1 Hold the handheld with these home maintenance tasks as proper use . ! Hold the dust container over trash receptacle and tap out debris (3.2,E). 3.3 Check cyclonic separator (F) for 30 minutes, the thermal protector will...
... from overheating. NOTICE ! turn vacuum off the motor unit (C). 3.2 Remove dust container from dust container and cleaning filter if needed , refer to protect it should be done by an authorized service representative. Press Hand Vac release button and remove Hand Vac from Stick Vac. 3.1 Hold the handheld with these home maintenance tasks as proper use . ! Hold the dust container over trash receptacle and tap out debris (3.2,E). 3.3 Check cyclonic separator (F) for 30 minutes, the thermal protector will...

Product Manual
Page 10
... authorized Hoover® dealer. 1. Charge battery. 4. If filter needs to continuing use. ! Actual model may vary from moving parts, remove hand vac before recharging on . 1. If appliance is found by using the checklist below. PROBLEM Cleaner won't run Hand Vac will take it usually can be solved quite easily when the cause is not working as it should be replaced, replace filter. 5. Needs service. 1. Filter is getting weak. 4. Nozzle/dirt passage clogged. 1. CLEANING THE BRUSHROLL ! TROUBLESHOOTING If a minor problem occurs...
... authorized Hoover® dealer. 1. Charge battery. 4. If filter needs to continuing use. ! Actual model may vary from moving parts, remove hand vac before recharging on . 1. If appliance is found by using the checklist below. PROBLEM Cleaner won't run Hand Vac will take it usually can be solved quite easily when the cause is not working as it should be replaced, replace filter. 5. Needs service. 1. Filter is getting weak. 4. Nozzle/dirt passage clogged. 1. CLEANING THE BRUSHROLL ! TROUBLESHOOTING If a minor problem occurs...

Product Manual
Page 11
...; Checking the Yellow Pages under "Vacuum Cleaners" or "Household". • Visit our website at hoover.com (U.S. 5. To obtain approved Hoover® service and genuine Hoover® parts, locate the nearest Authorized Hoover® Warranty Service Dealer (Depot) by the complete model number when requesting information or ordering parts. (The model number appears on the bottom of authorized service outlet locations call 1-800-944-9200; Service Use only approved and genuine Hoover® filters, belts...
...; Checking the Yellow Pages under "Vacuum Cleaners" or "Household". • Visit our website at hoover.com (U.S. 5. To obtain approved Hoover® service and genuine Hoover® parts, locate the nearest Authorized Hoover® Warranty Service Dealer (Depot) by the complete model number when requesting information or ordering parts. (The model number appears on the bottom of authorized service outlet locations call 1-800-944-9200; Service Use only approved and genuine Hoover® filters, belts...

Product Manual
Page 12
... from a party that vary from date of Hoover®, owner's acts or omissions, use of the product in a commercial operation (such as warranted, take or send the product to either a Hoover® Authorized Warranty Service Dealer along with the Owner's Manual, your product to you specific rights; During the Warranty Period, Hoover® will provide labor and parts, at www.hoover. Military Exchanges and Canada. HOW TO MAKE...
... from a party that vary from date of Hoover®, owner's acts or omissions, use of the product in a commercial operation (such as warranted, take or send the product to either a Hoover® Authorized Warranty Service Dealer along with the Owner's Manual, your product to you specific rights; During the Warranty Period, Hoover® will provide labor and parts, at www.hoover. Military Exchanges and Canada. HOW TO MAKE...


