User Guide
Page 2
Portable VisioCam LCD Video Chime System Installation and Use Contents Features 3 The VisioCam system 3 Checking pack contents 3 Setting up 4 Pre-installation setup 4 Installing the door camera 6 Door Camera Transformer option 7 Installing the receiver 8 Receiver Operation 8 Door camera 9 Expanding your system 10 Maintenance and use 11 Care and Maintenance 11 Replacing the receiver batteries 11 Troubleshooting 12 Specifications 13 Declaration...
Portable VisioCam LCD Video Chime System Installation and Use Contents Features 3 The VisioCam system 3 Checking pack contents 3 Setting up 4 Pre-installation setup 4 Installing the door camera 6 Door Camera Transformer option 7 Installing the receiver 8 Receiver Operation 8 Door camera 9 Expanding your system 10 Maintenance and use 11 Care and Maintenance 11 Replacing the receiver batteries 11 Troubleshooting 12 Specifications 13 Declaration...
User Guide
Page 3
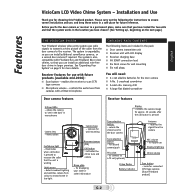
...selection button - See 'Expanding Your System' on the next page.) Features English THE VISIOCAM SYSTEM Your Friedland wireless video entry system uses radio signals to monochrome in larger premises. selects the chime tune for the door camera ■ A No. 2 crosshead screwdriver ■ A 6mm dia. for ...the location you can install an additional wire-free door chime in low light Movement sensor (PIR) Call button - for wall mounting Confidence light - enables the receiver to a TV set (optional) Chime volume Chime flasher Battery indicator Scan button - CHECKING PACK ...
...selection button - See 'Expanding Your System' on the next page.) Features English THE VISIOCAM SYSTEM Your Friedland wireless video entry system uses radio signals to monochrome in larger premises. selects the chime tune for the door camera ■ A No. 2 crosshead screwdriver ■ A 6mm dia. for ...the location you can install an additional wire-free door chime in low light Movement sensor (PIR) Call button - for wall mounting Confidence light - enables the receiver to a TV set (optional) Chime volume Chime flasher Battery indicator Scan button - CHECKING PACK ...
User Guide
Page 4
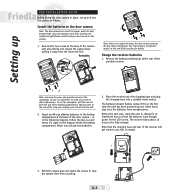
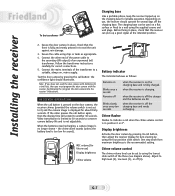
...The battery indicator flashes slowly if this is normal. � � 3. The receiver takes about 12 hours to power the door camera using an 8V door chime transformer. Note that the batteries have enough power for details. Refit the camera base and insert the screws to help prevent theft....or other information. Place the receiver onto the charging base and plug the charging base into the slot. 2. Setting up PRE-INSTALLATION SETUP Before fixing the door camera in place, set up ; Remove the battery isolating tab at the end of the portable receiver. � ��...
...The battery indicator flashes slowly if this is normal. � � 3. The receiver takes about 12 hours to power the door camera using an 8V door chime transformer. Note that the batteries have enough power for details. Refit the camera base and insert the screws to help prevent theft....or other information. Place the receiver onto the charging base and plug the charging base into the slot. 2. Setting up PRE-INSTALLATION SETUP Before fixing the door camera in place, set up ; Remove the battery isolating tab at the end of the portable receiver. � ��...
User Guide
Page 5
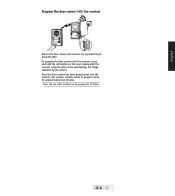
G-4 Note: You can select another tune by at least 2m (6ft). English Program the door camera into the receiver, press and hold the call button on the door camera until the receiver responds with a tune and displays the image captured by the camera. To program the door camera into the receiver Ensure the door camera and receiver are separated by pressing the ' ' button. Once the door camera has been programmed into the receiver, the receiver remains active in program mode for approximately two minutes.
G-4 Note: You can select another tune by at least 2m (6ft). English Program the door camera into the receiver, press and hold the call button on the door camera until the receiver responds with a tune and displays the image captured by the camera. To program the door camera into the receiver Ensure the door camera and receiver are separated by pressing the ' ' button. Once the door camera has been programmed into the receiver, the receiver remains active in program mode for approximately two minutes.
User Guide
Page 6
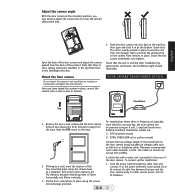
...of your visitor. ■ Avoid a position where the camera faces into the unit. ■ Do not mount within range of the door camera (i.e. Try moving the receiver closer. 2. There is nearby interference on interference reduction. 3. G-5 An obscured sensor causes the camera ..., while you check the reception on the receiver unit. VISIOCAM The following points are three possible reasons: 1. more information on the video channel. Remove the door camera back and change the video channel switch from the door camera. Refer to the troubleshooting section for example, CH ...
...of your visitor. ■ Avoid a position where the camera faces into the unit. ■ Do not mount within range of the door camera (i.e. Try moving the receiver closer. 2. There is nearby interference on interference reduction. 3. G-5 An obscured sensor causes the camera ..., while you check the reception on the receiver unit. VISIOCAM The following points are three possible reasons: 1. more information on the video channel. Remove the door camera back and change the video channel switch from the door camera. Refer to the troubleshooting section for example, CH ...
User Guide
Page 7
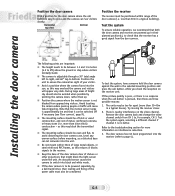
...installation by pressing the call button, the confidence light should not exceed 30m (100ft). Remove the two screws underneath the door camera. If fixing to the door camera using the camera base as bell wire or telephone cable. Drill using the screws and wall plugs provided. G-6 ...■ D780, D780S (DIN rail or surface mount) Connect the low voltage output of the transformer to a wall, mark the location of the door camera. Maximum recommended outer cable diameter is 72mm horizontally and 92mm vertically. 3. A cable inlet with a water seal is frequent use, typically more ...
...installation by pressing the call button, the confidence light should not exceed 30m (100ft). Remove the two screws underneath the door camera. If fixing to the door camera using the camera base as bell wire or telephone cable. Drill using the screws and wall plugs provided. G-6 ...■ D780, D780S (DIN rail or surface mount) Connect the low voltage output of the transformer to a wall, mark the location of the door camera. Maximum recommended outer cable diameter is 72mm horizontally and 92mm vertically. 3. A cable inlet with a water seal is frequent use, typically more ...
User Guide
Page 8
...receiver' instructions. If the caller presses the call when the chime volume control is too low for correct connections. 5. Video transmission is not adjustable. Chime flasher Flashes to seal the unit against rain damage. 3. Secure the door camera in place, check that the front is fully and evenly...) of the power cable to a suitable, always on the charging base and is not set to a wall using clips or tacks as follows: Remains on the door camera, the receiver chimes (provided the volume switch is fully charged. RECEIVER OPERATION When the call button, then adjust...
...receiver' instructions. If the caller presses the call when the chime volume control is too low for correct connections. 5. Video transmission is not adjustable. Chime flasher Flashes to seal the unit against rain damage. 3. Secure the door camera in place, check that the front is fully and evenly...) of the power cable to a suitable, always on the charging base and is not set to a wall using clips or tacks as follows: Remains on the door camera, the receiver chimes (provided the volume switch is fully charged. RECEIVER OPERATION When the call button, then adjust...
User Guide
Page 9
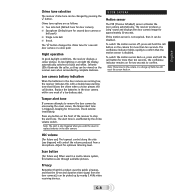
... or a change of batteries will control the volume produced from the door camera(s) can be disabled. Note: Power loss to confirm that the 30-second duration video signal from a microphone. Adjust for more than ten seconds. English Chime tune selection The receiver chime tune can be viewed on the receiver even when surrounded by...
... or a change of batteries will control the volume produced from the door camera(s) can be disabled. Note: Power loss to confirm that the 30-second duration video signal from a microphone. Adjust for more than ten seconds. English Chime tune selection The receiver chime tune can be viewed on the receiver even when surrounded by...
User Guide
Page 10
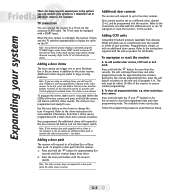
... set via the accessory SCART cable. Note: If the wireless door push supplied with a chime is not required, it in large or noisy premises. Refer to the instructions provided with an additional door camera. Refer to the instructions supplied with a SCART input. To clear all programmed data, e.g. Press the door push button until the chime sounds. G-9 Adding a door chime...
... set via the accessory SCART cable. Note: If the wireless door push supplied with a chime is not required, it in large or noisy premises. Refer to the instructions provided with an additional door camera. Refer to the instructions supplied with a SCART input. To clear all programmed data, e.g. Press the door push button until the chime sounds. G-9 Adding a door chime...

User Guide
Page 11
...the single battery cover screw at the bottom rear of 1200mAH. Do not use English CARE AND MAINTENANCE ■ Fingerprints or dirt on the door camera lens can cause a dull or blurred picture. Over-zealous or too frequent cleaning will become hot to the touch! ■ Do not...wipe the surface. Occasionally use a soft, damp cloth to become trapped inside which are precision components inside the door camera, as it may damage the internal parts. ■ Avoid replacing door camera batteries during wet weather. ■ Do not take the products apart; Remove the old batteries and ...
...the single battery cover screw at the bottom rear of 1200mAH. Do not use English CARE AND MAINTENANCE ■ Fingerprints or dirt on the door camera lens can cause a dull or blurred picture. Over-zealous or too frequent cleaning will become hot to the touch! ■ Do not...wipe the surface. Occasionally use a soft, damp cloth to become trapped inside which are precision components inside the door camera, as it may damage the internal parts. ■ Avoid replacing door camera batteries during wet weather. ■ Do not take the products apart; Remove the old batteries and ...
User Guide
Page 12
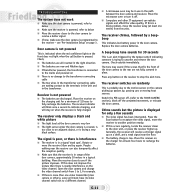
... Receiver is displayed for at least one video transmitter (door camera or others), every unit must have its video channel switch set to the door unit, or place the receiver higher up on the charger for only a few seconds ■ The video signal has been interrupted. The receiver indicator.... ■ A microwave oven may sound if the screws that the receiver is pressed. G-11 If this is in the door camera. The receiver chimes, followed by the tamper switch indicating someone is trying to an adjacent object, or is no damage to the transformer connecting cable...
... Receiver is displayed for at least one video transmitter (door camera or others), every unit must have its video channel switch set to the door unit, or place the receiver higher up on the charger for only a few seconds ■ The video signal has been interrupted. The receiver indicator.... ■ A microwave oven may sound if the screws that the receiver is pressed. G-11 If this is in the door camera. The receiver chimes, followed by the tamper switch indicating someone is trying to an adjacent object, or is no damage to the transformer connecting cable...
User Guide
Page 13
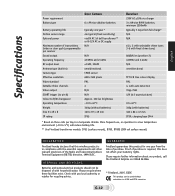
... alkaline batteries Battery operating life Motion sensor range Optional power Maximum number of transmitters (video or door push) programmable per receiver Sound output Operating frequency RF output level Antenna type (built in) Camera type Effective resolution Video standard Settable Video channels Video output SCART trigger (to pin 8) Colour to B/W changeover Operating temperature Weight Size H x W x D IP...
... alkaline batteries Battery operating life Motion sensor range Optional power Maximum number of transmitters (video or door push) programmable per receiver Sound output Operating frequency RF output level Antenna type (built in) Camera type Effective resolution Video standard Settable Video channels Video output SCART trigger (to pin 8) Colour to B/W changeover Operating temperature Weight Size H x W x D IP...