
User Manual
Page 7
... ...5 Star Wiring Configuration 6 2.4 DVR AND MULTIPLEXER CONNECTION 7 2.4.1 2.4.2 DVR Setup ...7 Multiplexer Setup...7 2.5 KEYBOARD CASCADING ...8 2.5.1 Master/Slave Connection 8 2.6 CONNECTOR PIN ASSIGNMENTS 9 SECTION 3: SETUP ...11 3.1 KEYBOARD LOCK ...11 3.2 LCD DISPLAY...12 3.3 SYSTEM SETUP...13 3.3.1 3.3.2 3.3.3 Keyboard Type ...13 DVR/Multiplexer/Camera Connection 14 Dome (PTZ) Protocol...16 SECTION 4: DVR CONTROL FUNCTIONS 17 4.1 DVR MODE...17 4.2 NUMBER ENTRY (FOR ENTERING PASSWORDS 17 4.3 DVR MENUS ...17 4.4 PICTURE CONTROL ...18 4.5 CAMERA SELECTION...18...
... ...5 Star Wiring Configuration 6 2.4 DVR AND MULTIPLEXER CONNECTION 7 2.4.1 2.4.2 DVR Setup ...7 Multiplexer Setup...7 2.5 KEYBOARD CASCADING ...8 2.5.1 Master/Slave Connection 8 2.6 CONNECTOR PIN ASSIGNMENTS 9 SECTION 3: SETUP ...11 3.1 KEYBOARD LOCK ...11 3.2 LCD DISPLAY...12 3.3 SYSTEM SETUP...13 3.3.1 3.3.2 3.3.3 Keyboard Type ...13 DVR/Multiplexer/Camera Connection 14 Dome (PTZ) Protocol...16 SECTION 4: DVR CONTROL FUNCTIONS 17 4.1 DVR MODE...17 4.2 NUMBER ENTRY (FOR ENTERING PASSWORDS 17 4.3 DVR MENUS ...17 4.4 PICTURE CONTROL ...18 4.5 CAMERA SELECTION...18...
User Manual
Page 8
... 5.2.1 5.2.2 5.2.3 Setup (Top) Menu...21 Bottom Menu ...22 Pop Up Menu...22 5.3 PICTURE CONTROL ...22 5.4 AUXILIARY MONITOR SELECTION 23 5.5 CAMERA SELECTION ...23 5.6 MULTIPLEXER SELECTION...24 SECTION 6: PTZ CONTROL FUNCTIONS WHEN USING HONEYWELL VCL (RAPIDDOME/ORBITER DOME) PROTOCOL...25 6.1 PTZ CAMERA SELECTION CONTROL 25 6.2 PTZ MODE ...25 6.3 PAN AND TILT...25 6.4 TURN 180°...25 6.5 ZOOM...26 6.6 FOCUS AND IRIS...26 6.7 WASH, WIPE AND AUXILIARY FUNCTIONS 26 6.8 MANUAL CHANGE OVER (CHANGE OVER...
... 5.2.1 5.2.2 5.2.3 Setup (Top) Menu...21 Bottom Menu ...22 Pop Up Menu...22 5.3 PICTURE CONTROL ...22 5.4 AUXILIARY MONITOR SELECTION 23 5.5 CAMERA SELECTION ...23 5.6 MULTIPLEXER SELECTION...24 SECTION 6: PTZ CONTROL FUNCTIONS WHEN USING HONEYWELL VCL (RAPIDDOME/ORBITER DOME) PROTOCOL...25 6.1 PTZ CAMERA SELECTION CONTROL 25 6.2 PTZ MODE ...25 6.3 PAN AND TILT...25 6.4 TURN 180°...25 6.5 ZOOM...26 6.6 FOCUS AND IRIS...26 6.7 WASH, WIPE AND AUXILIARY FUNCTIONS 26 6.8 MANUAL CHANGE OVER (CHANGE OVER...
User Manual
Page 10
... / UNFREEZE VIDEO ...41 8.5 FLASHBACK OPERATION ...41 8.6 PRESHOTS ...42 8.7 VECTORSCANS (VIDEO TOUR) ...43 8.7.1 8.7.2 Run VectorScan...43 Stop a VectorScan...43 8.8 PROGRAMMING SECTOR IDS...43 8.9 PROGRAMMING PRIVACY ZONES 43 8.10 PROGRAMMING PTZ TOURS ...44 8.11 PTZ TOUR OPERATION...44 SECTION 9: TECHNICAL SPECIFICATIONS 45 APPENDIX A: MENU NAVIGATION ...47 APPENDIX B: DIAGNOSTICS ...49 B.1 JOYSTICK AUTO CALIBRATION 49 B.2 KEY TEST...49 APPENDIX C: VCL (ORBITER/RAPIDDOME) DATA INPUT 51 APPENDIX D: PASSWORDS...53 LIST OF FIGURES Figure 1: HJZTP Rear Panel ...3 Figure...
... / UNFREEZE VIDEO ...41 8.5 FLASHBACK OPERATION ...41 8.6 PRESHOTS ...42 8.7 VECTORSCANS (VIDEO TOUR) ...43 8.7.1 8.7.2 Run VectorScan...43 Stop a VectorScan...43 8.8 PROGRAMMING SECTOR IDS...43 8.9 PROGRAMMING PRIVACY ZONES 43 8.10 PROGRAMMING PTZ TOURS ...44 8.11 PTZ TOUR OPERATION...44 SECTION 9: TECHNICAL SPECIFICATIONS 45 APPENDIX A: MENU NAVIGATION ...47 APPENDIX B: DIAGNOSTICS ...49 B.1 JOYSTICK AUTO CALIBRATION 49 B.2 KEY TEST...49 APPENDIX C: VCL (ORBITER/RAPIDDOME) DATA INPUT 51 APPENDIX D: PASSWORDS...53 LIST OF FIGURES Figure 1: HJZTP Rear Panel ...3 Figure...
User Manual
Page 17
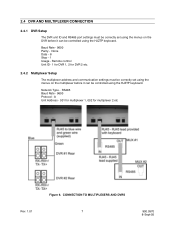
Remote control Unit ID - 1 for DVR 1, 2 for multiplexer 2 etc Rev. 1.01 Figure 6. CONNECTION TO MULTIPLEXERS AND DVRS 7 900.0570 8-Sept-05 None Data - 8 Stop - 1 Usage - 2.4 DVR AND MULTIPLEXER CONNECTION 2.4.1 DVR Setup The DVR unit ID and RS485 port settings must be correctly set using the menus on the multiplexer before it can be controlled using the HJZTP keyboard. Baud Rate - 9600 Parity - RS485 Baud Rate - 9600 Protocol - A Unit Address - 001 for...
Remote control Unit ID - 1 for DVR 1, 2 for multiplexer 2 etc Rev. 1.01 Figure 6. CONNECTION TO MULTIPLEXERS AND DVRS 7 900.0570 8-Sept-05 None Data - 8 Stop - 1 Usage - 2.4 DVR AND MULTIPLEXER CONNECTION 2.4.1 DVR Setup The DVR unit ID and RS485 port settings must be correctly set using the menus on the multiplexer before it can be controlled using the HJZTP keyboard. Baud Rate - 9600 Parity - RS485 Baud Rate - 9600 Protocol - A Unit Address - 001 for...
User Manual
Page 23
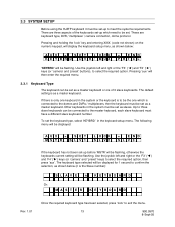
..., as a master keyboard. These are three aspects of 3 slave keyboards. Up to three slave keyboards can be set the keyboard type, select 'KEYBRD' in the keyboard setup menu. 3.3 SYSTEM SETUP Before using the HJZTP keyboard it must be set-up to the master keyboard, each slave keyboard must have a different slave keyboard number. Pressing and holding the 'lock' key and entering XXXX (code not shown) on the numeric keypad, will display the keyboard setup menu, as shown...
..., as a master keyboard. These are three aspects of 3 slave keyboards. Up to three slave keyboards can be set the keyboard type, select 'KEYBRD' in the keyboard setup menu. 3.3 SYSTEM SETUP Before using the HJZTP keyboard it must be set-up to the master keyboard, each slave keyboard must have a different slave keyboard number. Pressing and holding the 'lock' key and entering XXXX (code not shown) on the numeric keypad, will display the keyboard setup menu, as shown...
User Manual
Page 24
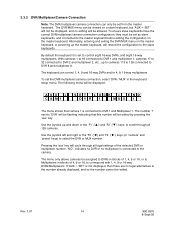
... slave keyboards, and connected to control eight 16-way DVRs, and eight 16-way multiplexers. By default the keyboard it is connected to the number already displayed, and so the number cannot be edited. With cameras 1 to 16 connected to DVR 1 and multiplexer 1, cameras 17 to 32 connected to DVR 2 and multiplexer 2, etc., up to cameras 113 to 128 connected to scroll through all 128 cameras. Use the joystick up the master keyboard...
... slave keyboards, and connected to control eight 16-way DVRs, and eight 16-way multiplexers. By default the keyboard it is connected to the number already displayed, and so the number cannot be edited. With cameras 1 to 16 connected to DVR 1 and multiplexer 1, cameras 17 to 32 connected to DVR 2 and multiplexer 2, etc., up to cameras 113 to 128 connected to scroll through all 128 cameras. Use the joystick up the master keyboard...

User Manual
Page 25
... set, press 'lock' to a multiplexer. 3.3.2 DVR/Multiplexer/Camera Connection, Continued Example: If a system has 40 cameras with: DVR 1, a 4-way DVR connected to cameras 1 through 4 inclusive DVR 2, a 4-way DVR connected to cameras 5 through 8 inclusive DVR 3, a 16-way DVR connected to cameras 9 through 24 inclusive DVR 4, a 9-way DVR connected to cameras 25 through 33 inclusive DVR 5, a 4-way DVR connected to cameras 35 through 38 inclusive DVR 6, a 1-way DVR connected to camera 39 Cameras 34 and 40 not connected to a DVR Multiplexer 1, a 16-way multiplexer connected to cameras...
... set, press 'lock' to a multiplexer. 3.3.2 DVR/Multiplexer/Camera Connection, Continued Example: If a system has 40 cameras with: DVR 1, a 4-way DVR connected to cameras 1 through 4 inclusive DVR 2, a 4-way DVR connected to cameras 5 through 8 inclusive DVR 3, a 16-way DVR connected to cameras 9 through 24 inclusive DVR 4, a 9-way DVR connected to cameras 25 through 33 inclusive DVR 5, a 4-way DVR connected to cameras 35 through 38 inclusive DVR 6, a 1-way DVR connected to camera 39 Cameras 34 and 40 not connected to a DVR Multiplexer 1, a 16-way multiplexer connected to cameras...

User Manual
Page 28
... pressed again, the sequence stops (displaying the current step in PTZ mode. The controlled camera can be displayed in the cycle of the above selection processes also make the displayed camera the controlled camera as shown on the DVR output. The screen layout of the multi-camera displays can be changed independently of the number keys (to enter a legal camera number) followed by putting the keyboard in the sequence). This also...
... pressed again, the sequence stops (displaying the current step in PTZ mode. The controlled camera can be displayed in the cycle of the above selection processes also make the displayed camera the controlled camera as shown on the DVR output. The screen layout of the multi-camera displays can be changed independently of the number keys (to enter a legal camera number) followed by putting the keyboard in the sequence). This also...
User Manual
Page 32
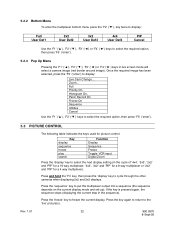
... Display Sequence Freeze Toggle VCR input Digital Zoom Press the 'display' key to select the next display setting (in live ' picture(s). Rev. 1.01 22 900.0570 8-Sept-05 Press the 'freeze' key to cycle through the other cameras when displaying 2x2 and 3x3 displays. Panic Record On Freeze On Sequence Utilities Cancel Use the 'F1' ('▲'), 'F2' ('▼') keys to the 'live screen mode will select a camera image...
... Display Sequence Freeze Toggle VCR input Digital Zoom Press the 'display' key to select the next display setting (in live ' picture(s). Rev. 1.01 22 900.0570 8-Sept-05 Press the 'freeze' key to cycle through the other cameras when displaying 2x2 and 3x3 displays. Panic Record On Freeze On Sequence Utilities Cancel Use the 'F1' ('▲'), 'F2' ('▼') keys to the 'live screen mode will select a camera image...
User Manual
Page 33
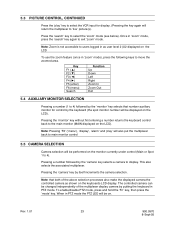
... 'zoom' mode. Pressing the 'camera' key by the 'monitor' key selects that both of the multiplexer display camera by the 'camera' key selects a camera to select the VCR input for control by the keyboard (the spot monitor number will be displayed on the LCD). This also selects the associated multiplexer. To enable/disable PTZ mode, press and hold the 'Fn' key, then press the 'mode' key. Note: Pressing 'F6' ('menu'), 'display', 'alarm' and 'play ' key to display.
... 'zoom' mode. Pressing the 'camera' key by the 'monitor' key selects that both of the multiplexer display camera by the 'camera' key selects a camera to select the VCR input for control by the keyboard (the spot monitor number will be displayed on the LCD). This also selects the associated multiplexer. To enable/disable PTZ mode, press and hold the 'Fn' key, then press the 'mode' key. Note: Pressing 'F6' ('menu'), 'display', 'alarm' and 'play ' key to display.
User Manual
Page 40
... telemetry buttons or the joystick are used to move to users logged in as below : Rev. 1.01 AUX = S E T L OCK = E ND Z OOM I R / L A MP A U T O1 8 0 Use joystick up . Note: The range of a Tour, Continued The tour is currently being controlled (camera number displayed on the LCD). Entering a time of '0' will select 1 second dwell time. 6.9.8 To Stop a Tour of Presets Press the 'autopan' key. (This will turn off...
... telemetry buttons or the joystick are used to move to users logged in as below : Rev. 1.01 AUX = S E T L OCK = E ND Z OOM I R / L A MP A U T O1 8 0 Use joystick up . Note: The range of a Tour, Continued The tour is currently being controlled (camera number displayed on the LCD). Entering a time of '0' will select 1 second dwell time. 6.9.8 To Stop a Tour of Presets Press the 'autopan' key. (This will turn off...

User Manual
Page 41
...' will be displayed for instruction on how to define the tours and presets. If the preset is the preset number. Selected the required preset number by using the numeric keys. HONEYWELL VCL PROTOCOL, CONTINUED 6.10.1 Home Select 'HOME' in the camera setup menu, then press 'aux' to display the home menu as shown below: AUX = S E T L OCK = E ND PRESET T OUR OF F To set as either a privacy zone or...
...' will be displayed for instruction on how to define the tours and presets. If the preset is the preset number. Selected the required preset number by using the numeric keys. HONEYWELL VCL PROTOCOL, CONTINUED 6.10.1 Home Select 'HOME' in the camera setup menu, then press 'aux' to display the home menu as shown below: AUX = S E T L OCK = E ND PRESET T OUR OF F To set as either a privacy zone or...
User Manual
Page 43
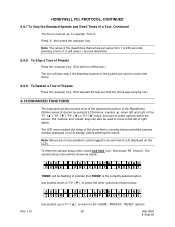
... lamp setting is being recorded, 'RECORDING MIMIC n' flashes on and off. If the system uses IR lamps, set , press 'lock' to exit the menu. 6.10.6 Auto 180 Select 'AUTO180' in the camera setup menu, then press 'aux' to display the auto180 menu as shown below : AUX = S E T L OCK = E ND AUT O1 8 0 OF F Press 'aux' to toggle the auto 180 setting between 'OFF' and 'ON'. This menu times out...
... lamp setting is being recorded, 'RECORDING MIMIC n' flashes on and off. If the system uses IR lamps, set , press 'lock' to exit the menu. 6.10.6 Auto 180 Select 'AUTO180' in the camera setup menu, then press 'aux' to display the auto180 menu as shown below : AUX = S E T L OCK = E ND AUT O1 8 0 OF F Press 'aux' to toggle the auto 180 setting between 'OFF' and 'ON'. This menu times out...
User Manual
Page 49
... list' menu on screen. Selecting 'PRG' will display the domes 'preshot program' menu on screen. Depending on which on screen menu has been selected, one of three LCD menus will be displayed. Selecting 'PROGRAM' will display the domes 'vectorscan program' menu on screen. Selecting 'VIEW' will display the domes 'vectorscan list' menu on screen. Selecting 'LST' will display the domes 'vectorscan view' menu on screen. Selecting 'LIST' will display the domes 'preshot go to' menu on screen. HONEYWELL DIAMOND...
... list' menu on screen. Selecting 'PRG' will display the domes 'preshot program' menu on screen. Depending on which on screen menu has been selected, one of three LCD menus will be displayed. Selecting 'PROGRAM' will display the domes 'vectorscan program' menu on screen. Selecting 'VIEW' will display the domes 'vectorscan list' menu on screen. Selecting 'LST' will display the domes 'vectorscan view' menu on screen. Selecting 'LIST' will display the domes 'preshot go to' menu on screen. HONEYWELL DIAMOND...

User Manual
Page 50
... programming menu). Press the 'camera' and 'preset' keys to send the space character. Press and hold 'Fn', then press 'counter' to jump to the domes menu. Press 'wipe' to send 'DELETE' to the domes to delete the last character. Pressing the 'counter' key will also shut down the menus if there has been no keyboard activity for saving settings). Press 'monitor' to...
... programming menu). Press the 'camera' and 'preset' keys to send the space character. Press and hold 'Fn', then press 'counter' to jump to the domes menu. Press 'wipe' to send 'DELETE' to the domes to delete the last character. Pressing the 'counter' key will also shut down the menus if there has been no keyboard activity for saving settings). Press 'monitor' to...
User Manual
Page 52
... 1 Program PTZ Tour 2 Program PTZ Tour 3 Terminate PTZ Programming Mode Start VectorScan 1 Start VectorScan 2 Start VectorScan 3 Setup the Scan and Camera (OSD Menus) Toggles the error table display Toggles auto exposure ON and OFF. (Factory default is ON.) Toggles backlight compensation ON and OFF. Toggles between standard operation and NightShot mode. (Camera models 843216-1011, 843216-1013, 843216-0984, and 843216-0985 only.) Toggles between freeze and unfreeze video...
... 1 Program PTZ Tour 2 Program PTZ Tour 3 Terminate PTZ Programming Mode Start VectorScan 1 Start VectorScan 2 Start VectorScan 3 Setup the Scan and Camera (OSD Menus) Toggles the error table display Toggles auto exposure ON and OFF. (Factory default is ON.) Toggles backlight compensation ON and OFF. Toggles between standard operation and NightShot mode. (Camera models 843216-1011, 843216-1013, 843216-0984, and 843216-0985 only.) Toggles between freeze and unfreeze video...
User Manual
Page 54
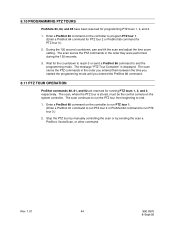
... time you started the programming mode until you entered the PreShot 86 command. 8.11 PTZ TOUR OPERATION PreShot commands 80, 81, and 82 are reserved for programming PTZ tours 1, 2, and 3. 1. During the 120 second countdown, pan and tilt the scan and adjust the lens zoom setting. The message "PTZ Tour Complete" is stored, must be the control camera on the controller to run PTZ...
... time you started the programming mode until you entered the PreShot 86 command. 8.11 PTZ TOUR OPERATION PreShot commands 80, 81, and 82 are reserved for programming PTZ tours 1, 2, and 3. 1. During the 120 second countdown, pan and tilt the scan and adjust the lens zoom setting. The message "PTZ Tour Complete" is stored, must be the control camera on the controller to run PTZ...
User Manual
Page 55
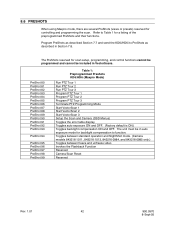
... change-over 99 presets (program and selection) Auto 180 turn around 4 rapid preset selections ( 1 to 4) 128 presets (program and selection) 10 vectorscans (selection) 4 rapid preset selections ( 1 to 4) Nightshot mode, freeze, flashback, 4 preset tours (program and selection) home, return to manual 4 mimic tours (program and selection) Privacy zone programming Home preset / tour programming Digital zoom, IR lamp, auto180 setup Power, camera and factory reset Wash, wipe, aux Full control of on screen menus...
... change-over 99 presets (program and selection) Auto 180 turn around 4 rapid preset selections ( 1 to 4) 128 presets (program and selection) 10 vectorscans (selection) 4 rapid preset selections ( 1 to 4) Nightshot mode, freeze, flashback, 4 preset tours (program and selection) home, return to manual 4 mimic tours (program and selection) Privacy zone programming Home preset / tour programming Digital zoom, IR lamp, auto180 setup Power, camera and factory reset Wash, wipe, aux Full control of on screen menus...

User Manual
Page 57
APPENDIX A: MENU NAVIGATION MIMIC RECORDING DEFINE MIMIC LOCK LOCK F6 (VCL) LOCK MAIN SCREEN LOCK LOCK F6 (DIAMOND) LOCK XXXX LOCK KEYBOARD SETUP LOCK PRTCL KEYBRD DVR/MUX LOCK LOCK DOME OSD MENU SELECTION DOME PROTOCOL CAMERA / DVR/ MUX ASSIGNMENT MASTER/SLAVE SET PRES LOCK VECT LOCK LOCK SECT DOME FUNCTIONS HOME LOCK LOCK PRIVACY RESET LOCK PRESHOT OSD MENU SELECTION VECTORSCAN OSD MENU SELECTION LOCK...
APPENDIX A: MENU NAVIGATION MIMIC RECORDING DEFINE MIMIC LOCK LOCK F6 (VCL) LOCK MAIN SCREEN LOCK LOCK F6 (DIAMOND) LOCK XXXX LOCK KEYBOARD SETUP LOCK PRTCL KEYBRD DVR/MUX LOCK LOCK DOME OSD MENU SELECTION DOME PROTOCOL CAMERA / DVR/ MUX ASSIGNMENT MASTER/SLAVE SET PRES LOCK VECT LOCK LOCK SECT DOME FUNCTIONS HOME LOCK LOCK PRIVACY RESET LOCK PRESHOT OSD MENU SELECTION VECTORSCAN OSD MENU SELECTION LOCK...
User Manual
Page 61
... RESUME TOUR OR AUTOPAN SEEK PRESET WASH ON WIPE ON LAMPS ON AUX ON NUMBERED AUX ON CAMERA NUMBERED AUX ON TOGGLE MONO / COLOUR DEFINE TOUR START DEFINE SECTOR RHS ALARM MODE ON PRIVACY ZONE SETUP TOUR POINT DATA CAMERA AUTO ALARM SEEK TIME REMOTE RESET KD6_SEND_CHAR The following Honeywell VCL (Orbiter/RapidDome) commands can be input into the keyboard using an RS485 connection to the KBD port.
... RESUME TOUR OR AUTOPAN SEEK PRESET WASH ON WIPE ON LAMPS ON AUX ON NUMBERED AUX ON CAMERA NUMBERED AUX ON TOGGLE MONO / COLOUR DEFINE TOUR START DEFINE SECTOR RHS ALARM MODE ON PRIVACY ZONE SETUP TOUR POINT DATA CAMERA AUTO ALARM SEEK TIME REMOTE RESET KD6_SEND_CHAR The following Honeywell VCL (Orbiter/RapidDome) commands can be input into the keyboard using an RS485 connection to the KBD port.


