User Guide
Page 1
Rev C - 02/11 UltraKey Touch DVR and PTZ Keyboard Controller HJC4000 Installation and User Guide Document 800-06554 -
Rev C - 02/11 UltraKey Touch DVR and PTZ Keyboard Controller HJC4000 Installation and User Guide Document 800-06554 -
User Guide
Page 5
... DC Power Port 18 Ethernet Port 18 RS232, RS485 Serial Port 19 RJ45 Box 19 UltraKey Touch Specifications 20 2 Using the UltraKey Touch Controller 21 Logging Onto the Controller 21 Using the UltraKey Touch to Navigate the LCD Menus 21 3 Connecting UltraKey Touch to a DVR 25 Navigating the LCD Configuration Menus 26...
... DC Power Port 18 Ethernet Port 18 RS232, RS485 Serial Port 19 RJ45 Box 19 UltraKey Touch Specifications 20 2 Using the UltraKey Touch Controller 21 Logging Onto the Controller 21 Using the UltraKey Touch to Navigate the LCD Menus 21 3 Connecting UltraKey Touch to a DVR 25 Navigating the LCD Configuration Menus 26...

User Guide
Page 6
... a Serial Connection 52 Step 1: Connect to the UltraKey Touch Serial Port 52 Step 2: Configure the Controller for PTZ 54 Step 3: Configure Serial Port of the Controller 54 Configuring UltraKey Touch Using the Web Browser (Optional 56 Logging into the Web Browser 56 Step 1:... Configure UltraKey Touch to System Configurations 56 Step 2: Standalone Configuration for PTZ Settings 57 Step 3: Configure the Controller for a Serial Port Connection 58 Controlling PTZs 59 Step 1: Keyboard Setup 59 Step 2: Camera Selection 60 Operating a PTZ Camera 60 5 System Administration and ...
... a Serial Connection 52 Step 1: Connect to the UltraKey Touch Serial Port 52 Step 2: Configure the Controller for PTZ 54 Step 3: Configure Serial Port of the Controller 54 Configuring UltraKey Touch Using the Web Browser (Optional 56 Logging into the Web Browser 56 Step 1:... Configure UltraKey Touch to System Configurations 56 Step 2: Standalone Configuration for PTZ Settings 57 Step 3: Configure the Controller for a Serial Port Connection 58 Controlling PTZs 59 Step 1: Keyboard Setup 59 Step 2: Camera Selection 60 Operating a PTZ Camera 60 5 System Administration and ...
User Guide
Page 7
... Port Connections 18 RJ45 Box Front and Back Ports 19 UltraKey Touch Controller Keyboard Layout 22 UltraKey Touch Navigation Controls 24 LCD and LCD Navigation Keys 26 DVR Configuration Menu Tree 26 Connecting the Controller for DVR Control 28 Connecting the Controller for DVR Control Using RS485 32 Ethernet Port Connections to DVR 36 UltraKey Touch...
... Port Connections 18 RJ45 Box Front and Back Ports 19 UltraKey Touch Controller Keyboard Layout 22 UltraKey Touch Navigation Controls 24 LCD and LCD Navigation Keys 26 DVR Configuration Menu Tree 26 Connecting the Controller for DVR Control 28 Connecting the Controller for DVR Control Using RS485 32 Ethernet Port Connections to DVR 36 UltraKey Touch...
User Guide
Page 9
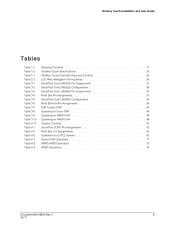
...3-9 Table 3-10 Table 3-11 Table 4-1 Table 4-2 Table 4-3 Table A-1 Table A-2 Table A-3 Shipping Checklist 17 UltraKey Touch Specifications 20 UltraKey Touch Controller Keys and Controls 22 LCD Menu Navigation During Setup 24 Serial Port Com2 (RS232) Pin Assignments 27 Serial Port Com2 (RS232) Configurations 29 Serial Port Com1 (RS485... Port Com1 (RS485) Configurations 34 RJ45 Ethernet Pin Assignments 35 DVR Control CAM 44 Operating a Fusion DVR 44 Operating an HRXD DVR 46 Operating an HRDP DVR 48 Joystick Controls 50 Serial Port COM1 Pin Assignments 52 RJ45 Box Pin Assignments 53 ...
...3-9 Table 3-10 Table 3-11 Table 4-1 Table 4-2 Table 4-3 Table A-1 Table A-2 Table A-3 Shipping Checklist 17 UltraKey Touch Specifications 20 UltraKey Touch Controller Keys and Controls 22 LCD Menu Navigation During Setup 24 Serial Port Com2 (RS232) Pin Assignments 27 Serial Port Com2 (RS232) Configurations 29 Serial Port Com1 (RS485... Port Com1 (RS485) Configurations 34 RJ45 Ethernet Pin Assignments 35 DVR Control CAM 44 Operating a Fusion DVR 44 Operating an HRXD DVR 46 Operating an HRDP DVR 48 Joystick Controls 50 Serial Port COM1 Pin Assignments 52 RJ45 Box Pin Assignments 53 ...
User Guide
Page 11
... irreparable damage to perform basic PTZ camera configuration. • Chapter 5, System Administration and Troubleshooting, covers system administration using the controller to equipment. Failure to take or avoid a specific action could result in a red octagon is a WARNING. Explanation of...and appendixes: • Chapter 1, UltraKey Touch Overview, introduces the UltraKey Touch controller. • Chapter 2, Using the UltraKey Touch Controller, provides procedures for logging on with the Ultrakey Touch controller and using it to navigate the LCD menus. • Chapter 3, Connecting UltraKey...
... irreparable damage to perform basic PTZ camera configuration. • Chapter 5, System Administration and Troubleshooting, covers system administration using the controller to equipment. Failure to take or avoid a specific action could result in a red octagon is a WARNING. Explanation of...and appendixes: • Chapter 1, UltraKey Touch Overview, introduces the UltraKey Touch controller. • Chapter 2, Using the UltraKey Touch Controller, provides procedures for logging on with the Ultrakey Touch controller and using it to navigate the LCD menus. • Chapter 3, Connecting UltraKey...

User Guide
Page 15
... Typographical Conventions This document uses the following typographical conventions: Font What it represents Example Use of an arrow Use of charge, any Honeywell product, please call Customer Service at 1.800.796.CCTV for reference purposes, Hours:Minute:Seconds. Syntax (object) entered Document 800-...indicates between items (>) holding the first key and then pressing the second key, and then releasing the two keys. On the controller, press Alt > Clr to enter the System Configuration: Standalone Setting menu. UltraKey Touch Installation and User Guide Warranty and Service ...
... Typographical Conventions This document uses the following typographical conventions: Font What it represents Example Use of an arrow Use of charge, any Honeywell product, please call Customer Service at 1.800.796.CCTV for reference purposes, Hours:Minute:Seconds. Syntax (object) entered Document 800-...indicates between items (>) holding the first key and then pressing the second key, and then releasing the two keys. On the controller, press Alt > Clr to enter the System Configuration: Standalone Setting menu. UltraKey Touch Installation and User Guide Warranty and Service ...
User Guide
Page 17
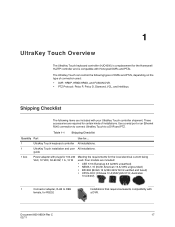
..., depending on the type of installations. Document 800-06554 Rev C 17 02/11 1 UltraKey Touch Overview The UltraKey Touch keyboard controller (HJC4000) is compatible with plugs for 100-240 VAC, 12 VDC, 50-60 HZ, 1 A, 12 W Meeting the requirements for ...; PTZ Protocol: Pelco P, Pelco D, Diamond, VCL, and Intellibus. Table 1-1 Shipping Checklist Quantity Part Use for the Honeywell HJZTP controller and is a replacement for ... 1 UltraKey Touch keyboard controller All installations. 1 UltraKey Touch installation and user All installations. guide 1 box Power adapter with...
..., depending on the type of installations. Document 800-06554 Rev C 17 02/11 1 UltraKey Touch Overview The UltraKey Touch keyboard controller (HJC4000) is compatible with plugs for 100-240 VAC, 12 VDC, 50-60 HZ, 1 A, 12 W Meeting the requirements for ...; PTZ Protocol: Pelco P, Pelco D, Diamond, VCL, and Intellibus. Table 1-1 Shipping Checklist Quantity Part Use for the Honeywell HJZTP controller and is a replacement for ... 1 UltraKey Touch keyboard controller All installations. 1 UltraKey Touch installation and user All installations. guide 1 box Power adapter with...
User Guide
Page 18
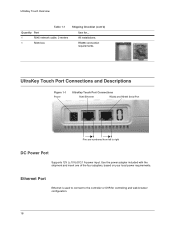
... Touch Port Connections and Descriptions Figure 1-1 Power UltraKey Touch Port Connections RJ45 Ethernet RS232 and RS485 Serial Port 1 8 1 8 Pins are numbered from left to the controller or DVR for ... UltraKey Touch Overview Table 1-1 Quantity Part 1 RJ45 network cable, 2 meters 1 RJ45 box Shipping Checklist (cont'd) Use for...
... Touch Port Connections and Descriptions Figure 1-1 Power UltraKey Touch Port Connections RJ45 Ethernet RS232 and RS485 Serial Port 1 8 1 8 Pins are numbered from left to the controller or DVR for ... UltraKey Touch Overview Table 1-1 Quantity Part 1 RJ45 network cable, 2 meters 1 RJ45 box Shipping Checklist (cont'd) Use for...

User Guide
Page 21
.... See Figure 2-2 for specific methods of navigating the LCD during configuration as well as normal operation. 2 Using the UltraKey Touch Controller You may need to learn how to configure the main menu settings. Press Alt>Clr to use the UltraKey Touch both before and after you ... Navigate the LCD Menus on the keyboard. 3. Document 800-06554 Rev C 21 02/11 Enter the password, 1234. 4. This section covers: • Logging Onto the Controller on page 21 • Using the UltraKey Touch to log in.
.... See Figure 2-2 for specific methods of navigating the LCD during configuration as well as normal operation. 2 Using the UltraKey Touch Controller You may need to learn how to configure the main menu settings. Press Alt>Clr to use the UltraKey Touch both before and after you ... Navigate the LCD Menus on the keyboard. 3. Document 800-06554 Rev C 21 02/11 Enter the password, 1234. 4. This section covers: • Logging Onto the Controller on page 21 • Using the UltraKey Touch to log in.
User Guide
Page 22
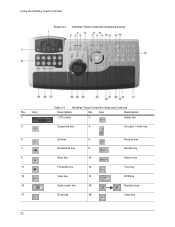
Icon 1 3 5 7 9 11 13 15 17 22 Table 2-1 UltraKey Touch Controller Keys and Controls Description No. Icon Description LCD screen 2 Alarm key Sequence key 4 Iris open / close key Set key 6 Backwards key 8 Stop key 10 Forwards key 12 View key 14 Split screen key 16 Enter key 18 Recycle key Review key Search key Tour key DVR key Number keys Clear key Using the UltraKey Touch Controller Figure 2-1 UltraKey Touch Controller Keyboard Layout No.
Icon 1 3 5 7 9 11 13 15 17 22 Table 2-1 UltraKey Touch Controller Keys and Controls Description No. Icon Description LCD screen 2 Alarm key Sequence key 4 Iris open / close key Set key 6 Backwards key 8 Stop key 10 Forwards key 12 View key 14 Split screen key 16 Enter key 18 Recycle key Review key Search key Tour key DVR key Number keys Clear key Using the UltraKey Touch Controller Figure 2-1 UltraKey Touch Controller Keyboard Layout No.
User Guide
Page 23
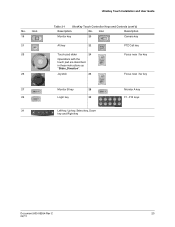
Joystick 26 Focus near / far key Focus near / far key Monitor B key 28 Login key 30 Left key, Up key, Select key, Down key and Right key Monitor A key F1-F10 keys Document 800-06554 Rev C 23 02/11 Icon 19 21 23 25 27 29 31 UltraKey Touch Installation and User Guide Table 2-1 UltraKey Touch Controller Keys and Controls (cont'd) Description No. No. Icon Description Monitor key 20 Camera key Alt key 22 PTZ Call key Touch pad slider 24 Operations with the touch pad are described in these instructions as "Slider_Direction".
Joystick 26 Focus near / far key Focus near / far key Monitor B key 28 Login key 30 Left key, Up key, Select key, Down key and Right key Monitor A key F1-F10 keys Document 800-06554 Rev C 23 02/11 Icon 19 21 23 25 27 29 31 UltraKey Touch Installation and User Guide Table 2-1 UltraKey Touch Controller Keys and Controls (cont'd) Description No. No. Icon Description Monitor key 20 Camera key Alt key 22 PTZ Call key Touch pad slider 24 Operations with the touch pad are described in these instructions as "Slider_Direction".
User Guide
Page 24
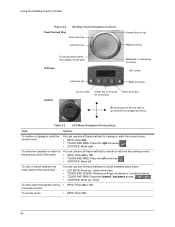
Using the UltraKey Touch Controller Figure 2-2 UltraKey Touch Navigation Controls Touch Pad and Ring Touch pad ring Left arrow key Forward key (or up) Right arrow key Touch pad slider (used like a laptop mouse pad) ... Keys Backward or reverse key (or down) LCD screen Joystick Left arrow key Right arrow key Up arrow key Center key is not used for controlling Down arrow key Move the joystick left and right or up and down to navigate the menus Table 2-2 LCD Menu Navigation During Setup Task Options...
Using the UltraKey Touch Controller Figure 2-2 UltraKey Touch Navigation Controls Touch Pad and Ring Touch pad ring Left arrow key Forward key (or up) Right arrow key Touch pad slider (used like a laptop mouse pad) ... Keys Backward or reverse key (or down) LCD screen Joystick Left arrow key Right arrow key Up arrow key Center key is not used for controlling Down arrow key Move the joystick left and right or up and down to navigate the menus Table 2-2 LCD Menu Navigation During Setup Task Options...

User Guide
Page 25
... Linkage (Additional) on page 37 • Configuring UltraKey Touch Using the Web Browser (Optional) on page 39 • Controlling a FUSION DVR on page 43 • Controlling an HRXD/HRSD DVR on page 46 • Controlling an HRDP DVR on the touch pad), Alt > Clr, or move the joystick to the left. • To... view or switch between the menu items of the same level you can start configuring the system. Then you can control the remote DVR through either of the serial port or Ethernet connections. This section explains how to connect the UltraKey Touch...
... Linkage (Additional) on page 37 • Configuring UltraKey Touch Using the Web Browser (Optional) on page 39 • Controlling a FUSION DVR on page 43 • Controlling an HRXD/HRSD DVR on page 46 • Controlling an HRDP DVR on the touch pad), Alt > Clr, or move the joystick to the left. • To... view or switch between the menu items of the same level you can start configuring the system. Then you can control the remote DVR through either of the serial port or Ethernet connections. This section explains how to connect the UltraKey Touch...
User Guide
Page 27
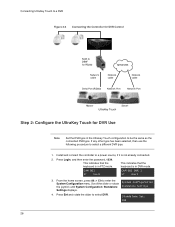
... Checklist on page 17 and for Cascade Linkage (Additional) on page 18. 1. Document 800-06554 Rev C 27 02/11 Plug the AC adapter into the controller power port and the adapter into the AC adapter. Connect the RJ45 network cable to the UltraKey Touch Using the Serial Port Table 3-1 Serial Port... click it into a power source. 3. UltraKey Touch Installation and User Guide Connect to the UltraKey Touch Using the Serial Port (RS232) Step 1: Connect to the controller serial port and the connector adapter. 4. Select the applicable adapter plug and insert it into place. 2.
... Checklist on page 17 and for Cascade Linkage (Additional) on page 18. 1. Document 800-06554 Rev C 27 02/11 Plug the AC adapter into the controller power port and the adapter into the AC adapter. Connect the RJ45 network cable to the UltraKey Touch Using the Serial Port Table 3-1 Serial Port... click it into a power source. 3. UltraKey Touch Installation and User Guide Connect to the UltraKey Touch Using the Serial Port (RS232) Step 1: Connect to the controller serial port and the connector adapter. 4. Select the applicable adapter plug and insert it into place. 2.
User Guide
Page 28
... indicates that the keyboard is in DVR mode. Standalone Set: DVR 28 Connecting UltraKey Touch to a DVR Figure 3-3 Connecting the Controller for DVR Control RJ45 to DB9F for RS232 Network cable NETWORK Network cable Network cable Serial Port (RS232) Network Port Network Port Master UltraKey Touch ...Settings Settings displays. 4. Press Ent and rotate the slider to a power source, if it is not already connected. 2. Install and connect the controller to select DVR. CAM 001 ST User2 CAM 001 DVR 1 ST User2 3. If any other type has been selected, then use the following...
... indicates that the keyboard is in DVR mode. Standalone Set: DVR 28 Connecting UltraKey Touch to a DVR Figure 3-3 Connecting the Controller for DVR Control RJ45 to DB9F for RS232 Network cable NETWORK Network cable Network cable Serial Port (RS232) Network Port Network Port Master UltraKey Touch ...Settings Settings displays. 4. Press Ent and rotate the slider to a power source, if it is not already connected. 2. Install and connect the controller to select DVR. CAM 001 ST User2 CAM 001 DVR 1 ST User2 3. If any other type has been selected, then use the following...
User Guide
Page 29
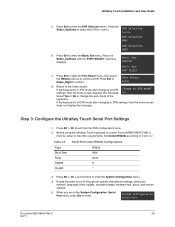
... System Configuration: Serial Port menu, press Ent to meet the requirements. Port Select RS232 8. Before using the UltraKey Touch keyboard to control Fusion/HRXD/HRDP DVRs, it must be setup to enter. DVR Selection Fusion DVR Selection HRDP DVR Selection HRXD 6. Set Com2 (...RS232) according to confirm. Press Ent or Slider_Right to Table 3-2. Press Alt > Clr a second time to control a DVR. Press Ent to enter the Port Select menu, then select the RS232 protocol to enter the System Configuration menu. 4. settings, then...
... System Configuration: Serial Port menu, press Ent to meet the requirements. Port Select RS232 8. Before using the UltraKey Touch keyboard to control Fusion/HRXD/HRDP DVRs, it must be setup to enter. DVR Selection Fusion DVR Selection HRDP DVR Selection HRXD 6. Set Com2 (...RS232) according to confirm. Press Ent or Slider_Right to Table 3-2. Press Alt > Clr a second time to control a DVR. Press Ent to enter the Port Select menu, then select the RS232 protocol to enter the System Configuration menu. 4. settings, then...
User Guide
Page 31
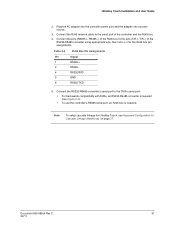
... port and the adapter into a power source. 3. Connect the pins (RS485+, RS485-) of the RJ45 box to the pins (T/R+, T/R-) of the controller and the RJ45 box. 4. Table 3-4 RJ45 Box Pin Assignments Pin Signal 1 RS485+ 2 RS485 - 4 RS232 RXD 5 GND 6 RS232 TXD 5. See Table 3-4 for ... port of the RS232-RS485 converter using appropriate wire. Note To setup cascade linkage for UltraKey Touch, see Figure 3-4). • To use the controller's RS485 serial port, an RJ45 box is required. Connect the RJ45 network cable to the DVR's serial port: • For backwards compatibility with...
... port and the adapter into a power source. 3. Connect the pins (RS485+, RS485-) of the RJ45 box to the pins (T/R+, T/R-) of the controller and the RJ45 box. 4. Table 3-4 RJ45 Box Pin Assignments Pin Signal 1 RS485+ 2 RS485 - 4 RS232 RXD 5 GND 6 RS232 TXD 5. See Table 3-4 for ... port of the RS232-RS485 converter using appropriate wire. Note To setup cascade linkage for UltraKey Touch, see Figure 3-4). • To use the controller's RS485 serial port, an RJ45 box is required. Connect the RJ45 network cable to the DVR's serial port: • For backwards compatibility with...

User Guide
Page 32
Connecting UltraKey Touch to a DVR Figure 3-4 Connecting the Controller for DVR Control Using RS485 RS232-RS485 Converter Serial Port (RS232) 5 6 RJ45 Box 7 8 Serial Port (RS485) 4 3 2 1 Network Cable Network Cable Serial Port (RS485) Network Port NETWORK Network Cable .... 1. If any other type has been selected, then use the following procedure to be the same as the connected DVR type. Install and connect the controller to a power source, if it is not already connected. 32
Connecting UltraKey Touch to a DVR Figure 3-4 Connecting the Controller for DVR Control Using RS485 RS232-RS485 Converter Serial Port (RS232) 5 6 RJ45 Box 7 8 Serial Port (RS485) 4 3 2 1 Network Cable Network Cable Serial Port (RS485) Network Port NETWORK Network Cable .... 1. If any other type has been selected, then use the following procedure to be the same as the connected DVR type. Install and connect the controller to a power source, if it is not already connected. 32
User Guide
Page 33
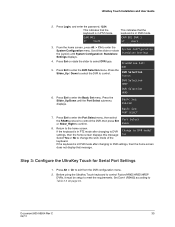
...the Slider_Up / Down to select the DVR to meet the requirements. Before using the UltraKey Touch keyboard to control Fusion/HRXD/HRSD/HRDP DVRs, it must be setup to control. Scroll the slider or rotate System Configuration the joystick until the Port Select submenu displays. Press Ent to ...until System Configuration: Standalone Standalone Settings Settings displays. 4. Press Ent to enter the Port Select menu, then select the RS485 protocol to controll the DVR, then press Ent Port Select or Slider_Right to enter the DVR Selection menu. If the keyboard is in PTZ mode after...
...the Slider_Up / Down to select the DVR to meet the requirements. Before using the UltraKey Touch keyboard to control Fusion/HRXD/HRSD/HRDP DVRs, it must be setup to control. Scroll the slider or rotate System Configuration the joystick until the Port Select submenu displays. Press Ent to ...until System Configuration: Standalone Standalone Settings Settings displays. 4. Press Ent to enter the Port Select menu, then select the RS485 protocol to controll the DVR, then press Ent Port Select or Slider_Right to enter the DVR Selection menu. If the keyboard is in PTZ mode after...