
Owner's Manual
Page 1
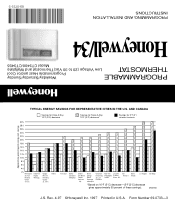
...Edmonton Regina Winnipeg Calgary Moncton North Bay Quebec St. Form Number 69-0733-3 AND CANADA Savings for Once-A-Day 10°F (5°C) decrease Savings for Twice-A-Day 10°F (5°C) decrease* Savings for 5°F ...energy cost savings TYPICAL ENERGY SAVINGS FOR REPRESENTATIVE CITIES IN THE U.S. Rev. 4-97 ©Honeywell Inc. 1997 Printed in U.S.A. San Diego M2416A J.S. 69-0733-3 PROGRAMMING AND INSTALLATION INSTRUCTIONS Honeywell/34 Model CT3400/CT3455 THERMOSTAT Low Voltage (20 to 30 Vac)Thermostat and Wallplate PROGRAMMABLE Programmable Heat and/or Cool...
...Edmonton Regina Winnipeg Calgary Moncton North Bay Quebec St. Form Number 69-0733-3 AND CANADA Savings for Once-A-Day 10°F (5°C) decrease Savings for Twice-A-Day 10°F (5°C) decrease* Savings for 5°F ...energy cost savings TYPICAL ENERGY SAVINGS FOR REPRESENTATIVE CITIES IN THE U.S. Rev. 4-97 ©Honeywell Inc. 1997 Printed in U.S.A. San Diego M2416A J.S. 69-0733-3 PROGRAMMING AND INSTALLATION INSTRUCTIONS Honeywell/34 Model CT3400/CT3455 THERMOSTAT Low Voltage (20 to 30 Vac)Thermostat and Wallplate PROGRAMMABLE Programmable Heat and/or Cool...
Owner's Manual
Page 2
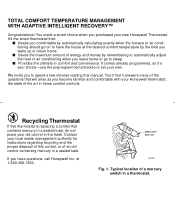
... choice-use the preprogrammed schedule or set your Honeywell thermostat, the state of a mercury switch in a sealed tube. Contact your new Honeywell Thermostat. s Saves the maximum amount of an old control containing mercury in a thermostat. It comes already programmed, so it answers many of the questions that : s Keeps you comfortable by remembering to automatically adjust the heat or air conditioning when you to sleep. TOTAL COMFORT TEMPERATURE MANAGEMENT WITH ADAPTIVE INTELLIGENT RECOVERY...
... choice-use the preprogrammed schedule or set your Honeywell thermostat, the state of a mercury switch in a sealed tube. Contact your new Honeywell Thermostat. s Saves the maximum amount of an old control containing mercury in a thermostat. It comes already programmed, so it answers many of the questions that : s Keeps you comfortable by remembering to automatically adjust the heat or air conditioning when you to sleep. TOTAL COMFORT TEMPERATURE MANAGEMENT WITH ADAPTIVE INTELLIGENT RECOVERY...
Owner's Manual
Page 3
... Contents STEP 1 Prepare For Installation ...2 STEP 2 Remove Old Thermostat 4 STEP 3 Before You Program ...6 Install the Batteries ...6 Adaptive Intelligent Recovery™ Selection 7 STEP 4 Program The Thermostat 9 STEP 5 Mount Thermostat Wallplate 16 STEP 6 Adjust System On-Time, Clock Display, as Required 18 STEP 7 Adjust Fan Operation Switch, as Required 20 STEP 8 Wire Wallplate Terminals 21 STEP 9 Mount The Thermostat 24 STEP 10 Check Thermostat Operation After Programming and Installing 25 STEP 11 Set the Fan and System Switches 28 Troubleshooting Guide ...30 Index ...34...
... Contents STEP 1 Prepare For Installation ...2 STEP 2 Remove Old Thermostat 4 STEP 3 Before You Program ...6 Install the Batteries ...6 Adaptive Intelligent Recovery™ Selection 7 STEP 4 Program The Thermostat 9 STEP 5 Mount Thermostat Wallplate 16 STEP 6 Adjust System On-Time, Clock Display, as Required 18 STEP 7 Adjust Fan Operation Switch, as Required 20 STEP 8 Wire Wallplate Terminals 21 STEP 9 Mount The Thermostat 24 STEP 10 Check Thermostat Operation After Programming and Installing 25 STEP 11 Set the Fan and System Switches 28 Troubleshooting Guide ...30 Index ...34...
Owner's Manual
Page 4
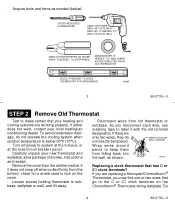
... the old thermostat. If either does not work, contact your new thermostat and wallplate; s Turn off when pulled firmly from falling back into the wall, as needed (below 50°F (10°C). s Acquire tools and items as shown. s Remove the cover from old thermostat or subbase. If there are replacing a Honeywell Chronotherm® Thermostat, you disconnect each wire, use masking tape to lock on the Chronotherm® Thermostat wiring wallplate. WALL...
... the old thermostat. If either does not work, contact your new thermostat and wallplate; s Turn off when pulled firmly from falling back into the wall, as needed (below 50°F (10°C). s Acquire tools and items as shown. s Remove the cover from old thermostat or subbase. If there are replacing a Honeywell Chronotherm® Thermostat, you disconnect each wire, use masking tape to lock on the Chronotherm® Thermostat wiring wallplate. WALL...
Owner's Manual
Page 5
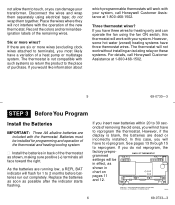
... of removing the old ones, you have three wires for heating only and can damage your system, call Honeywell Customer Assistance at 1-800-468-1502. onds of the thermostat as possible after the indicator starts flashing. INSTALL 3 AA ALKALINE BATTERIES AS SHOWN, POSITIVE (+) TERMINALS TOWARD RIGHT. If you will be installed for 1 to 2 months before batteries run out completely. If you can operate the fan using electrical tape...
... of removing the old ones, you have three wires for heating only and can damage your system, call Honeywell Customer Assistance at 1-800-468-1502. onds of the thermostat as possible after the indicator starts flashing. INSTALL 3 AA ALKALINE BATTERIES AS SHOWN, POSITIVE (+) TERMINALS TOWARD RIGHT. If you will be installed for 1 to 2 months before batteries run out completely. If you can operate the fan using electrical tape...
Owner's Manual
Page 6
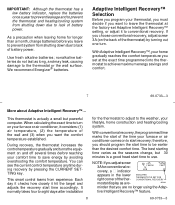
... thermostat) by turning out one turn on your lifestyle, home construction and heating/cooling system. M2483 minder that you adjust screw 3A for conventional recovery, a s indicator PM SET PT TUE DAYTIME appears in the lower right corner of battery power. As a precaution when leaving home for the thermostat to adjust to the weather, your furnace or air conditioner, it considers: (1) air temperature, (2) the temperature of the wall and (3) when you set at the factory-set Adaptive Intelligent Recovery...
... thermostat) by turning out one turn on your lifestyle, home construction and heating/cooling system. M2483 minder that you adjust screw 3A for conventional recovery, a s indicator PM SET PT TUE DAYTIME appears in the lower right corner of battery power. As a precaution when leaving home for the thermostat to adjust to the weather, your furnace or air conditioner, it considers: (1) air temperature, (2) the temperature of the wall and (3) when you set at the factory-set Adaptive Intelligent Recovery...
Owner's Manual
Page 7
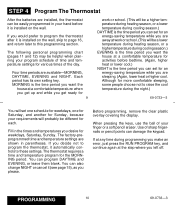
... temperature for activities before it is installed on the wall. Use of the day. Although for more comfortable sleeping, some people choose not to this programming section. When pressing the keys, use the ball of time and temperature settings for an energy-saving temperature while you are sleeping. (Again, lower heat or higher cool. PROGRAMMING 10 69-0733-3 STEP 4 Program The Thermostat After the batteries are installed, the thermostat can be easily programmed...
... temperature for activities before it is installed on the wall. Use of the day. Although for more comfortable sleeping, some people choose not to this programming section. When pressing the keys, use the ball of time and temperature settings for an energy-saving temperature while you are sleeping. (Again, lower heat or higher cool. PROGRAMMING 10 69-0733-3 STEP 4 Program The Thermostat After the batteries are installed, the thermostat can be easily programmed...
Owner's Manual
Page 8
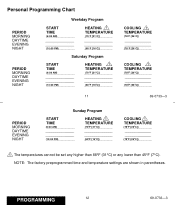
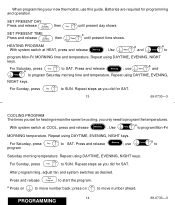
... Sunday Program START TIME (_6_:0_0__A_M (_1_0_:0_0__P_M HEATING 1 TEMPERATURE _(7_0_°_F__[_2_1_°C _(6_0_°_F__[_1_6_°C COOLING 1 TEMPERATURE (_7_8_°_F__[2_6_°_C (_7_8_°_F__[2_6_°_C 1 The temperatures cannot be set any higher than 88°F (31°C) or any lower than 45°F (7°C). NOTE: The factory-preprogrammed time and temperature settings are...
... Sunday Program START TIME (_6_:0_0__A_M (_1_0_:0_0__P_M HEATING 1 TEMPERATURE _(7_0_°_F__[_2_1_°C _(6_0_°_F__[_1_6_°C COOLING 1 TEMPERATURE (_7_8_°_F__[2_6_°_C (_7_8_°_F__[2_6_°_C 1 The temperatures cannot be set any higher than 88°F (31°C) or any lower than 45°F (7°C). NOTE: The factory-preprogrammed time and temperature settings are...
Owner's Manual
Page 9
... 69-0733-3 COOLING PROGRAM The times you only need to SUN. a Press on to program Mon-Fri MORNING time and temperature. SET PRESENT TIME Press and release Set Present Day/Time then a Time until present day shows. Use a Temp to move number ahead. 14 PROGRAMMING 69-0733-3 After programming, adjust fan and system switches as you did for programming and operation. Repeat using DAYTIME, EVENING, NIGHT keys. Repeat steps as desired. you set for heating remain the...
... 69-0733-3 COOLING PROGRAM The times you only need to SUN. a Press on to program Mon-Fri MORNING time and temperature. SET PRESENT TIME Press and release Set Present Day/Time then a Time until present day shows. Use a Temp to move number ahead. 14 PROGRAMMING 69-0733-3 After programming, adjust fan and system switches as you did for programming and operation. Repeat using DAYTIME, EVENING, NIGHT keys. Repeat steps as desired. you set for heating remain the...
Owner's Manual
Page 10
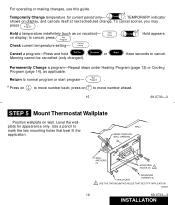
... changes, use this guide. to normal program or start program- Morning cannot be cancelled (only changed). Return to cancel, press Run . Level the wallplate for current period only- Hold Temp on to move number back; a Temporarily Change temperature for appearance only. To cancel sooner, you may press Run . press on to move number ahead. 15 69-0733-3 STEP 5 Mount Thermostat Wallplate s Position wallplate on display, and cancels itself at next scheduled change. WALL WIRES THROUGH WALL...
... changes, use this guide. to normal program or start program- Morning cannot be cancelled (only changed). Return to cancel, press Run . Level the wallplate for current period only- Hold Temp on to move number back; a Temporarily Change temperature for appearance only. To cancel sooner, you may press Run . press on to move number ahead. 15 69-0733-3 STEP 5 Mount Thermostat Wallplate s Position wallplate on display, and cancels itself at next scheduled change. WALL WIRES THROUGH WALL...

Owner's Manual
Page 11
...-3 STEP 6 Adjust System On-Time, Clock Display, As Required s The thermostat on another type of system, the ontime must be optimized with the wall. out one turn). • Gas/Oil Warm Air-Set at the Gas/ Oil Warm Air setting (1A-leave in the illustration as marked. leave in wall (if drywall) as a guide. In the unlikely event that you are installing it on -time is factory-set for...
...-3 STEP 6 Adjust System On-Time, Clock Display, As Required s The thermostat on another type of system, the ontime must be optimized with the wall. out one turn). • Gas/Oil Warm Air-Set at the Gas/ Oil Warm Air setting (1A-leave in the illustration as marked. leave in wall (if drywall) as a guide. In the unlikely event that you are installing it on -time is factory-set for...
Owner's Manual
Page 12
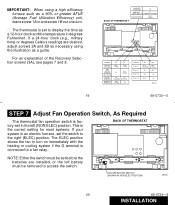
...-3 STEP 7 Adjust Fan Operation Switch, As Required s The thermostat fan operation switch is set in degrees Fahrenheit. If a 24-hour clock (e.g., military time) or degrees Celsius readings are installed, or the left (NON ELEC) position. The ELEC position allows the fan to a fan relay. s The thermostat is factory-set to display the time as a 12-hour clock and the temperature in the left battery 4A must be set the switch to access the switch. BACK OF THERMOSTAT NOTE...
...-3 STEP 7 Adjust Fan Operation Switch, As Required s The thermostat fan operation switch is set in degrees Fahrenheit. If a 24-hour clock (e.g., military time) or degrees Celsius readings are installed, or the left (NON ELEC) position. The ELEC position allows the fan to a fan relay. s The thermostat is factory-set to display the time as a 12-hour clock and the temperature in the left battery 4A must be set the switch to access the switch. BACK OF THERMOSTAT NOTE...

Owner's Manual
Page 13
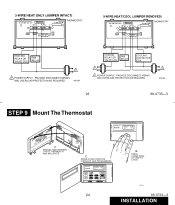
... the factory-installed jumper connect- s Match the letter of your old thermostat wire with the terminal of the corresponding letter on your local heating/air conditioning contractor. s Plug the hole in the wall with local codes and ordinances. PROVIDE DISCONNECT MEANS AND OVERLOAD PROTECTION AS REQUIRED. s Loosen the terminal screws and slip each wire beneath its matching terminal. M2486 ing terminals R and Rc. 21 69-0733-3 2-WIRE HEAT-ONLY (JUMPER...
... the factory-installed jumper connect- s Match the letter of your old thermostat wire with the terminal of the corresponding letter on your local heating/air conditioning contractor. s Plug the hole in the wall with local codes and ordinances. PROVIDE DISCONNECT MEANS AND OVERLOAD PROTECTION AS REQUIRED. s Loosen the terminal screws and slip each wire beneath its matching terminal. M2486 ing terminals R and Rc. 21 69-0733-3 2-WIRE HEAT-ONLY (JUMPER...
Owner's Manual
Page 14
... DAYTIME HEAT ON Set Present Day Time Hold Temp Day Morning Run Program Night On Auto Fan Daytime Current Setting Temp Evening Time Heat On Cool 24 B. PRESS LOWER EDGE OF CASE TO LATCH M5143 69-0733-3 INSTALLATION PROVIDE DISCONNECT MEANS AND OVERLOAD PROTECTION AS REQUIRED. 1 M 615A 23 69-0733-3 STEP 9 Mount The Thermostat AM MON DAYTIME HEAT ON A. PROVIDE DISCONNECT MEANS AND OVERLOAD PROTECTION AS REQUIRED. 3-WIRE HEAT ONLY (JUMPER INTACT) W G R RC Y THERMOSTAT 5-WIRE HEAT/COOL (JUMPER REMOVED) W G R RC Y THERMOSTAT HEATING...
... DAYTIME HEAT ON Set Present Day Time Hold Temp Day Morning Run Program Night On Auto Fan Daytime Current Setting Temp Evening Time Heat On Cool 24 B. PRESS LOWER EDGE OF CASE TO LATCH M5143 69-0733-3 INSTALLATION PROVIDE DISCONNECT MEANS AND OVERLOAD PROTECTION AS REQUIRED. 1 M 615A 23 69-0733-3 STEP 9 Mount The Thermostat AM MON DAYTIME HEAT ON A. PROVIDE DISCONNECT MEANS AND OVERLOAD PROTECTION AS REQUIRED. 3-WIRE HEAT ONLY (JUMPER INTACT) W G R RC Y THERMOSTAT 5-WIRE HEAT/COOL (JUMPER REMOVED) W G R RC Y THERMOSTAT HEATING...
Owner's Manual
Page 15
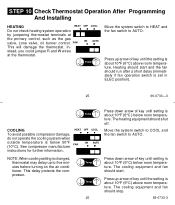
... switch to HEAT and the fan switch to five minutes before turning on the air conditioner. HEAT FAN M2472 OFF COOL ON AUTO Press down arrow of key until setting is Temp about 10°F (6°C ) below room tempera- STEP 10 Check Thermostat Operation After Programming And Installing HEATING HEAT OFF COOL Do not check heating system operation by jumpering thermostat terminals at the thermostat. See compressor manufacturer instructions for further information. Move the system switch to COOL and the fan switch...
... switch to HEAT and the fan switch to five minutes before turning on the air conditioner. HEAT FAN M2472 OFF COOL ON AUTO Press down arrow of key until setting is Temp about 10°F (6°C ) below room tempera- STEP 10 Check Thermostat Operation After Programming And Installing HEATING HEAT OFF COOL Do not check heating system operation by jumpering thermostat terminals at the thermostat. See compressor manufacturer instructions for further information. Move the system switch to COOL and the fan switch...

Owner's Manual
Page 16
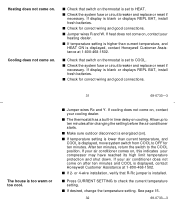
... the furnace. Exception: If fan operation switch on low with the air conditioner and on back of thermostat is set the fan switch. FAN ON AUTO FAN ON AUTO 28 69-0733-3 A single-speed fan turns on automatically with furnace only. The fan should run continuously. Use for improved air circulation during special occasions or for most homes. HEAT OFF COOL FAN ON AUTO Move the system switch to OFF and the fan switch to the thermostat.) FAN AUTO: Normal setting for more efficient electronic air...
... the furnace. Exception: If fan operation switch on low with the air conditioner and on back of thermostat is set the fan switch. FAN ON AUTO FAN ON AUTO 28 69-0733-3 A single-speed fan turns on automatically with furnace only. The fan should run continuously. Use for improved air circulation during special occasions or for most homes. HEAT OFF COOL FAN ON AUTO Move the system switch to OFF and the fan switch to the thermostat.) FAN AUTO: Normal setting for more efficient electronic air...
Owner's Manual
Page 17
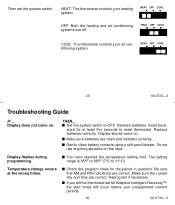
... using a soft pencil eraser. Temperature change occurs at least five seconds to reset thermostat. Reprogram if necessary. Remove batteries. s Make sure batteries are off. Be sure that AM and PM indications are correct. HEAT OFF COOL COOL: The thermostat controls your heating system. Display flashes during programming. s If you left the thermostat set the system switch. HEAT: The thermostat controls your air conditioning system. THEN... Insert back- Replace batteries correctly. Then set for at the wrong times. Display does not come...
... using a soft pencil eraser. Temperature change occurs at least five seconds to reset thermostat. Reprogram if necessary. Remove batteries. s Make sure batteries are off. Be sure that AM and PM indications are correct. HEAT OFF COOL COOL: The thermostat controls your heating system. Display flashes during programming. s If you left the thermostat set the system switch. HEAT: The thermostat controls your air conditioning system. THEN... Insert back- Replace batteries correctly. Then set for at the wrong times. Display does not come...
Owner's Manual
Page 18
... come on , contact your cooling dealer. s Check the system fuse or circuit breaker and replace or reset if necessary. s Check the system fuse or circuit breaker and replace or reset if necessary. or 4-wire installation, verify that switch on thermostat is displayed, contact Honeywell Customer Assistance at 1-800-468-1502. Allow up to check the current temperature setting. If display is blank or displays REPL BAT, install fresh batteries. s Jumper wires...
... come on , contact your cooling dealer. s Check the system fuse or circuit breaker and replace or reset if necessary. s Check the system fuse or circuit breaker and replace or reset if necessary. or 4-wire installation, verify that switch on thermostat is displayed, contact Honeywell Customer Assistance at 1-800-468-1502. Allow up to check the current temperature setting. If display is blank or displays REPL BAT, install fresh batteries. s Jumper wires...
Owner's Manual
Page 19
...affect thermostat operation. The system cycle length is factory-calibrated and cannot be adjusted. 33 69-0733-3 Index Adaptive Intelligent Recovery 7,8 Batteries, installation 6 Batteries, replacement ........ 6,7 Blinking display 6 Canceling programs 15 Change temperature 15 Checking current setting ....... 15 Clock display 19 Conventional Recovery ....... 7,8 Cooling temperatures ........ 9,11,12,14 Current setting 15 Customer Assistance 35 Day 13 DAYTIME 13,14,15 Energy-saving temperature 9 EVENING 13,14,15 Fan operation switch 20 Fan switch 29 Flashing display 6 Heating...
...affect thermostat operation. The system cycle length is factory-calibrated and cannot be adjusted. 33 69-0733-3 Index Adaptive Intelligent Recovery 7,8 Batteries, installation 6 Batteries, replacement ........ 6,7 Blinking display 6 Canceling programs 15 Change temperature 15 Checking current setting ....... 15 Clock display 19 Conventional Recovery ....... 7,8 Cooling temperatures ........ 9,11,12,14 Current setting 15 Customer Assistance 35 Day 13 DAYTIME 13,14,15 Energy-saving temperature 9 EVENING 13,14,15 Fan operation switch 20 Fan switch 29 Flashing display 6 Heating...
Owner's Manual
Page 20
... not cover removal or reinstallation costs. This warranty shall not apply if it is defective or malfunctions, Honeywell shall repair or replace it , postage prepaid, to the following information available-thermostat model number and date code, type of heating/cooling system (e.g., hot water, warm air, oil, gas, etc.), and number of a consumer. This warranty gives you specific legal rights, and you . in the possession of wires connected to the thermostat. THIS WARRANTY...
... not cover removal or reinstallation costs. This warranty shall not apply if it is defective or malfunctions, Honeywell shall repair or replace it , postage prepaid, to the following information available-thermostat model number and date code, type of heating/cooling system (e.g., hot water, warm air, oil, gas, etc.), and number of a consumer. This warranty gives you specific legal rights, and you . in the possession of wires connected to the thermostat. THIS WARRANTY...

