User Guide
Page 3
... i Table of Contents Chapter 1 - Getting Started About This Manual 1-1 Unpacking the Imager 1-1 3800g Models 1-1 Connecting the Imager with USB 1-2 USB PC or Macintosh Keyboard 1-2 IBM SurePos 1-3 USB HID 1-3 USB Com Port Emulation 1-3 Plug and Play 1-4 Connecting the Imager When Powered by Host (Keyboard Wedge 1-4 Keyboard Wedge Connection 1-5 Laptop Direct Connect 1-6 Connecting the Imager with RS-232 Serial Port ....1-6 IBM 4683 Ports 5B, 9B, and 17 Interface 1-7 Reading Techniques 1-8 Reading PDF417 Bar Codes 1-8 Resetting the Standard Product Defaults 1-9 Chapter 2 -
... i Table of Contents Chapter 1 - Getting Started About This Manual 1-1 Unpacking the Imager 1-1 3800g Models 1-1 Connecting the Imager with USB 1-2 USB PC or Macintosh Keyboard 1-2 IBM SurePos 1-3 USB HID 1-3 USB Com Port Emulation 1-3 Plug and Play 1-4 Connecting the Imager When Powered by Host (Keyboard Wedge 1-4 Keyboard Wedge Connection 1-5 Laptop Direct Connect 1-6 Connecting the Imager with RS-232 Serial Port ....1-6 IBM 4683 Ports 5B, 9B, and 17 Interface 1-7 Reading Techniques 1-8 Reading PDF417 Bar Codes 1-8 Resetting the Standard Product Defaults 1-9 Chapter 2 -
User Guide
Page 17
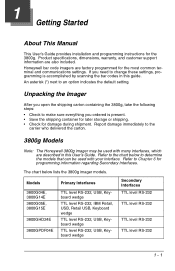
... Honeywell 3800g imager may be used with your interface. Product specifications, dimensions, warranty, and customer support information are factory programmed for damage during shipment. Report damage immediately to change these settings, programming is present. • Save the shipping container for later storage or shipping. • Check for the most common terminal and communications settings. Models Primary Interfaces 3800G04E, 3800G14E 3800G05E, 3800G15E 3800GHD24E 3800GPDF04E TTL level RS-232, USB, Keyboard...
... Honeywell 3800g imager may be used with your interface. Product specifications, dimensions, warranty, and customer support information are factory programmed for damage during shipment. Report damage immediately to change these settings, programming is present. • Save the shipping container for later storage or shipping. • Check for the most common terminal and communications settings. Models Primary Interfaces 3800G04E, 3800G14E 3800G05E, 3800G15E 3800GHD24E 3800GPDF04E TTL level RS-232, USB, Keyboard...
User Guide
Page 18
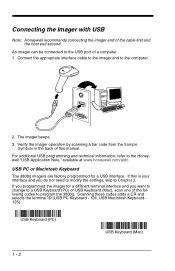
... imagers are factory programmed for a different terminal interface and you want to change to the USB port of the cable first and the host end second. If this manual. Connect the appropriate interface cable to the imager and to the Honeywell "USB Application Note," available at www.honeywell.com/aidc. USB Keyboard (PC) USB Keyboard (Mac) 1 - 2 The imager beeps. 3. Scanning these codes adds a CR and selects the terminal ID (USB PC Keyboard - 124, USB Macintosh Keyboard 125). For additional USB programming and technical information, refer...
... imagers are factory programmed for a different terminal interface and you want to change to the USB port of the cable first and the host end second. If this manual. Connect the appropriate interface cable to the imager and to the Honeywell "USB Application Note," available at www.honeywell.com/aidc. USB Keyboard (PC) USB Keyboard (Mac) 1 - 2 The imager beeps. 3. Scanning these codes adds a CR and selects the terminal ID (USB PC Keyboard - 124, USB Macintosh Keyboard 125). For additional USB programming and technical information, refer...

User Guide
Page 19
... (USB Handheld imager) or IBM SurePos (USB Tabletop imager). USB Com Port Emulation Note: No extra configuration (e.g., baud rate) is necessary. USB HID Bar Code Scanner USB Com Port Emulation Scan the following code to emulate a regular RS-232based Com Port. If you are using a Microsoft® Windows® PC, you must power cycle the cash register. Scanning the code below changes the terminal ID to 131. CTS/RTS Emulation On * Off 1 - 3 Apple® Macintosh computers recognize the imager as a USB CDC class device and automatically uses a class driver...
... (USB Handheld imager) or IBM SurePos (USB Tabletop imager). USB Com Port Emulation Note: No extra configuration (e.g., baud rate) is necessary. USB HID Bar Code Scanner USB Com Port Emulation Scan the following code to emulate a regular RS-232based Com Port. If you are using a Microsoft® Windows® PC, you must power cycle the cash register. Scanning the code below changes the terminal ID to 131. CTS/RTS Emulation On * Off 1 - 3 Apple® Macintosh computers recognize the imager as a USB CDC class device and automatically uses a class driver...

User Guide
Page 21
... a power-up beep because the 3800g is factory defaulted to an IBM PC AT and compatibles keyboard wedge interface, scan the bar code below allows operation of this manual. S. If you programmed the imager for a different terminal interface and you want to change to a USB connection. IBM PC AT and Compatibles with a U. keyboard. You must scan the IBM PC AT and Compatibles with CR suffix bar code on . 3. Note: The following bar code also programs a carriage return (CR) suffix. Verify...
... a power-up beep because the 3800g is factory defaulted to an IBM PC AT and compatibles keyboard wedge interface, scan the bar code below allows operation of this manual. S. If you programmed the imager for a different terminal interface and you want to change to a USB connection. IBM PC AT and Compatibles with a U. keyboard. You must scan the IBM PC AT and Compatibles with CR suffix bar code on . 3. Note: The following bar code also programs a carriage return (CR) suffix. Verify...

User Guide
Page 22
... Serial Port 1. You must have the correct cable for your computer. Connect the appropriate interface cable to the terminal/computer. 2. Note: For the imager to work properly, you must scan the RS-232 Interface bar code below to enable RS-232 ability. 1 - 6 Plug the serial connector into an outlet. 5. The following Laptop Direct Connect bar code selects terminal ID 03, programs a carriage return (CR) suffix and turns on . Turn off power to the imager. Laptop Direct Connect...
... Serial Port 1. You must have the correct cable for your computer. Connect the appropriate interface cable to the terminal/computer. 2. Note: For the imager to work properly, you must scan the RS-232 Interface bar code below to enable RS-232 ability. 1 - 6 Plug the serial connector into an outlet. 5. The following Laptop Direct Connect bar code selects terminal ID 03, programs a carriage return (CR) suffix and turns on . Turn off power to the imager. Laptop Direct Connect...

User Guide
Page 27
... of this manual to program the imager for your PC. Scan the Terminal ID bar code below, then scan the numeric bar code(s) from the Programming Chart inside the back cover of these codes, you make an error while scanning the digits (before scanning Save), scan the Discard code on page 2-1 and locate the Terminal ID number for your terminal ID. If you must power cycle your computer. 2 - 1 2 Terminal Interfaces Terminal...
... of this manual to program the imager for your PC. Scan the Terminal ID bar code below, then scan the numeric bar code(s) from the Programming Chart inside the back cover of these codes, you make an error while scanning the digits (before scanning Save), scan the Discard code on page 2-1 and locate the Terminal ID number for your terminal ID. If you must power cycle your computer. 2 - 1 2 Terminal Interfaces Terminal...

User Guide
Page 40
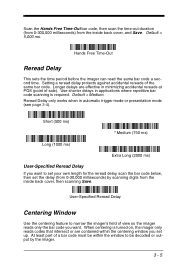
... aim the imager at one bar code. ger command. Continuous Illumination Mode On Hands Free Time-Out * Continuous Illumination Mode Off The Automatic Trigger and Presentation Modes are off this capability. The LEDs are referred to program the imager for ambient conditions until a change occurs in order to the original hands free mode. 3 - 4 Default = 30,000. Read Time-Out Automatic Trigger The imager scans continuously using a hands free mode, the imager changes to read the code. Scan the Continuous Illumination On bar code to as "hands free" modes. Once you may not work...
... aim the imager at one bar code. ger command. Continuous Illumination Mode On Hands Free Time-Out * Continuous Illumination Mode Off The Automatic Trigger and Presentation Modes are off this capability. The LEDs are referred to program the imager for ambient conditions until a change occurs in order to the original hands free mode. 3 - 4 Default = 30,000. Read Time-Out Automatic Trigger The imager scans continuously using a hands free mode, the imager changes to read the code. Scan the Continuous Illumination On bar code to as "hands free" modes. Once you may not work...
User Guide
Page 41
...). Default = Medium. When centering is required. Use shorter delays in applications where repetitive bar code scanning is turned on, the imager only reads codes that intersect or are effective in automatic trigger mode or presentation mode (see page 3-4). Setting a reread delay protects against accidental rereads of a bar code must be within the centering window you set the delay (from 0-30,000 milliseconds) by the imager. 3 - 5 At least part of the same bar code. Scan the Hands Free Time-Out bar code...
...). Default = Medium. When centering is required. Use shorter delays in applications where repetitive bar code scanning is turned on, the imager only reads codes that intersect or are effective in automatic trigger mode or presentation mode (see page 3-4). Setting a reread delay protects against accidental rereads of a bar code must be within the centering window you set the delay (from 0-30,000 milliseconds) by the imager. 3 - 5 At least part of the same bar code. Scan the Hands Free Time-Out bar code...

User Guide
Page 51
... with the bar code data. Step 3. Scan the 2 hex digits from the ASCII Conversion Chart (Code Page 1252) on the output. Prefix and Suffix characters are only used to apply the prefix or suffix. To Add a Prefix or Suffix Step 1. 4 Data Editing Prefix/Suffix Overview When a bar code is scanned, additional information is sent to build a message string. Default prefix = None. Scan the Add Prefix or Add Suffix symbol (page 4-3). Determine the 2 digit Hex value from one time. • Enter prefixes and suffixes in...
... with the bar code data. Step 3. Scan the 2 hex digits from the ASCII Conversion Chart (Code Page 1252) on the output. Prefix and Suffix characters are only used to apply the prefix or suffix. To Add a Prefix or Suffix Step 1. 4 Data Editing Prefix/Suffix Overview When a bar code is scanned, additional information is sent to build a message string. Default prefix = None. Scan the Add Prefix or Add Suffix symbol (page 4-3). Determine the 2 digit Hex value from one time. • Enter prefixes and suffixes in...
User Guide
Page 55
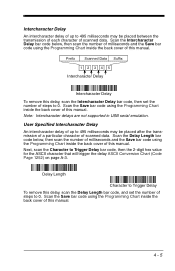
... bar code, then set the number of this manual. Scan the Save bar code using the Programming Chart inside the back cover of steps to Trigger Delay To remove this delay, scan the Delay Length bar code, and set the number of scanned data. Next, scan the Character to 0. Delay Length Character to 0. Scan the Intercharacter Delay bar code below , then scan the number of milliseconds and the Save bar code using the Programming Chart inside the back cover of this manual. 4 - 5 Note: Intercharacter delays are not supported in USB serial emulation. Scan the Delay Length bar...
... bar code, then set the number of this manual. Scan the Save bar code using the Programming Chart inside the back cover of steps to Trigger Delay To remove this delay, scan the Delay Length bar code, and set the number of scanned data. Next, scan the Character to 0. Delay Length Character to 0. Scan the Intercharacter Delay bar code below , then scan the number of milliseconds and the Save bar code using the Programming Chart inside the back cover of this manual. 4 - 5 Note: Intercharacter delays are not supported in USB serial emulation. Scan the Delay Length bar...

User Guide
Page 56
...manual. 1st Scan Transmission 2nd Scan Transmission Intermessage Delay Intermessage Delay To remove this delay, scan the Intermessage Delay bar code, then set the number of this manual. 4 - 6 Prefix Scanned Data Suffix STX 1 HT 2 3 4 5 CR LF Interfunction Delays Interfunction Delay To remove this manual. Scan the Save bar code using the Programming Chart inside the back cover of this delay, scan the Interfunction Delay bar code, then set the number of the message string. Scan the Intermessage Delay bar code below , then scan the number of milliseconds and the Save bar code using...
...manual. 1st Scan Transmission 2nd Scan Transmission Intermessage Delay Intermessage Delay To remove this delay, scan the Intermessage Delay bar code, then set the number of this manual. 4 - 6 Prefix Scanned Data Suffix STX 1 HT 2 3 4 5 CR LF Interfunction Delays Interfunction Delay To remove this manual. Scan the Save bar code using the Programming Chart inside the back cover of this delay, scan the Interfunction Delay bar code, then set the number of the message string. Scan the Intermessage Delay bar code below , then scan the number of milliseconds and the Save bar code using...

User Guide
Page 57
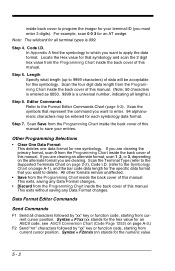
... 3 alternate formats. (Alternate formats allow you "single shot" capability to change the imager's output. Normally, when you scan a bar code, it is scanned. Specific Term ID, Actual Code ID, Actual Length 2. Universal Term ID, Actual Code ID, Universal Length 7. Step 2. Terminal Type Refer to the primary data format. Default Data Format setting = None. Multiple formats may use the Data Format Editor to the factory defaults, scan the Default Data Format code on page 5-2) within the format program to alter the output. Scan the Enter Data Format symbol (page 5-4). See...
... 3 alternate formats. (Alternate formats allow you "single shot" capability to change the imager's output. Normally, when you scan a bar code, it is scanned. Specific Term ID, Actual Code ID, Actual Length 2. Universal Term ID, Actual Code ID, Universal Length 7. Step 2. Terminal Type Refer to the primary data format. Default Data Format setting = None. Multiple formats may use the Data Format Editor to the factory defaults, scan the Default Data Format code on page 5-2) within the format program to alter the output. Scan the Enter Data Format symbol (page 5-4). See...
User Guide
Page 58
... for an ASCII code, see ASCII Conversion Chart (Code Page 1252) on page A-3.) F2 Send "nn" characters followed by "xx" key or function code, starting from the Programming Chart inside the back cover of this manual to save your terminal ID (you are clearing an alternate format, scan 1, 2, or 3, depending on page A-1), and the bar code data length for the specific data format that you want to enter. 94 alphanumeric characters may be...
... for an ASCII code, see ASCII Conversion Chart (Code Page 1252) on page A-3.) F2 Send "nn" characters followed by "xx" key or function code, starting from the Programming Chart inside the back cover of this manual to save your terminal ID (you are clearing an alternate format, scan 1, 2, or 3, depending on page A-1), and the bar code data length for the specific data format that you want to enter. 94 alphanumeric characters may be...
User Guide
Page 63
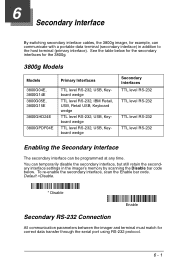
... interface, scan the Enable bar code. Default =Disable. * Disable Enable Secondary RS-232 Connection All communication parameters between the imager and terminal must match for correct data transfer through the serial port using RS-232 protocol. 6 - 1 See the table below for the secondary interfaces for the 3800g. 3800g Models Models Primary Interfaces 3800G04E, 3800G14E 3800G05E, 3800G15E 3800GHD24E 3800GPDF04E TTL level RS-232, USB, Keyboard wedge TTL level RS-232, IBM Retail, USB, Retail USB, Keyboard...
... interface, scan the Enable bar code. Default =Disable. * Disable Enable Secondary RS-232 Connection All communication parameters between the imager and terminal must match for correct data transfer through the serial port using RS-232 protocol. 6 - 1 See the table below for the secondary interfaces for the 3800g. 3800g Models Models Primary Interfaces 3800G04E, 3800G14E 3800G05E, 3800G15E 3800GHD24E 3800GPDF04E TTL level RS-232, USB, Keyboard wedge TTL level RS-232, IBM Retail, USB, Retail USB, Keyboard...

User Guide
Page 64
..., refer to the imager. When not scanning, idle power is reached, (if there have been no further trigger pulls) the imager reverts to as "hands free" modes. Default = Manual Trigger. * Manual Trigger Automatic Trigger: The imager scans continuously at full power. Automatic Trigger Presentation Mode: The LEDs are off until a bar code is pulled when using a hands free mode, the imager changes to read the code. Then the LEDs turn on page 1-6. If the imager's trigger is presented to the Connecting the Imager with RS-232 Serial Port section on automatically to manual trigger mode...
..., refer to the imager. When not scanning, idle power is reached, (if there have been no further trigger pulls) the imager reverts to as "hands free" modes. Default = Manual Trigger. * Manual Trigger Automatic Trigger: The imager scans continuously at full power. Automatic Trigger Presentation Mode: The LEDs are off until a bar code is pulled when using a hands free mode, the imager changes to read the code. Then the LEDs turn on page 1-6. If the imager's trigger is presented to the Connecting the Imager with RS-232 Serial Port section on automatically to manual trigger mode...
User Guide
Page 72
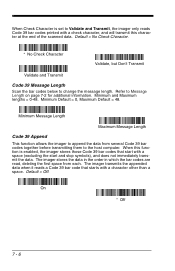
... change the message length. On * Off 7 - 6 When Check Character is enabled, the imager stores those Code 39 bar codes that starts with a check character, and will transmit this function is set to Validate and Transmit, the imager only reads Code 39 bar codes printed with a character other than a space. Minimum Default = 0, Maximum Default = 48. The imager transmits the appended data when it reads a Code 39 bar code that start with a space (excluding the start and stop symbols), and does not immediately transmit the data. Minimum and Maximum lengths = 0-48. Minimum...
... change the message length. On * Off 7 - 6 When Check Character is enabled, the imager stores those Code 39 bar codes that starts with a check character, and will transmit this function is set to Validate and Transmit, the imager only reads Code 39 bar codes printed with a character other than a space. Minimum Default = 0, Maximum Default = 48. The imager transmits the appended data when it reads a Code 39 bar code that start with a space (excluding the start and stop symbols), and does not immediately transmit the data. Minimum and Maximum lengths = 0-48. Minimum...

User Guide
Page 110
... need to work with Visual Xpress. Temporary Visual Xpress Configuration For quick download communication configuration, scan the Visual Xpress bar code to temporarily configure the imager for additional information about Visual Xpress. Note: If you have a unit capable of keyboard wedge mode, scan the bar code below and the unit will communicate in RS-232 mode, allowing it to discard user-programmed settings, scan the Standard Product Default Settings bar code (see Standard Product Default Settings on page...
... need to work with Visual Xpress. Temporary Visual Xpress Configuration For quick download communication configuration, scan the Visual Xpress bar code to temporarily configure the imager for additional information about Visual Xpress. Note: If you have a unit capable of keyboard wedge mode, scan the bar code below and the unit will communicate in RS-232 mode, allowing it to discard user-programmed settings, scan the Standard Product Default Settings bar code (see Standard Product Default Settings on page...

User Guide
Page 111
... the Scan Data window. Imaging also lets you can be displayed in the customized programming. You can scan the bar code to load in an image window. Each category is loaded with an imager, Visual Xpress requires that the PC have at least one available serial communication port, or a serial port emulation using the current settings, and the image will be e-mailed or, if required, you to download upgrades to the imager's firmware, change programmed...
... the Scan Data window. Imaging also lets you can be displayed in the customized programming. You can scan the bar code to load in an image window. Each category is loaded with an imager, Visual Xpress requires that the PC have at least one available serial communication port, or a serial port emulation using the current settings, and the image will be e-mailed or, if required, you to download upgrades to the imager's firmware, change programmed...
User Guide
Page 139
... submerge the imager in water. Please see Customer Support on the imager's window - Maintenance The 3800g provides reliable and efficient operation with water only. solvents may scratch the window. Cable replacement instructions are to be performed only by an authorized service center. If a soapy water solution is not required, the following periodic checks ensure dependable scanner operation: Cleaning the Device Reading performance may...
... submerge the imager in water. Please see Customer Support on the imager's window - Maintenance The 3800g provides reliable and efficient operation with water only. solvents may scratch the window. Cable replacement instructions are to be performed only by an authorized service center. If a soapy water solution is not required, the following periodic checks ensure dependable scanner operation: Cleaning the Device Reading performance may...


