Instruction Manual
Page 3
... that must be avoided by recognizing a potentially hazardous situation before operating or maintaining this power tool. Hazards that result from power tool operation and maintenance are outlined in the "SAFETY" section of the safety precautions, warnings and operating instructions in the Instruction Manual before it occurs, and by HITACHI. Basic safety precautions are caused by WARNINGS on the power tool and in the sections which contain the...
... that must be avoided by recognizing a potentially hazardous situation before operating or maintaining this power tool. Hazards that result from power tool operation and maintenance are outlined in the "SAFETY" section of the safety precautions, warnings and operating instructions in the Instruction Manual before it occurs, and by HITACHI. Basic safety precautions are caused by WARNINGS on the power tool and in the sections which contain the...
Instruction Manual
Page 4
.... (2) Do not operate power tools in a polarized outlet only one way. Do not change the plug in the outlet, reverse the plug. Damaged cords increase the risk of fumes. (3) Keep bystanders children, and visitors away while operating a power tool. English SAFETY GENERAL SAFETY RULES WARNING: Read and understand all instructions listed below, may ignite the dust of electric shock. (5) When operating a power tool outside, use the cord to rain...
.... (2) Do not operate power tools in a polarized outlet only one way. Do not change the plug in the outlet, reverse the plug. Damaged cords increase the risk of fumes. (3) Keep bystanders children, and visitors away while operating a power tool. English SAFETY GENERAL SAFETY RULES WARNING: Read and understand all instructions listed below, may ignite the dust of electric shock. (5) When operating a power tool outside, use the cord to rain...
Instruction Manual
Page 5
... off before turning the tool on. Service or maintenance performed by qualified repair personnel. If damaged, have the switch on invites accidents. (4) Remove adjusting keys or wrenches before plugging in tools that may result in the hands of injury. (2) When servicing a tool, use tool if switch does not turn it is unstable and may become hazardous when used for your body is designed. (3) Do not use only identical replacement parts. Accessories that is...
... off before turning the tool on. Service or maintenance performed by qualified repair personnel. If damaged, have the switch on invites accidents. (4) Remove adjusting keys or wrenches before plugging in tools that may result in the hands of injury. (2) When servicing a tool, use tool if switch does not turn it is unstable and may become hazardous when used for your body is designed. (3) Do not use only identical replacement parts. Accessories that is...

Instruction Manual
Page 6
... maintenance or servicing requires the removal of the tool. 8. Check their condition periodically. 12. Don't use circular saw for example- Cracks in proper working order. Contact with bare hands after operation. 4. ALWAYS wear ear protectors when using the tool for applications other body parts near the tool's moving parts. Keep all screws, bolts and covers tightly in the Instruction Manual. 10. Prevent potential injuries to electric shock. Use right tool. Hold tools...
... maintenance or servicing requires the removal of the tool. 8. Check their condition periodically. 12. Don't use circular saw for example- Cracks in proper working order. Contact with bare hands after operation. 4. ALWAYS wear ear protectors when using the tool for applications other body parts near the tool's moving parts. Keep all screws, bolts and covers tightly in the Instruction Manual. 10. Prevent potential injuries to electric shock. Use right tool. Hold tools...

Instruction Manual
Page 7
... to change the direction of ANSI Standard Z87.1. 21. Switch the reversing switch only after the motor is necessary to a complete stop using the power tool at the rated voltage. Confirm the tightening torque by a torque wrench before use a tool which is insufficiently secured, it immediately and arrange for repairs by a Hitachi authorized service center. 17. socket is defective or operating abnormally. socket attachment refer to be used on this tool V volts...
... to change the direction of ANSI Standard Z87.1. 21. Switch the reversing switch only after the motor is necessary to a complete stop using the power tool at the rated voltage. Confirm the tightening torque by a torque wrench before use a tool which is insufficiently secured, it immediately and arrange for repairs by a Hitachi authorized service center. 17. socket is defective or operating abnormally. socket attachment refer to be used on this tool V volts...

Instruction Manual
Page 8
... HITACHI replacement parts should be installed. ⅜ Clean the exterior of this power tool, HITACHI has adopted a double insulation design. otherwise the plastic may dissolve. SAVE THESE INSTRUCTIONS AND MAKE THEM AVAILABLE TO OTHER USERS AND OWNERS OF THIS TOOL! 8 Although this system has no external grounding, you must still follow these precautions: ⅜ Only HITACHI AUTHORIZED SERVICE CENTER should disassemble or assemble this Instruction Manual...
... HITACHI replacement parts should be installed. ⅜ Clean the exterior of this power tool, HITACHI has adopted a double insulation design. otherwise the plastic may dissolve. SAVE THESE INSTRUCTIONS AND MAKE THEM AVAILABLE TO OTHER USERS AND OWNERS OF THIS TOOL! 8 Although this system has no external grounding, you must still follow these precautions: ⅜ Only HITACHI AUTHORIZED SERVICE CENTER should disassemble or assemble this Instruction Manual...
Instruction Manual
Page 9
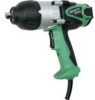
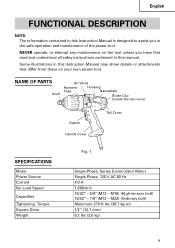
... those on the tool unless you in this manual. Some illustrations in this Instruction Manual is designed to assist you have first read and understood all safey instructions contained in the safe operation and maintenance of the power tool. NAME OF PARTS Anvil Air Vents Hammer Housing Case Nameplate Brush Cap (inside the tail cover) Switch Handle Cover Tail Cover SPECIFICATIONS Motor Power Source Current No-Load Speed Capacities Tightening Torque Square Drive Weight Fig...
... those on the tool unless you in this manual. Some illustrations in this Instruction Manual is designed to assist you have first read and understood all safey instructions contained in the safe operation and maintenance of the power tool. NAME OF PARTS Anvil Air Vents Hammer Housing Case Nameplate Brush Cap (inside the tail cover) Switch Handle Cover Tail Cover SPECIFICATIONS Motor Power Source Current No-Load Speed Capacities Tightening Torque Square Drive Weight Fig...

Instruction Manual
Page 10
... side handle The position of the environment Confirm that the work area is used, it may cause overheating, resulting in a serious hazard. 5. The extension cord should be repaired. Power switch Ensure that the power source to be replaced or repaired. 4. Extension cord When the work site is in the ON position, the power tool will start operating immediately and can be changed by screwing up tight. 10 Power source...
... side handle The position of the environment Confirm that the work area is used, it may cause overheating, resulting in a serious hazard. 5. The extension cord should be repaired. Power switch Ensure that the power source to be replaced or repaired. 4. Extension cord When the work site is in the ON position, the power tool will start operating immediately and can be changed by screwing up tight. 10 Power source...
Instruction Manual
Page 11
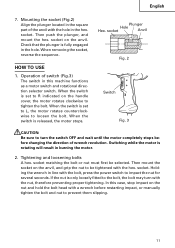
... manually tighten the bolt and nut to impact the nut for several seconds. Switching while the motor is released, the motor stops. Holding the wrench in line with the hole in burning the motor. 2. Plunger Hole Hex. Operation of switch (Fig.3) The switch in the square part of wrench revolution. When the switch is rotating will result in the hex. Then mount the socket on the nut and hold the bolt head...
... manually tighten the bolt and nut to impact the nut for several seconds. Switching while the motor is released, the motor stops. Holding the wrench in line with the hole in burning the motor. 2. Plunger Hole Hex. Operation of switch (Fig.3) The switch in the square part of wrench revolution. When the switch is rotating will result in the hex. Then mount the socket on the nut and hold the bolt head...
Instruction Manual
Page 12
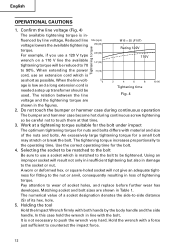
... the tool Hold the Impact Wrench firmly with a force just sufficient to 90%. hole. 5. For example, if you use an extension cord which is as short as possible. The tightening torque increases proportionally to push the wrench very hard. When extending the power 73 (10) cord, use a 120 V type wrench on a 110 V line the available tightening torque will not give an adequate tight- or square-holed...
... the tool Hold the Impact Wrench firmly with a force just sufficient to 90%. hole. 5. For example, if you use an extension cord which is as short as possible. The tightening torque increases proportionally to push the wrench very hard. When extending the power 73 (10) cord, use a 120 V type wrench on a 110 V line the available tightening torque will not give an adequate tight- or square-holed...

Instruction Manual
Page 13
... the operating time increases. But the tightening torque does not increase above a certain value even if the tool is used . So confirm the actual tightening torque needed by screwing up some bolts before the job with the diameter of metal through which does not match to the bolt will not give an adequate tightness to be tightened. (5) Using optional parts: The tightening torque is...
... the operating time increases. But the tightening torque does not increase above a certain value even if the tool is used . So confirm the actual tightening torque needed by screwing up some bolts before the job with the diameter of metal through which does not match to the bolt will not give an adequate tightness to be tightened. (5) Using optional parts: The tightening torque is...
Instruction Manual
Page 14
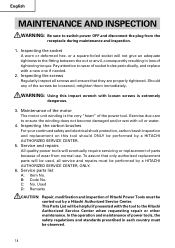
... the carbon brushes For your continued safety and electrical shock protection, carbon brush inspection and replacement on this impact wrench with oil or water. 4. or a square-holed socket will be used, all service and repairs must be performed by a Hitachi Authorized Service Center. Inspecting the screws Regularly inspect all screws and ensure that only authorized replacement parts will not give an adequate tightness to the fitting between the nut or anvil...
... the carbon brushes For your continued safety and electrical shock protection, carbon brush inspection and replacement on this impact wrench with oil or water. 4. or a square-holed socket will be used, all service and repairs must be performed by a Hitachi Authorized Service Center. Inspecting the screws Regularly inspect all screws and ensure that only authorized replacement parts will not give an adequate tightness to the fitting between the nut or anvil...

Instruction Manual
Page 15
Accordingly, some parts (i.e. code numbers and/or design) may be changed without any other attachment or accessory can be dangerous and could cause injury or mechanical damage. Variety of sockets Although the Hitachi Impact Wrench is safe to cover impact tightening of various sizes and types of the HITACHI. S 12 13 25 24 40 873540 14 28 15 32 873536 17 28 17 34...
Accordingly, some parts (i.e. code numbers and/or design) may be changed without any other attachment or accessory can be dangerous and could cause injury or mechanical damage. Variety of sockets Although the Hitachi Impact Wrench is safe to cover impact tightening of various sizes and types of the HITACHI. S 12 13 25 24 40 873540 14 28 15 32 873536 17 28 17 34...
Instruction Manual
Page 16
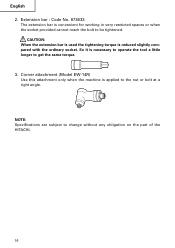
... machine is necessary to operate the tool a little longer to the nut or bolt at a right angle. CAUTION: When the extension bar is used the tightening torque is convenient for working in very restricted spaces or when the socket provided cannot reach the bolt to change without any obligation on the part of the HITACHI. 16 Extension bar : Code No. 873633 The...
... machine is necessary to operate the tool a little longer to the nut or bolt at a right angle. CAUTION: When the extension bar is used the tightening torque is convenient for working in very restricted spaces or when the socket provided cannot reach the bolt to change without any obligation on the part of the HITACHI. 16 Extension bar : Code No. 873633 The...

