User Guide
Page 8
d. Do not make other adjustments. After this product falls or after its cabinet is damaged. Adjust this product malfunctions, even when operated according to the instruction manual. After the power cord or AC Adaptor plug is damaged. After the main unit is considered necessary. 6 English After the functionality of Hitachi Software. b. After liquid is required to correct improper adjustments. f. A qualified service representative is spilled...
d. Do not make other adjustments. After this product falls or after its cabinet is damaged. Adjust this product malfunctions, even when operated according to the instruction manual. After the power cord or AC Adaptor plug is damaged. After the main unit is considered necessary. 6 English After the functionality of Hitachi Software. b. After liquid is required to correct improper adjustments. f. A qualified service representative is spilled...

User Guide
Page 9
... slide the stand slowly when adjusting it. StarBoard T-17SXL Safe Handling Careful thought was given to the cautions on this device and in unexpected injuries or damage to close the pen's rear part too forcefully. WARNINGS Warning Details Use the AC Adaptor supplied with this user's guide. Use only AC Adaptor or power cables specified by the manufacturer. Use the screen at an...
... slide the stand slowly when adjusting it. StarBoard T-17SXL Safe Handling Careful thought was given to the cautions on this device and in unexpected injuries or damage to close the pen's rear part too forcefully. WARNINGS Warning Details Use the AC Adaptor supplied with this user's guide. Use only AC Adaptor or power cables specified by the manufacturer. Use the screen at an...
User Guide
Page 10
...2-1 2.1 Turning the StarBoard On 2-1 2.2 Using the Stylus Pen 2-2 2.2.1 How to Take Care of the StarBoard 3-5 3.4 Consumables...3-5 3.5 LCD Panel ...3-5 3.6 Provisions of Product Warranty 3-6 8 English Introduction 1-1 1.1 Preparations before Use 1-1 1.1.1 Product Overview...1-1 1.1.2 Features ...1-1 1.2 Parts Check ...1-2 1.3 Part Names and Functions 1-3 1.3.1 Front Screen ...1-3 1.3.2 Front Switch Panel ...1-4 1.3.3 Connector Panel ...1-5 1.3.4 Function Buttons ...1-6 1.4 Assembly and Setup 1-7 1.4.1 Adjusting the Stand ...1-7 1.4.2 How to Use the Pen Holder 1-8 1.4.3 Connection...
...2-1 2.1 Turning the StarBoard On 2-1 2.2 Using the Stylus Pen 2-2 2.2.1 How to Take Care of the StarBoard 3-5 3.4 Consumables...3-5 3.5 LCD Panel ...3-5 3.6 Provisions of Product Warranty 3-6 8 English Introduction 1-1 1.1 Preparations before Use 1-1 1.1.1 Product Overview...1-1 1.1.2 Features ...1-1 1.2 Parts Check ...1-2 1.3 Part Names and Functions 1-3 1.3.1 Front Screen ...1-3 1.3.2 Front Switch Panel ...1-4 1.3.3 Connector Panel ...1-5 1.3.4 Function Buttons ...1-6 1.4 Assembly and Setup 1-7 1.4.1 Adjusting the Stand ...1-7 1.4.2 How to Use the Pen Holder 1-8 1.4.3 Connection...
User Guide
Page 12
... buttons located on video images Write text and images to operate the PC on the screen displayed on the LCD monitor. That allows you operate a PC with presentations in PowerPoint Text and images can be used frequently in classes and presentations. {Eight function buttons Standard functions used as soon as shortcuts when using the StarBoard. Introduction 1.1 Preparations before Use This section covers preparations before using the software. 1-1 English...
... buttons located on video images Write text and images to operate the PC on the screen displayed on the LCD monitor. That allows you operate a PC with presentations in PowerPoint Text and images can be used frequently in classes and presentations. {Eight function buttons Standard functions used as soon as shortcuts when using the StarBoard. Introduction 1.1 Preparations before Use This section covers preparations before using the software. 1-1 English...
User Guide
Page 13
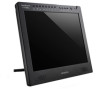
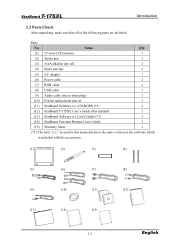
StarBoard T-17SXL Introduction 1.2 Parts Check After unpacking, make sure that all of the following parts are included. Name Qty. (1) 17-inch LCD monitor 1 (2) Stylus pen 1 (3) AAA alkaline dry cell 1 (4) Spare pen tips 2 (5) AC adapter 1 (6) Power cable 2 (7) RGB cable 1 (8) USB cable 1 (9) Audio cable (stereo mini-plug) 1 (10) Pen tip replacement pin set 1 (11) StarBoard Software x.x (CD-ROM) (*1) 2 (12) StarBoard T-17SXL User's Guide (this manual denotes the same version as the software which is included with the accessories. (1) (2) (3) (4) (5) (6) (7) ...
StarBoard T-17SXL Introduction 1.2 Parts Check After unpacking, make sure that all of the following parts are included. Name Qty. (1) 17-inch LCD monitor 1 (2) Stylus pen 1 (3) AAA alkaline dry cell 1 (4) Spare pen tips 2 (5) AC adapter 1 (6) Power cable 2 (7) RGB cable 1 (8) USB cable 1 (9) Audio cable (stereo mini-plug) 1 (10) Pen tip replacement pin set 1 (11) StarBoard Software x.x (CD-ROM) (*1) 2 (12) StarBoard T-17SXL User's Guide (this manual denotes the same version as the software which is included with the accessories. (1) (2) (3) (4) (5) (6) (7) ...
User Guide
Page 14
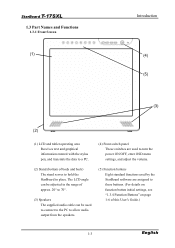
...; to 70°. (3) Speakers The supplied audio cable can be used to connect to the PC to allow audio output from the speakers. (5) Function buttons Eight standard functions used by the StarBoard software are used to turn the power ON/OFF, enter OSD menu settings, and adjust the volume. (2) Stand (bottom of body and back) The stand serves to these buttons. (For details on function button initial settings, see "1.3.4 Function Buttons" on page 1-6 of this User's Guide.) 1-3 English
...; to 70°. (3) Speakers The supplied audio cable can be used to connect to the PC to allow audio output from the speakers. (5) Function buttons Eight standard functions used by the StarBoard software are used to turn the power ON/OFF, enter OSD menu settings, and adjust the volume. (2) Stand (bottom of body and back) The stand serves to these buttons. (For details on function button initial settings, see "1.3.4 Function Buttons" on page 1-6 of this User's Guide.) 1-3 English

User Guide
Page 15
... Introduction (3) (4) (6) (5) (1) (2) (1) Power button This button turns the StarBoard LCD monitor ON/OFF. (2) Power indicator This indicator turns green when power is supplied normally to select OSD menu options and change settings. (6) (-) button Brightness can be adjusted by the (+) and (-) buttons after making menu selections to apply those. (5) (+) button This button is used to display the OSD menu. Press it after pressing the (-) button. It turns red when no image signal is output from the PC, or when power saving mode is on page 2-6 of this User's Guide. 1-4 English
... Introduction (3) (4) (6) (5) (1) (2) (1) Power button This button turns the StarBoard LCD monitor ON/OFF. (2) Power indicator This indicator turns green when power is supplied normally to select OSD menu options and change settings. (6) (-) button Brightness can be adjusted by the (+) and (-) buttons after making menu selections to apply those. (5) (+) button This button is used to display the OSD menu. Press it after pressing the (-) button. It turns red when no image signal is output from the PC, or when power saving mode is on page 2-6 of this User's Guide. 1-4 English

User Guide
Page 16
The supplied audio cable is connected to this port. (5) USB port A USB cable is used to output PC audio from the PC. (3) VGA output port This port is used to connect a PC via RGB cable to display images from the StarBoard speakers. StarBoard T-17SXL 1.3.3 Connector Panel Bottom Introduction Top (5) (4) (1) (2) (3) (4) (5) View of StarBoard Back Right Side (1) Power port The AC adapter is connected here. (2) VGA input port This port is used to connect external devices such as a projector via RGB cable to output video displayed on the StarBoard. (4) Audio input port This port...
The supplied audio cable is connected to this port. (5) USB port A USB cable is used to output PC audio from the PC. (3) VGA output port This port is used to connect a PC via RGB cable to display images from the StarBoard speakers. StarBoard T-17SXL 1.3.3 Connector Panel Bottom Introduction Top (5) (4) (1) (2) (3) (4) (5) View of StarBoard Back Right Side (1) Power port The AC adapter is connected here. (2) VGA input port This port is used to connect external devices such as a projector via RGB cable to output video displayed on the StarBoard. (4) Audio input port This port...

User Guide
Page 18
Select a stable, flat location. Stand Lever (2) Slide the stand to adjust the stand. (1) Pull up the stand lever. Also avoid installing in mind when installing the StarBoard. StarBoard T-17SXL Introduction 1.4 Assembly and Setup Keep the following points in locations exposed to direct sunlight. 1.4.1 Adjusting the Stand Follow the procedure shown below to the desired angle, and release the lever. 1-7 English Avoid installing in locations that are dusty, extremely hot, cold, or humid.
Select a stable, flat location. Stand Lever (2) Slide the stand to adjust the stand. (1) Pull up the stand lever. Also avoid installing in mind when installing the StarBoard. StarBoard T-17SXL Introduction 1.4 Assembly and Setup Keep the following points in locations exposed to direct sunlight. 1.4.1 Adjusting the Stand Follow the procedure shown below to the desired angle, and release the lever. 1-7 English Avoid installing in locations that are dusty, extremely hot, cold, or humid.

User Guide
Page 19
StarBoard T-17SXL (3) Check that the lever and stand are secure. When adjusting the stand, if you pull up the lever without holding onto the body, the body may reflect off the screen. 1.4.2 How to the body. Use the screen at an easily viewable angle. Use the screen at an easily viewable angle, taking into account external light and ceiling lighting, which may move...
StarBoard T-17SXL (3) Check that the lever and stand are secure. When adjusting the stand, if you pull up the lever without holding onto the body, the body may reflect off the screen. 1.4.2 How to the body. Use the screen at an easily viewable angle. Use the screen at an easily viewable angle, taking into account external light and ceiling lighting, which may move...

User Guide
Page 20
... use the StarBoard's built-in speakers.) (4) Connect the AC adapter connector to the StarBoard power connector. (5) Connect the power cable to the AC adapter, then plug the power plug into power socket. (6) If outputting the StarBoard screen to external equipment, connect the RGB cable to an input port on the side of the cable to the VGA output port. Connect the other end of the StarBoard, and tighten the screws to connect the PC and StarBoard. StarBoard T-17SXL 1.4.3 Connection...
... use the StarBoard's built-in speakers.) (4) Connect the AC adapter connector to the StarBoard power connector. (5) Connect the power cable to the AC adapter, then plug the power plug into power socket. (6) If outputting the StarBoard screen to external equipment, connect the RGB cable to an input port on the side of the cable to the VGA output port. Connect the other end of the StarBoard, and tighten the screws to connect the PC and StarBoard. StarBoard T-17SXL 1.4.3 Connection...
User Guide
Page 22
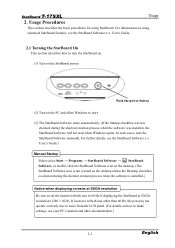
... LCD panel. (For details on how to make settings, see the StarBoard Software x.x. If used at SXGA resolution (1280×1024). For information on the StarBoard power. User's Guide. 2.1 Turning the StarBoard On This section describes how to start. (3) The StarBoard Software starts automatically. (If the Startup checkbox was installed, the StarBoard Software will not start the StarBoard Software manually. StarBoard T-17SXL Usage 2. Push the power button (2) Turn on the PC and allow Windows...
... LCD panel. (For details on how to make settings, see the StarBoard Software x.x. If used at SXGA resolution (1280×1024). For information on the StarBoard power. User's Guide. 2.1 Turning the StarBoard On This section describes how to start. (3) The StarBoard Software starts automatically. (If the Startup checkbox was installed, the StarBoard Software will not start the StarBoard Software manually. StarBoard T-17SXL Usage 2. Push the power button (2) Turn on the PC and allow Windows...

User Guide
Page 27
... used to select OSD menu options and change settings. •AUTO/SELECT button This button is used to automatically adjust the screen display and select OSD menu options. • (-) button Brightness can be applied when the OSD closes.) 2-6 English It is used when adjusting the StarBoard LCD screen. OSD Menu ■Adjustment procedure (1) Press the Menu button to display the OSD menu. (2) Use the (+) button and (-) button to select a menu item. (3) Press the AUTO/SELECT button to confirm the selection. (4) Use the (+) button and (-) button to adjust the value, and AUTO...
... used to select OSD menu options and change settings. •AUTO/SELECT button This button is used to automatically adjust the screen display and select OSD menu options. • (-) button Brightness can be applied when the OSD closes.) 2-6 English It is used when adjusting the StarBoard LCD screen. OSD Menu ■Adjustment procedure (1) Press the Menu button to display the OSD menu. (2) Use the (+) button and (-) button to select a menu item. (3) Press the AUTO/SELECT button to confirm the selection. (4) Use the (+) button and (-) button to adjust the value, and AUTO...

User Guide
Page 29
...: Japanese, English, French, German, Spanish, Italian, and Chinese. RETURN : Used to return to select the display language. StarBoard T-17SXL (4) COLOUR TEMPRATURE Used to adjust the colour temperature of the screen. (SRGB, 9300K, 7200K, 6500K, 5000K) Usage USER : Used to adjust the red, green, and blue colours of the screen. (0-100) RETURN : Used to return to the previous page. (5) ECO MODE Used to turn the ECO mode ON, and limit brightness setting from...
...: Japanese, English, French, German, Spanish, Italian, and Chinese. RETURN : Used to return to select the display language. StarBoard T-17SXL (4) COLOUR TEMPRATURE Used to adjust the colour temperature of the screen. (SRGB, 9300K, 7200K, 6500K, 5000K) Usage USER : Used to adjust the red, green, and blue colours of the screen. (0-100) RETURN : Used to return to the previous page. (5) ECO MODE Used to turn the ECO mode ON, and limit brightness setting from...

User Guide
Page 30
... T-17SXL (7) OTHER SETUP Usage SMOOTH : Used to adjust the smoothness of the image. (0-3) OSD H.POSITION : Used to adjust horizontal position of OSD window. (0-100) OSD V.POSITION : Used to adjust vertical position of time before the OSD menu closes automatically. (0-60) : Used to adjust the speaker volume. (0-100) : Used to turn OSD window background transparency ON/OFF. RESET RETURN : Used to reset OSD menu settings to their default values. : Used to return to the previous page. (8) EXIT Used to turn the screen resolution display ON/OFF. OSD TIMEOUT VOLUME MODE MESSAGE : Used...
... T-17SXL (7) OTHER SETUP Usage SMOOTH : Used to adjust the smoothness of the image. (0-3) OSD H.POSITION : Used to adjust horizontal position of OSD window. (0-100) OSD V.POSITION : Used to adjust vertical position of time before the OSD menu closes automatically. (0-60) : Used to adjust the speaker volume. (0-100) : Used to turn OSD window background transparency ON/OFF. RESET RETURN : Used to reset OSD menu settings to their default values. : Used to return to the previous page. (8) EXIT Used to turn the screen resolution display ON/OFF. OSD TIMEOUT VOLUME MODE MESSAGE : Used...
User Guide
Page 32
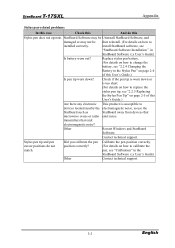
... PC power on how to external (RGB) output at the screen display mode settings. (Method of switching differs by PC. or switch to connect, see the PC manual and other documentation.) Other Contact technical support. StarBoard Software-related problems In this case StarBoard is external Connect cable after starting up the PC, (RGB) output selected? on how to connect, see "StarBoard Software Installation" in StarBoard Software x.x User's Guide) Other Contact technical support. 3-1 English StarBoard software, see "1.4.3 Connection...
... PC power on how to external (RGB) output at the screen display mode settings. (Method of switching differs by PC. or switch to connect, see the PC manual and other documentation.) Other Contact technical support. StarBoard Software-related problems In this case StarBoard is external Connect cable after starting up the PC, (RGB) output selected? on how to connect, see "StarBoard Software Installation" in StarBoard Software x.x User's Guide) Other Contact technical support. 3-1 English StarBoard software, see "1.4.3 Connection...
User Guide
Page 33
... to installed correctly. Other Calibrate the pen position correctly. (For details on how to change the battery, see "Calibration" in StarBoard Software x.x User's Guide) Is battery worn out? This product is worn down ? Did you calibrate the pen position correctly? Check if the pen tip is susceptible to replace the stylus pen tip, see "StarBoard Software Installation " in the StarBoard Software x.x User's Guide) Contact technical support. 3-2 English StarBoard T-17SXL Appendix...
... to installed correctly. Other Calibrate the pen position correctly. (For details on how to change the battery, see "Calibration" in StarBoard Software x.x User's Guide) Is battery worn out? This product is worn down ? Did you calibrate the pen position correctly? Check if the pen tip is susceptible to replace the stylus pen tip, see "StarBoard Software Installation " in the StarBoard Software x.x User's Guide) Contact technical support. 3-2 English StarBoard T-17SXL Appendix...
User Guide
Page 34
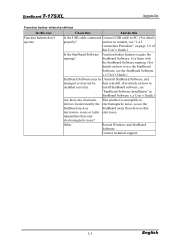
Function button features require the StarBoard Software. Other Restart Windows and StarBoard Software. Check this And do this case Function buttons don't operate. Contact technical support. 3-3 English StarBoard T-17SXL Appendix Function button-related problems In this Is the USB cable connected Connect USB cable to PC. (For details properly? This product is susceptible to electromagnetic noise, so use the StarBoard Software, see the StarBoard Software x.x User's Guide.) StarBoard Software may be Uninstall StarBoard Software, and...
Function button features require the StarBoard Software. Other Restart Windows and StarBoard Software. Check this And do this case Function buttons don't operate. Contact technical support. 3-3 English StarBoard T-17SXL Appendix Function button-related problems In this Is the USB cable connected Connect USB cable to PC. (For details properly? This product is susceptible to electromagnetic noise, so use the StarBoard Software, see the StarBoard Software x.x User's Guide.) StarBoard Software may be Uninstall StarBoard Software, and...

User Guide
Page 35
... - 80% (no condensation) Power consumption / power supply External dimensions 40 W or less (4W or less in power saving mode) / AC adapter Input (AC 100 - 240 V, 50/60 Hz, 1 A) Output (DC 12 V, 3.3 A) 395.0 (W)×375.0 (H)×57.0 (D) mm (without stand) Weight Approx. 5.2 kg Stand adjustment Adjustable in amplifier) During use : 30 - 80% (no condensation); StarBoard T-17SXL Appendix 3.2 System Specifications Item Specification Product name Model No. in storage: -10...
... - 80% (no condensation) Power consumption / power supply External dimensions 40 W or less (4W or less in power saving mode) / AC adapter Input (AC 100 - 240 V, 50/60 Hz, 1 A) Output (DC 12 V, 3.3 A) 395.0 (W)×375.0 (H)×57.0 (D) mm (without stand) Weight Approx. 5.2 kg Stand adjustment Adjustable in amplifier) During use : 30 - 80% (no condensation); StarBoard T-17SXL Appendix 3.2 System Specifications Item Specification Product name Model No. in storage: -10...

User Guide
Page 37
...) - After receiving this product, please immediately fill out and return this product's warranty service period. 4. Other parts - StarBoard T-17SXL Appendix 3.6 Provisions of failure or damage resulting from handling contrary to the handling and precautions mentioned in the following table: Product Name Part Name Warranty Coverage StarBoard 17-inch LCD monitor + Stylus pen + RGB cable + USB cable + AC adapter + Power cable + Audio cable + Stand + Replacement tip for Stylus pen -
...) - After receiving this product, please immediately fill out and return this product's warranty service period. 4. Other parts - StarBoard T-17SXL Appendix 3.6 Provisions of failure or damage resulting from handling contrary to the handling and precautions mentioned in the following table: Product Name Part Name Warranty Coverage StarBoard 17-inch LCD monitor + Stylus pen + RGB cable + USB cable + AC adapter + Power cable + Audio cable + Stand + Replacement tip for Stylus pen -


