Owners Guide
Page 2
... for wall, shelf or ceiling mounting as close to the point of the cabinet which will enable HITACHI to the front, or top, of cable 2 blades with the cart, stand, tripod, bracket, or table specified by the manufacturer. 12. Refer all servicing to radiators, heat... from the Safety is damaged, liquid has been spilled or objects CAUTION have fallen into your outlet, consult an electrician for your HITACHI plasma television. NO USER SERVICEABLE PARTS INSIDE. REFER SERVICING TO QUALIFIED SERVICE PERSONNEL. recommended safety standards for (including amplifiers) that the...
... for wall, shelf or ceiling mounting as close to the point of the cabinet which will enable HITACHI to the front, or top, of cable 2 blades with the cart, stand, tripod, bracket, or table specified by the manufacturer. 12. Refer all servicing to radiators, heat... from the Safety is damaged, liquid has been spilled or objects CAUTION have fallen into your outlet, consult an electrician for your HITACHI plasma television. NO USER SERVICEABLE PARTS INSIDE. REFER SERVICING TO QUALIFIED SERVICE PERSONNEL. recommended safety standards for (including amplifiers) that the...

Owners Guide
Page 4
...: 1. Please see page 7 for a maximum tilting angle of the remote control by pushing down and sliding the back cover off. 2. This stand for the front glass panel. When replacing old batteries, push them towards the springs and insert the top of the packing material. ³ Remote...the ceiling does not provide adequate ventilation for the electronics or proper support for use of other apparatus is WM07S and for optional www.hitachi.us/tv accessories. Match the batteries to swell or rupture resulting in the battery Bottom View (Remote Control) compartment. 4. Do ...
...: 1. Please see page 7 for a maximum tilting angle of the remote control by pushing down and sliding the back cover off. 2. This stand for the front glass panel. When replacing old batteries, push them towards the springs and insert the top of the packing material. ³ Remote...the ceiling does not provide adequate ventilation for the electronics or proper support for use of other apparatus is WM07S and for optional www.hitachi.us/tv accessories. Match the batteries to swell or rupture resulting in the battery Bottom View (Remote Control) compartment. 4. Do ...
Owners Guide
Page 5
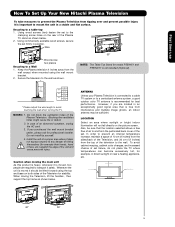
.... 10 cm * Please adjust the wire length to a Wall 1. Do not block the ventilation holes of the Plasma TV stand as shown below . First time use How To Set Up Your New Hitachi Plasma Television To take measures to prevent the Plasma Television from tipping over and prevent possible injury it safely... unit and cause personal injury. Whenever the unit is moved it does not expose anyone to any danger of hitting themselves (for model P55H401 and P55H4011 is free from the wall except when mounted using the top and base on both sides of set to the wall as shown below . 2. ...
.... 10 cm * Please adjust the wire length to a Wall 1. Do not block the ventilation holes of the Plasma TV stand as shown below . First time use How To Set Up Your New Hitachi Plasma Television To take measures to prevent the Plasma Television from tipping over and prevent possible injury it safely... unit and cause personal injury. Whenever the unit is moved it does not expose anyone to any danger of hitting themselves (for model P55H401 and P55H4011 is free from the wall except when mounted using the top and base on both sides of set to the wall as shown below . 2. ...
Owners Guide
Page 6
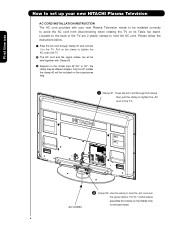
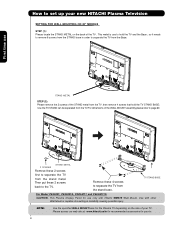
... to the TV. Please follow the instructions below. ³ Pass the AC cord through this clamp ; First time use How to set up your new HITACHI Plasma Television AC CORD INSTALLATION INSTRUCTION The AC cord provided with Clamp #2. » Depend on the model size 42",50" or 55", the clamp may... the AC cord to hold the AC cord and the signal cables. Only for 50" models the clamp #2 will be included on its Table top stand. For 50 " model please assemble this clamp to avoid the AC cord from disconnecting when rotating the TV on the accessories bag. ³ Clamp #1 : Pass...
... to the TV. Please follow the instructions below. ³ Pass the AC cord through this clamp ; First time use How to set up your new HITACHI Plasma Television AC CORD INSTALLATION INSTRUCTION The AC cord provided with Clamp #2. » Depend on the model size 42",50" or 55", the clamp may... the AC cord to hold the AC cord and the signal cables. Only for 50" models the clamp #2 will be included on its Table top stand. For 50 " model please assemble this clamp to avoid the AC cord from disconnecting when rotating the TV on the accessories bag. ³ Clamp #1 : Pass...
Owners Guide
Page 7
...P55H401 and P55H4011 CAUTION- Please access our web site at: www.hitachi.us/tv for recommended accessories for the Plasma TV depending on the back of the STAND metal from the TV, now the TV STAND can be separated from the STAND base in order to page 61 & 62. 4 SCREWS STAND METAL TV STAND BASE ..., P50H4011 and P50H4011A CAUTION- Use with other Wall Mount is use to set up your new HITACHI Plasma Television SETTING FOR WALL MOUNTING ON 50" & 55" MODELS STEP (1) : Please locate the STAND METAL on the size of the WALL MOUNT assembly please refer to separate the TV from the Base...
...P55H401 and P55H4011 CAUTION- Please access our web site at: www.hitachi.us/tv for recommended accessories for the Plasma TV depending on the back of the STAND metal from the TV, now the TV STAND can be separated from the STAND base in order to page 61 & 62. 4 SCREWS STAND METAL TV STAND BASE ..., P50H4011 and P50H4011A CAUTION- Use with other Wall Mount is use to set up your new HITACHI Plasma Television SETTING FOR WALL MOUNTING ON 50" & 55" MODELS STEP (1) : Please locate the STAND METAL on the size of the WALL MOUNT assembly please refer to separate the TV from the Base...
Owners Guide
Page 8
.... so it needs to remove 6 screws from the STAND base in instability causing possible injury. Please access our web site at: www.hitachi.us/tv for recommended accessories for use STAND METAL STEP (2): Please remove the 2 screws of the STAND metal from the Base. How to set up your ...new HITACHI Plasma Television SETTING FOR WALL MOUNTING ON 42" MODELS STEP (1) ...
.... so it needs to remove 6 screws from the STAND base in instability causing possible injury. Please access our web site at: www.hitachi.us/tv for recommended accessories for use STAND METAL STEP (2): Please remove the 2 screws of the STAND metal from the Base. How to set up your ...new HITACHI Plasma Television SETTING FOR WALL MOUNTING ON 42" MODELS STEP (1) ...
Owners Guide
Page 12
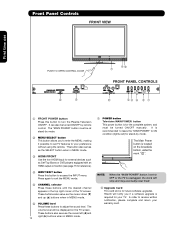
... ቨ POWER button Television MAIN POWER button This power button is set TV features to your warranty card. It is located on the TV screen. Hitachi will stop and may eventually reset itself. ቩ Upgrade Card This card slot is required for future software upgrades. The "MAIN POWER" button must be... also serve as the cursor down (̄) and up (̆) buttons when in MENU mode. ቤ HDMI-FRONT Use the front HDMI input for stand-by remote control. The volume level will be turned ON/OFF manually. The Main Power button is recommended to leave the "MAIN POWER" to ON...
... ቨ POWER button Television MAIN POWER button This power button is set TV features to your warranty card. It is located on the TV screen. Hitachi will stop and may eventually reset itself. ቩ Upgrade Card This card slot is required for future software upgrades. The "MAIN POWER" button must be... also serve as the cursor down (̄) and up (̆) buttons when in MENU mode. ቤ HDMI-FRONT Use the front HDMI input for stand-by remote control. The volume level will be turned ON/OFF manually. The Main Power button is recommended to leave the "MAIN POWER" to ON...
Owners Guide
Page 13
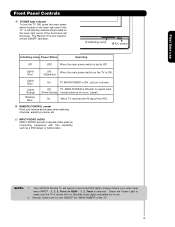
... right corner of the front bezel will appear to be turned OFF (lights orange) if there is no sync. A red stand-by indicator lamp located on the lower right side of the TV. 13 picture is set to make sure the TV is... turned off or in Stand-by ) Lights Blue Lights Orange Blinking Blue On TV MAIN POWER is ON. (Stand-by mode (lights red) when not in use Front Panel Controls ቪ POWER light..., such as a DVD player or Camcorders. Check the Power Light to Off. signal). Lights Red OFF. Your HITACHI Plasma TV will illuminate.
... right corner of the front bezel will appear to be turned OFF (lights orange) if there is no sync. A red stand-by indicator lamp located on the lower right side of the TV. 13 picture is set to make sure the TV is... turned off or in Stand-by ) Lights Blue Lights Orange Blinking Blue On TV MAIN POWER is ON. (Stand-by mode (lights red) when not in use Front Panel Controls ቪ POWER light..., such as a DVD player or Camcorders. Check the Power Light to Off. signal). Lights Red OFF. Your HITACHI Plasma TV will illuminate.
Owners Guide
Page 59
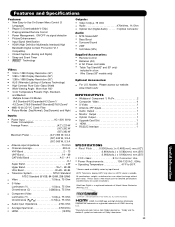
...RIGHTS RESERVED. COPYRIGHT c 1999-2007 MONTAVISTA SOFTWARE, INC. Useful Information 59 HDMI, the HDMI logo and High-Definition Multimedia Interface are trademarks of Hitachi Home Electronics (America), Inc. VHF-Band 2 ~ 13 UHF-Band 14 ~ 69 CATV Mid Band A-5 ~ A-1 A-I Super Band J-W Hyper Band W+1 - Please ...8226; 20W • Soft Mute (50%) Supplied Accessories: • Remote Control • Batteries (AA) • 6' AC Power cord cable • Table Top Stand(42" and 50" only) included in a box • Wire Clamp (50" models only) Optional Accessories: • For U.S.
...RIGHTS RESERVED. COPYRIGHT c 1999-2007 MONTAVISTA SOFTWARE, INC. Useful Information 59 HDMI, the HDMI logo and High-Definition Multimedia Interface are trademarks of Hitachi Home Electronics (America), Inc. VHF-Band 2 ~ 13 UHF-Band 14 ~ 69 CATV Mid Band A-5 ~ A-1 A-I Super Band J-W Hyper Band W+1 - Please ...8226; 20W • Soft Mute (50%) Supplied Accessories: • Remote Control • Batteries (AA) • 6' AC Power cord cable • Table Top Stand(42" and 50" only) included in a box • Wire Clamp (50" models only) Optional Accessories: • For U.S.
Owners Guide
Page 60
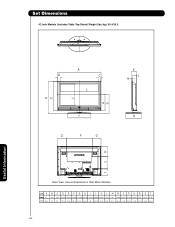
Set Dimensions 42 Inch Models (Includes Table Top Stand) Weight (lbs./kg): 80.4/36.5 Useful Information Rear View, Use as Reference for Wall Mount Bracket Units A B Inches 42 2-3/4 mm 1067.00 70.5 CD E FGH I J K L MNOPQ R ST 2-3/4 30-21/32 28-1/16 21-31/32 17-31/32 15-11/32 36-7/16 20-23/32 4-23/32 3-9/16 1-1/8 15-9/32 8-19/32 24-13/16 8-19/32 9-7/8 12-1/8 6-1/16 70.5 779.15 713.00 558.32 456.15 390.00 926 526.60 119.50 90.80 28.70 388.38 218.50 630.00 218.50 251.00 308.00 154.00 60
Set Dimensions 42 Inch Models (Includes Table Top Stand) Weight (lbs./kg): 80.4/36.5 Useful Information Rear View, Use as Reference for Wall Mount Bracket Units A B Inches 42 2-3/4 mm 1067.00 70.5 CD E FGH I J K L MNOPQ R ST 2-3/4 30-21/32 28-1/16 21-31/32 17-31/32 15-11/32 36-7/16 20-23/32 4-23/32 3-9/16 1-1/8 15-9/32 8-19/32 24-13/16 8-19/32 9-7/8 12-1/8 6-1/16 70.5 779.15 713.00 558.32 456.15 390.00 926 526.60 119.50 90.80 28.70 388.38 218.50 630.00 218.50 251.00 308.00 154.00 60
Owners Guide
Page 61
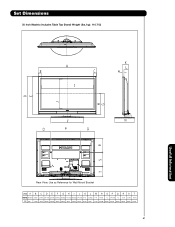
Set Dimensions 50 Inch Models (Includes Table Top Stand) Weight (lbs./kg): 116.7/53 Useful Information Rear View, Use as Reference for Wall Mount Bracket Units A B C D E F G H I J K L M N O P Q R S T Inches 48-13/16 2-9/16 2-9/16 34-11/16 32-5/16 27-17/32 19-29/32 17-17/32 43-23/32 24-13/16 5-1/2 3-25/32 1-1/4 16-5/8 12 24-13/16 12 11-3/4 12-1/8 8-7/16 mm 1240 65.00 65.00 880.85 820.50 699.12 505.85 445.5 1110.00 630.00 127.50 96.00 31.50 422.08 305.00 630.00 305.00 298.00 308.00 214.50 61
Set Dimensions 50 Inch Models (Includes Table Top Stand) Weight (lbs./kg): 116.7/53 Useful Information Rear View, Use as Reference for Wall Mount Bracket Units A B C D E F G H I J K L M N O P Q R S T Inches 48-13/16 2-9/16 2-9/16 34-11/16 32-5/16 27-17/32 19-29/32 17-17/32 43-23/32 24-13/16 5-1/2 3-25/32 1-1/4 16-5/8 12 24-13/16 12 11-3/4 12-1/8 8-7/16 mm 1240 65.00 65.00 880.85 820.50 699.12 505.85 445.5 1110.00 630.00 127.50 96.00 31.50 422.08 305.00 630.00 305.00 298.00 308.00 214.50 61
Owners Guide
Page 62
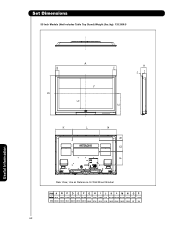
Set Dimensions 55 Inch Models (Not Includes Table Top Stand) Weight (lbs./kg): 133.3/60.5 Useful Information Rear View, Use as Reference for Wall Mount Bracket Units A B C D E F G H I J K L M N O Inches 55-1/2 3-15/32 3-15/32 35-5/8 19-3/16 48-19/32 27-1/4 5-1/32 3-25/32 1-1/4 15-11/32 24-13/16 15-11/32 4-15/16 10-1/8 mm 1410.00 88.00 88.00 904.50 485.50 1234.00 692.00 127.50 96.00 31.50 390.00 630.00 390.00 125.00 257 P 12-1/8 308 62
Set Dimensions 55 Inch Models (Not Includes Table Top Stand) Weight (lbs./kg): 133.3/60.5 Useful Information Rear View, Use as Reference for Wall Mount Bracket Units A B C D E F G H I J K L M N O Inches 55-1/2 3-15/32 3-15/32 35-5/8 19-3/16 48-19/32 27-1/4 5-1/32 3-25/32 1-1/4 15-11/32 24-13/16 15-11/32 4-15/16 10-1/8 mm 1410.00 88.00 88.00 904.50 485.50 1234.00 692.00 127.50 96.00 31.50 390.00 630.00 390.00 125.00 257 P 12-1/8 308 62


