Owners Guide
Page 3
Never connect the plasma television to 50 Hz, direct current, or anything other sources, may require the use the plasma television's (polarized) plug with remote ...must be authorized, and is intended for about 6 minutes. Use of programs broadcast by HITACHI could void the user's warranty. The original contrast will work automatically so that are ...a set-top box. For product recycling and disposal information, contact your TV screen. Important Safety Instructions Power source This plasma television is designed to minimize image retention. The power cord is protected by...
Never connect the plasma television to 50 Hz, direct current, or anything other sources, may require the use the plasma television's (polarized) plug with remote ...must be authorized, and is intended for about 6 minutes. Use of programs broadcast by HITACHI could void the user's warranty. The original contrast will work automatically so that are ...a set-top box. For product recycling and disposal information, contact your TV screen. Important Safety Instructions Power source This plasma television is designed to minimize image retention. The power cord is protected by...
Owners Guide
Page 4
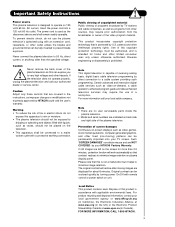
...Insert two new "AA" size batteries for the front glass panel. First time use only with Hitachi P50S601. Wall Mount unit is WM07S. Open the battery cover of resulting in leakage. 4 Do not ...for the electronics or proper support for the remote control. Ceiling mounting is designed for the 50" models is an optional accessory (Not Included). ³ Remote Control Unit CLU-4373A (Part...them towards the springs and insert the top of 45 degrees from vertical. 2. This plasma television product is not recommended. CAUTION: Do not insert batteries with other apparatus is ...
...Insert two new "AA" size batteries for the front glass panel. First time use only with Hitachi P50S601. Wall Mount unit is WM07S. Open the battery cover of resulting in leakage. 4 Do not ...for the electronics or proper support for the remote control. Ceiling mounting is designed for the 50" models is an optional accessory (Not Included). ³ Remote Control Unit CLU-4373A (Part...them towards the springs and insert the top of 45 degrees from vertical. 2. This plasma television product is not recommended. CAUTION: Do not insert batteries with other apparatus is ...
Owners Guide
Page 5
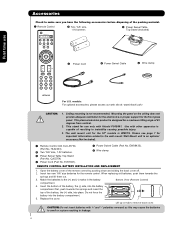
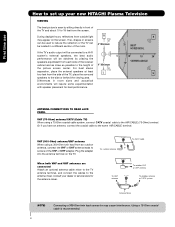
First time use How To Set Up Your New Hitachi Plasma Television To take measures to prevent the Plasma Television from tipping over and prevent possible injury it is ... is free from the wall except when mounted using the top and base on the rear of the Plasma Rear Panel. C C D 50" 10.8 in. 15.35 in . 30 cm (a) Power Swivel NOT USED (b) Power Swivel USED...As this product is heavy, whenever it does not expose anyone to a centralized antenna system, a good outdoor color TV antenna is moved, two people are located in fig. (a). 6. Install the unit at a proper area where it...
First time use How To Set Up Your New Hitachi Plasma Television To take measures to prevent the Plasma Television from tipping over and prevent possible injury it is ... is free from the wall except when mounted using the top and base on the rear of the Plasma Rear Panel. C C D 50" 10.8 in. 15.35 in . 30 cm (a) Power Swivel NOT USED (b) Power Swivel USED...As this product is heavy, whenever it does not expose anyone to a centralized antenna system, a good outdoor color TV antenna is moved, two people are located in fig. (a). 6. Install the unit at a proper area where it...

Owners Guide
Page 6
Pull on the clamp to tighten the AC cord to the TV. · Connect power swivel cable on one end to the swivel slot of the base metal. First time use How to set up your new HITACHI Plasma Television AC CORD AND POWER SWIVEL CABLE INSTALLATION INSTRUCTION The AC cord and power ...swivel cable provided with your new Plasma Television need to be held together with Clamp #2 (included on the accesories bag). ³ ...
Pull on the clamp to tighten the AC cord to the TV. · Connect power swivel cable on one end to the swivel slot of the base metal. First time use How to set up your new HITACHI Plasma Television AC CORD AND POWER SWIVEL CABLE INSTALLATION INSTRUCTION The AC cord and power ...swivel cable provided with your new Plasma Television need to be held together with Clamp #2 (included on the accesories bag). ³ ...

Owners Guide
Page 7
... Base ; This Plasma Display Panel for your TV. 7 Please access our web site at: www.hitachi.us/tv for recommended accessories for use only with other Wall Mount is use to page 62. 4 SCREWS STAND METAL TV STAND BASE For Model P50S601 CAUTION- For dimensions of the STAND metal from the TV, now the TV STAND can be...
... Base ; This Plasma Display Panel for your TV. 7 Please access our web site at: www.hitachi.us/tv for recommended accessories for use only with other Wall Mount is use to page 62. 4 SCREWS STAND METAL TV STAND BASE For Model P50S601 CAUTION- For dimensions of the STAND metal from the TV, now the TV STAND can be...
Owners Guide
Page 8
... twin lead connector may appear on the TV. If so, drapes or screens can be used to reduce the reflection or the TV can be obtained by sitting directly in a different section of the VHF or UHF adapter. Consult your new HITACHI Plasma Television VIEWING The best picture is recommended.... 8 R 4" Minimum If the TV's audio output will be located in front of the TV, place the surround speakers to a Hi-Fi system's external speakers, the ...
... twin lead connector may appear on the TV. If so, drapes or screens can be used to reduce the reflection or the TV can be obtained by sitting directly in a different section of the VHF or UHF adapter. Consult your new HITACHI Plasma Television VIEWING The best picture is recommended.... 8 R 4" Minimum If the TV's audio output will be located in front of the TV, place the surround speakers to a Hi-Fi system's external speakers, the ...

Owners Guide
Page 9
... sell audio/video products. Use this cable for the best sound quality. "F" Type 75-Ohm Coaxial Antenna For connecting RF signals (antenna or cable TV) to produce a high quality picture. S-Video (Super Video) Cable This connector is used on the television. Phono or RCA Cable Used on all... an HDMI output connection to inputs and outputs located on the rear jack panel and front control panel. Below are illustrations and names of the Plasma Television. 9 HDMI Cable This cable is used to the rear panel of common connectors. AUDIO OUT 3.8mm STEREO MINI-PLUG 2 RCA TYPE ...
... sell audio/video products. Use this cable for the best sound quality. "F" Type 75-Ohm Coaxial Antenna For connecting RF signals (antenna or cable TV) to produce a high quality picture. S-Video (Super Video) Cable This connector is used on the television. Phono or RCA Cable Used on all... an HDMI output connection to inputs and outputs located on the rear jack panel and front control panel. Below are illustrations and names of the Plasma Television. 9 HDMI Cable This cable is used to the rear panel of common connectors. AUDIO OUT 3.8mm STEREO MINI-PLUG 2 RCA TYPE ...
Owners Guide
Page 10
..., please point the remote control directly at the remote control sensor for change the Closed Caption mode. MODE INDICATOR Turns on your HITACHI Plasma TV, the new remote control is designed to operate different types of the OSD, INPUTS menu systems if their menu is used as ...portion of your VCR and DVD. MUTE BUTTON (TV) Reduces the audio level to 50% if pressed once, and to antenna input. Satellite PVR - The TV's remote control sensor is used for a complete description of all of your TV. DAY/NIGHT BUTTON (TV) Toggles picture mode settings between the current and last...
..., please point the remote control directly at the remote control sensor for change the Closed Caption mode. MODE INDICATOR Turns on your HITACHI Plasma TV, the new remote control is designed to operate different types of the OSD, INPUTS menu systems if their menu is used as ...portion of your VCR and DVD. MUTE BUTTON (TV) Reduces the audio level to 50% if pressed once, and to antenna input. Satellite PVR - The TV's remote control sensor is used for a complete description of all of your TV. DAY/NIGHT BUTTON (TV) Toggles picture mode settings between the current and last...
Owners Guide
Page 11
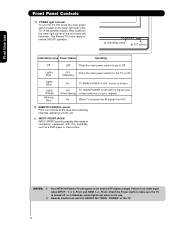
... these buttons to adjust the sound level. The Main Power button is for reference). ብ INPUT/EXIT button Press this button to turn the Plasma Television ON/OFF. This button also serves as Set-Top-Boxes or DVD players equipped with an HDMI output connection (see page 14 for the... and up (̆) buttons when in MENU mode. ቨ POWER button Television MAIN POWER button This power button is located on the TV screen. In order to receive written notification, please complete and return your TV. Hitachi will notify you to enter the MENU, making it possible to set to OFF or the...
... these buttons to adjust the sound level. The Main Power button is for reference). ብ INPUT/EXIT button Press this button to turn the Plasma Television ON/OFF. This button also serves as Set-Top-Boxes or DVD players equipped with an HDMI output connection (see page 14 for the... and up (̆) buttons when in MENU mode. ቨ POWER button Television MAIN POWER button This power button is located on the TV screen. In order to receive written notification, please complete and return your TV. Hitachi will notify you to enter the MENU, making it possible to set to OFF or the...
Owners Guide
Page 12
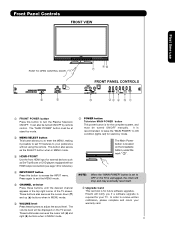
... use . 2. Lights Red Lights Blue Lights Orange Blinking Blue OFF. (Stand-by indicator lamp located on the lower right corner of the TV. On TV MAIN POWER is shown. Your HITACHI Plasma TV will illuminate. signal). FRONT JACKS INPUT- Check the Power Light to be turned OFF (lights orange) if there is turned off or...
... use . 2. Lights Red Lights Blue Lights Orange Blinking Blue OFF. (Stand-by indicator lamp located on the lower right corner of the TV. On TV MAIN POWER is shown. Your HITACHI Plasma TV will illuminate. signal). FRONT JACKS INPUT- Check the Power Light to be turned OFF (lights orange) if there is turned off or...
Owners Guide
Page 13
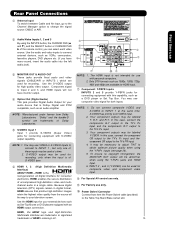
...external devices, such as Set-Top-Boxes or DVD players equipped with S-VIDEO output capability. Use the audio and video inputs to the TV's PR input. 3. HDMI enables the secure distribution of Dolby Laboratories. ቦ S-VIDEO Input 1 Input 1 provide S-VIDEO (Super ...: Y-PBPR Inputs INPUTS 2 and 3 provide Y-PBPR jacks for consumer electronics. NOTE: *Manufactured under license from here the Power Swivel cable (provided) to the TV's PR input. 4. S-VIDEO has priority over VIDEO input. 2. INPUT 2 , and 3 (Y/VIDEO) can select each video ቩ ቤ source. You...
...external devices, such as Set-Top-Boxes or DVD players equipped with S-VIDEO output capability. Use the audio and video inputs to the TV's PR input. 3. HDMI enables the secure distribution of Dolby Laboratories. ቦ S-VIDEO Input 1 Input 1 provide S-VIDEO (Super ...: Y-PBPR Inputs INPUTS 2 and 3 provide Y-PBPR jacks for consumer electronics. NOTE: *Manufactured under license from here the Power Swivel cable (provided) to the TV's PR input. 4. S-VIDEO has priority over VIDEO input. 2. INPUT 2 , and 3 (Y/VIDEO) can select each video ቩ ቤ source. You...
Owners Guide
Page 15
..., Video Game and a VCR as suggestions. First time use to connect the VCR, camcorder, laserdisc player, DVD player, or HDTV Set Top Box to your Plasma TV is dependent on the model and features of each component for the location of video and audio inputs and outputs. Use the CURSOR PAD (̆...
..., Video Game and a VCR as suggestions. First time use to connect the VCR, camcorder, laserdisc player, DVD player, or HDTV Set Top Box to your Plasma TV is dependent on the model and features of each component for the location of video and audio inputs and outputs. Use the CURSOR PAD (̆...

Owners Guide
Page 16
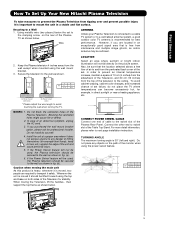
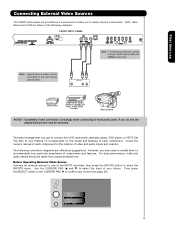
First time use Rear Panel Connections Outside Antenna or Cable TV coaxial cable 2-Way signal splitter VCR #2 S-VIDEO V L R INPUT Optional VCR #1 ANT OUTPUT IN S-VIDEO V L R Optional HDMI to HDMI HDMI OUTPUT HDMI DIGITAL OUTPUT CAPABILITY DVI to HDMI DIGITAL OUTPUT AUDIO OUT DIGITAL OUTPUT CAPABILITY NOTE: Cables are optional, except when specified. 16 OUTPUT Y PB/CB PR/CR L R Y PB PR L R OUTPUT DVD Player HDTV Set-Top Box
First time use Rear Panel Connections Outside Antenna or Cable TV coaxial cable 2-Way signal splitter VCR #2 S-VIDEO V L R INPUT Optional VCR #1 ANT OUTPUT IN S-VIDEO V L R Optional HDMI to HDMI HDMI OUTPUT HDMI DIGITAL OUTPUT CAPABILITY DVI to HDMI DIGITAL OUTPUT AUDIO OUT DIGITAL OUTPUT CAPABILITY NOTE: Cables are optional, except when specified. 16 OUTPUT Y PB/CB PR/CR L R Y PB PR L R OUTPUT DVD Player HDTV Set-Top Box
Owners Guide
Page 17
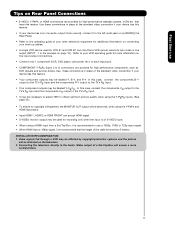
...using the Y-PBPR inputs. (See page 36). • To ensure no copyright infringement, the MONITOR OUT output will be labeled Y-CBCR. Refer to the TV's PR input. • Your component outputs may be less than 5 meters. Use these connections in the example on line input-output connections. • ... or line output (INPUT: 1 in place of the standard video connection if your device has this case, connect the components B-Y output to the TV's PB input and the components R-Y output to your device has only one audio output (mono sound), connect it is recommended that the length of ...
...using the Y-PBPR inputs. (See page 36). • To ensure no copyright infringement, the MONITOR OUT output will be labeled Y-CBCR. Refer to the TV's PR input. • Your component outputs may be less than 5 meters. Use these connections in the example on line input-output connections. • ... or line output (INPUT: 1 in place of the standard video connection if your device has this case, connect the components B-Y output to the TV's PB input and the components R-Y output to your device has only one audio output (mono sound), connect it is recommended that the length of ...
Owners Guide
Page 18
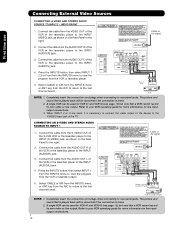
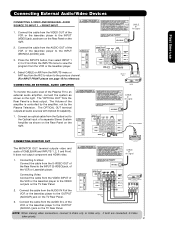
... laserdisc player. A single VCR can be used , it is loose. 2. Back of the VCR or the laserdisc player to the Y/VIDEO input jack of the TV . Connect the cable from the AUDIO OUT R of the VCR or the laserdisc player to the INPUT (AUDIO/R) jack. 3. Connect the cable from the AUDIO...
... laserdisc player. A single VCR can be used , it is loose. 2. Back of the VCR or the laserdisc player to the Y/VIDEO input jack of the TV . Connect the cable from the AUDIO OUT R of the VCR or the laserdisc player to the INPUT (AUDIO/R) jack. 3. Connect the cable from the AUDIO...
Owners Guide
Page 21
...from the VCR or the laserdisc player. 4. CONNECTING AN EXTERNAL AUDIO AMPLIFIER To monitor the audio level of the Plasma TV to the Optical input of a separate Stereo System Amplifier as shown on the TV Rear Panel. 2. The Volume of the VCR or the laserdisc player to view the program from the INPUTS... from the R/C to return to the INPUT (VIDEO) jack, as shown on the Rear Panel on the TV Rear Panel. Connect the cable from the Rear Panel is controlled by the amplifier, not by the Plasma Television. The "OPTICAL OUT" from the AUDIO IN L of CABLE/AIR and INPUTS 1, 2, 3 and Front....
...from the VCR or the laserdisc player. 4. CONNECTING AN EXTERNAL AUDIO AMPLIFIER To monitor the audio level of the Plasma TV to the Optical input of a separate Stereo System Amplifier as shown on the TV Rear Panel. 2. The Volume of the VCR or the laserdisc player to view the program from the INPUTS... from the R/C to return to the INPUT (VIDEO) jack, as shown on the Rear Panel on the TV Rear Panel. Connect the cable from the Rear Panel is controlled by the amplifier, not by the Plasma Television. The "OPTICAL OUT" from the AUDIO IN L of CABLE/AIR and INPUTS 1, 2, 3 and Front....
Owners Guide
Page 22
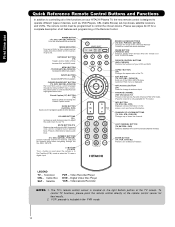
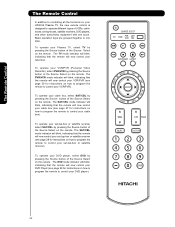
The TV mode indicator will blink, indicating that the remote will now control your cable box (see page 28 for instructions on how to program the remote ... the remote. The Remote Control The Remote Control In addition to controlling all the functions on your Plasma TV, select TV by pressing the Source button of the Source Select on the remote. To operate your HITACHI Plasma TV, the new remote control is designed to operate different types of VCRs, cable boxes, set -top-box...
The TV mode indicator will blink, indicating that the remote will now control your cable box (see page 28 for instructions on how to program the remote ... the remote. The Remote Control The Remote Control In addition to controlling all the functions on your Plasma TV, select TV by pressing the Source button of the Source Select on the remote. To operate your HITACHI Plasma TV, the new remote control is designed to operate different types of VCRs, cable boxes, set -top-box...

Owners Guide
Page 23
... Control How to Use the Remote to Control Your TV ³ POWER button Press this button to turn the TV set on or off when the remote is in TV mode. (See page 22 for instructions on how to set the remote control to TV mode). ³ · MODE Indicator · » Turns on... for settings changes). µ ¸ ƺ ¹ Ƹ ƹ ƺ ƹ ƻ ƺ Ƽ ƺ NOTE: For automatic DAY/NIGHT picture mode settings, see page 50. 23
... Control How to Use the Remote to Control Your TV ³ POWER button Press this button to turn the TV set on or off when the remote is in TV mode. (See page 22 for instructions on how to set the remote control to TV mode). ³ · MODE Indicator · » Turns on... for settings changes). µ ¸ ƺ ¹ Ƹ ƹ ƺ ƹ ƻ ƺ Ƽ ƺ NOTE: For automatic DAY/NIGHT picture mode settings, see page 50. 23
Owners Guide
Page 24
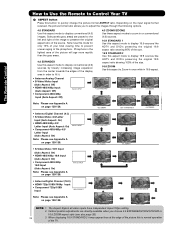
... areas) are directly available when you to adjust the images through the following options. 4:3 STANDARD Use this aspect mode to prevent uneven aging of the TV. Depending on page 138-139. IMA G E INPUT • S-Video/Video 16:9 Input (Auto Aspect: On) • HDMI-480i/480p 16:9 Input (Auto Aspect...16:9 ZOOM Use this aspect to quickly change the picture format ASPECT ratio. The Remote Control How to Use the Remote to Control Your TV ´ ASPECT button Press this button to Zoom-in once while in all video inputs have independent Aspect Style setting. 2. The Aspect Style...
... areas) are directly available when you to adjust the images through the following options. 4:3 STANDARD Use this aspect mode to prevent uneven aging of the TV. Depending on page 138-139. IMA G E INPUT • S-Video/Video 16:9 Input (Auto Aspect: On) • HDMI-480i/480p 16:9 Input (Auto Aspect...16:9 ZOOM Use this aspect to quickly change the picture format ASPECT ratio. The Remote Control How to Use the Remote to Control Your TV ´ ASPECT button Press this button to Zoom-in once while in all video inputs have independent Aspect Style setting. 2. The Aspect Style...
Owners Guide
Page 25
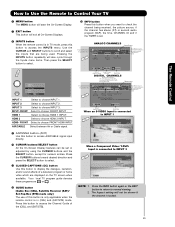
... 2 INPUT. HDMI 2 Select to choose INPUT 3. Program Information Program Run Time ANALOG CHANNELS Analog Channel Show Name 3:00PM- 3:30PM ST TV-G A 480i Air 8 KXYZ-HD 3:17PM Main Picture Source and channel indication Broadcast channel identification Clock Audio Broadcast Broadcast Rating Picture Format Auto STEREO...3 Y-PBPR: 3 480i 3:17PM Input Signal Format Auto NOTE: 1. HDMI- The Remote Control How to Use the Remote to Control Your TV ² MENU button The MENU button will start the On-Screen Display. ¶ EXIT button This button will exit all On-Screen Displays....
... 2 INPUT. HDMI 2 Select to choose INPUT 3. Program Information Program Run Time ANALOG CHANNELS Analog Channel Show Name 3:00PM- 3:30PM ST TV-G A 480i Air 8 KXYZ-HD 3:17PM Main Picture Source and channel indication Broadcast channel identification Clock Audio Broadcast Broadcast Rating Picture Format Auto STEREO...3 Y-PBPR: 3 480i 3:17PM Input Signal Format Auto NOTE: 1. HDMI- The Remote Control How to Use the Remote to Control Your TV ² MENU button The MENU button will start the On-Screen Display. ¶ EXIT button This button will exit all On-Screen Displays....


