
Owners Guide
Page 1
PLASMA TELEVISION Operating Guide for P50S601 IMPORTANT SAFETY INSTRUCTIONS 2-3 FIRST TIME USE ...4-21 THE REMOTE CONTROL...22-33 ON-SCREEN DISPLAY ...34-57 USEFUL INFORMATION...58-64 END USER LICENSE AGREEMENT FOR HITACHI DTV SOFTWARE 129-137 APPENDIXES...138-139 INDEX...140
PLASMA TELEVISION Operating Guide for P50S601 IMPORTANT SAFETY INSTRUCTIONS 2-3 FIRST TIME USE ...4-21 THE REMOTE CONTROL...22-33 ON-SCREEN DISPLAY ...34-57 USEFUL INFORMATION...58-64 END USER LICENSE AGREEMENT FOR HITACHI DTV SOFTWARE 129-137 APPENDIXES...138-139 INDEX...140
Owners Guide
Page 3
...Original contrast can expose you to a mains socket outlet with remote control or power switch on plasma display panel. Dispose of a set-top box. Insert ...TV screen. Prevention of the plasma television. The original contrast will work automatically so that is used as video games, stock market quotations, computer generated graphics, and other outlet unless the blades and ground terminal can be restored quickly by HITACHI... to a cable system providing such programming. Never connect the plasma television to 50 Hz, direct current, or anything other limited consumer uses only...
...Original contrast can expose you to a mains socket outlet with remote control or power switch on plasma display panel. Dispose of a set-top box. Insert ...TV screen. Prevention of the plasma television. The original contrast will work automatically so that is used as video games, stock market quotations, computer generated graphics, and other outlet unless the blades and ground terminal can be restored quickly by HITACHI... to a cable system providing such programming. Never connect the plasma television to 50 Hz, direct current, or anything other limited consumer uses only...
Owners Guide
Page 4
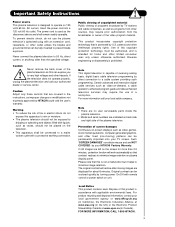
... ² Wire clamp For U.S. The wall mount unit for the remote control. QJ03754) ¿ Power Cord (Part No. Insert two new "AA" size batteries for the 50" models is designed for the front glass panel. When replacing old ...plasma television product is WM07S. Mounting the panel on tab to swell or rupture resulting in instability causing possible injury. 3. Match the batteries to the wall mount. First time use only with Hitachi P50S601. Wall Mount unit is not recommended. EV01841). ´ Power Swivel Cable (Part No. EW08433). ² Wire clamp REMOTE CONTROL...
... ² Wire clamp For U.S. The wall mount unit for the remote control. QJ03754) ¿ Power Cord (Part No. Insert two new "AA" size batteries for the 50" models is designed for the front glass panel. When replacing old ...plasma television product is WM07S. Mounting the panel on tab to swell or rupture resulting in instability causing possible injury. 3. Match the batteries to the wall mount. First time use only with Hitachi P50S601. Wall Mount unit is not recommended. EV01841). ´ Power Swivel Cable (Part No. EW08433). ² Wire clamp REMOTE CONTROL...
Owners Guide
Page 10
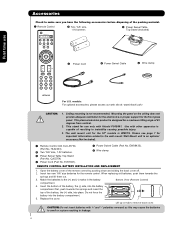
.... To control TV functions, please point the remote control directly at the remote control sensor for TV mode.) INFO BUTTON (TV, STB, CBL, PVR) Displays various information on your HITACHI Plasma TV, the new remote control is in DVD, PVR/VCR mode. DAY/NIGHT BUTTON (TV) Toggles picture mode settings between the current and last channel viewed. MUTE BUTTON (TV) Reduces the audio level to 50...
.... To control TV functions, please point the remote control directly at the remote control sensor for TV mode.) INFO BUTTON (TV, STB, CBL, PVR) Displays various information on your HITACHI Plasma TV, the new remote control is in DVD, PVR/VCR mode. DAY/NIGHT BUTTON (TV) Toggles picture mode settings between the current and last channel viewed. MUTE BUTTON (TV) Reduces the audio level to 50...
Owners Guide
Page 11
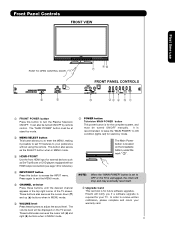
... 14 for reference). ብ INPUT/EXIT button Press this button to turn the Plasma Television ON/OFF. Press again to receive written notification, please complete and return your...TV screen. Front Panel Controls FRONT VIEW First time use PUSH TO OPEN CONTROL DOOR UPGRADE CARD (SERVICE USE ONLY) PUSH EJECT ቩ ቤ ቪቫ ቨ FRONT PANEL CONTROLS ቭ ቢ FRONT POWER button Press this button to access the INPUT menu. Hitachi... software upgrade is located on the TV screen. The Main Power button is required for stand-by remote control.
... 14 for reference). ብ INPUT/EXIT button Press this button to turn the Plasma Television ON/OFF. Press again to receive written notification, please complete and return your...TV screen. Front Panel Controls FRONT VIEW First time use PUSH TO OPEN CONTROL DOOR UPGRADE CARD (SERVICE USE ONLY) PUSH EJECT ቩ ቤ ቪቫ ቨ FRONT PANEL CONTROLS ቭ ቢ FRONT POWER button Press this button to access the INPUT menu. Hitachi... software upgrade is located on the TV screen. The Main Power button is required for stand-by remote control.
Owners Guide
Page 12
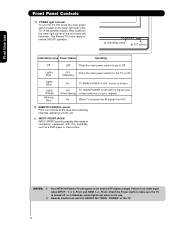
... To turn ON/OFF the "MAIN POWER" of the TV. 12 The Plasma TV is turned off or in Stand-by ) When the main power switch on the lower right corner of the TV. Remote Control can not turn the TV ON, press the main power switch located on the lower... Front and HDMI 1, 2 , Front. FRONT provide composite Video jacks for remote ON/OFF operation. ቪ Indicating Lamp ቫ R/C sensor Indicating Lamp Power Status Operating Off OFF. Off TV MAIN POWER is set to Off. Your HITACHI Plasma TV will illuminate. When the main power switch is ON with this area when selecting...
... To turn ON/OFF the "MAIN POWER" of the TV. 12 The Plasma TV is turned off or in Stand-by ) When the main power switch on the lower right corner of the TV. Remote Control can not turn the TV ON, press the main power switch located on the lower... Front and HDMI 1, 2 , Front. FRONT provide composite Video jacks for remote ON/OFF operation. ቪ Indicating Lamp ቫ R/C sensor Indicating Lamp Power Status Operating Off OFF. Off TV MAIN POWER is set to Off. Your HITACHI Plasma TV will illuminate. When the main power switch is ON with this area when selecting...
Owners Guide
Page 13
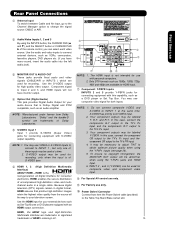
...OUT & AUDIO OUT These jacks provide fixed audio and video signals (CABLE/AIR or INPUTS ) which are trademarks or registered trademarks of the remote control, you have monitor output. ብ Optical Out (Digital Audio) This jack provides Digital Audio Output for connecting equipment with S-VIDEO output ...capability. Rear Panel Connections ቢ Antenna Input To switch between Cable and Air input, go to the Channel Manager option to the TV's PR input. 4. Component signal to Input 2 and 3, and HDMI inputs will be used for connecting equipment with this capability, such as...
...OUT & AUDIO OUT These jacks provide fixed audio and video signals (CABLE/AIR or INPUTS ) which are trademarks or registered trademarks of the remote control, you have monitor output. ብ Optical Out (Digital Audio) This jack provides Digital Audio Output for connecting equipment with S-VIDEO output ...capability. Rear Panel Connections ቢ Antenna Input To switch between Cable and Air input, go to the Channel Manager option to the TV's PR input. 4. Component signal to Input 2 and 3, and HDMI inputs will be used for connecting equipment with this capability, such as...
Owners Guide
Page 22
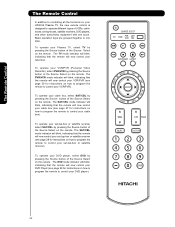
... set-top-box or satellite receiver (see page 30 for instructions on how to program the remote to control your cable box). The Remote Control The Remote Control In addition to controlling all the functions on your HITACHI Plasma TV, the new remote control is designed to operate different types of VCRs, cable boxes, set-top-boxes, satellite receivers, DVD players, and...
... set-top-box or satellite receiver (see page 30 for instructions on how to program the remote to control your cable box). The Remote Control The Remote Control In addition to controlling all the functions on your HITACHI Plasma TV, the new remote control is designed to operate different types of VCRs, cable boxes, set-top-boxes, satellite receivers, DVD players, and...

Owners Guide
Page 23
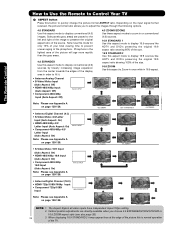
... mode settings, see page 50. 23 The Remote Control How to Use the Remote to Control Your TV ³ POWER button Press this button to turn the TV set on or blinks three times to show remote control mode. » SOURCE SELECT button 18 Press this button to select remote control mode. ¿ DAY/...with less brightness and º ¾ contrast for instructions on how to set the remote control to TV mode). ³ · MODE Indicator · » Turns on or off when the remote is in TV mode. (See page 22 for a more brightness and contrast to toggle between Day (Normal...
... mode settings, see page 50. 23 The Remote Control How to Use the Remote to Control Your TV ³ POWER button Press this button to turn the TV set on or blinks three times to show remote control mode. » SOURCE SELECT button 18 Press this button to select remote control mode. ¿ DAY/...with less brightness and º ¾ contrast for instructions on how to set the remote control to TV mode). ³ · MODE Indicator · » Turns on or off when the remote is in TV mode. (See page 22 for a more brightness and contrast to toggle between Day (Normal...
Owners Guide
Page 24
...: 1. Side panels (gray areas) are directly available when you to adjust the images through the following options. 4:3 STANDARD Use this is normal operation of the TV. IMA G E INPUT • S-Video/Video 16:9 Input (Auto Aspect: On) • HDMI-480i/480p 16:9 Input (Auto Aspect: On) • Component-...to fill it may appear lines at the edge of the picture this aspect mode to display conventional (4:3) images. The Remote Control How to Use the Remote to Control Your TV ´ ASPECT button Press this mode for only 15% of your total viewing time to prevent uneven aging of the...
...: 1. Side panels (gray areas) are directly available when you to adjust the images through the following options. 4:3 STANDARD Use this is normal operation of the TV. IMA G E INPUT • S-Video/Video 16:9 Input (Auto Aspect: On) • HDMI-480i/480p 16:9 Input (Auto Aspect: On) • Component-...to fill it may appear lines at the edge of the picture this aspect mode to display conventional (4:3) images. The Remote Control How to Use the Remote to Control Your TV ´ ASPECT button Press this mode for only 15% of your total viewing time to prevent uneven aging of the...
Owners Guide
Page 25
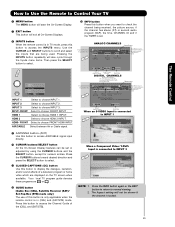
... When a Component Video: Y-PbPr Input is connected to scroll and select the inputs that are displayed on the TV screen when available. The Remote Control How to Use the Remote to Control Your TV ² MENU button The MENU button will start the On-Screen Display. ¶ EXIT button This button will... exit all On-Screen Displays. º INPUTS button When the remote control is in (CBL) and (SAT/STB) mode. INPUT ...
... When a Component Video: Y-PbPr Input is connected to scroll and select the inputs that are displayed on the TV screen when available. The Remote Control How to Use the Remote to Control Your TV ² MENU button The MENU button will start the On-Screen Display. ¶ EXIT button This button will... exit all On-Screen Displays. º INPUTS button When the remote control is in (CBL) and (SAT/STB) mode. INPUT ...
Owners Guide
Page 26
... Remote to Control Your TV ƹ VOLUME (VOL), MUTE button Press the VOLUME button (̆ or ̄) until the displayed channel turns from your regular tuned channels. To reduce the sound to one half of normal volume (SOFT MUTE) to select channels. Cable 6 Volume 8 Soft Mute 8 FAV Cable 6 The Remote Control ...;). Enter 0 first for channels 1 to 9, or simply press the single digit channel you wish to tune then press the ENTER button for the TV to Favorite (FAV) channel mode. Press it was set to select channels, lock access code, etc. You can also delete a channel from WHITE...
... Remote to Control Your TV ƹ VOLUME (VOL), MUTE button Press the VOLUME button (̆ or ̄) until the displayed channel turns from your regular tuned channels. To reduce the sound to one half of normal volume (SOFT MUTE) to select channels. Cable 6 Volume 8 Soft Mute 8 FAV Cable 6 The Remote Control ...;). Enter 0 first for channels 1 to 9, or simply press the single digit channel you wish to tune then press the ENTER button for the TV to Favorite (FAV) channel mode. Press it was set to select channels, lock access code, etc. You can also delete a channel from WHITE...
Owners Guide
Page 27
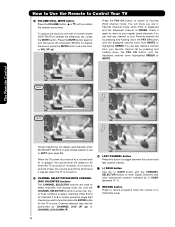
...Up & Down -Last CH -Number PAD -Enter ባ EXCLUSIVE TV buttons These buttons are removed from the remote control. You must first program the remote to match the remote system of cable boxes. The indicator light will now control your cable box as stated above procedures, your cable box. &#... the above procedures, please consult your cable box operating guide. 3. The remote control will turn off your cable box. The Remote Control ባ 1. Hold down the SOURCE SELECT button on the remote control ባ ባ to position the LED light to instruction manual of...
...Up & Down -Last CH -Number PAD -Enter ባ EXCLUSIVE TV buttons These buttons are removed from the remote control. You must first program the remote to match the remote system of cable boxes. The indicator light will now control your cable box as stated above procedures, your cable box. &#... the above procedures, please consult your cable box operating guide. 3. The remote control will turn off your cable box. The Remote Control ባ 1. Hold down the SOURCE SELECT button on the remote control ባ ባ to position the LED light to instruction manual of...
Owners Guide
Page 28
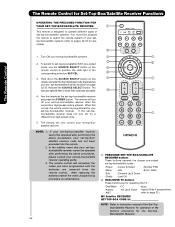
... -Exit -Guide -Cursor & Select -Info -Channel Up & Down -Last CH -Number PAD -Enter, Dash ባ EXCLUSIVE TV buttons These buttons are removed from the remote control. Aim the remote at the set -top-box/satellite (SAT) pre-coded ባ mode, use the SOURCE SELECT button on page 32-33.... code. 5. NOTE: 1. In the unlikely event that matches your set - When this occurs, the remote control is programmed for your settop-box/satellite systems (refer to pages 32-33 for operating the TV : -Day/Night -Aspect -ANT -CC -Vol Up & Down -Mute -Inputs (Only if programmed...
... -Exit -Guide -Cursor & Select -Info -Channel Up & Down -Last CH -Number PAD -Enter, Dash ባ EXCLUSIVE TV buttons These buttons are removed from the remote control. Aim the remote at the set -top-box/satellite (SAT) pre-coded ባ mode, use the SOURCE SELECT button on page 32-33.... code. 5. NOTE: 1. In the unlikely event that matches your set - When this occurs, the remote control is programmed for your settop-box/satellite systems (refer to pages 32-33 for operating the TV : -Day/Night -Aspect -ANT -CC -Vol Up & Down -Mute -Inputs (Only if programmed...
Owners Guide
Page 29
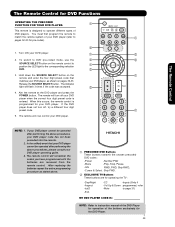
..., -Info RWD, FWD, Skip RWD, -Cursor & Select Skip FWD. ባ EXCLUSIVE TV Buttons These buttons are removed from the remote control. The remote will remember the codes you have programmed until the batteries are for operating the TV : -Day/Night -Aspect -ANT -Exit -CC -Inputs (Only if -Vol Up &...ቢ pages 32-33 for the DVD Player. 29 When this occurs, the remote control is programmed for DVD Functions OPERATING THE PRECODED ቢ FUNCTION FOR YOUR DVD PLAYER. The remote control will turn off your DVD player when the correct four digit preset code is designed...
..., -Info RWD, FWD, Skip RWD, -Cursor & Select Skip FWD. ባ EXCLUSIVE TV Buttons These buttons are removed from the remote control. The remote will remember the codes you have programmed until the batteries are for operating the TV : -Day/Night -Aspect -ANT -Exit -CC -Inputs (Only if -Vol Up &...ቢ pages 32-33 for the DVD Player. 29 When this occurs, the remote control is programmed for DVD Functions OPERATING THE PRECODED ቢ FUNCTION FOR YOUR DVD PLAYER. The remote control will turn off your DVD player when the correct four digit preset code is designed...
Owners Guide
Page 30
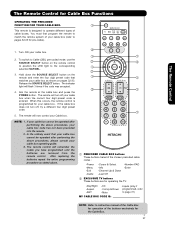
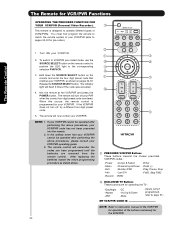
... & Down -Number PAD -Last CH -RWD -Enter -Dash (-) -Play, Pause, Stop -FWD, Skip FWD ባ EXCLUSIVE TV Buttons These buttons are removed from the remote control. After replacing the batteries repeat the entire programming procedure as shown on the remote control to position the LED light to pages 32-33 for pre-codes). ቢ The...
... & Down -Number PAD -Last CH -RWD -Enter -Dash (-) -Play, Pause, Stop -FWD, Skip FWD ባ EXCLUSIVE TV Buttons These buttons are removed from the remote control. After replacing the batteries repeat the entire programming procedure as shown on the remote control to position the LED light to pages 32-33 for pre-codes). ቢ The...
Owners Guide
Page 31
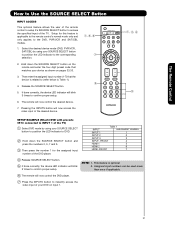
... to Table 1). 4. Release the SOURCE SELECT button. 5. Pressing the INPUTS button will now control the desired device. 7. SETUP EXAMPLE (Hitachi DVD with precode 0573 connected to INPUT 1 of the TV) ᕃ Select DVD mode by using your SOURCE SELECT button to position the LED indicator ... input of the TV. The remote will now access the video input of the desired device. NOTE: 1. Setup for the assigned input number of the DVD player. If done correctly, the device LED indicator will blink 3 times to the corresponding selection. 2. The Remote Control How to Use...
... to Table 1). 4. Release the SOURCE SELECT button. 5. Pressing the INPUTS button will now control the desired device. 7. SETUP EXAMPLE (Hitachi DVD with precode 0573 connected to INPUT 1 of the TV) ᕃ Select DVD mode by using your SOURCE SELECT button to position the LED indicator ... input of the TV. The remote will now access the video input of the desired device. NOTE: 1. Setup for the assigned input number of the DVD player. If done correctly, the device LED indicator will blink 3 times to the corresponding selection. 2. The Remote Control How to Use...

Owners Guide
Page 32
The Remote Control Remote Control Codes Cable BRAND Codes ABC 0003,0008,0011 Americast 0899 Amino 1602 Bell South 0899 Clearmaster 0883 ClearMax 0883 Coolmax 0883 Digeo 1187 Director 0476 General Instrument.. 0476,0810,0276,0003, 0011 GoldStar 0144 Hamlin 0009,0273 Hitachi 0011,1421 i3 Micro... 0037,0038,1237 Gradiente 0000 Harley Davidson 0000 Harman/Kardon 0081,0038 Harwood 0072 Headquarter 0046 Hewlett Packard 1972 HI-Q 0047 Hitachi 0000,0042,0041,0065, 0089, 0105, 0543, 0544 Howard Computers ....... 1972 HP 1972 Hughes Network System.0042,0739 Humax...
The Remote Control Remote Control Codes Cable BRAND Codes ABC 0003,0008,0011 Americast 0899 Amino 1602 Bell South 0899 Clearmaster 0883 ClearMax 0883 Coolmax 0883 Digeo 1187 Director 0476 General Instrument.. 0476,0810,0276,0003, 0011 GoldStar 0144 Hamlin 0009,0273 Hitachi 0011,1421 i3 Micro... 0037,0038,1237 Gradiente 0000 Harley Davidson 0000 Harman/Kardon 0081,0038 Harwood 0072 Headquarter 0046 Hewlett Packard 1972 HI-Q 0047 Hitachi 0000,0042,0041,0065, 0089, 0105, 0543, 0544 Howard Computers ....... 1972 HP 1972 Hughes Network System.0042,0739 Humax...

Owners Guide
Page 34
...sharpness. Use this to Standard for standard colors or Black and White for illustration purposes only, therefore; Press EXIT on your HITACHI Plasma TV. Reduces conspicuous noise in the picture. 34 MPEG NR Auto Movie Mode Color Space Auto Color Black Side Panel Aspect Reset ...tint. Set the gray side bars On/Off when watching 4:3 signals in the picture. Press MENU on the remote control to display the different features on the remote control to maintain constant color levels even after a program or channel changes. Day Dynamic, Day Normal and Night. ...
...sharpness. Use this to Standard for standard colors or Black and White for illustration purposes only, therefore; Press EXIT on your HITACHI Plasma TV. Reduces conspicuous noise in the picture. 34 MPEG NR Auto Movie Mode Color Space Auto Color Black Side Panel Aspect Reset ...tint. Set the gray side bars On/Off when watching 4:3 signals in the picture. Press MENU on the remote control to display the different features on the remote control to maintain constant color levels even after a program or channel changes. Day Dynamic, Day Normal and Night. ...

Owners Guide
Page 54
... described above. 2. NOTE: 1. To do this function to any of the video inputs. 1. If no remote control button is turned on . Auto When AUTO is selected, the TV will turn on and switch to watch a movie with your choices. Use the CURSOR PAD ̆ or ̄ to highlight the AUTO LINK option ... before AUTO LINK is convenient when you want to INPUT 3 automatically, when the INPUT 3 input device is turned on by AUTO LINK, the TV will turn off after the TV is pressed after three hours. Press the CURSOR PAD ̇, ̈ to previous menu. OR INPUT 3 Auto Link Use this , turn...
... described above. 2. NOTE: 1. To do this function to any of the video inputs. 1. If no remote control button is turned on . Auto When AUTO is selected, the TV will turn on and switch to watch a movie with your choices. Use the CURSOR PAD ̆ or ̄ to highlight the AUTO LINK option ... before AUTO LINK is convenient when you want to INPUT 3 automatically, when the INPUT 3 input device is turned on by AUTO LINK, the TV will turn off after the TV is pressed after three hours. Press the CURSOR PAD ̇, ̈ to previous menu. OR INPUT 3 Auto Link Use this , turn...


