Owners Guide
Page 1
PLASMA TELEVISION Operating Guide for P42H401, P42H401A P50H401, P50H401A, P55H401, P42H4011 P42H4011A, P50H4011, P50H4011A and P55H4011 IMPORTANT SAFETY INSTRUCTIONS ...2-3 FIRST TIME USE ...4-22 THE REMOTE CONTROL ...23-31 ON-SCREEN DISPLAY ...32-54 USEFUL INFORMATION ...55-64 OPERATING GUIDE IN SPANISH ...65-128 END USER LICENSE AGREEMENT FOR HITACHI DTV SOFTWARE 129-137 APPENDIXES ...138-139 INDEX ...140 SPANISH
PLASMA TELEVISION Operating Guide for P42H401, P42H401A P50H401, P50H401A, P55H401, P42H4011 P42H4011A, P50H4011, P50H4011A and P55H4011 IMPORTANT SAFETY INSTRUCTIONS ...2-3 FIRST TIME USE ...4-22 THE REMOTE CONTROL ...23-31 ON-SCREEN DISPLAY ...32-54 USEFUL INFORMATION ...55-64 OPERATING GUIDE IN SPANISH ...65-128 END USER LICENSE AGREEMENT FOR HITACHI DTV SOFTWARE 129-137 APPENDIXES ...138-139 INDEX ...140 SPANISH
Owners Guide
Page 3
... disposal information, contact your HITACHI Factory Warranty. To prevent electric shock, do not expose this apparatus to rain or moisture. • The plasma television should not be placed...with liquids, such as this copyright protection technology must be permanently imprinted onto your TV screen. The original contrast will work automatically so that is designed to a ...the use the plasma television's (polarized) plug with a protective earthing connection. If still images are covered in accordance with remote control or power switch on plasma display panel. Original...
... disposal information, contact your HITACHI Factory Warranty. To prevent electric shock, do not expose this apparatus to rain or moisture. • The plasma television should not be placed...with liquids, such as this copyright protection technology must be permanently imprinted onto your TV screen. The original contrast will work automatically so that is designed to a ...the use the plasma television's (polarized) plug with a protective earthing connection. If still images are covered in accordance with remote control or power switch on plasma display panel. Original...

Owners Guide
Page 4
... rupture resulting in the battery Bottom View (Remote Control) compartment. 4. The wall mount unit for the 50" and 42" models is WM07S and for the 55"...This plasma television product is WM07L. This stand for a maximum tilting angle of 45 degrees from vertical. 2. Please see page 7 for optional www.hitachi.us/tv ...accessories. When replacing old batteries, push them towards the springs and insert the top of the remote control by pushing down and sliding the back cover off. 2. Do not force the battery into place. CAUTION: Do not insert batteries with Hitachi P42H401...
... rupture resulting in the battery Bottom View (Remote Control) compartment. 4. The wall mount unit for the 50" and 42" models is WM07S and for the 55"...This plasma television product is WM07L. This stand for a maximum tilting angle of 45 degrees from vertical. 2. Please see page 7 for optional www.hitachi.us/tv ...accessories. When replacing old batteries, push them towards the springs and insert the top of the remote control by pushing down and sliding the back cover off. 2. Do not force the battery into place. CAUTION: Do not insert batteries with Hitachi P42H401...
Owners Guide
Page 11
...is displayed. CHANNEL BUTTONS (TV, CBL, SAT, VCR) Changes the channel. Please see pages 2331 for a complete description of all of the functions on your HITACHI Plasma TV, the new remote control is designed to operate different types of the TV screen. CC BUTTON (TV) Press to restore audio level.... EXIT BUTTON (TV, CBL, SAT) Exits out of your VCR and DVD. INFO BUTTON (TV, CBL, SAT) Displays various information...
...is displayed. CHANNEL BUTTONS (TV, CBL, SAT, VCR) Changes the channel. Please see pages 2331 for a complete description of all of the functions on your HITACHI Plasma TV, the new remote control is designed to operate different types of the TV screen. CC BUTTON (TV) Press to restore audio level.... EXIT BUTTON (TV, CBL, SAT) Exits out of your VCR and DVD. INFO BUTTON (TV, CBL, SAT) Displays various information...
Owners Guide
Page 12
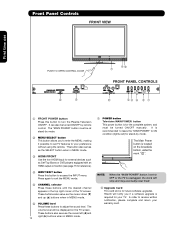
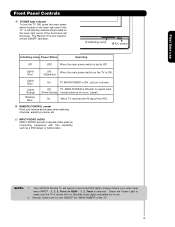
...CHANNEL selector Press these buttons to ON condition (lights red) for stand-by remote control. It is located on the TV screen. Hitachi will notify you to enter the MENU, making it possible to set to OFF or the TV is unplugged, the clock will be turned ON/OFF manually. Front Panel Controls ... for the complete system, and must be turned ON/OFF by mode. NOTE: When the "MAIN POWER" button is set TV features to access the INPUT menu. In order to turn the Plasma Television ON/OFF. The "MAIN POWER" button must be displayed on the broadside bottom, under the mark " ".
...CHANNEL selector Press these buttons to ON condition (lights red) for stand-by remote control. It is located on the TV screen. Hitachi will notify you to enter the MENU, making it possible to set to OFF or the TV is unplugged, the clock will be turned ON/OFF manually. Front Panel Controls ... for the complete system, and must be turned ON/OFF by mode. NOTE: When the "MAIN POWER" button is set TV features to access the INPUT menu. In order to turn the Plasma Television ON/OFF. The "MAIN POWER" button must be displayed on the broadside bottom, under the mark " ".
Owners Guide
Page 13
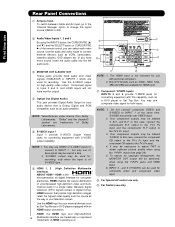
... turn ON/OFF the "MAIN POWER" of the TV. 13 NOTES: 1. Your HITACHI Plasma TV will illuminate. Check the Power Light to make sure the TV is ON with this area when selecting channels, adjusting volume, etc. ቭ INPUT-FRONT JACKS INPUT-FRONT provide composite Video jacks for remote ON/OFF operation. ቪ Indicating Lamp ቫ...
... turn ON/OFF the "MAIN POWER" of the TV. 13 NOTES: 1. Your HITACHI Plasma TV will illuminate. Check the Power Light to make sure the TV is ON with this area when selecting channels, adjusting volume, etc. ቭ INPUT-FRONT JACKS INPUT-FRONT provide composite Video jacks for remote ON/OFF operation. ቪ Indicating Lamp ቫ...
Owners Guide
Page 14
...PAD ቪ ̈ of S-VIDEO type. ቧ HDMI 1, 2 (High Definition Multimedia Interface) ABOUT HDMI - The HDMI input is of the remote control, you have monitor output. ብ Optical Out (Digital Audio) This jack provides Digital Audio Output for recording, only when the input is not ...) signals remain in a single cable. Use the HDMI input for high quality video output. Do not connect composite VIDEO and S-VIDEO to the TV's PR input. 3. In this capability, such as 1080p, 1080i, 720p, 480i and 480p are trademarks or registered trademarks of these inputs may be...
...PAD ቪ ̈ of S-VIDEO type. ቧ HDMI 1, 2 (High Definition Multimedia Interface) ABOUT HDMI - The HDMI input is of the remote control, you have monitor output. ብ Optical Out (Digital Audio) This jack provides Digital Audio Output for recording, only when the input is not ...) signals remain in a single cable. Use the HDMI input for high quality video output. Do not connect composite VIDEO and S-VIDEO to the TV's PR input. 3. In this capability, such as 1080p, 1080i, 720p, 480i and 480p are trademarks or registered trademarks of these inputs may be...
Owners Guide
Page 23
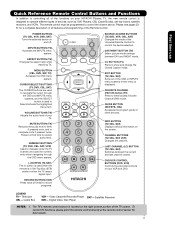
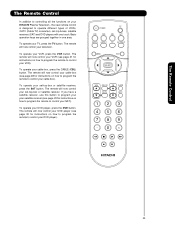
... now control your television. The Remote Control The Remote Control In addition to controlling all the functions on your HITACHI Plasma Television , the new remote control is designed to operate different types of VCRs, CATV (Cable TV) converters, set-top-boxes, satellite receivers (SAT) and DVD players with one area. To operate your set -top-box...
... now control your television. The Remote Control The Remote Control In addition to controlling all the functions on your HITACHI Plasma Television , the new remote control is designed to operate different types of VCRs, CATV (Cable TV) converters, set-top-boxes, satellite receivers (SAT) and DVD players with one area. To operate your set -top-box...
Owners Guide
Page 24
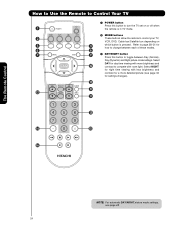
...190; » DAY/NIGHT button Press this button to turn the TV set on or off when ³ the remote is pressed. The Remote Control How to Use the Remote to Control Your TV ³ POWER button Press this button to control your TV, VCR, DVD, Cable box/Satellite box depending on ´ &#...191; » ² which button is in TV mode. · MODE buttons ...
...190; » DAY/NIGHT button Press this button to turn the TV set on or off when ³ the remote is pressed. The Remote Control How to Use the Remote to Control Your TV ³ POWER button Press this button to control your TV, VCR, DVD, Cable box/Satellite box depending on ´ &#...191; » ² which button is in TV mode. · MODE buttons ...
Owners Guide
Page 25
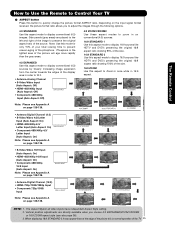
... How to Use the Remote to Control Your TV ¿ ASPECT button Press this button to zoom in on the input signal format received, the picture format ratio allows you choose 4:3 EXPANDED/ZOOM1/ZOOM2 ... change the picture format ASPECT ratio. Vertical position adjustments are placed to the left and right of the image to prevent uneven aging of the TV 25 Phosphors in 16:9 aspect. Side panels (gray areas) are directly available when you to adjust the images through the following options. 4:3 STANDARD Use this...
... How to Use the Remote to Control Your TV ¿ ASPECT button Press this button to zoom in on the input signal format received, the picture format ratio allows you choose 4:3 EXPANDED/ZOOM1/ZOOM2 ... change the picture format ASPECT ratio. Vertical position adjustments are placed to the left and right of the image to prevent uneven aging of the TV 25 Phosphors in 16:9 aspect. Side panels (gray areas) are directly available when you to adjust the images through the following options. 4:3 STANDARD Use this...
Owners Guide
Page 26
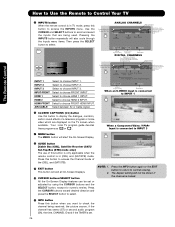
... Box (CBL), Satellite Receiver (SAT)/ Set-Top-Box (STB) mode only] The use of this button is only applicable when the remote control is in TV mode, press this button to display the dialogue, narration, and/or sound effects of a television program or home video which are being ...to return to select. INFO Auto Y-PBPR: 3 480i 3:17PM Input Signal Format NOTE: 1. 2. How to Use the Remote to Control Your TV The Remote Control ´ INPUTS button When the remote control is in (CBL) and (SAT/STB) mode. Press the CURSOR buttons toward desired direction and press the SELECT ...
... Box (CBL), Satellite Receiver (SAT)/ Set-Top-Box (STB) mode only] The use of this button is only applicable when the remote control is in TV mode, press this button to display the dialogue, narration, and/or sound effects of a television program or home video which are being ...to return to select. INFO Auto Y-PBPR: 3 480i 3:17PM Input Signal Format NOTE: 1. 2. How to Use the Remote to Control Your TV The Remote Control ´ INPUTS button When the remote control is in (CBL) and (SAT/STB) mode. Press the CURSOR buttons toward desired direction and press the SELECT ...

Owners Guide
Page 27
... will display automatically when MUTE/SOFT MUTE is on and Closed Caption is set to 30 when the TV is set when the TV is turned on . How to Use the Remote to Control Your TV ¹ VOLUME (VOL), MUTE button Press the VOLUME button (̆ or ̄) until you are used to ... channels, lock access code, etc. Press the FAV CH button to switch to answer the telephone, etc., press the MUTE button. When the TV power is GREEN. Cable 6 The Remote Control MUTE Volume 8 FAV CH FAV Cable 6 MUTE Soft Mute 8 FAV CH Cable 6 Mute 8 Closed Captioning will default to AUTO (see page...
... will display automatically when MUTE/SOFT MUTE is on and Closed Caption is set to 30 when the TV is set when the TV is turned on . How to Use the Remote to Control Your TV ¹ VOLUME (VOL), MUTE button Press the VOLUME button (̆ or ̄) until you are used to ... channels, lock access code, etc. Press the FAV CH button to switch to answer the telephone, etc., press the MUTE button. When the TV power is GREEN. Cable 6 The Remote Control MUTE Volume 8 FAV CH FAV Cable 6 MUTE Soft Mute 8 FAV CH Cable 6 Mute 8 Closed Captioning will default to AUTO (see page...
Owners Guide
Page 28
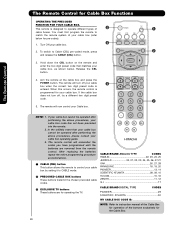
... for operating the TV. The Remote Control NOTE: 1. After replacing the batteries repeat the entire programming procedure as shown below for pre-codes). » 1. Hold down the CBL button on the remote and enter the two digit preset code that your cable box cannot be operated ... buttons These buttons transmit the chosen precoded cable codes. » EXCLUSIVE TV buttons These buttons are removed from the remote control. This remote is designed to match the remote system of · ³ cable boxes. Aim the remote at the cable box and press the POWER button. When this occurs...
... for operating the TV. The Remote Control NOTE: 1. After replacing the batteries repeat the entire programming procedure as shown below for pre-codes). » 1. Hold down the CBL button on the remote and enter the two digit preset code that your cable box cannot be operated ... buttons These buttons transmit the chosen precoded cable codes. » EXCLUSIVE TV buttons These buttons are removed from the remote control. This remote is designed to match the remote system of · ³ cable boxes. Aim the remote at the cable box and press the POWER button. When this occurs...
Owners Guide
Page 29
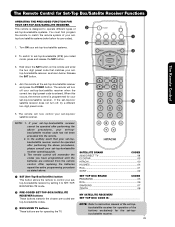
...set-topbox/satellite receiver for operation of your set -topbox/satellite receiver code has not been precoded into the remote. 2. SATELLITE BRAND CODES 2006 DIRECT TV 09 ECOSTAR 03 HITACHI 00 HUGHES 04 RCA 01 SONY 02 SET TOP BOX BRAND CODES PANASONIC 05 RCA 06 SAMSUNG 07 ZENITH 08... MY SATELLITE RECEIVER/ SET TOP BOX CODE IS NOTE: Refer to match the remote system of the buttons exclusively for operating the TV. Turn...
...set-topbox/satellite receiver for operation of your set -topbox/satellite receiver code has not been precoded into the remote. 2. SATELLITE BRAND CODES 2006 DIRECT TV 09 ECOSTAR 03 HITACHI 00 HUGHES 04 RCA 01 SONY 02 SET TOP BOX BRAND CODES PANASONIC 05 RCA 06 SAMSUNG 07 ZENITH 08... MY SATELLITE RECEIVER/ SET TOP BOX CODE IS NOTE: Refer to match the remote system of the buttons exclusively for operating the TV. Turn...
Owners Guide
Page 30
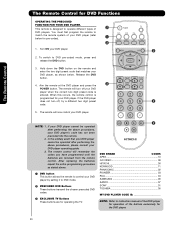
... to DVD mode. · PRECODED DVD Buttons These buttons transmit the chosen precoded DVD codes. » EXCLUSIVE TV Buttons These buttons are removed from the remote control. This remote is programmed for the DVD player. 30 If the DVD player does not turn off , try a different two...batteries are for DVD Functions OPERATING THE PRECODED FUNCTION FOR YOUR DVD PLAYER. The Remote Control The Remote Control for operating the TV. · DVD BRAND CODES APEX 10 GO VIDEO 09 HITACHI 00 KENWOOD 11 PANASONIC 02 PIONEER 03 RCA 04 SAMSUNG 06 SANYO 07 SONY 01...
... to DVD mode. · PRECODED DVD Buttons These buttons transmit the chosen precoded DVD codes. » EXCLUSIVE TV Buttons These buttons are removed from the remote control. This remote is programmed for the DVD player. 30 If the DVD player does not turn off , try a different two...batteries are for DVD Functions OPERATING THE PRECODED FUNCTION FOR YOUR DVD PLAYER. The Remote Control The Remote Control for operating the TV. · DVD BRAND CODES APEX 10 GO VIDEO 09 HITACHI 00 KENWOOD 11 PANASONIC 02 PIONEER 03 RCA 04 SAMSUNG 06 SANYO 07 SONY 01...
Owners Guide
Page 31
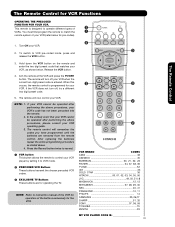
... below . NOTE: Refer to VCR mode. · PRECODED VCR Buttons These buttons transmit the chosen precoded VCR codes. » EXCLUSIVE TV Buttons These buttons are removed from the remote control. If the VCR does not turn off , try a different two digit preset code. 5. To switch to operate different types of... now control your VCR. The remote will turn off your VCR. » 2. The Remote Control for the VCR. · · VCR BRAND CODES AIWA 48 DAEWOO 45 EMERSON 20, 21, 22, 23 FISHER 34, 37, 38, 39 FUNAI 52 G E 33 GOLD STAR 36 HITACHI 00, 01, 02, 03, 04, 05, ...
... below . NOTE: Refer to VCR mode. · PRECODED VCR Buttons These buttons transmit the chosen precoded VCR codes. » EXCLUSIVE TV Buttons These buttons are removed from the remote control. If the VCR does not turn off , try a different two digit preset code. 5. To switch to operate different types of... now control your VCR. The remote will turn off your VCR. » 2. The Remote Control for the VCR. · · VCR BRAND CODES AIWA 48 DAEWOO 45 EMERSON 20, 21, 22, 23 FISHER 34, 37, 38, 39 FUNAI 52 G E 33 GOLD STAR 36 HITACHI 00, 01, 02, 03, 04, 05, ...
Owners Guide
Page 32
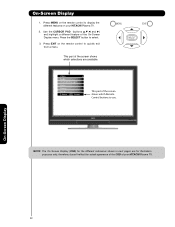
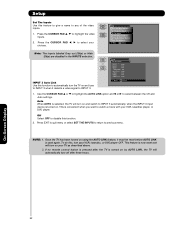
... the CURSOR PAD (buttons ̆,̄,̇ and ̈) and highlight a different feature of your HITACHI Plasma TV. 2. Press EXIT on the remote control to display the different features on the remote control to quickly exit from a menu. This part of the screen shows which selections are for illustration purposes only, therefore; NOTE: The On... the OSD of the On-Screen Display menu. Video Audio Channel Manager Locks Timers Setup Move SEL Select This part of the screen shows which Remote Control buttons to select. 3. On-Screen Display 1.
... the CURSOR PAD (buttons ̆,̄,̇ and ̈) and highlight a different feature of your HITACHI Plasma TV. 2. Press EXIT on the remote control to display the different features on the remote control to quickly exit from a menu. This part of the screen shows which selections are for illustration purposes only, therefore; NOTE: The On... the OSD of the On-Screen Display menu. Video Audio Channel Manager Locks Timers Setup Move SEL Select This part of the screen shows which Remote Control buttons to select. 3. On-Screen Display 1.
Owners Guide
Page 52
... is turned on and switch to watch a movie with your VCR, laserdisc player, or DVD player. To do this, turn on by AUTO LINK, the TV will turn your VCR, laserdisc, or DVD player OFF. Setup Set The Inputs Use this feature to give a name to select your choices. Setup Setup... to INPUT 3 automatically, when the INPUT 3 input device is turned on using the AUTO LINK feature, it detects a video signal to automatically turn on your TV as described above. 2. Once the TV has been turned on . If no remote control button is used again.
... is turned on and switch to watch a movie with your VCR, laserdisc player, or DVD player. To do this, turn on by AUTO LINK, the TV will turn your VCR, laserdisc, or DVD player OFF. Setup Set The Inputs Use this feature to give a name to select your choices. Setup Setup... to INPUT 3 automatically, when the INPUT 3 input device is turned on using the AUTO LINK feature, it detects a video signal to automatically turn on your TV as described above. 2. Once the TV has been turned on . If no remote control button is used again.
Owners Guide
Page 55
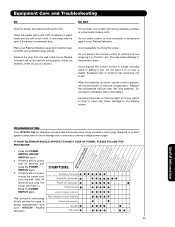
...soft cloth moistened in . Press the POWER SWITCH again. A mild soap may cause damage to the precision parts. Place your HITACHI Plasma Television. Avoid placing the remote control in picture © ©©© © Poor reception on some channels © ©©© &#... 2. If there is still no power, wait 30 seconds and press the POWER SWITCH again. 3. Useful Information TROUBLESHOOTING Your HITACHI Plasma Television incorporates advanced power surge protection technology designed to protect against component or circuit damage due to direct sunlight for a long...
...soft cloth moistened in . Press the POWER SWITCH again. A mild soap may cause damage to the precision parts. Place your HITACHI Plasma Television. Avoid placing the remote control in picture © ©©© © Poor reception on some channels © ©©© &#... 2. If there is still no power, wait 30 seconds and press the POWER SWITCH again. 3. Useful Information TROUBLESHOOTING Your HITACHI Plasma Television incorporates advanced power surge protection technology designed to protect against component or circuit damage due to direct sunlight for a long...
Owners Guide
Page 59
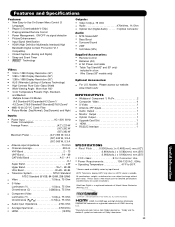
...hitachi.us /tv INPUTS/OUTPUTS • Wideband Component Y, PB,PR 2 • Composite Video 4 • S-Video 1 • Antenna (RF)Inputs 1 • Audio Output 1 • Monitor Output 1 • Optical Output 1 • Upgrade Card Slot 1 • HDMI 3 • RS232C Interface 1 SPECIFICATIONS • Pixel Pitch . . . . 0.900(horiz.) x 0.485(vert.) mm.(42... Sound • 20W • Soft Mute (50%) Supplied Accessories: • Remote Control • Batteries (AA) • 6' AC Power cord cable • Table Top Stand(42" and 50" only) included in a box • Wire Clamp (50" ...
...hitachi.us /tv INPUTS/OUTPUTS • Wideband Component Y, PB,PR 2 • Composite Video 4 • S-Video 1 • Antenna (RF)Inputs 1 • Audio Output 1 • Monitor Output 1 • Optical Output 1 • Upgrade Card Slot 1 • HDMI 3 • RS232C Interface 1 SPECIFICATIONS • Pixel Pitch . . . . 0.900(horiz.) x 0.485(vert.) mm.(42... Sound • 20W • Soft Mute (50%) Supplied Accessories: • Remote Control • Batteries (AA) • 6' AC Power cord cable • Table Top Stand(42" and 50" only) included in a box • Wire Clamp (50" ...


