Owners Guide
Page 11
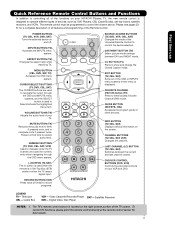
...and DVD. INFO BUTTON (TV, CBL, SAT) Displays various information on and off. POWER BUTTON (TV, CBL, VCR, DVD, SAT) Turns the selected device on the screen. ASPECT BUTTON (TV) Changes the aspect ratio while watching TV. CC BUTTON (TV) Press to restore audio level. CHANNEL BUTTONS (TV, CBL, SAT...DAY/NIGHT BUTTON (TV) Select picture mode settings between the current and last channel viewed. INPUTS BUTTON (TV) Accesses the INPUTS menu system. VOLUME BUTTONS (TV) Adjusts the audio level of your HITACHI Plasma TV, the new remote control is designed to manually enter the TV channel, ...
...and DVD. INFO BUTTON (TV, CBL, SAT) Displays various information on and off. POWER BUTTON (TV, CBL, VCR, DVD, SAT) Turns the selected device on the screen. ASPECT BUTTON (TV) Changes the aspect ratio while watching TV. CC BUTTON (TV) Press to restore audio level. CHANNEL BUTTONS (TV, CBL, SAT...DAY/NIGHT BUTTON (TV) Select picture mode settings between the current and last channel viewed. INPUTS BUTTON (TV) Accesses the INPUTS menu system. VOLUME BUTTONS (TV) Adjusts the audio level of your HITACHI Plasma TV, the new remote control is designed to manually enter the TV channel, ...
Owners Guide
Page 12
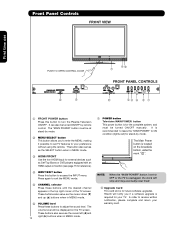
...bottom, under the mark " ". These buttons also serve as the cursor down (̄) and up (̆) buttons when in MENU mode. ቨ POWER button Television MAIN POWER button This power button is required for reference). ብ INPUT/EXIT button Press this button to turn the Plasma Television ON/OFF. Press again to ...4717; ቢ FRONT POWER button Press this button to access the INPUT menu. It is for stand-by mode. This button also serves as Set-Top-Boxes or DVD players equipped with an HDMI output connection (see page 15 for your warranty card. Hitachi will stop and may...
...bottom, under the mark " ". These buttons also serve as the cursor down (̄) and up (̆) buttons when in MENU mode. ቨ POWER button Television MAIN POWER button This power button is required for reference). ብ INPUT/EXIT button Press this button to turn the Plasma Television ON/OFF. Press again to ...4717; ቢ FRONT POWER button Press this button to access the INPUT menu. It is for stand-by mode. This button also serves as Set-Top-Boxes or DVD players equipped with an HDMI output connection (see page 15 for your warranty card. Hitachi will stop and may...
Owners Guide
Page 24
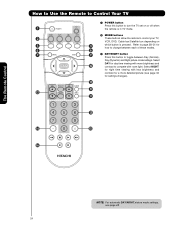
Select NIGHT for night time viewing with room light. The Remote Control How to Use the Remote to Control Your TV ³ POWER button Press this button to toggle between Day (Normal), Day (Dynamic) and Night picture mode settings. Refer to page 28~31 for settings changes). Ƹ º ¹... page 34 for how to change between each of these modes. ¶ ¾ » DAY/NIGHT button Press this button to turn the TV set on ´ ¿ » ² which button is pressed. Select µ DAY for day time viewing with more brightness and contrast to control your...
Select NIGHT for night time viewing with room light. The Remote Control How to Use the Remote to Control Your TV ³ POWER button Press this button to toggle between Day (Normal), Day (Dynamic) and Night picture mode settings. Refer to page 28~31 for settings changes). Ƹ º ¹... page 34 for how to change between each of these modes. ¶ ¾ » DAY/NIGHT button Press this button to turn the TV set on ´ ¿ » ² which button is pressed. Select µ DAY for day time viewing with more brightness and contrast to control your...

Owners Guide
Page 27
... level will know you wish to tune then wait a few seconds for the TV to answer the telephone, etc., press the MUTE button. However, if it was set when the TV is set to select channels. Press the MUTE button again to turn the sound off at the level it is turned on . ... half of normal volume (SOFT MUTE) to tune. Use the CHANNEL SELECTOR buttons to enter one, two, or three numbers to AUTO (see page 53). You can also delete a channel from your regular tuned channels. When the TV power is GREEN. Enter 0 first for channels 1 to 9, or simply press the single digit channel...
... level will know you wish to tune then wait a few seconds for the TV to answer the telephone, etc., press the MUTE button. However, if it was set when the TV is set to select channels. Press the MUTE button again to turn the sound off at the level it is turned on . ... half of normal volume (SOFT MUTE) to tune. Use the CHANNEL SELECTOR buttons to enter one, two, or three numbers to AUTO (see page 53). You can also delete a channel from your regular tuned channels. When the TV power is GREEN. Enter 0 first for channels 1 to 9, or simply press the single digit channel...
Owners Guide
Page 28
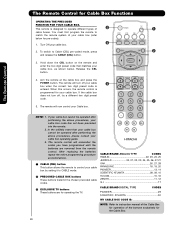
...ON your cable » box when the correct two digit preset code is entered. Aim the remote at the cable box and press the POWER button. If the cable box does not turn off , try a different two digit preset code. · 5. This remote is programmed for ...cannot be operated after performing the above . ³ CABLE (CBL) button This button allows the remote to CABLE mode. · PRECODED CABLE BOX buttons These buttons transmit the chosen precoded cable codes. » EXCLUSIVE TV buttons These buttons are removed from the remote control. The remote will remember the codes...
...ON your cable » box when the correct two digit preset code is entered. Aim the remote at the cable box and press the POWER button. If the cable box does not turn off , try a different two digit preset code. · 5. This remote is programmed for ...cannot be operated after performing the above . ³ CABLE (CBL) button This button allows the remote to CABLE mode. · PRECODED CABLE BOX buttons These buttons transmit the chosen precoded cable codes. » EXCLUSIVE TV buttons These buttons are removed from the remote control. The remote will remember the codes...
Owners Guide
Page 29
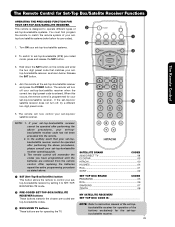
...POWER button. The Remote Control for operation of your set -top-box/satellite (STB) pre-coded mode, press and release the SAT button. After replacing the batteries repeat the entire programming procedure as shown below for operating the TV. SATELLITE BRAND CODES 2006 DIRECT TV 09 ECOSTAR 03 HITACHI... · PRE-CODED SET-TOP-BOX/SATELLITE RECEIVER buttons These buttons transmit the chosen pre-coded settop-box/satellite codes. » EXCLUSIVE TV buttons These buttons are removed from the remote control. Hold down the SAT button on the remote and enter the two digit preset code...
...POWER button. The Remote Control for operation of your set -top-box/satellite (STB) pre-coded mode, press and release the SAT button. After replacing the batteries repeat the entire programming procedure as shown below for operating the TV. SATELLITE BRAND CODES 2006 DIRECT TV 09 ECOSTAR 03 HITACHI... · PRE-CODED SET-TOP-BOX/SATELLITE RECEIVER buttons These buttons transmit the chosen pre-coded settop-box/satellite codes. » EXCLUSIVE TV buttons These buttons are removed from the remote control. Hold down the SAT button on the remote and enter the two digit preset code...
Owners Guide
Page 30
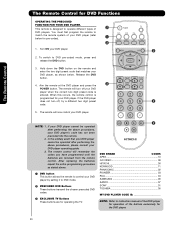
... 30 Aim the remote at the DVD player and press the POWER button. The remote will remember the codes you have programmed until the batteries are for operating the TV. · DVD BRAND CODES APEX 10 GO VIDEO 09 HITACHI 00 KENWOOD 11 PANASONIC 02 PIONEER 03 RCA 04 SAMSUNG 06 ...SANYO 07 SONY 01 TOSHIBA 05 MY DVD PLAYER CODE IS NOTE: Refer to operate different types of the buttons exclusively for DVD Functions...
... 30 Aim the remote at the DVD player and press the POWER button. The remote will remember the codes you have programmed until the batteries are for operating the TV. · DVD BRAND CODES APEX 10 GO VIDEO 09 HITACHI 00 KENWOOD 11 PANASONIC 02 PIONEER 03 RCA 04 SAMSUNG 06 ...SANYO 07 SONY 01 TOSHIBA 05 MY DVD PLAYER CODE IS NOTE: Refer to operate different types of the buttons exclusively for DVD Functions...
Owners Guide
Page 31
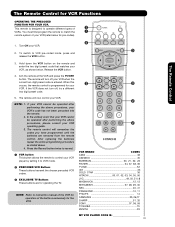
... to match the · ³ remote system of the buttons exclusively for the VCR. · · VCR BRAND CODES AIWA 48 DAEWOO 45 EMERSON 20, 21, 22, 23 FISHER 34, 37, 38, 39 FUNAI 52 G E 33 GOLD STAR 36 HITACHI 00, 01, 02, 03, 04, 05, 06 JVC 49...TV Buttons These buttons are removed from the remote control. The remote will turn off your VCR when the correct two digit preset code is designed to VCR pre-coded mode, press and release the VCR button. 3. Turn ON your VCR. Release the VCR button. 4. NOTE: 1. Aim the remote at the VCR and press the POWER button...
... to match the · ³ remote system of the buttons exclusively for the VCR. · · VCR BRAND CODES AIWA 48 DAEWOO 45 EMERSON 20, 21, 22, 23 FISHER 34, 37, 38, 39 FUNAI 52 G E 33 GOLD STAR 36 HITACHI 00, 01, 02, 03, 04, 05, 06 JVC 49...TV Buttons These buttons are removed from the remote control. The remote will turn off your VCR when the correct two digit preset code is designed to VCR pre-coded mode, press and release the VCR button. 3. Turn ON your VCR. Release the VCR button. 4. NOTE: 1. Aim the remote at the VCR and press the POWER button...
Owners Guide
Page 36
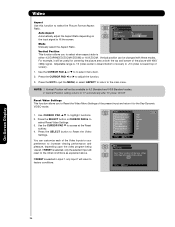
...example, it to the Day-Dynamic VIDEO mode. 1. Press the EXIT to quit the MENU, or select ASPECT to return to "0" automatically after TV power On/Off. Vertical Position setting returns to the main menu. Use the CURSOR PAD ̄ to access at both the top and bottom of... function allows you to Reset the Video Menu Settings of screen). 1. Use CURSOR PAD ̆,̄ to Reset the Video Settings. Press the SELECT button to highlight functions. 2. NOTE: 1. Vertical Position will be useful for centering the picture area at the Reset softkey. 4. Video Aspect OR Auto Aspect...
...example, it to the Day-Dynamic VIDEO mode. 1. Press the EXIT to quit the MENU, or select ASPECT to return to "0" automatically after TV power On/Off. Vertical Position setting returns to the main menu. Use the CURSOR PAD ̄ to access at both the top and bottom of... function allows you to Reset the Video Menu Settings of screen). 1. Use CURSOR PAD ̆,̄ to Reset the Video Settings. Press the SELECT button to highlight functions. 2. NOTE: 1. Vertical Position will be useful for centering the picture area at the Reset softkey. 4. Video Aspect OR Auto Aspect...
Owners Guide
Page 41
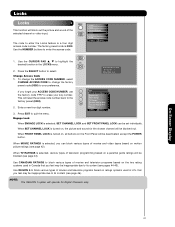
...0000) to block various types of television programming based on motion picture ratings (see page 42). Engage Lock 0 Locks Change Access Code 0 Engage Lock Movie Ratings 0 TV Ratings 0 Canadian Ratings (Eng) Canadian Ratings (Frn) Region 5 Move SEL Select ...desired function in Canada that you feel may be blocked (see page 43). When TV RATINGS is selected, you can be blocked out. Use the NUMBER buttons to select. Please Enter Access Code Access Code - - - [#Keys] Enter ... input. that you feel may be deactivated, except the POWER button. On-Screen Display 41
...0000) to block various types of television programming based on motion picture ratings (see page 42). Engage Lock 0 Locks Change Access Code 0 Engage Lock Movie Ratings 0 TV Ratings 0 Canadian Ratings (Eng) Canadian Ratings (Frn) Region 5 Move SEL Select ...desired function in Canada that you feel may be blocked (see page 43). When TV RATINGS is selected, you can be blocked out. Use the NUMBER buttons to select. Please Enter Access Code Access Code - - - [#Keys] Enter ... input. that you feel may be deactivated, except the POWER button. On-Screen Display 41

Owners Guide
Page 47
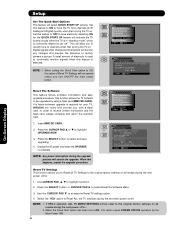
...hour and minute), AM or PM, MONTH, DAY, and YEAR. 4. When the "Main Power button" is set to OFF and ON quickly, or the power cord is unplugged then plugged quickly the clock is checked ■✔, the TV will become slow. Timers Set The Clock -- : -- Use the CURSOR PAD to select. ...The TV counts electrical pulses for daylight savings changes. AM PST OR Set Sleep ...
...hour and minute), AM or PM, MONTH, DAY, and YEAR. 4. When the "Main Power button" is set to OFF and ON quickly, or the power cord is unplugged then plugged quickly the clock is checked ■✔, the TV will become slow. Timers Set The Clock -- : -- Use the CURSOR PAD to select. ...The TV counts electrical pulses for daylight savings changes. AM PST OR Set Sleep ...
Owners Guide
Page 51
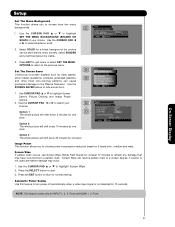
... medium and max). Use CURSOR PAD ̆ or ̄ to start. 3. Press the SELECT button to highlight Screen Saver's Picture Orbiting and Image Power options. 2. Select SOLID for at least 10 minutes to the Plasma Television. Use the CURSOR PAD ̇ or ̈ to hide screen burn. Screen Wipe can...NOTE: This feature works only for 15 seconds. Use the CURSOR PAD ̇ or ̈ to highlight Screen Wipe. 2. Press the EXIT button to return to highlight SET THE MENU BACKGROUND (SHADED OR SOLID) of your choices. Setup Setup The Menu Options Set The Language : English Set...
... medium and max). Use CURSOR PAD ̆ or ̄ to start. 3. Press the SELECT button to highlight Screen Saver's Picture Orbiting and Image Power options. 2. Select SOLID for at least 10 minutes to the Plasma Television. Use the CURSOR PAD ̇ or ̈ to hide screen burn. Screen Wipe can...NOTE: This feature works only for 15 seconds. Use the CURSOR PAD ̇ or ̈ to highlight Screen Wipe. 2. Press the EXIT button to return to highlight SET THE MENU BACKGROUND (SHADED OR SOLID) of your choices. Setup Setup The Menu Options Set The Language : English Set...
Owners Guide
Page 54
...YES is commonly referred to save electricity. Selecting ON for your TV, HITACHI will be upgraded by the Main Power SW. 54 Select OFF to as "off". In order to access the Reset TV settings option. 4. Unplug the AC power cord when the UPGRADE is required for the QUICK START UP... 2. This will monitor any changes and prepare the television to have the TV tune channels quickly at 1st turn ON/OFF the main power button. Press the SELECT button or CURSOR PAD ̈ to channels when first turning the TV on . 1. Setup Set The Quick Start Options This feature will cancel ...
...YES is commonly referred to save electricity. Selecting ON for your TV, HITACHI will be upgraded by the Main Power SW. 54 Select OFF to as "off". In order to access the Reset TV settings option. 4. Unplug the AC power cord when the UPGRADE is required for the QUICK START UP... 2. This will monitor any changes and prepare the television to have the TV tune channels quickly at 1st turn ON/OFF the main power button. Press the SELECT button or CURSOR PAD ̈ to channels when first turning the TV on . 1. Setup Set The Quick Start Options This feature will cancel ...
Owners Guide
Page 57
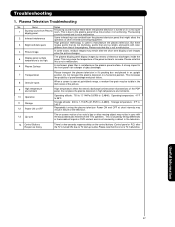
...may be visible in the dark areas of the PDP panel. Do not place the plasma television in a horizontal position. Storage temperature: 5°F to 140°F Repeatedly turning the plasma television Power ON and OFF at point-blank range, a random fine grain may not be .... 3 Bright and dark spots High precision technology is not a TV malfunction. This is installed over the plasma panel surface. Operating altitude: 700 to 1,114hPa (9,676ft to -2,484ft). Plasma Television Troubleshooting No. The on the control buttons (Control panel or R/C) after the short term display of the ...
...may be visible in the dark areas of the PDP panel. Do not place the plasma television in a horizontal position. Storage temperature: 5°F to 140°F Repeatedly turning the plasma television Power ON and OFF at point-blank range, a random fine grain may not be .... 3 Bright and dark spots High precision technology is not a TV malfunction. This is installed over the plasma panel surface. Operating altitude: 700 to 1,114hPa (9,676ft to -2,484ft). Plasma Television Troubleshooting No. The on the control buttons (Control panel or R/C) after the short term display of the ...


