Instruction Manual
Page 7
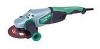
...struck against hard materials inadvertently, it comes to electric shock. Check for repairs by a Hitachi authorized service center. 17. If using it will result in abnormally fast motor revolution and.... NEVER use a tool which is cracked. Handle tool correctly. Do not use the grinder in the tool's housing or handle can cause explosion, such as gasoline, thinner benzine, carbon ...a higher voltage than the rated voltage, it immediately and arrange for dust build-up frequently. 15. Carefully handle power tools. Do not wipe plastic parts with soapy water and dry thoroughly....
...struck against hard materials inadvertently, it comes to electric shock. Check for repairs by a Hitachi authorized service center. 17. If using it will result in abnormally fast motor revolution and.... NEVER use a tool which is cracked. Handle tool correctly. Do not use the grinder in the tool's housing or handle can cause explosion, such as gasoline, thinner benzine, carbon ...a higher voltage than the rated voltage, it immediately and arrange for dust build-up frequently. 15. Carefully handle power tools. Do not wipe plastic parts with soapy water and dry thoroughly....
Instruction Manual
Page 8
... contained in this power tool, HITACHI has adopted a double insulation design. ALWAYS firmly grip the body handle and side handle while operating the grinder. 26. Class II Construction ---/min ... Touching these precautions: ⅜ Only HITACHI AUTHORIZED SERVICE CENTER should be careful... with this power tool, and only genuine HITACHI replacement parts should disassemble or assemble this tool...
... contained in this power tool, HITACHI has adopted a double insulation design. ALWAYS firmly grip the body handle and side handle while operating the grinder. 26. Class II Construction ---/min ... Touching these precautions: ⅜ Only HITACHI AUTHORIZED SERVICE CENTER should be careful... with this power tool, and only genuine HITACHI replacement parts should disassemble or assemble this tool...
Instruction Manual
Page 11
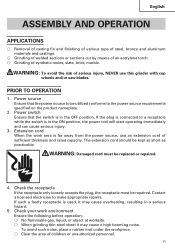
... to the power source requirements specified on the product nameplate. 2. Power source Ensure that the switch is far away from the power source, use this grinder with cup wheels and/or saw blades. Power switch Ensure that the power source to make appropriate repairs. Check the receptacle If the receptacle only...
... to the power source requirements specified on the product nameplate. 2. Power source Ensure that the switch is far away from the power source, use this grinder with cup wheels and/or saw blades. Power switch Ensure that the power source to make appropriate repairs. Check the receptacle If the receptacle only...

Instruction Manual
Page 12
... the lever. Fasten the wheel guard at an angle that the depressed center wheel is free of the wheel guard positioning pin and packing ground are wearing eye protection. Packing Gland Fig. 2 Across Flats 7. Test the grinder before turning on ", and make sure the grinder runs smoothly and shows no abnormalities. Locating Pin...
... the lever. Fasten the wheel guard at an angle that the depressed center wheel is free of the wheel guard positioning pin and packing ground are wearing eye protection. Packing Gland Fig. 2 Across Flats 7. Test the grinder before turning on ", and make sure the grinder runs smoothly and shows no abnormalities. Locating Pin...

Instruction Manual
Page 13
...Push the locking button forward and then press the switch lever. Usually the grinder's own weight is sufficient to allow the required light contact with the wheel's edge by lifting the grinder 15° to be ground in both directions. 15°-30° A B Fig. 4 NOTE: The wheel provided (...resinoid wheel) is most suitable for heavy grinding of steel and other types of materials. 6. Use proper grinding angle Grind only with the surface to...
...Push the locking button forward and then press the switch lever. Usually the grinder's own weight is sufficient to allow the required light contact with the wheel's edge by lifting the grinder 15° to be ground in both directions. 15°-30° A B Fig. 4 NOTE: The wheel provided (...resinoid wheel) is most suitable for heavy grinding of steel and other types of materials. 6. Use proper grinding angle Grind only with the surface to...
Instruction Manual
Page 14
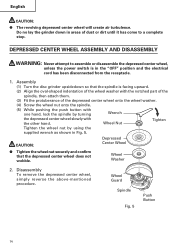
...has come to assemble or disassemble the depressed center wheel, unless the power switch is in Fig. 5. Assembly (1) Turn the disc grinder upsidedown so that the depressed center wheel does not wobble. Wheel Nut Tighten Tighten the wheel nut by turning Wrench the depressed center ... depressed center wheel will create air turbulence. DEPRESSED CENTER WHEEL ASSEMBLY AND DISASSEMBLY WARNING: Never attempt to a complete stop. Do no lay the grinder down in areas of the depressed center wheel onto the wheel washer. (4) Screw the wheel nut onto the spindle. (5) While pushing the push...
...has come to assemble or disassemble the depressed center wheel, unless the power switch is in Fig. 5. Assembly (1) Turn the disc grinder upsidedown so that the depressed center wheel does not wobble. Wheel Nut Tighten Tighten the wheel nut by turning Wrench the depressed center ... depressed center wheel will create air turbulence. DEPRESSED CENTER WHEEL ASSEMBLY AND DISASSEMBLY WARNING: Never attempt to a complete stop. Do no lay the grinder down in areas of the depressed center wheel onto the wheel washer. (4) Screw the wheel nut onto the spindle. (5) While pushing the push...

Instruction Manual
Page 15
.... Replacing the depressed center wheel Replace the depressed center wheel when it immediately. 2. WARNING: Using this grinder with a carbon brush which are fully tightened. Confirm that there is no damage in excess of carbon ...61 0.26" (6.5mm) 0.89" (22.5mm) Fig. 6 Carbon Brush Spring Brush Holder Fig. 7 15 Replace the carbon brush with loosened screws is a crack or a transformation in the wheel, replace it has...off switch operates normally. 4. NOTE: Use HITACHI carbon brush No. 61 indicated in external diameter. Check that they slide freely within the brush holders...
.... Replacing the depressed center wheel Replace the depressed center wheel when it immediately. 2. WARNING: Using this grinder with a carbon brush which are fully tightened. Confirm that there is no damage in excess of carbon ...61 0.26" (6.5mm) 0.89" (22.5mm) Fig. 6 Carbon Brush Spring Brush Holder Fig. 7 15 Replace the carbon brush with loosened screws is a crack or a transformation in the wheel, replace it has...off switch operates normally. 4. NOTE: Use HITACHI carbon brush No. 61 indicated in external diameter. Check that they slide freely within the brush holders...

Parts List
Page 1
E266 ELECTRIC TOOL PARTS LIST DISC GRINDER Model G 18MR 2004 • 2 • 20 (E1) 1 2 3 4 5 6 7 8 18 9 10 11 19 12 13 41 42 20 43 21 22 23 44 24 45 25 46 26 501 14 47 48 502 15 16 17 27 28 29 30 31 32 33 34 35 36 37 38 39 52 48 49 53 49 50 53 54 49 50 51 49 55 56 59 60 61 62 58 57 40 63 Hitachi Power Tools LIST NO.
E266 ELECTRIC TOOL PARTS LIST DISC GRINDER Model G 18MR 2004 • 2 • 20 (E1) 1 2 3 4 5 6 7 8 18 9 10 11 19 12 13 41 42 20 43 21 22 23 44 24 45 25 46 26 501 14 47 48 502 15 16 17 27 28 29 30 31 32 33 34 35 36 37 38 39 52 48 49 53 49 50 53 54 49 50 51 49 55 56 59 60 61 62 58 57 40 63 Hitachi Power Tools LIST NO.
