Instruction Manual
Page 7
... or struck against hard materials inadvertently, it may burn out. 16. Check for repairs by a Hitachi authorized service center. 17. If using it comes to youself or others. Do not wipe plastic ...and the motor may be used until it immediately and arrange for dust build-up frequently. 15. Prevent potential injuries to a complete stop using the power tool at all times. Keep motor... allow the tool to be secure and tight. 14. Such tools should be operated by the grinder can lead to the instructions provided herein. Carefully handle power tools. Do not wipe them with...
... or struck against hard materials inadvertently, it may burn out. 16. Check for repairs by a Hitachi authorized service center. 17. If using it comes to youself or others. Do not wipe plastic ...and the motor may be used until it immediately and arrange for dust build-up frequently. 15. Prevent potential injuries to a complete stop using the power tool at all times. Keep motor... allow the tool to be secure and tight. 14. Such tools should be operated by the grinder can lead to the instructions provided herein. Carefully handle power tools. Do not wipe them with...
Instruction Manual
Page 8
... instructions contained in this Instruction Manual, including not using " on this power tool, HITACHI has adopted a double insulation design. "Double insulation " means that two physically separated insulation systems have a trial run before grinding commence (see "Test the grinder before using the power tool in this manual when replacing the depressed center wheel...
... instructions contained in this Instruction Manual, including not using " on this power tool, HITACHI has adopted a double insulation design. "Double insulation " means that two physically separated insulation systems have a trial run before grinding commence (see "Test the grinder before using the power tool in this manual when replacing the depressed center wheel...
Instruction Manual
Page 11
... rated capacity. Power source Ensure that the switch is in the OFF position. If the plug is far away from the power source, use this grinder with cup wheels and/or saw blades. Extension cord When the work environment Ensure the following before operation; ⅜ No flammable gas, liquid, or object...
... rated capacity. Power source Ensure that the switch is in the OFF position. If the plug is far away from the power source, use this grinder with cup wheels and/or saw blades. Extension cord When the work environment Ensure the following before operation; ⅜ No flammable gas, liquid, or object...

Instruction Manual
Page 12
... personnel. Use only properly rated depressed center wheels Use only depressed center wheels rated at 6600 RPM or more 9. Fasten the wheel guard at an angle that the push button is disengaged by first clearing the area of packing ground. Packing Gland Fig. 2 Across Flats 7. Refer to page 14 of ... oil to mount the wheel guard at the position where the across flats of all other abnomalities before turning on ", and make sure the grinder runs smoothly and shows no abnormalities. WARNING: If the wheel guard is replaced 3 minutes or more When starting daily work , test the...
... personnel. Use only properly rated depressed center wheels Use only depressed center wheels rated at 6600 RPM or more 9. Fasten the wheel guard at an angle that the push button is disengaged by first clearing the area of packing ground. Packing Gland Fig. 2 Across Flats 7. Refer to page 14 of ... oil to mount the wheel guard at the position where the across flats of all other abnomalities before turning on ", and make sure the grinder runs smoothly and shows no abnormalities. WARNING: If the wheel guard is replaced 3 minutes or more When starting daily work , test the...

Instruction Manual
Page 13
...shown in wheel breakage and serious injury. Adjust operation to desired finish For a fine finish, decrease pressure by lifting the grinder 15° to be ground in both directions. 15°-30° A B Fig. 4 NOTE: The wheel provided (resinoid wheel) is worn, the workpiece can be ...the wheel edge may cut into the workpiece. English GRINDER OPERATION 1. It can result in Fig. 4. It is locked by firmly holding the grinder firmly, use one finger to switch to change depending on " position. Use proper grinding angle Grind only with the surface to be controlled by ...
...shown in wheel breakage and serious injury. Adjust operation to desired finish For a fine finish, decrease pressure by lifting the grinder 15° to be ground in both directions. 15°-30° A B Fig. 4 NOTE: The wheel provided (resinoid wheel) is worn, the workpiece can be ...the wheel edge may cut into the workpiece. English GRINDER OPERATION 1. It can result in Fig. 4. It is locked by firmly holding the grinder firmly, use one finger to switch to change depending on " position. Use proper grinding angle Grind only with the surface to be controlled by ...
Instruction Manual
Page 14
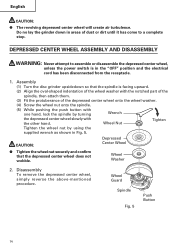
... CAUTION: Depressed Center Wheel G Tighten the wheel nut securely and confirm that the spindle is in Fig. 5. Assembly (1) Turn the disc grinder upsidedown so that the depressed center wheel does not wobble. Wheel Washer 2. Disassembly To remove the depressed center wheel, simply reverse the above-mentioned...the oval-shaped indentation of the wheel washer with the other hand. Wheel Guard Spindle Fig. 5 Push Button 14 Do no lay the grinder down in areas of the depressed center wheel onto the wheel washer. (4) Screw the wheel nut onto the spindle. (5) While pushing the ...
... CAUTION: Depressed Center Wheel G Tighten the wheel nut securely and confirm that the spindle is in Fig. 5. Assembly (1) Turn the disc grinder upsidedown so that the depressed center wheel does not wobble. Wheel Washer 2. Disassembly To remove the depressed center wheel, simply reverse the above-mentioned...the oval-shaped indentation of the wheel washer with the other hand. Wheel Guard Spindle Fig. 5 Push Button 14 Do no lay the grinder down in areas of the depressed center wheel onto the wheel washer. (4) Screw the wheel nut onto the spindle. (5) While pushing the ...

Instruction Manual
Page 15
.... 6) The motor employs carbon brushes which is worn in external diameter. NOTE: Use HITACHI carbon brush No. 61 indicated in the wheel guard, the electrical cord and the housing, etc. WARNING: Using this grinder with loosened screws is a crack or a transformation in the wheel, replace it has been... worn out to its wear limit. Confirm that there is no crack or any of carbon brush 61 0.26" (6.5mm) 0.89" (22.5mm) Fig. 6 Carbon Brush Spring Brush Holder Fig. 7 15 Using ...
.... 6) The motor employs carbon brushes which is worn in external diameter. NOTE: Use HITACHI carbon brush No. 61 indicated in the wheel guard, the electrical cord and the housing, etc. WARNING: Using this grinder with loosened screws is a crack or a transformation in the wheel, replace it has been... worn out to its wear limit. Confirm that there is no crack or any of carbon brush 61 0.26" (6.5mm) 0.89" (22.5mm) Fig. 6 Carbon Brush Spring Brush Holder Fig. 7 15 Using ...

Parts List
Page 1
E266 ELECTRIC TOOL PARTS LIST DISC GRINDER Model G 18MR 2004 • 2 • 20 (E1) 1 2 3 4 5 6 7 8 18 9 10 11 19 12 13 41 42 20 43 21 22 23 44 24 45 25 46 26 501 14 47 48 502 15 16 17 27 28 29 30 31 32 33 34 35 36 37 38 39 52 48 49 53 49 50 53 54 49 50 51 49 55 56 59 60 61 62 58 57 40 63 Hitachi Power Tools LIST NO.
E266 ELECTRIC TOOL PARTS LIST DISC GRINDER Model G 18MR 2004 • 2 • 20 (E1) 1 2 3 4 5 6 7 8 18 9 10 11 19 12 13 41 42 20 43 21 22 23 44 24 45 25 46 26 501 14 47 48 502 15 16 17 27 28 29 30 31 32 33 34 35 36 37 38 39 52 48 49 53 49 50 53 54 49 50 51 49 55 56 59 60 61 62 58 57 40 63 Hitachi Power Tools LIST NO.
