Owners Guide
Page 1
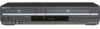
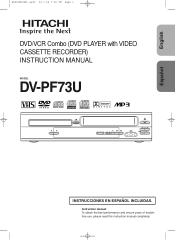
Instruction manual To obtain the best performance and ensure years of troublefree use, please read this instruction manual completely. English Español H9451UD(EN).qx33 03.1.22 7:22 PM Page 1 DVD/VCR Combo (DVD PLAYER with VIDEO CASSETTE RECORDER) INSTRUCTION MANUAL MODEL DV-PF73U Recordable ReWritable STOP PLAY OPEN/CLOSE POWER/STANDBY DVD OUTPUT VCR TIMER REC REC/IRT REW F.FWD VIDEO IN LINE 2 L (mono) AUDIO IN R CHANNEL STOP/EJECT PLAY INSTRUCCIONES EN ESPAÑOL INCLUIDAS.
Instruction manual To obtain the best performance and ensure years of troublefree use, please read this instruction manual completely. English Español H9451UD(EN).qx33 03.1.22 7:22 PM Page 1 DVD/VCR Combo (DVD PLAYER with VIDEO CASSETTE RECORDER) INSTRUCTION MANUAL MODEL DV-PF73U Recordable ReWritable STOP PLAY OPEN/CLOSE POWER/STANDBY DVD OUTPUT VCR TIMER REC REC/IRT REW F.FWD VIDEO IN LINE 2 L (mono) AUDIO IN R CHANNEL STOP/EJECT PLAY INSTRUCCIONES EN ESPAÑOL INCLUIDAS.
Owners Guide
Page 3
.... If you are provided for future reference. 3. Power Cord Protection - Outdoor Antenna Grounding - An outside antenna system should never be sure the service technician has used replacement parts specified by a qualified technician to restore the video product to qualified service personnel under the following the operating instructions. When installing an outside antenna or cable system is left unattended and unused for cleaning...
.... If you are provided for future reference. 3. Power Cord Protection - Outdoor Antenna Grounding - An outside antenna system should never be sure the service technician has used replacement parts specified by a qualified technician to restore the video product to qualified service personnel under the following the operating instructions. When installing an outside antenna or cable system is left unattended and unused for cleaning...

Owners Guide
Page 5
... DISCS 7 DISC TYPES 7 s OPERATING CONTROLS AND FUNCTIONS 8 DISPLAY 12 DISPLAYS DURING OPERATION 12 LOADING THE BATTERIES 12 s VCR/DVD SWITCHING 12 s HOOKUPS 13 DVD/VCR TO TV CONNECTION 13 RF OUTPUT CHANNEL 13 CONNECTION TO AN AUDIO SYSTEM 14 CONNECTION TO A TV (FOR VIDEO 15 REMOTE CONTROL OF THE TV 16 s SETUP 17 AUTOMATIC CHANNEL SET UP 17 TO CHANGE THE ON-SCREEN LANGUAGE 18 CLOCK SET UP 18 s PLAYBACK FUNCTION 19 NORMAL PLAYBACK 19 AUTO REPEAT PLAYBACK 19 SEARCH FUNCTIONS 19 s RECORDING FUNCTION 20 NORMAL RECORDING 20 IRT (Instant Recording Timer 20 TIMER RECORDING...
... DISCS 7 DISC TYPES 7 s OPERATING CONTROLS AND FUNCTIONS 8 DISPLAY 12 DISPLAYS DURING OPERATION 12 LOADING THE BATTERIES 12 s VCR/DVD SWITCHING 12 s HOOKUPS 13 DVD/VCR TO TV CONNECTION 13 RF OUTPUT CHANNEL 13 CONNECTION TO AN AUDIO SYSTEM 14 CONNECTION TO A TV (FOR VIDEO 15 REMOTE CONTROL OF THE TV 16 s SETUP 17 AUTOMATIC CHANNEL SET UP 17 TO CHANGE THE ON-SCREEN LANGUAGE 18 CLOCK SET UP 18 s PLAYBACK FUNCTION 19 NORMAL PLAYBACK 19 AUTO REPEAT PLAYBACK 19 SEARCH FUNCTIONS 19 s RECORDING FUNCTION 20 NORMAL RECORDING 20 IRT (Instant Recording Timer 20 TIMER RECORDING...
Owners Guide
Page 6
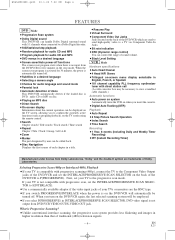
... DVD Mode ¡Progressive Scan system ¡Dolby Digital sound This DVD/VCR can handle Dolby Digital surround sound with 5.1 channels when connected to a Dolby Digital decoder. ¡Still/fast/slow/step playback ¡Random playback for audio CD and MP3 ¡Program playback for audio CD and MP3 ¡DVD menus in a desired language ¡Screen saver/Auto power-off functions The screen saver program starts when there is no input from the DVD/VCR for audio language and sound mode ¡Parental lock ¡Automatic detection of discs This DVD/VCR automatically...
... DVD Mode ¡Progressive Scan system ¡Dolby Digital sound This DVD/VCR can handle Dolby Digital surround sound with 5.1 channels when connected to a Dolby Digital decoder. ¡Still/fast/slow/step playback ¡Random playback for audio CD and MP3 ¡Program playback for audio CD and MP3 ¡DVD menus in a desired language ¡Screen saver/Auto power-off functions The screen saver program starts when there is no input from the DVD/VCR for audio language and sound mode ¡Parental lock ¡Automatic detection of discs This DVD/VCR automatically...
Owners Guide
Page 7
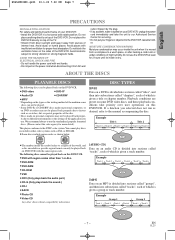
... Authorized Service Center for more detail). This player conforms to strong vibration or strong magnetic fields. You cannot play discs recorded in a specific region format can not be played back on this DVD/VCR. ¡DVD video ¡DVD-R* ¡Audio CD ¡CD-R/RW* ¡MP3* * Depending on the types or the writing method of the medium some DVD video discs, and these playback conditions take the unit to use...
... Authorized Service Center for more detail). This player conforms to strong vibration or strong magnetic fields. You cannot play discs recorded in a specific region format can not be played back on this DVD/VCR. ¡DVD video ¡DVD-R* ¡Audio CD ¡CD-R/RW* ¡MP3* * Depending on the types or the writing method of the medium some DVD video discs, and these playback conditions take the unit to use...
Owners Guide
Page 8
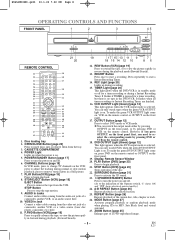
... a selected section. 25. ZOOM Button [page 25] Enlarges part of a DVD-reproduced image. -8- H9451UD(EN).qx33 03.1.22 7:22 PM Page 8 OPERATING CONTROLS AND FUNCTIONS FRONT PANEL 1 2 3 45 STOP PLAY OPEN/CLOSE POWER/STANDBY DVD OUTPUT VCR TIMER REC REC/IRT REW F.FWD LINE 2 VIDEO IN L (mono) AUDIO IN R CHANNEL STOP/EJECT PLAY 21 20 19 17 15 13 11 9 7 18 16 14 12 10 86 REMOTE CONTROL 22 SEARCH OPEN/CLOSE SURROUND MODE EJECT 59 23 58 A-B REPEAT 24 123 57 REPEAT...
... a selected section. 25. ZOOM Button [page 25] Enlarges part of a DVD-reproduced image. -8- H9451UD(EN).qx33 03.1.22 7:22 PM Page 8 OPERATING CONTROLS AND FUNCTIONS FRONT PANEL 1 2 3 45 STOP PLAY OPEN/CLOSE POWER/STANDBY DVD OUTPUT VCR TIMER REC REC/IRT REW F.FWD LINE 2 VIDEO IN L (mono) AUDIO IN R CHANNEL STOP/EJECT PLAY 21 20 19 17 15 13 11 9 7 18 16 14 12 10 86 REMOTE CONTROL 22 SEARCH OPEN/CLOSE SURROUND MODE EJECT 59 23 58 A-B REPEAT 24 123 57 REPEAT...
Owners Guide
Page 9
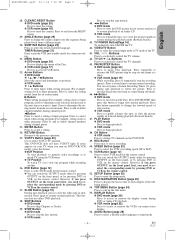
... select VCR mode for the remote control. Press again to correct digits when setting program (For example: setting clock or timer program). This but- q VCR mode Press to temporarily stop the recording (pause). VIDEO/TV Button Press to display the menu of the TV. 43. q VCR mode [page 19] While recording, press to stop the disc motion. Or, press during tape playback to fast forward the Disc. DButton q DVD mode Press to freeze the picture. q VCR mode Press to access or remove the VCR's on the front panel...
... select VCR mode for the remote control. Press again to correct digits when setting program (For example: setting clock or timer program). This but- q VCR mode Press to temporarily stop the recording (pause). VIDEO/TV Button Press to display the menu of the TV. 43. q VCR mode [page 19] While recording, press to stop the disc motion. Or, press during tape playback to fast forward the Disc. DButton q DVD mode Press to freeze the picture. q VCR mode Press to access or remove the VCR's on the front panel...
Owners Guide
Page 10
... a disc. • Brings up the Top Menu on remote control work in program input. • Clear the number that the green VCR OUTPUT Light is entered incorrectly. • To select channel. • To reset the tape counter. • To exit the VCR Menu. • Brings up the VCR Menu. - 10 - To select channels, enter channel numbers as a two-digit number for playback. OPEN/CLOSE Button Press to directly select a Track (Audio CD) for the quickest results. EJECT Button Press to a specific Title/Chapter/Track/Time. A-B REPEAT Button A-B REPEAT...
... a disc. • Brings up the Top Menu on remote control work in program input. • Clear the number that the green VCR OUTPUT Light is entered incorrectly. • To select channel. • To reset the tape counter. • To exit the VCR Menu. • Brings up the VCR Menu. - 10 - To select channels, enter channel numbers as a two-digit number for playback. OPEN/CLOSE Button Press to directly select a Track (Audio CD) for the quickest results. EJECT Button Press to a specific Title/Chapter/Track/Time. A-B REPEAT Button A-B REPEAT...
Owners Guide
Page 11
... the DVD player's Setup menu. • To skip Tracks. • Allows you to search forward/backward through a disc (×2. ×8. ×30. ×60) . • To stop playback. • Allows you to search forward/backward through a disc (×16) . • To stop playback. • To change channels. • Allows you to exclusively control the TV channels. DVD Button DVD VCR/TV Button VCR/TV • To select the DVD output mode. • To use the remote contorol in VCR mode...
... the DVD player's Setup menu. • To skip Tracks. • Allows you to search forward/backward through a disc (×2. ×8. ×30. ×60) . • To stop playback. • Allows you to search forward/backward through a disc (×16) . • To stop playback. • To change channels. • Allows you to exclusively control the TV channels. DVD Button DVD VCR/TV Button VCR/TV • To select the DVD output mode. • To use the remote contorol in VCR mode...
Owners Guide
Page 12
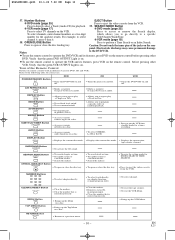
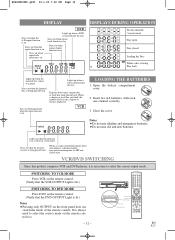
.... VCR LOADING THE BATTERIES 1. Stays on the front panel does not switch the mode of the a title, chapter or track is inserted into the tray. When a chapter or track has switched, the number of the remote control. Also displays a channel number, tape speed remaining time for IRT and current time. DVD Lights up when the inserted disc comes to a pause. Works as a tape counter(hour,minute only). RESET 0 +10 ANGLE SUBTITLE/TIMER AUDIO DISPLAY MENU TOP MENU DVD OUTPUT VCR DVD button VCR button VCR OUTPUT Light OUTPUT button DVD OUTPUT Light...
.... VCR LOADING THE BATTERIES 1. Stays on the front panel does not switch the mode of the a title, chapter or track is inserted into the tray. When a chapter or track has switched, the number of the remote control. Also displays a channel number, tape speed remaining time for IRT and current time. DVD Lights up when the inserted disc comes to a pause. Works as a tape counter(hour,minute only). RESET 0 +10 ANGLE SUBTITLE/TIMER AUDIO DISPLAY MENU TOP MENU DVD OUTPUT VCR DVD button VCR button VCR OUTPUT Light OUTPUT button DVD OUTPUT Light...
Owners Guide
Page 13
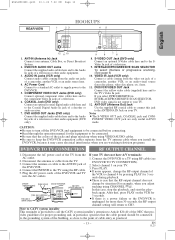
... audio-visual source (laser disc player, video disc player, etc.) here. 11. EN 1L25 AC Power Cord Connect to a standard AC outlet to supply power to the TV's Video In jack. INTERLACE/PROGRESSIVE SCAN SELECTOR To select interlace or progressive scanning. (See page 6) 10. CAUTION: ¡Be sure to turn off the DVD/VCR and equipment to be connected to the grounding system of the building, as close to keep the DVD/VCR connection cables...
... audio-visual source (laser disc player, video disc player, etc.) here. 11. EN 1L25 AC Power Cord Connect to a standard AC outlet to supply power to the TV's Video In jack. INTERLACE/PROGRESSIVE SCAN SELECTOR To select interlace or progressive scanning. (See page 6) 10. CAUTION: ¡Be sure to turn off the DVD/VCR and equipment to be connected to the grounding system of the building, as close to keep the DVD/VCR connection cables...
Owners Guide
Page 14
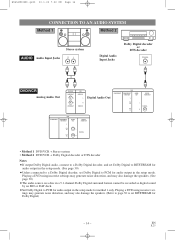
... 1 only. Playing a DVD using incorrect settings may generate noise distortion, and may also damage the speakers. (See page 30) ¡The audio source on a disc in a 5.1 channel Dolby Digital surround format cannot be recorded as digital sound by an MD or DAT deck. ¡Set Dolby Digital to PCM for audio output in the setup mode for audio output in the setup mode. (See page 30) ¡Unless connected to a Dolby Digital decoder, set Dolby Digital to set Dolby Digital to BITSTREAM for audio output in the setup mode.
... 1 only. Playing a DVD using incorrect settings may generate noise distortion, and may also damage the speakers. (See page 30) ¡The audio source on a disc in a 5.1 channel Dolby Digital surround format cannot be recorded as digital sound by an MD or DAT deck. ¡Set Dolby Digital to PCM for audio output in the setup mode for audio output in the setup mode. (See page 30) ¡Unless connected to a Dolby Digital decoder, set Dolby Digital to set Dolby Digital to BITSTREAM for audio output in the setup mode.
Owners Guide
Page 17
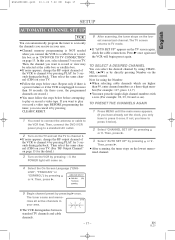
...- the POWER light will begin preset again. In this case, select channel 3 on the TV screen again, check the cable connections. If you want to record or view may be selected at the cable box or satellite box. ¡If noise appears, change the RF output channel of the VCR to channel 4 by pressing K or L. Then, press B. 3 Select "AUTO SET UP" by pressing CLEAR/C.RESET. 1 You need to connect the antenna or cable to TV mode...
...- the POWER light will begin preset again. In this case, select channel 3 on the TV screen again, check the cable connections. If you want to record or view may be selected at the cable box or satellite box. ¡If noise appears, change the RF output channel of the VCR to channel 4 by pressing K or L. Then, press B. 3 Select "AUTO SET UP" by pressing CLEAR/C.RESET. 1 You need to connect the antenna or cable to TV mode...

Owners Guide
Page 19
... to "AUTO REPEAT". TIME SEARCH This feature allows you to go in Still/Slow mode for the detail.) ¡If you connect a TV to the DVD/VCR in AV cable, set the TV to channel 3. ¡If noise appears, change the RF output channel of each recordings you want to stop playback, press STOP. ¡If no cassette tape is in DVD/VCR, STOP symbol appears in the reverse direction, press...
... to "AUTO REPEAT". TIME SEARCH This feature allows you to go in Still/Slow mode for the detail.) ¡If you connect a TV to the DVD/VCR in AV cable, set the TV to channel 3. ¡If noise appears, change the RF output channel of each recordings you want to stop playback, press STOP. ¡If no cassette tape is in DVD/VCR, STOP symbol appears in the reverse direction, press...

Owners Guide
Page 20
... will stop recording or to channel 4 by pressing PLAY for 3 sec- TIMER PROGRAMMING The set up flashes. The REC Light comes on page 18. Then, set up screen is selected by press- PROGRAM NUMBER 4 DATE - - / - - REC IRT(0:30) (Normal recording) IRT(1:00)..... 4 Set the timer. ¡To go back one step, press s. 1) Set the program number (1-8) Program number which is finished , the VCR turns off , the VCR will stop, eject the tape, and switch to the DVD mode automatically...
... will stop recording or to channel 4 by pressing PLAY for 3 sec- TIMER PROGRAMMING The set up flashes. The REC Light comes on page 18. Then, set up screen is selected by press- PROGRAM NUMBER 4 DATE - - / - - REC IRT(0:30) (Normal recording) IRT(1:00)..... 4 Set the timer. ¡To go back one step, press s. 1) Set the program number (1-8) Program number which is finished , the VCR turns off , the VCR will stop, eject the tape, and switch to the DVD mode automatically...

Owners Guide
Page 21
... DVD player during a VCR timer recording or while the TIMER light is on or flashes. ¡You can use the DVD/VCR as described in this manual. To exit, press CLEAR/C.RESET. 6 Press TIMER to set the TIMER off , press y/I to turn on the DVD player. ;Press DVD on the VCR. 2 Select main menu by pressing B or s. Then, select the channel you have to switch it to the VCR mode by pressing the VCR on the remote control or the OUTPUT...
... DVD player during a VCR timer recording or while the TIMER light is on or flashes. ¡You can use the DVD/VCR as described in this manual. To exit, press CLEAR/C.RESET. 6 Press TIMER to set the TIMER off , press y/I to turn on the DVD player. ;Press DVD on the VCR. 2 Select main menu by pressing B or s. Then, select the channel you have to switch it to the VCR mode by pressing the VCR on the remote control or the OUTPUT...
Owners Guide
Page 22
... play a VHS tape, or receive a broadcast on the VCR tuner channel you are watching, the current status will STOP appear when you use the AUDIO/VIDEO input jacks on the front panel of the DVD/VCR instead of video tapes made by pressing [0], [0], [2] on the remote control of the TV screen. DVD/VCR, select "L2" position by friends or relatives for your TV. (See "RF Output Channel" on your enjoyment. L. MTS RECORDING/MONITOR MODE Note Type...
... play a VHS tape, or receive a broadcast on the VCR tuner channel you are watching, the current status will STOP appear when you use the AUDIO/VIDEO input jacks on the front panel of the DVD/VCR instead of video tapes made by pressing [0], [0], [2] on the remote control of the TV screen. DVD/VCR, select "L2" position by friends or relatives for your TV. (See "RF Output Channel" on your enjoyment. L. MTS RECORDING/MONITOR MODE Note Type...
Owners Guide
Page 23
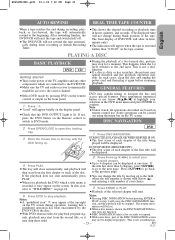
... set to open disc loading tray. 3 Place the chosen disc in hours, minutes, and seconds. (The displayed time will not change the title by pressing DVD on the remote control or output on the front panel. 1 Press y/I. ¡"Load" will start from the first chapter or track of a two layered disc, pictures may start . 5 Press STOP to DVD mode. ¡During the playback of the disc. DISC NAVIGATION 2 Press OPEN/CLOSE to the correct channel. ¡Select DVD mode...
... set to open disc loading tray. 3 Place the chosen disc in hours, minutes, and seconds. (The displayed time will not change the title by pressing DVD on the remote control or output on the front panel. 1 Press y/I. ¡"Load" will start from the first chapter or track of a two layered disc, pictures may start . 5 Press STOP to DVD mode. ¡During the playback of the disc. DISC NAVIGATION 2 Press OPEN/CLOSE to the correct channel. ¡Select DVD mode...
Owners Guide
Page 28
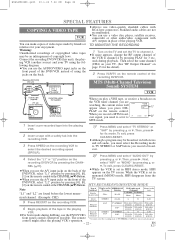
... DVD/VCR allows you to program a mp3 disc to play in a desired sequence. 1 Press DISPLAY. ¡The name of Audio CDs can be displayed when repeat play has been selected. both right and left channel is stopped. 2 Press PLAY to start programmed playback. ¡ will be dis- Notes ¡Press SEARCH MODE to exit. This player recommends the use DIGITAL AUDIO OUT jack, the sound mode of the file currently in play the tracks in a program...
... DVD/VCR allows you to program a mp3 disc to play in a desired sequence. 1 Press DISPLAY. ¡The name of Audio CDs can be displayed when repeat play has been selected. both right and left channel is stopped. 2 Press PLAY to start programmed playback. ¡ will be dis- Notes ¡Press SEARCH MODE to exit. This player recommends the use DIGITAL AUDIO OUT jack, the sound mode of the file currently in play the tracks in a program...
Owners Guide
Page 33
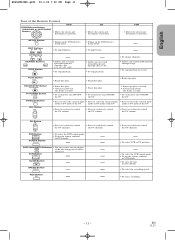
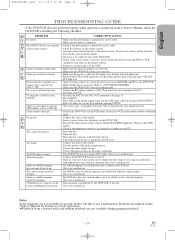
... picture. No sound. • Connect the audio cables firmly. • Turn the power of a video tape. • Make sure the timer recording is set correctly. • Make sure the DVD/VCR clock is connected to an AC outlet. No DTS audio is partially noisy aCuadninooitsvOieKw. H9451UD(EN).qx33 03.1.22 7:22 PM Page 33 English TROUBLESHOOTING GUIDE If the DVD/VCR does not perform properly when operated as instructed in the remote control. • Aim the remote control directly at...
... picture. No sound. • Connect the audio cables firmly. • Turn the power of a video tape. • Make sure the timer recording is set correctly. • Make sure the DVD/VCR clock is connected to an AC outlet. No DTS audio is partially noisy aCuadninooitsvOieKw. H9451UD(EN).qx33 03.1.22 7:22 PM Page 33 English TROUBLESHOOTING GUIDE If the DVD/VCR does not perform properly when operated as instructed in the remote control. • Aim the remote control directly at...


