Owners Guide
Page 3
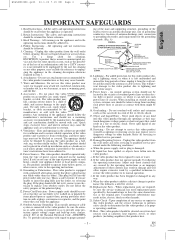
... of time, unplug it is grounded so as the original part. Servicing - Damage Requiring Service - Adjust only those controls that for long periods of an authorization code for a CATV converter, is meant for cleaning or any service or repairs to this video product from touching such power lines or circuits as opening or removing covers may expose you to service this video product from the type...
... of time, unplug it is grounded so as the original part. Servicing - Damage Requiring Service - Adjust only those controls that for long periods of an authorization code for a CATV converter, is meant for cleaning or any service or repairs to this video product from touching such power lines or circuits as opening or removing covers may expose you to service this video product from the type...
Owners Guide
Page 5
... DISCS 7 DISC TYPES 7 s OPERATING CONTROLS AND FUNCTIONS 8 DISPLAY 12 DISPLAYS DURING OPERATION 12 LOADING THE BATTERIES 12 s VCR/DVD SWITCHING 12 s HOOKUPS 13 DVD/VCR TO TV CONNECTION 13 RF OUTPUT CHANNEL 13 CONNECTION TO AN AUDIO SYSTEM 14 CONNECTION TO A TV (FOR VIDEO 15 REMOTE CONTROL OF THE TV 16 s SETUP 17 AUTOMATIC CHANNEL SET UP 17 TO CHANGE THE ON-SCREEN LANGUAGE 18 CLOCK SET UP 18 s PLAYBACK FUNCTION 19 NORMAL PLAYBACK 19 AUTO REPEAT PLAYBACK 19 SEARCH FUNCTIONS 19 s RECORDING FUNCTION 20 NORMAL RECORDING 20 IRT (Instant Recording Timer 20 TIMER RECORDING...
... DISCS 7 DISC TYPES 7 s OPERATING CONTROLS AND FUNCTIONS 8 DISPLAY 12 DISPLAYS DURING OPERATION 12 LOADING THE BATTERIES 12 s VCR/DVD SWITCHING 12 s HOOKUPS 13 DVD/VCR TO TV CONNECTION 13 RF OUTPUT CHANNEL 13 CONNECTION TO AN AUDIO SYSTEM 14 CONNECTION TO A TV (FOR VIDEO 15 REMOTE CONTROL OF THE TV 16 s SETUP 17 AUTOMATIC CHANNEL SET UP 17 TO CHANGE THE ON-SCREEN LANGUAGE 18 CLOCK SET UP 18 s PLAYBACK FUNCTION 19 NORMAL PLAYBACK 19 AUTO REPEAT PLAYBACK 19 SEARCH FUNCTIONS 19 s RECORDING FUNCTION 20 NORMAL RECORDING 20 IRT (Instant Recording Timer 20 TIMER RECORDING...
Owners Guide
Page 6
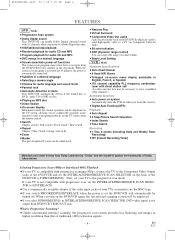
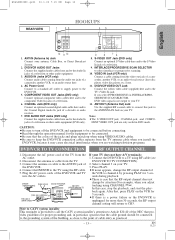
... view scrambled cable channels.) Automatic functions ¡Auto power on system Automatically turns the VCR on -screen menu display selectable in the stop mode. Next, set your TV to a Dolby Digital decoder. ¡Still/fast/slow/step playback ¡Random playback for audio CD and MP3 ¡Program playback for audio language and sound mode ¡Parental lock ¡Automatic detection of discs This DVD/VCR automatically detects if the loaded disc is DVD, audio CD or MP3 on disc. ¡Playing an MP3 disc ¡Direct Search ¡On-screen display...
... view scrambled cable channels.) Automatic functions ¡Auto power on system Automatically turns the VCR on -screen menu display selectable in the stop mode. Next, set your TV to a Dolby Digital decoder. ¡Still/fast/slow/step playback ¡Random playback for audio CD and MP3 ¡Program playback for audio language and sound mode ¡Parental lock ¡Automatic detection of discs This DVD/VCR automatically detects if the loaded disc is DVD, audio CD or MP3 on disc. ¡Playing an MP3 disc ¡Direct Search ¡On-screen display...
Owners Guide
Page 7
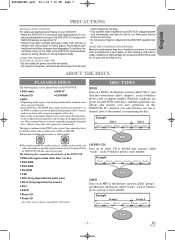
... a function you use. Avoid places with region codes other than 1 or ALL. ¡DVD-ROM ¡DVD-RAM ¡CD-ROM ¡VSD ¡CDV (Only plays back the audio part.) ¡CD-G (Only plays back the sound.) ¡CD-I ¡SACD ¡Photo CD ¡Video CD Any other color systems such as PAL or SECAM. ¡Some discs include region codes as shown below. This player...
... a function you use. Avoid places with region codes other than 1 or ALL. ¡DVD-ROM ¡DVD-RAM ¡CD-ROM ¡VSD ¡CDV (Only plays back the audio part.) ¡CD-G (Only plays back the sound.) ¡CD-I ¡SACD ¡Photo CD ¡Video CD Any other color systems such as PAL or SECAM. ¡Some discs include region codes as shown below. This player...
Owners Guide
Page 8
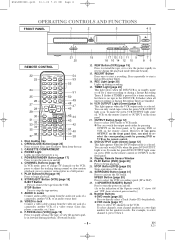
... the front panel, or by .) 24. q VCR mode [page 17] Press to directly select a Track (Audio CD) for a timer recording or during a Instant Recording Timer. H9450UD(EN).qx33 03.1.22 7:19 PM Page 8 OPERATING CONTROLS AND FUNCTIONS FRONT PANEL 1 2 3 45 STOP PLAY OPEN/CLOSE POWER/STANDBY DVD OUTPUT VCR TIMER REC REC/IRT REW F.FWD LINE 2 VIDEO IN L (mono) AUDIO IN R CHANNEL STOP/EJECT PLAY 21 20 19 17 15 13 11 9 7 18 16 14 12 10 86 REMOTE CONTROL 22 23...
... the front panel, or by .) 24. q VCR mode [page 17] Press to directly select a Track (Audio CD) for a timer recording or during a Instant Recording Timer. H9450UD(EN).qx33 03.1.22 7:19 PM Page 8 OPERATING CONTROLS AND FUNCTIONS FRONT PANEL 1 2 3 45 STOP PLAY OPEN/CLOSE POWER/STANDBY DVD OUTPUT VCR TIMER REC REC/IRT REW F.FWD LINE 2 VIDEO IN L (mono) AUDIO IN R CHANNEL STOP/EJECT PLAY 21 20 19 17 15 13 11 9 7 18 16 14 12 10 86 REMOTE CONTROL 22 23...
Owners Guide
Page 9
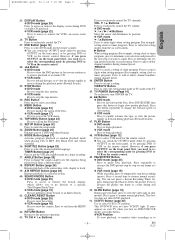
... view the picture rapidly in fast reverse motion or to reverse playback of a DVD-reproduced image. 35. Sets Black level and virtual surround. 36. A-B REPEAT Button [page 26] Repeats playback of slow motion. CLEAR/C.RESET Button q DVD mode [page 25] Press to determine the setting modes from the on the front panel first, you press OUTPUT on screen menu. Press to reset the setting. Press to begin playback. 48. VIDEO/TV Button Press to select DVD mode for the remote control. q VCR mode Press...
... view the picture rapidly in fast reverse motion or to reverse playback of a DVD-reproduced image. 35. Sets Black level and virtual surround. 36. A-B REPEAT Button [page 26] Repeats playback of slow motion. CLEAR/C.RESET Button q DVD mode [page 25] Press to determine the setting modes from the on the front panel first, you press OUTPUT on screen menu. Press to reset the setting. Press to begin playback. 48. VIDEO/TV Button Press to select DVD mode for the remote control. q VCR mode Press...

Owners Guide
Page 10
... channel. NUMBER Buttons 1 2 3 4 5 6 7 8 9 0 +10 CLEAR/C.RESET Button CLEAR C.RESET • To select chapter directly. • Clear the makers. • Clear the number that the green VCR OUTPUT Light is on. ¡To use display function, or input program order. • Clear the makers. • Removes status No. MENU Button MENU TOP MENU Button TOP MENU RETURN Button RETURN • Brings up the Menu on a disc. • Brings up the VCR Menu. - 10 - OPEN/CLOSE Button Press to open or close the disc loading tray. 54. POWER/STANDBY Button DVD • Turns the DVD...
... channel. NUMBER Buttons 1 2 3 4 5 6 7 8 9 0 +10 CLEAR/C.RESET Button CLEAR C.RESET • To select chapter directly. • Clear the makers. • Clear the number that the green VCR OUTPUT Light is on. ¡To use display function, or input program order. • Clear the makers. • Removes status No. MENU Button MENU TOP MENU Button TOP MENU RETURN Button RETURN • Brings up the Menu on a disc. • Brings up the VCR Menu. - 10 - OPEN/CLOSE Button Press to open or close the disc loading tray. 54. POWER/STANDBY Button DVD • Turns the DVD...
Owners Guide
Page 11
...; Press to select the external input • Press to select the external input • Press to exclusively control the TV channels. mode or TV mode of the Remote Control ENTER/Arrow Button (UP/DOWN or LEFT/RIGHT Button) TV CH VOL VIDEO/TV ENTER TV CH VOL DVD • Moves the cursor and determines its position. • Brings up the DVD player's Setup menu. EN 1L25 English H9450UD(EN...
...; Press to select the external input • Press to select the external input • Press to exclusively control the TV channels. mode or TV mode of the Remote Control ENTER/Arrow Button (UP/DOWN or LEFT/RIGHT Button) TV CH VOL VIDEO/TV ENTER TV CH VOL DVD • Moves the cursor and determines its position. • Brings up the DVD player's Setup menu. EN 1L25 English H9450UD(EN...
Owners Guide
Page 12
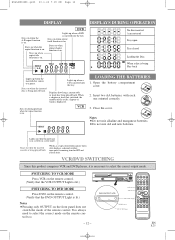
... disc comes to select the correct mode on the remote control too. - 12 - H9450UD(EN).qx33 03.1.22 7:19 PM Page 12 DISPLAY Stays on when the A-B repeat function is on. Stays on when the repeat function is being played back. STOP PLAY OPEN/CLOSE POWER/STANDBY DVD OUTPUT VCR TIMER REC REC/OTR REW F.FWD LINE 2 VIDEO IN L (mono) AUDIO IN R CHANNEL STOP/EJECT PLAY DVD OUTPUT VCR DVD button VCR button VCR OUTPUT Light OUTPUT button SURROUND OPEN/CLOSE SPEED AUDIO EJECT 1 2 4 5 7 8 DISPLAY 4 0 TV DVD SKIP/CH. 3 SKIP/CH. 6 VCR/TV 9 SLOW +10 VCR PAUSE/STEP PLAY STOP...
... disc comes to select the correct mode on the remote control too. - 12 - H9450UD(EN).qx33 03.1.22 7:19 PM Page 12 DISPLAY Stays on when the A-B repeat function is on. Stays on when the repeat function is being played back. STOP PLAY OPEN/CLOSE POWER/STANDBY DVD OUTPUT VCR TIMER REC REC/OTR REW F.FWD LINE 2 VIDEO IN L (mono) AUDIO IN R CHANNEL STOP/EJECT PLAY DVD OUTPUT VCR DVD button VCR button VCR OUTPUT Light OUTPUT button SURROUND OPEN/CLOSE SPEED AUDIO EJECT 1 2 4 5 7 8 DISPLAY 4 0 TV DVD SKIP/CH. 3 SKIP/CH. 6 VCR/TV 9 SLOW +10 VCR PAUSE/STEP PLAY STOP...
Owners Guide
Page 13
... PLAY for the equipment to be connected before connecting. ¡Read through the operation manual for 3 seconds during playback. ¡There is unplugged for proper grounding and, in DVD mode. Select channel 3 on your TV. 12. AC Power Cord Connect to a standard AC outlet to supply power to the TV's Video In jack. INTERLACE/PROGRESSIVE SCAN SELECTOR to the TV using RF cable (see DVD/VCR TO TV CONNECTION). 2. COMPONENT VIDEO OUT Jacks (DVD only) Connect optional component video cables...
... PLAY for the equipment to be connected before connecting. ¡Read through the operation manual for 3 seconds during playback. ¡There is unplugged for proper grounding and, in DVD mode. Select channel 3 on your TV. 12. AC Power Cord Connect to a standard AC outlet to supply power to the TV's Video In jack. INTERLACE/PROGRESSIVE SCAN SELECTOR to the TV using RF cable (see DVD/VCR TO TV CONNECTION). 2. COMPONENT VIDEO OUT Jacks (DVD only) Connect optional component video cables...
Owners Guide
Page 14
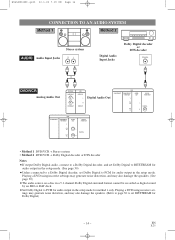
... a 5.1 channel Dolby Digital surround format cannot be recorded as digital sound by an MD or DAT deck. ¡Set Dolby Digital to PCM for audio output in the setup mode for method 1 only. EN 1L25 H9450UD(EN).qx33 03.1.22 7:19 PM Page 14 CONNECTION TO AN AUDIO SYSTEM Method 1 Method 2 Stereo system AUDIO Audio Input Jacks R L Digital Audio Input Jacks Dolby Digital decoder or DTS decoder COAXIAL DVD/VCR Analog Audio Out DVD/VCR AUDIO OUT L R VIDEO OUT VCR AUDIO IN L R VIDEO IN Digital Audio Out S-VIDEO OUT DVD COMPONENT VIDEO...
... a 5.1 channel Dolby Digital surround format cannot be recorded as digital sound by an MD or DAT deck. ¡Set Dolby Digital to PCM for audio output in the setup mode for method 1 only. EN 1L25 H9450UD(EN).qx33 03.1.22 7:19 PM Page 14 CONNECTION TO AN AUDIO SYSTEM Method 1 Method 2 Stereo system AUDIO Audio Input Jacks R L Digital Audio Input Jacks Dolby Digital decoder or DTS decoder COAXIAL DVD/VCR Analog Audio Out DVD/VCR AUDIO OUT L R VIDEO OUT VCR AUDIO IN L R VIDEO IN Digital Audio Out S-VIDEO OUT DVD COMPONENT VIDEO...
Owners Guide
Page 16
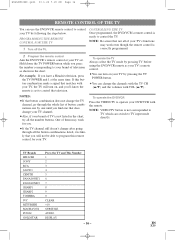
... You can use the DVD/VCR remote control to TV input mode directly. PROGRAMMING THE REMOTE CONTROL FOR THE TV 1 Turn off the TV. If you press the number corresponding to program this button combination sends a signal that does change after going through the whole list of them may work for your TV. NOTE: VIDEO/TV button is set . To operate the TV Always select the TV mode by pressing TV before using the DVD/VCR remote as shown...
... You can use the DVD/VCR remote control to TV input mode directly. PROGRAMMING THE REMOTE CONTROL FOR THE TV 1 Turn off the TV. If you press the number corresponding to program this button combination sends a signal that does change after going through the whole list of them may work for your TV. NOTE: VIDEO/TV button is set . To operate the TV Always select the TV mode by pressing TV before using the DVD/VCR remote as shown...
Owners Guide
Page 17
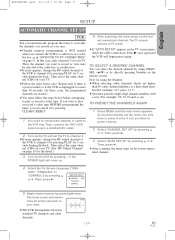
... to channel 4 by directly pressing Number on the remote control. Then, connect the DVD /VCR power plug to a standard AC outlet. 2 Turn on your area. Then select the same channel (CH4) on the TV and set the clock, you want to record or view may be selected at the cable box or satellite box. ¡If noise appears, change the RF output channel of the VCR to press it by pressing CLEAR/C.RESET. 1 You need to connect...
... to channel 4 by directly pressing Number on the remote control. Then, connect the DVD /VCR power plug to a standard AC outlet. 2 Turn on your area. Then select the same channel (CH4) on the TV and set the clock, you want to record or view may be selected at the cable box or satellite box. ¡If noise appears, change the RF output channel of the VCR to press it by pressing CLEAR/C.RESET. 1 You need to connect...
Owners Guide
Page 19
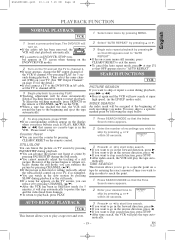
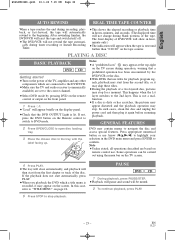
... adjustment will play the tape auto- The DVD/VCR will turn on. ¡If the safety tab has been removed, the VCR will be done automatically (Digital Tracking function) when you start playback automatically. ¡If a cassette is in DVD/VCR, STOP symbol appears in TV screen when turning on the DVD/VCR(VCR mode). 2 Turn on the display when you press buttons such as PLAY, RECORD, D or E, that the Index Search menu appears. 2 Enter the number...
... adjustment will play the tape auto- The DVD/VCR will turn on. ¡If the safety tab has been removed, the VCR will be done automatically (Digital Tracking function) when you start playback automatically. ¡If a cassette is in DVD/VCR, STOP symbol appears in TV screen when turning on the DVD/VCR(VCR mode). 2 Turn on the display when you press buttons such as PLAY, RECORD, D or E, that the Index Search menu appears. 2 Enter the number...
Owners Guide
Page 20
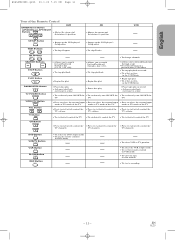
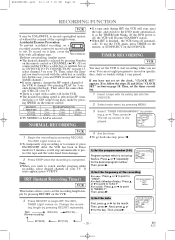
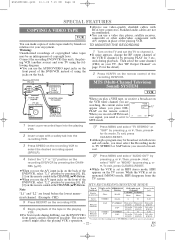
... switch to the DVD mode automatically as in SP (stan- EN 1L25 Tape Speed Recording/Playback Time Type of the copyright owner. Then, set the timer recording. 1 Insert a tape with the cable box or satellite box. The REC, TIMER Light comes on it will stop automatically to protect the tape and the video head from damage. 2 Press STOP when the recording is selected. Change the recording length by pressing PLAY for 3 sec- PROGRAM NUMBER 4 DATE - - / - - To record...
... switch to the DVD mode automatically as in SP (stan- EN 1L25 Tape Speed Recording/Playback Time Type of the copyright owner. Then, set the timer recording. 1 Insert a tape with the cable box or satellite box. The REC, TIMER Light comes on it will stop automatically to protect the tape and the video head from damage. 2 Press STOP when the recording is selected. Change the recording length by pressing PLAY for 3 sec- PROGRAM NUMBER 4 DATE - - / - - To record...
Owners Guide
Page 21
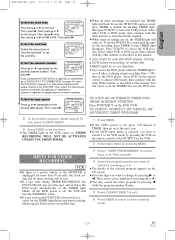
... YOU PRESS TIMER. 1 Press TIMER. ¡If the VCR's power is not in the DVD/VCR or does not have to switch it to the VCR mode by pressing the VCR on the remote control or the OUTPUT on the VCR. 2 Select main menu by pressing B or s. ing K or L. REC SPEED - - Then, press B. 5) Set the end time Follow the instructions of the DVD/VCR. REC SPEED - - 6) Set the channel number Press K or L repeatedly for AM...
... YOU PRESS TIMER. 1 Press TIMER. ¡If the VCR's power is not in the DVD/VCR or does not have to switch it to the VCR mode by pressing the VCR on the remote control or the OUTPUT on the VCR. 2 Select main menu by pressing B or s. ing K or L. REC SPEED - - Then, press B. 5) Set the end time Follow the instructions of the DVD/VCR. REC SPEED - - 6) Set the channel number Press K or L repeatedly for AM...
Owners Guide
Page 22
... panel of the DVD/VCR instead of using the jacks on the back. [Recording DVD/VCR] (this unit) DVD/VCR VCR AUDIO OUT AUDIO IN ANT-IN L L R R ANT-OUT VIDEO OUT VIDEO IN DVD S-VIDEO CONPONENT AUDIO OUT VIDEO OUT OUT Y DIGITAL AUDIO OUT I P PROGRESSIVE CB PB L COAXIAL CR PR R ¡Always use a video disc player, satellite receiver, camcorder or other audio/video component with RCA-type connectors. Then, press B. MTS (Multi-Channel Television Sound) SYSTEM VCR Coaxial cable (supplied) [TV set in the playing Regular (monaural audio...
... panel of the DVD/VCR instead of using the jacks on the back. [Recording DVD/VCR] (this unit) DVD/VCR VCR AUDIO OUT AUDIO IN ANT-IN L L R R ANT-OUT VIDEO OUT VIDEO IN DVD S-VIDEO CONPONENT AUDIO OUT VIDEO OUT OUT Y DIGITAL AUDIO OUT I P PROGRESSIVE CB PB L COAXIAL CR PR R ¡Always use a video disc player, satellite receiver, camcorder or other audio/video component with RCA-type connectors. Then, press B. MTS (Multi-Channel Television Sound) SYSTEM VCR Coaxial cable (supplied) [TV set in the playing Regular (monaural audio...
Owners Guide
Page 23
... disc, pictures may stop for playback program signals, playback may appear at the top-right on the TV screen. 4 Press PLAY. ¡The tray will close automatically, and playback will be carried out using the menu bar on the TV screen during operation, warning that use Arrow (L/K/B/s) to the correct channel. ¡Select DVD mode by the DVD/VCR or the disc. ¡With DVDs that a prohibited operation has been encountered by pressing DVD on the remote control or output...
... disc, pictures may stop for playback program signals, playback may appear at the top-right on the TV screen. 4 Press PLAY. ¡The tray will close automatically, and playback will be carried out using the menu bar on the TV screen during operation, warning that use Arrow (L/K/B/s) to the correct channel. ¡Select DVD mode by the DVD/VCR or the disc. ¡With DVDs that a prohibited operation has been encountered by pressing DVD on the remote control or output...
Owners Guide
Page 28
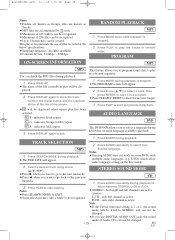
.... 1 Press DISPLAY. ¡The name of the screen. 1 Press MODE during playback is 1 or 2, the sound mode will be changed . - 28 - The DVD/VCR allows you use of files recorded at the top of the file currently in a program. ¡Press CLEAR/C.RESET to erase the incorrect input. 3 Press PLAY to start programmed playback. ¡ will appear. 1 Press AUDIO during playback. TRACK SELECTION MP3 1 Press SEARCH MODE during DVD disc (if multi language available) playback. STEREO SOUND MODE ¡Press...
.... 1 Press DISPLAY. ¡The name of the screen. 1 Press MODE during playback is 1 or 2, the sound mode will be changed . - 28 - The DVD/VCR allows you use of files recorded at the top of the file currently in a program. ¡Press CLEAR/C.RESET to erase the incorrect input. 3 Press PLAY to start programmed playback. ¡ will appear. 1 Press AUDIO during playback. TRACK SELECTION MP3 1 Press SEARCH MODE during DVD disc (if multi language available) playback. STEREO SOUND MODE ¡Press...
Owners Guide
Page 33
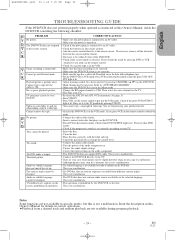
... DVD/VCR clock is not a malfunction. V D • Connect the video cables firmly. • Insert a correct video disc that the green VCR OUT- No DTS audio is lit. Distorted picture. • This DVD/VCR does not support DTS audio. This is set up . • Cancel the parental lock or change the control level. screen, prohibiting an operation. Read the description in VCR mode. EN 1L25 H9450UD(EN).qx33 03.1.22 7:19 PM Page 33 English TROUBLESHOOTING GUIDE If the DVD/VCR...
... DVD/VCR clock is not a malfunction. V D • Connect the video cables firmly. • Insert a correct video disc that the green VCR OUT- No DTS audio is lit. Distorted picture. • This DVD/VCR does not support DTS audio. This is set up . • Cancel the parental lock or change the control level. screen, prohibiting an operation. Read the description in VCR mode. EN 1L25 H9450UD(EN).qx33 03.1.22 7:19 PM Page 33 English TROUBLESHOOTING GUIDE If the DVD/VCR...


