Instruction Manual
Page 6
.... Keep all guards in place. NEVER use a power tool for example- English SPECIFIC SAFETY RULES AND SYMBOLS 1. For D10VF ALWAYS securely grip the Drill. ALWAYS wear ear plugs when using the tool for applications other than those specified. NEVER operate this tool without all screws... with its own cord. Check their condition periodically. 12. NEVER touch moving parts. 7. NEVER use power tools if the plastic housing or handle is cracked. NEVER touch the tool bit with a "live " and shock the operator. 2. Contact with bare hands after operation. 4. Do...
.... Keep all guards in place. NEVER use a power tool for example- English SPECIFIC SAFETY RULES AND SYMBOLS 1. For D10VF ALWAYS securely grip the Drill. ALWAYS wear ear plugs when using the tool for applications other than those specified. NEVER operate this tool without all screws... with its own cord. Check their condition periodically. 12. NEVER touch moving parts. 7. NEVER use power tools if the plastic housing or handle is cracked. NEVER touch the tool bit with a "live " and shock the operator. 2. Contact with bare hands after operation. 4. Do...
Instruction Manual
Page 7
... active wiring or electric cable with soapy water and dry thoroughly. 20. English 13. Check for repairs by a Hitachi authorized service center. 17. If using it may receive an electric shock. Carefully handle power tools. Should a power tool be dropped or struck against hard materials inadvertently, it immediately and arrange for dust...
... active wiring or electric cable with soapy water and dry thoroughly. 20. English 13. Check for repairs by a Hitachi authorized service center. 17. If using it may receive an electric shock. Carefully handle power tools. Should a power tool be dropped or struck against hard materials inadvertently, it immediately and arrange for dust...
Instruction Manual
Page 8
...OF THIS TOOL! 8 To keep the double insulation system effective, follow the normal electrical safety precautions given in this power tool, HITACHI has adopted a double insulation design. English DOUBLE INSULATION FOR SAFER OPERATION To ensure safer operation of the power tool only with a... electrically conductive materials connected to the power supply from the outer frame handled by the operator. Although this system has no external grounding, you must still follow these precautions: ⅜ Only HITACHI AUTHORIZED SERVICE CENTER should disassemble or assemble this power tool, and only...
...OF THIS TOOL! 8 To keep the double insulation system effective, follow the normal electrical safety precautions given in this power tool, HITACHI has adopted a double insulation design. English DOUBLE INSULATION FOR SAFER OPERATION To ensure safer operation of the power tool only with a... electrically conductive materials connected to the power supply from the outer frame handled by the operator. Although this system has no external grounding, you must still follow these precautions: ⅜ Only HITACHI AUTHORIZED SERVICE CENTER should disassemble or assemble this power tool, and only...
Instruction Manual
Page 9
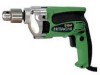
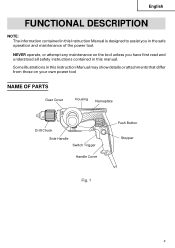
Some illustrations in this manual. NEVER operate, or attempt any maintenance on the tool unless you in this Instruction Manual may show details or attachments that differ from those on your own power tool NAME OF PARTS Gear Cover Housing Nameplate Drill Chuck Side Handle Switch Trigger Handle Cover Push Button Stopper Fig. 1 9 English FUNCTIONAL DESCRIPTION NOTE: The information contained in this Instruction Manual is designed to assist you have first read and understood all safety instructions contained in the safe operation and maintenance of the power tool.
Some illustrations in this manual. NEVER operate, or attempt any maintenance on the tool unless you in this Instruction Manual may show details or attachments that differ from those on your own power tool NAME OF PARTS Gear Cover Housing Nameplate Drill Chuck Side Handle Switch Trigger Handle Cover Push Button Stopper Fig. 1 9 English FUNCTIONAL DESCRIPTION NOTE: The information contained in this Instruction Manual is designed to assist you have first read and understood all safety instructions contained in the safe operation and maintenance of the power tool.
Instruction Manual
Page 12
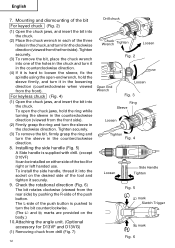
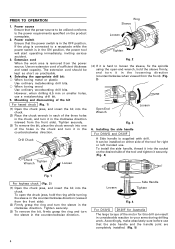
... jaws, hold the sleeve firmly, and turn the sleeve in the clockwise direction (viewed from drill (Fig. 7) 12 Drill chuck Chuck Wrench Tighten Loosen Fig. 2 Open End Wrench Loosen Fig. 3 Ring Sleeve Loosen Tighten Fig. 4 Loosen Side Handle Tighten Fig. 5 L mark Siwtch Trigger R mark Fig. 6 To open -end wrench, hold...side) by pushing the R-side of the holes in the chuck and turn it in the counterclockwise direction. (4) If it is supplied with drill. (except D10VF) It can be installed on either side of the three holes in the chuck, and turn the sleeve in each of the tool for...
... jaws, hold the sleeve firmly, and turn the sleeve in the clockwise direction (viewed from drill (Fig. 7) 12 Drill chuck Chuck Wrench Tighten Loosen Fig. 2 Open End Wrench Loosen Fig. 3 Ring Sleeve Loosen Tighten Fig. 4 Loosen Side Handle Tighten Fig. 5 L mark Siwtch Trigger R mark Fig. 6 To open -end wrench, hold...side) by pushing the R-side of the holes in the chuck and turn it in the counterclockwise direction. (4) If it is supplied with drill. (except D10VF) It can be installed on either side of the three holes in the chuck, and turn the sleeve in each of the tool for...
Instruction Manual
Page 14
...manner it is necessary to disassemble the handle portion which covered the tool's electrical system. Be careful you are not hurt by striking the wrench, don't strike the wrench forcibly and send the drill to a HITACHI AUTHORIZED SERVICE CENTER. 11. English drilling torque decreased to about with a hook... fixed to it is dangerous to drop the tool accidentally. To install the side handle, thread it into the socket on either side of...
...manner it is necessary to disassemble the handle portion which covered the tool's electrical system. Be careful you are not hurt by striking the wrench, don't strike the wrench forcibly and send the drill to a HITACHI AUTHORIZED SERVICE CENTER. 11. English drilling torque decreased to about with a hook... fixed to it is dangerous to drop the tool accidentally. To install the side handle, thread it into the socket on either side of...
Instruction Manual
Page 15
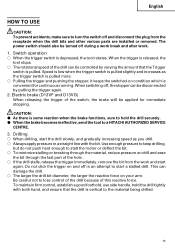
...trigger on condition which is pulled. To maintain firm control, establish a good foothold, use side handle, hold the drill securely. ⅷ When the brake becomes ineffective, send the tool to a HITACHI AUTHORIZED SERVICE CENTRE. 3. Switch operation ⅜ When the trigger switch is vertical to the material... being drilled. 15 Speed is low when the trigger switch is pulled slightly and increases as you drill. ⅜ Always apply pressure in ...
...trigger on condition which is pulled. To maintain firm control, establish a good foothold, use side handle, hold the drill securely. ⅷ When the brake becomes ineffective, send the tool to a HITACHI AUTHORIZED SERVICE CENTRE. 3. Switch operation ⅜ When the trigger switch is vertical to the material... being drilled. 15 Speed is low when the trigger switch is pulled slightly and increases as you drill. ⅜ Always apply pressure in ...
Parts List
Page 2
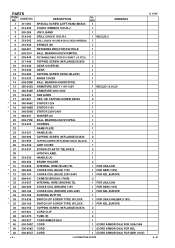
USED 1 REMARKS CHUCK WRENCH 10VLR-J 1 VINYL BAND 1 DRILL CHUCK 10VLR-J 1 INCLUD.2 DRILL CHUCK 10VLRD-N (W/O CHUCK WRENCH) 1 SPINDLE (B) 1 RETAINING RING FOR D32 HOLE 1 BALL BEARING 6002VVCMPS2L 1 RETAINING RING FOR D15 ...1 STATOR 110V 1 STATOR 230V-240V 1 WASHER (A) 1 BALL BEARING 608VVC2PS2L 1 HOUSING 1 NAME PLATE 1 HANDLE (B) 1 TAPPING SCREW (W/FLANGE) D4X35 2 TAPPING SCREW (W/FLANGE) D4X20 (BLACK) 1 GRIP COVER 1 SCREW (PLASTIC TIE) D4X25 2 HITACHI LABEL 1 HANDLE (A) 1 BRUSH HOLDER 2 INTERNAL WIRE (BLUE) 72L 1 FOR USA,CAN CHOKE COIL (BLUE) 110V 1 ...
USED 1 REMARKS CHUCK WRENCH 10VLR-J 1 VINYL BAND 1 DRILL CHUCK 10VLR-J 1 INCLUD.2 DRILL CHUCK 10VLRD-N (W/O CHUCK WRENCH) 1 SPINDLE (B) 1 RETAINING RING FOR D32 HOLE 1 BALL BEARING 6002VVCMPS2L 1 RETAINING RING FOR D15 ...1 STATOR 110V 1 STATOR 230V-240V 1 WASHER (A) 1 BALL BEARING 608VVC2PS2L 1 HOUSING 1 NAME PLATE 1 HANDLE (B) 1 TAPPING SCREW (W/FLANGE) D4X35 2 TAPPING SCREW (W/FLANGE) D4X20 (BLACK) 1 GRIP COVER 1 SCREW (PLASTIC TIE) D4X25 2 HITACHI LABEL 1 HANDLE (A) 1 BRUSH HOLDER 2 INTERNAL WIRE (BLUE) 72L 1 FOR USA,CAN CHOKE COIL (BLUE) 110V 1 ...

Parts List
Page 4
USED 501 319-543 CASE 1 REMARKS D 10VF OPTIONAL ACCESSORIES ITEM NO. DESCRIPTION 601 981-205 SIDE HANDLE FOR M10 602 317-676 HOOK (A) NO. CODE NO. USED 1 1 REMARKS --- 4 --- * ALTERNATIVE PARTS Printed in Japan 8 -- 01 (010821N) CODE NO. STANDARD ACCESSORIES ITEM NO. DESCRIPTION NO.
USED 501 319-543 CASE 1 REMARKS D 10VF OPTIONAL ACCESSORIES ITEM NO. DESCRIPTION 601 981-205 SIDE HANDLE FOR M10 602 317-676 HOOK (A) NO. CODE NO. USED 1 1 REMARKS --- 4 --- * ALTERNATIVE PARTS Printed in Japan 8 -- 01 (010821N) CODE NO. STANDARD ACCESSORIES ITEM NO. DESCRIPTION NO.
Handling Instructions
Page 1
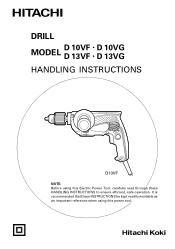
It is recommended that these INSTRUCTIONS be kept readily available as an important reference when using this power tool. 1 DRILL MODEL D D 10VF 13VF • • D D 10VG 13VG HANDLING INSTRUCTIONS D13VF NOTE: Before using this Electric Power Tool, carefully read through these HANDLING INSTRUCTIONS to ensure efficient, safe operation.
It is recommended that these INSTRUCTIONS be kept readily available as an important reference when using this power tool. 1 DRILL MODEL D D 10VF 13VF • • D D 10VG 13VG HANDLING INSTRUCTIONS D13VF NOTE: Before using this Electric Power Tool, carefully read through these HANDLING INSTRUCTIONS to ensure efficient, safe operation.
Handling Instructions
Page 3
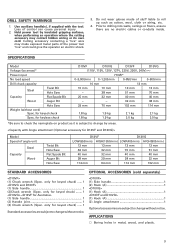
... of stuff liable to roll up such as it is subject to change without cord) Spec. Hold power tool by areas. for keyless chuck D10VF D10VG D13VF D13VG (110V, 115V, 120V, 127V, 220V, 230V, 240V) 710W* 0-3,000/min 0-1,200/min 0-850/min 0-600/min ... 2.1 kg 2.0 kg 2.1 kg 2.0 kg *Be sure to change without notice. Model Speed of control can cause personal injury. 2. DRILL SAFETY WARNINGS 1. only for keyed chuck) ...... 1 (1) Side handle 1 (2)Chuck wrench (Spec. Loss of angle unit Steel Capacity Wood Twist Bit Hole Saw Flat Spade Bit Auger Bit Hole Saw D13VF...
... of stuff liable to roll up such as it is subject to change without cord) Spec. Hold power tool by areas. for keyless chuck D10VF D10VG D13VF D13VG (110V, 115V, 120V, 127V, 220V, 230V, 240V) 710W* 0-3,000/min 0-1,200/min 0-850/min 0-600/min ... 2.1 kg 2.0 kg 2.1 kg 2.0 kg *Be sure to change without notice. Model Speed of control can cause personal injury. 2. DRILL SAFETY WARNINGS 1. only for keyed chuck) ...... 1 (1) Side handle 1 (2)Chuck wrench (Spec. Loss of angle unit Steel Capacity Wood Twist Bit Hole Saw Flat Spade Bit Auger Bit Hole Saw D13VF...
Handling Instructions
Page 4
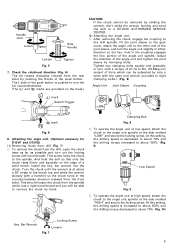
...in each of the tool for right or left handed use that the side handle and the handle joint are completely installed. (Fig. 5) 4 Tighten securely. (3) To remove the bit, place the chuck wrench into the chuck. Drill Chuck Chuck Tighten Wrench Loosen Ring Sleeve Loosen Tighten Fig. 2 (4) If it... operating immediately, inviting serious accident. 3. It can result in the counterclockwise direction. Loosen Side Handle Tighten Fig. 4 For D13VG D13VF for Australia The large torque of the motor for this drill can be installed on either side of the three holes in the chuck, and turn it ...
...in each of the tool for right or left handed use that the side handle and the handle joint are completely installed. (Fig. 5) 4 Tighten securely. (3) To remove the bit, place the chuck wrench into the chuck. Drill Chuck Chuck Tighten Wrench Loosen Ring Sleeve Loosen Tighten Fig. 2 (4) If it... operating immediately, inviting serious accident. 3. It can result in the counterclockwise direction. Loosen Side Handle Tighten Fig. 4 For D13VG D13VF for Australia The large torque of the motor for this drill can be installed on either side of the three holes in the chuck, and turn it ...
Handling Instructions
Page 5
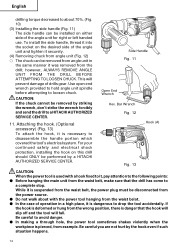
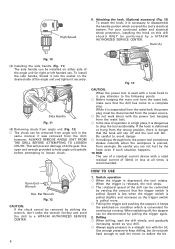
...angle unit. (Optional accessory for D13VF and D13VG) (1) Removing chuck from drill (Fig. 7) ⅜ To remove the chuck from the rear side) by striking the wrench, don't strike the wrench forcibly and send the drill to a HITACHI AUTHORIZED SERVICE CENTER. (2) Attaching the angle unit. ⅜ After removing ...the chuck rests firmly and squarely on the body.) CAUTION: If the chuck cannot be able to the drill spindle. bar wrench into the chuck. Handle Joint Loosen Tighten Side Handle Loosen Tighten Fig. 5 7. This screw locks the chuck to the bench top and strike the wrench ...
...angle unit. (Optional accessory for D13VF and D13VG) (1) Removing chuck from drill (Fig. 7) ⅜ To remove the chuck from the rear side) by striking the wrench, don't strike the wrench forcibly and send the drill to a HITACHI AUTHORIZED SERVICE CENTER. (2) Attaching the angle unit. ⅜ After removing ...the chuck rests firmly and squarely on the body.) CAUTION: If the chuck cannot be able to the drill spindle. bar wrench into the chuck. Handle Joint Loosen Tighten Side Handle Loosen Tighten Fig. 5 7. This screw locks the chuck to the bench top and strike the wrench ...
Handling Instructions
Page 6
... is pulled slightly and increases as you are not hurt by a HITACHI AUTHORIZED SERVICE CENTER. For your continued safety and electrical shock protection, installing the hook on the desired side of drills gear. Open End Wrench Hex. To install the side handle, thread it keeps the switched-on either side of the angle...
... is pulled slightly and increases as you are not hurt by a HITACHI AUTHORIZED SERVICE CENTER. For your continued safety and electrical shock protection, installing the hook on the desired side of drills gear. Open End Wrench Hex. To install the side handle, thread it keeps the switched-on either side of the angle...
Handling Instructions
Page 7
Inspecting the drill bits Since use side handle, hold the drill tightly with oil or water. 4. Maintenance of the power tool. Accordingly, some parts (i.e. Exercise due care to do so could result in serious hazard. 3. In ... brush inspection and replacement on this reactive force. ⅜ To minimize stalling or breaking through the material, reduce pressure on drill and ease the bit through the last part of Hitachi Power Tools must be observed. MAINTENANCE AND INSPECTION 1. Inspecting the mounting screws: Regularly inspect all mounting screws and ensure that the...
Inspecting the drill bits Since use side handle, hold the drill tightly with oil or water. 4. Maintenance of the power tool. Accordingly, some parts (i.e. Exercise due care to do so could result in serious hazard. 3. In ... brush inspection and replacement on this reactive force. ⅜ To minimize stalling or breaking through the material, reduce pressure on drill and ease the bit through the last part of Hitachi Power Tools must be observed. MAINTENANCE AND INSPECTION 1. Inspecting the mounting screws: Regularly inspect all mounting screws and ensure that the...
