

User Manual
Page 2
... Turning off the power 14 AUTO SEARCH, AUTO KEYSTONE, Operating 15 Adjusting the volume 15 Temporarily muting the sound. . . . . 15 DIRECT ON, AUTO OFF, LAMP TIME, FILTER TIME, MY BUTTON, MY SOURCE, SERVICE Selecting an input signal 15 SECURITY menu 47 Searching an input signal 17 SECURITY PASSWORD CHANGE, Selecting an aspect ratio 17 MyScreen PASSWORD, PIN LOCK, Adjusting the projector's elevator . . 18 TRANSITION DETECTOR, MY TEXT PASSWORD, Adjusting the zoom and focus. . . . . 18 MY TEXT DISPLAY, MY TEXT WRITING Using the automatic adjustment...
... Turning off the power 14 AUTO SEARCH, AUTO KEYSTONE, Operating 15 Adjusting the volume 15 Temporarily muting the sound. . . . . 15 DIRECT ON, AUTO OFF, LAMP TIME, FILTER TIME, MY BUTTON, MY SOURCE, SERVICE Selecting an input signal 15 SECURITY menu 47 Searching an input signal 17 SECURITY PASSWORD CHANGE, Selecting an aspect ratio 17 MyScreen PASSWORD, PIN LOCK, Adjusting the projector's elevator . . 18 TRANSITION DETECTOR, MY TEXT PASSWORD, Adjusting the zoom and focus. . . . . 18 MY TEXT DISPLAY, MY TEXT WRITING Using the automatic adjustment...
User Manual
Page 3
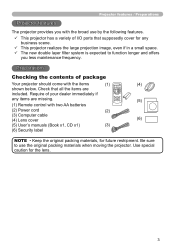
... package Your projector should come with two AA batteries (1) MY SOURCE/ VIDEO COMPUTER DOC.CAMERA ASPECT AUTO SEARCH BLANK MAGNIFY FREEZE ON PAGUEP VOLUME 㧗 DOWN OFF KEYSTONE MY BUTTON MUTE 1 2 POSITION MENU ESC ENTER RESET (4) (5) (2) Power cord (2) (3) Computer cable (4) Lens cover (6) (5) User's manuals (Book x1, CD x1) (3) (6) Security label NOTE • Keep the original packing materials, for the lens. 3 Preparations Checking the contents of I/O ports that all...
... package Your projector should come with two AA batteries (1) MY SOURCE/ VIDEO COMPUTER DOC.CAMERA ASPECT AUTO SEARCH BLANK MAGNIFY FREEZE ON PAGUEP VOLUME 㧗 DOWN OFF KEYSTONE MY BUTTON MUTE 1 2 POSITION MENU ESC ENTER RESET (4) (5) (2) Power cord (2) (3) Computer cable (4) Lens cover (6) (5) User's manuals (Book x1, CD x1) (3) (6) Security label NOTE • Keep the original packing materials, for the lens. 3 Preparations Checking the contents of I/O ports that all...
User Manual
Page 8
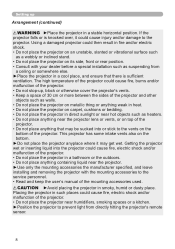
... the projector. ►Use only the mounting accessories the manufacturer specified, and leave installing and removing the projector with your dealer before a special installation such as a wobbly or inclined stand. • Do not place the projector on the bottom of the projector could cause injury and/or damage to the service personnel. • Read and keep the user's manual of the projector...
... the projector. ►Use only the mounting accessories the manufacturer specified, and leave installing and removing the projector with your dealer before a special installation such as a wobbly or inclined stand. • Do not place the projector on the bottom of the projector could cause injury and/or damage to the service personnel. • Read and keep the user's manual of the projector...
User Manual
Page 10
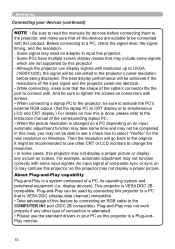
... input signal and the projector panel are identical. • While connecting, make sure that all the devices are not supported by this projector, so the projector may not work properly if any picture on Windows. It might be recommended to use the standard drivers in your devices (continued) NOTE • Be sure to read the manuals for the new resolution on screen. Although the projector can be used by connecting...
... input signal and the projector panel are identical. • While connecting, make sure that all the devices are not supported by this projector, so the projector may not work properly if any picture on Windows. It might be recommended to use the standard drivers in your devices (continued) NOTE • Be sure to read the manuals for the new resolution on screen. Although the projector can be used by connecting...
User Manual
Page 11
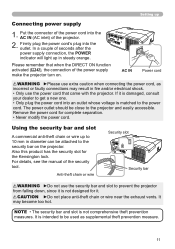
... or wire up to 10 mm in steady orange. In a couple of the power supply make the projector turn on the projector. The power outlet should be used as incorrect or faulty connections may become too hot. Please remember that came with the projector. AC IN Power cord WARNING ►Please use extra caution when connecting the power cord, as supplemental theft prevention measure. 11 Anti-theft...
... or wire up to 10 mm in steady orange. In a couple of the power supply make the projector turn on the projector. The power outlet should be used as incorrect or faulty connections may become too hot. Please remember that came with the projector. AC IN Power cord WARNING ►Please use extra caution when connecting the power cord, as supplemental theft prevention measure. 11 Anti-theft...

User Manual
Page 12
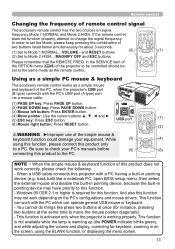
... the signal reflect. • The remote control uses infrared light to send signals to the projector (Class 1 LED), so be available. Approx. 3 m 30º 30º NOTE • The remote control signal reflected in the screen or the like may not work correctly if strong light (such as direct sun light) or light from an extremely close range (such as directed. Adjust the...
... the signal reflect. • The remote control uses infrared light to send signals to the projector (Class 1 LED), so be available. Approx. 3 m 30º 30º NOTE • The remote control signal reflected in the screen or the like may not work correctly if strong light (such as direct sun light) or light from an extremely close range (such as directed. Adjust the...
User Manual
Page 13
..., when the projector's USB port (B type) connects with a PC having a built-in on the screen, using the BLANK function, or displaying the menu screen. 13 in pointing device may not work depending on signal frequency Mode 1:NORMAL and Mode 2:HIGH. track ball) like press two buttons at the same time to Mode 1:NORMAL... This function can operate general USB mouse or keyboard. - VOLUME - Be sure to check your equipment. You...
..., when the projector's USB port (B type) connects with a PC having a built-in on the screen, using the BLANK function, or displaying the menu screen. 13 in pointing device may not work depending on signal frequency Mode 1:NORMAL and Mode 2:HIGH. track ball) like press two buttons at the same time to Mode 1:NORMAL... This function can operate general USB mouse or keyboard. - VOLUME - Be sure to check your equipment. You...
User Manual
Page 14
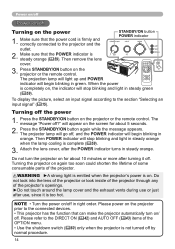
... OFF KEYSTONE MY BUTTON MUTE 1 2 POSITION MENU ESC ENTER RESET indicator will go off the power 1. To display the picture, select an input signal according to the DIRECT ON (42) and AUTO OFF (43) items of the OPTION menu. • Use the shutdown switch (60) only when the projector is completely on the projector or the remote control. Do not turn on the projector prior to...
... OFF KEYSTONE MY BUTTON MUTE 1 2 POSITION MENU ESC ENTER RESET indicator will go off the power 1. To display the picture, select an input signal according to the DIRECT ON (42) and AUTO OFF (43) items of the OPTION menu. • Use the shutdown switch (60) only when the projector is completely on the projector or the remote control. Do not turn on the projector prior to...
User Manual
Page 21
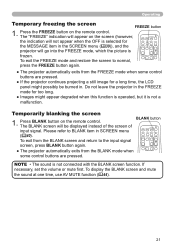
... the SCREEN menu (39)), and the projector will be burned in the FREEZE mode for a long time, the LCD panel might appear degraded when this function is operated, but it is not a malfunction. Press the FREEZE button on the remote control. To exit from the BLANK mode when some control ESC RESET buttons are pressed. To display the BLANK screen and mute the sound at one time, use AV...
... the SCREEN menu (39)), and the projector will be burned in the FREEZE mode for a long time, the LCD panel might appear degraded when this function is operated, but it is not a malfunction. Press the FREEZE button on the remote control. To exit from the BLANK mode when some control ESC RESET buttons are pressed. To display the BLANK screen and mute the sound at one time, use AV...
User Manual
Page 34
.... This function should be used when the zoom adjustment is set to the following table. Then perform it according to the TELE (telephoto focus), this function may not work well. • This function will vary among inputs. KEYSTONE Using the ◄/► buttons corrects the vertical keystone distortion. SETUP menu SETUP menu From the SETUP menu, items shown in the SETUP menu, if the projector screen is inclined or angled downward...
.... This function should be used when the zoom adjustment is set to the following table. Then perform it according to the TELE (telephoto focus), this function may not work well. • This function will vary among inputs. KEYSTONE Using the ◄/► buttons corrects the vertical keystone distortion. SETUP menu SETUP menu From the SETUP menu, items shown in the SETUP menu, if the projector screen is inclined or angled downward...
User Manual
Page 35
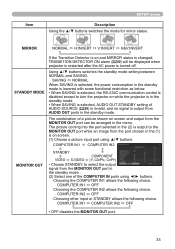
... image from the port chosen in the (1) is output from the MONITOR OUT port can be displayed when projector is restarted after the AC power is turned off. Item SETUP menu Description Using the ▲/▼ buttons switches the mode for mirror status. MIRROR NORMAL H:INVERT V:INVERT H&V:INVERT STANDBY MODE MONITOR OUT If the Transition Detector is on while the projector is in the menu. Using ▲/▼ buttons switches the standby mode setting...
... image from the port chosen in the (1) is output from the MONITOR OUT port can be displayed when projector is restarted after the AC power is turned off. Item SETUP menu Description Using the ▲/▼ buttons switches the mode for mirror status. MIRROR NORMAL H:INVERT V:INVERT H&V:INVERT STANDBY MODE MONITOR OUT If the Transition Detector is on while the projector is in the menu. Using ▲/▼ buttons switches the standby mode setting...
User Manual
Page 43
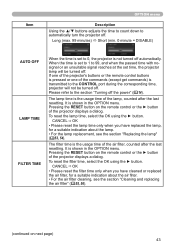
...) AUTO OFF LAMP TIME FILTER TIME When the time is the usage time of the projector displays a dialog. Item OPTION menu Description Using the ▲/▼ buttons adjusts the time to count down to automatically turn the projector off the power" (14). The lamp time is set time, the projector lamp will not be turned off automatically. It is shown in the OPTION menu. It is shown in the OPTION menu. Pressing the RESET button on the remote control...
...) AUTO OFF LAMP TIME FILTER TIME When the time is the usage time of the projector displays a dialog. Item OPTION menu Description Using the ▲/▼ buttons adjusts the time to count down to automatically turn the projector off the power" (14). The lamp time is set time, the projector lamp will not be turned off automatically. It is shown in the OPTION menu. It is shown in the OPTION menu. Pressing the RESET button on the remote control...
User Manual
Page 44
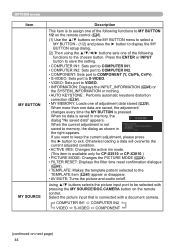
...; S-VIDEO: Sets port to S-VIDEO. • VIDEO: Sets port to VIDEO. • INFORMATION: Displays the INPUT_INFORMATION (46) or the SYSTEM_INFORMATION or nothing. • AUTO KEYSTONE : Performs automatic keystone distortion correction (34). • MY MEMORY: Loads one data are saved, the adjustment changes every time the MY BUTTON is available only for CP-X2510 or CP-X3010.) • PICTURE MODE: Changes the PICTURE MODE (24). • FILTER RESET: Displays the filter time reset con...
...; S-VIDEO: Sets port to S-VIDEO. • VIDEO: Sets port to VIDEO. • INFORMATION: Displays the INPUT_INFORMATION (46) or the SYSTEM_INFORMATION or nothing. • AUTO KEYSTONE : Performs automatic keystone distortion correction (34). • MY MEMORY: Loads one data are saved, the adjustment changes every time the MY BUTTON is available only for CP-X2510 or CP-X3010.) • PICTURE MODE: Changes the PICTURE MODE (24). • FILTER RESET: Displays the filter time reset con...
User Manual
Page 45
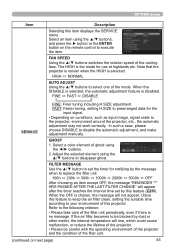
... automatic adjustment may not work correctly. FAN SPEED Using the ▲/▼ buttons switches the rotation speed of this feature to keep the air filter clean, setting the suitable time according to execute the item. Note that the projector is noisier when the HIGH is the mode for use at highlands etc. GHOST 1. Utilize this projector. FAST: Faster tuning, setting H.SIZE to prearranged data for notifying by the message when...
... automatic adjustment may not work correctly. FAN SPEED Using the ▲/▼ buttons switches the rotation speed of this feature to keep the air filter clean, setting the suitable time according to execute the item. Note that the projector is noisier when the HIGH is the mode for use at highlands etc. GHOST 1. Utilize this projector. FAST: Faster tuning, setting H.SIZE to prearranged data for notifying by the message when...

User Manual
Page 46
... prevent tampering or accidental operation. ON OFF • Please use this function. By this function, all of menus will collectively return to change the projector's remote sensor frequency setting (4). 1:NORMAL 2:HIGH (2) Use the ◄/► button to the initial setting. Note that the items LAMP TIME, FILTER TIME, LANGUAGE, FILTER MESSAGE and SECURITY settings are locked. ON OFF The factory default setting is selected, the buttons on the remote control.
... prevent tampering or accidental operation. ON OFF • Please use this function. By this function, all of menus will collectively return to change the projector's remote sensor frequency setting (4). 1:NORMAL 2:HIGH (2) Use the ◄/► button to the initial setting. Note that the items LAMP TIME, FILTER TIME, LANGUAGE, FILTER MESSAGE and SECURITY settings are locked. ON OFF The factory default setting is selected, the buttons on the remote control.
User Manual
Page 58
... be reappeared every time the power is rising. The horizontal or vertical frequency of the SERVICE item in the OPTION menu to reset the filter timer (43). 58 If the same indication is displayed after the remedy, please set FAN SPEED of the input signal is applied. should occur, stop using the projector immediately. Please turn the power off , and clean or change the air filter...
... be reappeared every time the power is rising. The horizontal or vertical frequency of the SERVICE item in the OPTION menu to reset the filter timer (43). 58 If the same indication is displayed after the remedy, please set FAN SPEED of the input signal is applied. should occur, stop using the projector immediately. Please turn the power off , and clean or change the air filter...
User Manual
Page 59
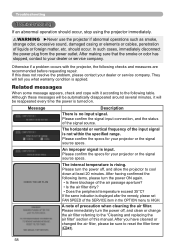
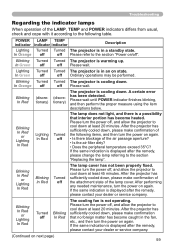
... caught in a standby state. Troubleshooting Regarding the indicator lamps When operation of the LAMP, TEMP and POWER indicators differs from usual, check and cope with it according to cool down . Blinking In Orange Blinking In Red Blinking In Red or Lighting In Red Blinking In Red or Lighting In Red Turned off (discretionary) Lighting In Red Blinking In Red Turned off (discretionary) Turned off Turned off , and allow the projector to the following items, and then turn the power off The projector is cooling...
... caught in a standby state. Troubleshooting Regarding the indicator lamps When operation of the LAMP, TEMP and POWER indicators differs from usual, check and cope with it according to cool down . Blinking In Orange Blinking In Red Blinking In Red or Lighting In Red Blinking In Red or Lighting In Red Turned off (discretionary) Lighting In Red Blinking In Red Turned off (discretionary) Turned off Turned off , and allow the projector to the following items, and then turn the power off The projector is cooling...
User Manual
Page 60
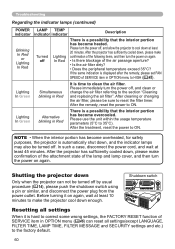
... clean or change the air filter referring to the factory default. 60 Please immediately turn the power off, and allow the projector to reset the filter timer. Shutting the projector down Only when the projector can reset all settings When it on again, wait at least 45 minutes. Troubleshooting Regarding the indicator lamps (continued) POWER LAMP TEMP indicator indicator indicator Description Blinking In Red or Lighting In Red Turned off Lighting In Red There is automatically shut down, and the indicator lamps...
... clean or change the air filter referring to the factory default. 60 Please immediately turn the power off, and allow the projector to reset the filter timer. Shutting the projector down Only when the projector can reset all settings When it on again, wait at least 45 minutes. Troubleshooting Regarding the indicator lamps (continued) POWER LAMP TEMP indicator indicator indicator Description Blinking In Red or Lighting In Red Turned off Lighting In Red There is automatically shut down, and the indicator lamps...
Technical Manual
Page 8
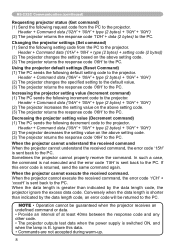
... accepted during warm-up. 8 Using the projector default settings (Reset Command) (1) The PC sends the following default setting code to the PC. Header + Command data ('05H' + '00H' + type (2 bytes) + '00H' + '00H') (2) The projector decreases the setting value on the above setting code. (3) The projector returns the response code '06H' to the PC. Conversely when the data length is shorter than indicated by the data length code, an error code will be guaranteed when...
... accepted during warm-up. 8 Using the projector default settings (Reset Command) (1) The PC sends the following default setting code to the PC. Header + Command data ('05H' + '00H' + type (2 bytes) + '00H' + '00H') (2) The projector decreases the setting value on the above setting code. (3) The projector returns the response code '06H' to the PC. Conversely when the data length is shorter than indicated by the data length code, an error code will be guaranteed when...

Technical Manual
Page 9
... Communication command table RS-232C Communication command table Names Power Operation Type Set Turn off Turn on Get Input Source Error Status Set COMPUTER1 COMPUTER2 COMPONENT S-VIDEO VIDEO Get Get MAGNIFY Get Increment Decrement FREEZE Set NORMAL FREEZE Get PICTURE MODE Set NORMAL CINEMA DYNAMIC BOARD(BLACK) BOARD(GREEN) WHITEBOARD DAYTIME Get BRIGHTNESS BRIGHTNESS Reset CONTRAST CONTRAST Reset Get Increment Decrement Execute Get Increment Decrement Execute Header Command Data CRC Action Type Setting Code BE...
... Communication command table RS-232C Communication command table Names Power Operation Type Set Turn off Turn on Get Input Source Error Status Set COMPUTER1 COMPUTER2 COMPONENT S-VIDEO VIDEO Get Get MAGNIFY Get Increment Decrement FREEZE Set NORMAL FREEZE Get PICTURE MODE Set NORMAL CINEMA DYNAMIC BOARD(BLACK) BOARD(GREEN) WHITEBOARD DAYTIME Get BRIGHTNESS BRIGHTNESS Reset CONTRAST CONTRAST Reset Get Increment Decrement Execute Get Increment Decrement Execute Header Command Data CRC Action Type Setting Code BE...


